Brasilia Europa - Zone Patio by Multiple Awnings
←
→
Page content transcription
If your browser does not render page correctly, please read the page content below

Brasilia Europa
    Installation guide
    February 2021

3                        Brasilia Europa February 2021   v1   Multiple Awnings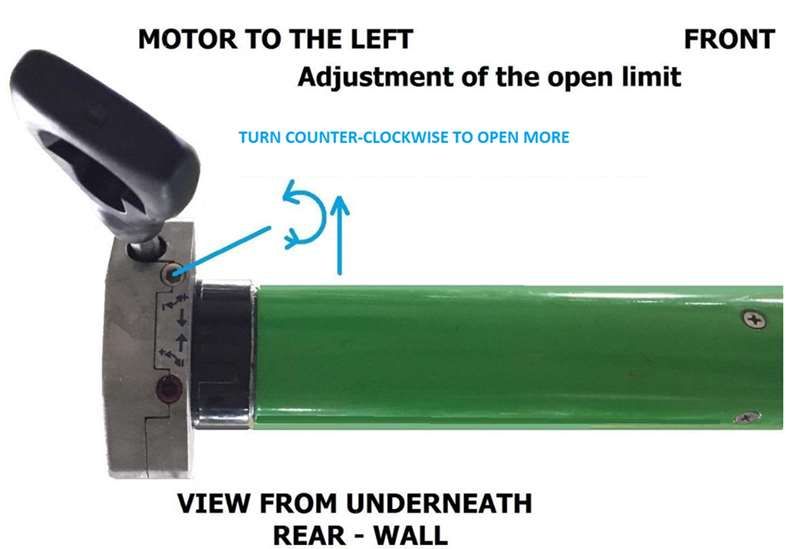
Table des matières
1      Read Me! ................................................... 3
                                                                                  4.2     Testing the solidity of the
2      Getting Ready ............................................ 4               installation ................................................... 21
    2.1       Tools and help you will need .............. 4                       4.3   Connecting and operating your
    2.2       Revision of installation requirements. 5                            awning ......................................................... 21

       2.2.1          Required height.......................... 5                    4.3.1         Remote .................................... 21

       2.2.2          Required width........................... 5             5      Safety and advice .................................... 22

       2.2.3          Masonry ..................................... 6             5.1       Acrylic fabric maintenance .............. 23

       2.2.4          Under Eaves - Soffit installation . 6                       5.2       Removing the valance...................... 24

    2.3       Unpacking the awning ....................... 8                      5.3    Maintenance of the electric motor and
                                                                                  remote 25
    2.4       Parts list.............................................. 8
                                                                              6      Appendices .............................................. 27
3      Overview and brackets.............................. 9
                                                                                  6.1       Adjusting the pitch ........................... 27
    3.1   Siding walls made of wood, vinyl or
    aluminum ....................................................... 9            6.2       Programming the awning limits ...... 28

       3.1.1          Where to install........................ 10                    6.2.1         Programming the open limit.... 29

       3.1.2   Finding the studs, joists or                                       6.3    Motor and remote resetting and
       headers 12                                                                 synchronization ............................................ 31

       3.1.3          Shims and solidity .................... 13                  6.4       D. Wind sensor................................. 32

       3.1.4          Brackets installation ................. 15                  6.5       New Wind Sensor installation .......... 32

    3.2       Masonry ........................................... 15              6.6    F. Memorizing the wind sensor in the
                                                                                  motor receiver ............................................. 34
       3.2.1          Choosing the position .............. 16
                                                                                  6.7       Calibrating the wind sensor ............. 35
       3.2.2          Installation on bricks ................ 16
                                                                                  6.8       Regulating the sensitivity to the
       3.2.3          Installation ............................... 16             wind      36
    3.3       Under Soffit or Eaves ........................ 17                   6.9       Memorizing a new remote control .. 36
       3.3.1          Choosing the position .............. 18                     6.10 Protecting the awning when it is
       3.3.2          Finding the trusses, joists or                              moving ......................................................... 37
       rafters        18                                                          6.11      Timeout after a “wind alarm”.......... 37
       3.3.3          Shims and solidity .................... 19                  6.12 Removing the awning from the
       3.3.4          Bracket installation .................. 19                  brackets ....................................................... 37
4      Installing the awning ............................... 20               7      Troubleshooting Guide ........................... 38
    4.1    Mounting the awning on the                                         Contact us:....................................................... 43
    brackets ........................................................ 20

2                                                        Brasilia Europa February 2021   v1                                Multiple Awnings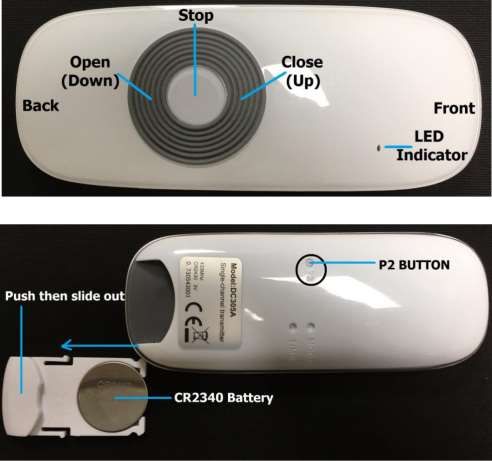
1 Read Me!
This section contains IMPORTANT WARNINGS concerning YOUR SAFETY and the INTEGRITY OF YOUR
AWNING AND INSTALLATION.

WARNING: The wind sensor is not a security device to prevent damages caused by high winds and
rainwater accumulation; accumulated water, snow or ice, can severely damage your awning (a simple
power outage will render the automatic closing of the awning impossible).

NEVER LEAVE YOUR AWNING IN THE OPEN POSITION WITHOUT PROPER SURVEILLANCE.

BE CAREFUL! Your awning is not meant to cope with high winds, water, snow or ice accumulations since
this can cause the awning’s arms to break or to make it fall causing severe corporal and material -
property damage.

NEVER LEAVE YOUR AWNING IN THE OPEN POSITION WITHOUT PROPER SURVEILLANCE.

BE CAREFUL! A correct and proper installation of the brackets as well as the integrity of the wall or
eaves onto which they will be affixed is the sole responsibility of the customer – user. All houses are
different; and the anchoring devices supplied with the awing might not be suited for your situation –
installation. IF YOU ARE IN DOUBT, DO NOT HESITATE TO CONSULT A PROFESSIONAL CONTRACTOR.

3                                      Brasilia Europa February 2021                 Multiple Awnings
2 Getting Ready
2.1 Tools and help you will need
Security knife for unpacking
ladders or step ladders
Chalk line
Measuring tape
Pencil (Ink marker or carpenter’s pencil)
Ratchet and Socket (9/16’’)
Philips screwdriver to open the tube
6 mm Allen key to adjust the pitch
Drill
Level
To install in wooden structures: 3/16’’ bit
To install in masonry structures: 3/8’’ masonry bit
Optional:
Stud finder
Masking tape
Nylon or metal spacers (shims)
Zip tool (to remove siding)
Caulking
You will need help to install the brackets. It takes two persons to safely install an awning on
the brackets, but we strongly recommend three persons. You can also rent a manual lift.
4 Brasilia Europa February 2021 Multiple Awnings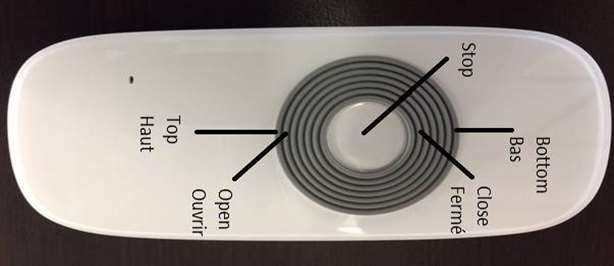
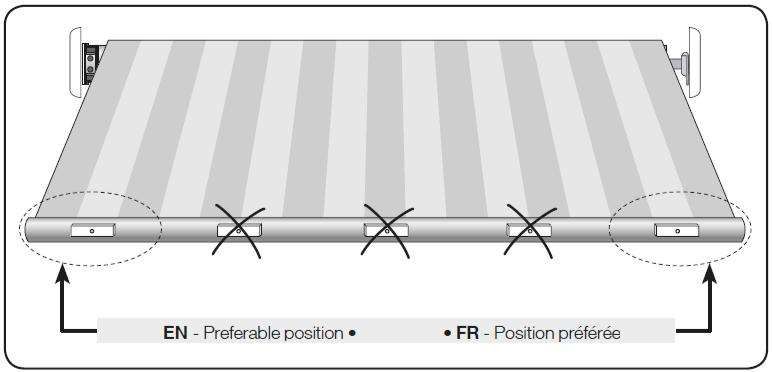
2.2 Revision of installation requirements

Properly evaluate the required space to install the awning by following the steps explained from
section 3.2.1 to 3.2.4 included.

If you have 2 Europas installed side-by-side or close from a corner: You must keep a 2” space
between the awnings and 3” on the motor or manual crank side if it is located close to a corner
of an internal wall. Doing so will allow you to install easily the decorative cap.

2.2.1 Required height
Your awning has an adjustable pitch and will be set to a minimum of 18” when opened, for a 10’
projection awning. You may need to give it more slope if your installation or surface is not
perfectly level. Please consider this when selecting the height of installation.
We recommend a mounting height of 108” inches; but it should be at least 96” inches: the
MINIMAL required height. You will need a free unencumbered space of 9.5 inches high on top
of the total width of the awning’s structure.
For a motorized awning, the length of the electrical cord is 15 feet long and it must be plugged
into a GFI outlet.
The motor’s amperage requirement is less than 2 amps.

2.2.2 Required width

The number of brackets for an Europa awning varies in regards to the width of the awning
in question (see figure 6). The weight of the awning is solely supported at these anchoring
points. Consequently, studs or other structural parts of the house are mandatory at these
anchor points.

Whether you are installing on siding, masonry or other types of wall, be advised that the far
corner of walls have a few inches without structural studs, this is regardless of the type of
exterior cladding. Consider this if you have limited space to install the brackets if your
installation is on a narrow wall or windows close to the corners.

You will then need to find the studs, the headers or joists to install your brackets.

5                                    Brasilia Europa February 2021                Multiple Awnings
Be advised that many recent constructions have i BEAMS or METAL WEB JOISTS instead of
the solid wood joists. These joists ARE NOT APPROPRIATE AS BRACKETS FOR AWNINGS.

2.2.3 Masonry
Masonry walls are weaker near the top. You will need to have at least 4 rows of bricks over
the top of the bracket for a secure installation. The weight of the rows above prevents the
awning from pulling the bricks loose.

IMPORTANT SAFETY NOTICE:

SOME BRICK WALLS MIGHT NOT BE STRONG ENOUGH TO SAFELY SUPPORT AN AWNING.
THE SUPPLIED FASTENERS ARE NOT DESIGNED TO ATTACH THE AWNING TO VENEER BRICK
WALLS, DECORATIVE BRICKS OR TO « SOFT BRICKS».

IN DOUBT? CONSULT A CERTIFIED CONTRACTOR TO CONFIRM IF THE SUPPLIED FASTENERS
ARE ADEQUATE FOR THE TYPE OF WALL ONTO WHICH YOU ARE PLANNING YOUR
INSTALLATION. IF THEY ARE NOT HE WILL BE ABLE TO INFORM YOU ON YOUR
INSTALLATION’S SPECIFIC REQUIREMENTS.

2.2.4 Under Eaves - Soffit installation
You need to open your soffit to see inside your eaves and plan before you can even
consider installing a soffit awning. You need to see if your joists or rafters are level or
slanted and if they are strong enough to support the awning.

If your trusses are slanted, you will need to purchase adapters for rafters or to install a
leveled beam; please consult a certified contractor on this subject if this is the case for your
type of installation.

PLEASE NOTE that Levelled Beams and Rafter Adaptors are not included in the price of your
awning.

                                                                                Figure 1

6                                     Brasilia Europa February 2021                Multiple Awnings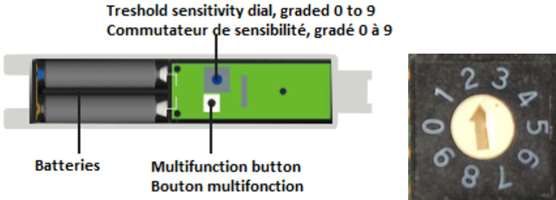
If your eaves are cantilevered on both sides, the corners of the eaves are not strong
enough to support the awning. See Figure 2

                                          Figure 2

This means that your awning cannot be wider than the wall, even if the eaves are wider
than the wall and you had planned the installation under eaves. See figure 3.

                                          Figure 3

7                                   Brasilia Europa February 2021              Multiple Awnings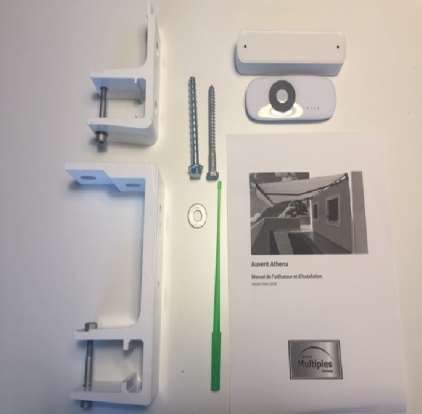
2.3 Unpacking the awning

Make sure that the weight of the Awning is towards the ground (gravity will help this
process). Unscrew and remove completely all 12 screws; 4 at each end of the tube and also
the 4 screws of the hardware compartment; put them aside for storage. Make sure that all
screws are removed since they may damage the awning if left on the tube. Once the screws
are removed, remove the end caps and the accessory compartment cover. Afterwards, cut
and remove the two green straps and pull the awning out of the tube, on your lawn or on a
canvas. A second person will be needed to safely perform this operation.
Rest the awning on stands, on a canvas (tarp) or two stable chairs with the brackets and the
hand crank upwards. Remove the accessories packed on the awning. Carefully remove the
plastic wrapping, there is a groove behind the awning, this is the place to insert the security
knife. Do not use a regular knife or exacto as this can damage the awning.

CAUTION: The Europa’s arms are spring-loaded and could open without warning. They
were closed in the factory, but if damaged during transportation, they could abruptly open
while being unwrapped.

2.4 Parts list

8                                    Brasilia Europa February 2021                Multiple Awnings
3 Overview and brackets

In this section, we will be examining the installation procedure. Installation of the brackets can
be done by one person, but you will need at least one other person to install the awning
onto its brackets. The installation of the brackets is the crucial portion of work that requires
the most time and attention to details.

3.1 Siding walls made of wood, vinyl or aluminum

For all buildings with wooden structures, and sidings that cannot support awnings, wooden
screws must be solidly anchored into a structural part of the house.

9                                     Brasilia Europa February 2021                Multiple Awnings
3.1.1 Where to install

Installation height
Do make certain to leave at least 9 1/2’’ between the top of the brackets and the bottom of the
eaves. See figure 4.

                                           Figure 4

Your awning’s pitch (angle) is pre-set at the highest possible position at the factory with an
approximate drop of 18‘’ from the top of the wall bracket to the lowest point at the front bar of
the awning. For example : If you mount the Awning on the wall at 9’ from the deck or patio, the
lowest point at the bottom of the front bar of the fully opened awning will be 7’6”. See figure 5.
If the need be, the pitch can be re-adjusted, see section 7.A.

                                              Figure 5

Measure up from the deck/patio floor on one side and make a mark at your desired mounting
height less 1” (should be at least 96” inches but we recommend 108”).
10                                   Brasilia Europa February 2021               Multiple Awnings
Make a second mark at 9.5” below the first mark. The space between these marks must be clear
of all obstructions (light fixtures, etc.) on the wall. Using a chalk line or a string, snap a line on the
lower mark for the full length of the awning. The bottom of the wall bracket will rest on the lower
line.
If you decide to install a soffit bracket on the wall, the top of the soffit bracket can touch the
eaves.
Width
With a chalk line, mark vertically the middle point as well as both left and right extremities of the
awning. Then, mark 2 horizontal lines with 9.5” space between, the limits of the installation zone,
right on the mounting height and bottom mark. You`ll get the awning mounting area showing a
rectangle sizes of the width of the awning x 9.5” high.
Refer to figure 6 to choose the position of the brackets. These positions are approximate;
brackets must always be installed into studs or a structural part of the house.
Figure 6
11 Brasilia Europa February 2021 Multiple Awnings3.1.2 Finding the studs, joists or headers You must now locate the studs, joists or headers in the area in which each screw must be anchored and similarly to where the holes of the brackets must be drilled, as explained below. 3.1.2.1 Method A Your brackets will be installed within the length of the awning, in the positions indicated on figure 6, depending on the size of the awning. If your Awning will be installed on a wall which has a window or a door, use this opportunity to locate the studs in your home and transfer those measurements to the outside: Use a roll of masking tape. From the inside of your home, upon the wall that your Awning will be installed, place a strip (about 6’’ strip) of masking tape vertically on the windowpane. Now using a stud finder locate the stud on the same inside wall and mark the center of the stud. Measure from the tape or the door to the center of the stud, and write the measurement down. Continue to locate the additional studs and record those measurements. On the outside wall, using the inside measurements, measure from the tape or the door to the location of the center of the studs. Mark the center of each stud on which a bolts will be fixed with a 6 1/2’’ vertical line. NOTE: To facilitate the mounting of the awning on its brackets, it is very important that the line be straight and properly leveled. CAUTION: PROPER INSTALLATION OF THE WALL BRACKETS IS THE MOST CRITICAL ASPECT OF THE AWNING MOUNTING. IT IS CRITICAL THAT ALL BOLTS BE FASTENED TO STUDS, JOISTS, HEADERS OR OTHER MAJOR STRUCTURAL PARTS OF YOUR WALL. Even a moderate wind exerts great force on the Awning and the wall support brackets. This is why it is important that all brackets be fastened properly and securely. Proper location will also make it easier to insert the pre-assembled Awning into the supporting brackets. WARNING: FAILURE TO SECURELY FASTEN ALL REQUIRED SCREWS TO FIX THE BRACKETS TO THE WALL COULD RESULT IN THE COLLAPSE OF THE AWNING AND CAUSE PERSONAL INJURY. 12 Brasilia Europa February 2021 Multiple Awnings
NOTE: The majority of constructions have a spacing of 16” between the wall studs, but
some of the more recent constructions will have 24” spacing between the wall studs.

3.1.2.2 Method B:

To find the studs if the above method (method A) does not work, you will have to lift your siding
(using a Zip Tool). The insulation material often ends with a stud; test this location by hammering
a long nail, screwing in a long screw or by drilling a small hole. A Zip Tools will permit you to lift
the siding without damaging it.

When defining the location of your brackets, the wall may be uneven or slightly curved/arched.
In this case, you will have to use more shims depending on the location of the brackets. It is
critical that your brackets be level both on the depth and on the height.

                                                Figure 7

3.1.3 Shims and solidity

Sidings, corrugated metal, stucco, decorative bricks and wood often have some empty space
between the structural components and the siding. If the Awning crushes the siding, the latter
can move. If the awning moves, the result will be an uneven installation, the awning falling off
and therefore cause personal injurie as well as material damages to the wall and awning.
In order to have a solid installation, use appropriate shims. A good way to shim the
brackets is to use tubular spacers or washers, either nylon or metal.

13                                     Brasilia Europa February 2021                 Multiple Awnings
The spacer can be installed on top of the siding if a sufficiently large surface is in direct
contact against a solid surface. Otherwise, the spacer can be installed underneath the siding
where a hole can be cut into the siding for the spacer to be inserted in.
Figure 8
Decide if the spacer should go on top, under or through the siding.
If the spacer goes on top of the siding, it is important that it is resting against a solid surface.
The shim or spacer should NEVER rest on fiberboard (ten-test), insulating foam or mineral wool.
If there is sheet insulation, fiberboard or mineral wool in between the bracket location and solid
surface, remove a square of the insulation material and replace it with a piece of solid wood on
top of the solid surface (wood etc.). That piece of wood needs to be well attached and will serve
to support the spacer or the bracket. Be careful, there is often a forense on top of the fiberboard,
wider than the stud. The lag bolt MUST be installed in the stud, not just in the piece of wood
and not just in the forense. Probe the chosen spot with a small drill bit before installing, this will
avoid shattering the stud by drilling too close to its edge. See figure 9.
Figure 9
IT IS MANDATORY TO PUT CAULKING AROUND THE SPACERS OR SHIMS TO PREVENT
WATER INFILTRATION.
14 Brasilia Europa February 2021 Multiple Awnings3.1.4 Brackets installation
Once the studs, joist or headers have been found and the appropriate shims have been
chosen comes the installation of the brackets.
3.1.4.1 Brackets
Make sure that every single bracket necessary is installed exactly in the middle of a stud.
Use 3/16‘’ drill bit to drill 3” deep holes throughout the siding and the shims into the studs
or joists. Doing so will help to prevent the studs from splitting or eroding while doing the
installation of the lag bolts.
Using a drill or a ratchet wrench, install the brackets with the 3/8’’ x 4 ‘’ lag bolts. Use the included
washers between the heads of the bolts and the brackets. While tightening the bolts, use a
level to keep the bracket to level.
Do not over tighten the bolts as this could split the wooden structure or weaken the bolt.
3.2 Masonry
This installation method is meant for solid brick walls (this excludes all types of decorative brick)
where the masonry brick brackets/ties are in perfect order. If the brick wall is weak, you will
need to find studs, and you might need to purchase longer lag bolts than those supplied with the
awning. If this is the case, consult a certified contractor since you will need to use shims to
prevent crushing the bricks against the studs while tightening.
WARNING: SOME BRICK WALLS MIGHT NOT BE STRONG ENOUGH TO SAFELY SUPPORT AN
AWNING. THE SUPPLIED FASTENERS ARE NOT DESIGNED TO ATTACH THE CERTAIN TYPES OF
BRICK WALLS OR ONTO DECORATIVE BRICKS. IF THIS IS THE CASE, CONSULT A CERTIFIED
CONTRACTOR FOR PROPER MOUNTING. SOME CONSTRUCTIONS WILL REQUIRE MORE SCREWS
WHICH ARE NOT INCLUDED WITH YOUR AWNING.
You will need to install shims if the brick surface is uneven.
Figure 10
15 Brasilia Europa February 2021 Multiple Awnings3.2.1 Choosing the position Make sure to leave at least a 9 1/2’’ space between the bottom of the brackets and the eave. The awning is higher than the bracket. IMPORTANT NOTE: NEVER INSTALL BRACKETS ON THE TOP 4 ROWS OF BRICKS NEAR THE ROOF SINCE THESE ROWS ARE NOT STRONG ENOUGHT TO SUPPORT THE AWNING. 3.2.2 Installation on bricks Based on the awning size chart (see figure 6), choose the correct position to install on bricks. It is more important to ensure a secure bracket installation than following exactly the position on the drawing. Ensure also that all the bolts are inserted at least 1/2” from the brick edges and that the brackets do not interfere with the arm support position. Place each bracket at the right height, using the bottom chalk line and trace every bracket and every hole position while making sure that the brackets are level. WARNING: The provided masonry fasteners cannot be used in the joint between two bricks. Install them in the brick body, not within 1/2” an edge of the brick. The fasteners are also not designed for hollow surfaces. Visit a hardware store for proper fasteners that must be used for your type of installation. Do not use supplied fasteners on stucco walls. 3.2.3 Installation 3.2.3.1 Brackets WARNING: The holes must be drilled in two separate steps. Not following these steps may result in holes that are too large. Masonry bolts will not be anchored properly if the holes are too large. While making sure they are level, put in position the first bracket at the required height (in reference to the lower chalk line). Locate the brick joints and mark the area where the screws will hold the bracket while respecting the minimal distance between the edge of the brick and the bracket holes. Repeat the same operation for all the brackets. 16 Brasilia Europa February 2021 Multiple Awnings
First, use a 1/8‘’ masonry drill bit to drill holes 3’’ deep throughout the masonry or the
concrete wall.

Afterwards, use a 3/8‘’ drill bit to drill holes 3’’ depth throughout the masonry or the concrete
wall. While drilling, ensure that the drill bit is as stable as possible. This will prevent the holes
from having a flared shape or from becoming too large. See figure 11.

                 Figure 11

Using a 9/16‘’ socket, install the brackets. Use the 3/8’’ x 4’’ bolts and the flat washers
provided under the head of the screw to do so. While tightening the bolts, keep the bracket
level using a level. Do not overtighten the masonry bolts; doing so may erode the wall or
weaken the bolt.
WARNING: YOU MUST MAKE SURE THAT THE MASONRY BOLTS ARE WELL ANCHORED IN
THE HOLES. IF NOT, REMOVE THEM AND VISIT A HARDWARE STORE FOR APPROPRIATE
MASONRY BOLTS.

3.3 Under Soffit or Eaves

It is imperative to properly evaluate the distance between the trusses or joists and the soffit
cover or other decorative siding in order to choose appropriate shims. It is often easier to
find structural support close to the end of the eaves than close to the wall.

The following instructions are for eaves or soffits that are PERFECTLY HORIZONTAL AND
LEVEL. For slanted eaves or rafters, it might be necessary to use an adapter or angled
shims.

17                                    Brasilia Europa February 2021                 Multiple Awnings
3.3.1 Choosing the position
Using the chalk line, draw a straight horizontal line under the eaves and longer than the
length of the awning. This line represents the rear of the bracket. The brackets are 3.22” deep.
When drawing your line under the eaves, consider that when retracted, the awning will still
extend 10" forward from the chalk line. See figure 12.
Figure 12
NOTE: To facilitate the installation of the awning on the brackets, it is very important to
make the line perfectly straight.
CAUTION: PROPER LOCATION OF THE BRACKETS IS THE MOST IMPORTANT ASPECT OF THE
AWNING MOUNTING. IT IS CRITICAL THAT YOU FASTEN ALL THE SCREWS TO THE RAFTERS
OR OTHER MAJOR STRUCTURAL ELEMENTS.
Even a moderate wind exerts great force on the Awning and the brackets. This is why it is
MOST IMPORTANT THAT THE BRACKETS BE FASTENED PROPERLY AND SECURELY.
3.3.2 Finding the trusses, joists or rafters
Now, locate the structural parts in the awning mounting area. You will probably have to
remove some of the soffit or decorative covering from your eaves. Mark with a 6” line, down
the center of each rafter on which a bracket will be installed.
18 Brasilia Europa February 2021 Multiple AwningsBased on the awning size chart, choose the correct position to install on the rafters or trusses.
It is more important to ensure secure bracket installation than following exactly the position
on the drawing. See Figure 6.
Using brackets and chalk lines, choose the final location of the awning. Make sure that EACH
AND EVERY REQUIRED SCREW IS POSITIONED AT THE CENTER OF THE RAFTERS.
3.3.3 Shims and solidity
Sometimes, there is a good distance between the soffit or other decorative cover and the
trusses. To make absolutely certain that you have a solid installation, use appropriate shims.
A good way to shim the brackets is to use tubular metal spacers, metal or nylon washers-
spacers can also be used. If the distance is too large between trusses, it will be preferable
to install a 2” X 6” beam for the whole length of the awning, or a combination of spacers and
the beam. Be sure all your shims are very solid. The greater the distance, there is a higher risk
the spacers will move if narrow.
3.3.4 Bracket installation
Using a 3/16“drill bit, drill all the pilot holes into the rafters to about 3 1/2” deep. This will
help to prevent the fraying from splitting while installing the lag screws.
See figure 13.
Figure 13
19 Brasilia Europa February 2021 Multiple Awnings3.3.4.1 Brackets
Using a 9/16” socket, install the brackets levelled with the 3/8” X 4” long lag screws. Use the
flat washer provided under the head of the screw. While tightening the lag bolts, keep the
brackets levelled (use the level if needed). Do not overtighten the lag screws; doing so may
split the wood framing or weaken the screw.
If necessary, use shims or spacers.
WARNING: YOU MUST SECURELY FASTEN ALL THE SCREWS TO THE RAFTERS. SOME HOMES MAY
REQUIRE MORE LAG BOLTS, OR LONGER ONES. PLEASE CONSULT A CERTIFIED CONTRACTOR IF
YOU ARE IN DOUBT. FAILURE TO DO SO COULD RESULT IN COLLAPSE OF THE AWNING AND
CAUSE PERSONAL INJURY AS WELL AS MATERIAL DAMAGE.
4 Installing the awning
4.1 Mounting the awning on the brackets
Carefully remove all packaging material from the awning.
With the help of at least one additional person, lift the Awning (with the front bar facing
you and the Awnings supporting brackets behind). Even a small awning weighs more than
50 kg (110 lbs.).
Slide the bar into the brackets and secure it by tightening the fastening hardware for each
bracket. Make sure to insert the screw from the bottom of the bracket towards the top (the
screw must go through the spacer’s hole meant for this purpose). You might need to apply
a bit of pressure to permit a proper insertion of the bar into the brackets.
See figure 14.
Figure 14
20 Brasilia Europa February 2021 Multiple Awnings4.2 Testing the solidity of the installation
You will need help to test the strength of the installation of your awning. Open it completely.
A person must place himself at the end of the awning near the wall. The other person must
gently raise the awning frontal bar and move it. A properly installed awning will see its arms
move a little, but the structure and brackets must not move. If the awning does move, this
means that there are 2 possible issues:
1- The screws are not fixed to the studs; if this is the case, you must locate the studs,
joists or headers in the area in which each screw must be anchored. Re consult
sections 4.2.3 to 4.3.4.1 for all the details
2- The surface is uneven; use appropriate shims. A good way to shim the brackets is to
use tubular spacers or washers, either nylon or metal. Re consult sections 4.2.3 to
4.3.4.1 for all the details.
4.3 Connecting and operating your awning
Plug your power cord into a GFI AC outlet.
NOTE: During a power outage, you can open or close your awning with the included hand
crank. Simply insert the crank into the crank loop and turn. If you use the hand crank, it is
possible that you will have to adjust the stop limits of your awning again, refer to appendix
7.B.
4.3.1 Remote
WARNING: Do not expose the remote control to water as this could cause it to malfunction.
It is recommended to install the wall hanger inside the house.
4.4. Last details
The open and close limits have been programmed and tested in the factory. If you have to
modify the limits, see appendix 7.B.
CAUTION: If you use the hand crank or if you make adjustments on your awning, do not let
it open past the point where the fabric sags and starts to roll up in the wrong direction on
the roller bar. This could damage the fabric.
21 Brasilia Europa February 2021 Multiple AwningsTest your awning by pressing the open (down) and close (up) buttons on the remote. If your Awning does not open to its full projection or doesn’t seem to open and close correctly, see instructions in appendix 7.B. to modify closed and open stop limits. IMPORTANT WARNING FOR 18’, 19’ AND 20’ EUROPA AWNINGS! DO NOT ALLOW THE AWNING TO OPEN PAST THE POINT WHERE THE FABRIC WOULD SAG AND WRAP UNDER THE ROLLER AS THIS WILL TEAR THE FABRIC ON THE CENTER SUPPORT 5 Safety and advice WARNING: PRIOR TO OPERATING THE AWNING, BE SURE THAT NO OBJECT OR PERSONS CAN COME IN CONTACT WITH IT AS IT OPENS AND CLOSES. KEEP CHILDREN AWAY FROM ANY MOVING PARTS OF THE AWNING AS IT OPERATES. FAILURE TO DO SO COULD RESULT IN PERSONAL INJURY. CAUTION: Never hang items from any part of the Awning, except those accessories that are supplied by the manufacturer. WARNING: NEVER ATTEMPT to repair or disassemble any part of the awning without following replacement part procedures supplied by the manufacturers. TRYING TO DO SO WITHOUT PROPER INSTRUCTIONS CAN RESULT IN PERSONAL INJURIES AND CAUSE YOUR AWNING TO MALFUNCTION. CAUTION: DAMAGES to the Awning Fabric, Arms and Mechanism CAUSED BY WATER POOLING, SNOW, ICE ACCUMULATIONS OR HIGH WINDS are NOT COVERED BY THE MANUFACTURER’S WARRANTY. Always retract your Awning during periods of snow, ice 22 Brasilia Europa February 2021 Multiple Awnings
pellets, rain or high winds. Never leave your Awning extended out and unattended during
periods of heavy winds.
WARNING: RAIN WATER POOLING ON THE FABRIC COULD RESULT IN DAMAGE TO, OR THE
COLLAPSE OF THE AWNING AND CAUSE PERSONAL INJURIES. YOU MUST ROLL UP YOUR
AWNING WHEN WATER STARTS POOLING ON THE FABRIC (WATER WILL DRAIN OUT WHEN
THE AWNING ROLLS UP, MAKE SURE TO RE OPEN YOUR AWNING TO DRY OUT THE FABRIC
AS SOON AS IT IS POSSIBLE IF THE FABRIC WAS NOT DRY WHEN IT WAS ROLLED UP.
For long-term storage or non-use of the motorized Awning, the Motor manufacturer suggests
running the motor every few months to maintain the mobility of the internal components.
WARNING: NEVER USE A BARBECUE GRILL, ANY TYPE OF PATIO HEATER OR FIREPLACE
UNDER YOUR AWNING. DOING SO COULD RESULT IN THE FABRIC BURNING OR MELTING
AND COULD POSSIBLY CATCH FIRE; THIS WOULD RESULT IN PERSONAL INJURIES AS WELL AS
MATERIAL DAMAGE.
IMPORTANT WARNING FOR 19’ AND 20’ EUROPA AWNINGS! DO NOT ALLOW THE AWNING
TO OPEN PAST THE POINT WHERE THE FABRIC WOULD SAG AND WRAP UNDER THE ROLLER
AS THIS WILL TEAR THE FABRIC ON THE CENTER SUPPORT.
5.1 Acrylic fabric maintenance
MULTIPLE AWNINGS woven acrylic fabrics are made of 100 % solution-dyed fiber and have a
special finish, which delays the formation and the accumulation of dirt. To preserve the fabric,
you must respect the following cleaning instructions:
Standard Maintenance:
Thoroughly remove the dust from the dry Awning fabric by vacuum cleaning, or by
gently brushing. NEVER USE A PRESSURE WASHER as this will remove the water
repellant coating and cut the threads.
Then clean with lukewarm water and mild soap while gently brushing or rubbing.
Rinse thoroughly to remove all traces of soap.
CAUTION: If an Awning is retracted while wet, open it as quickly as possible to allow the
fabric to dry. Although the fabric is mold, mildew and rot resistant, this procedure is
necessary because atmospheric pollution deposits on the surface of the fabric can mold and
mildew under damp conditions.
23 Brasilia Europa February 2021 Multiple Awnings5.2 Removing the valance
The following procedure will detail the valance removal process on the following product: (1)
Athena and (2) Europa.
1. Remove the three screws located on the end of the front bar (figure 1).
Figure 1
2. Remove the end plate form the front bar.
3. Slide the valance off the channel (figure 2).
Figure 2
4. Screw back the end plate with the appropriate screws (refer to steps 1 and 2).
24 Brasilia Europa February 2021 Multiple Awnings5.3 Maintenance of the electric motor and remote
Outdoor Electric Motor:
The electric Motor is equipped with an automatic overheat shutoff system. If you operate
your Awning several times continuously, the motor will stop its operation before it overheats.
The motor will resume normal operation after 20 minutes of cooling down.
Protecting the AC (GFI) Electrical Outlet from water damage when the motor cord is plugged
in:
To prevent water from entering the AC (GFI) Wall Outlet it is recommended to form a dip loop
at the end of the power cord, see figure 15. Additionally, it is recommended to install a
Weatherproof Cover over the Outlet. Covers are available at most local hardware stores.
Figure 15
Preparing your Awning for winter:
Disconnect the motor’s power cord from the AC (GFI) Wall Outlet and cover the socket to
prevent rain and moisture from entering the outlet since this could interfere with proper motor
function in the spring. Before rolling up your Awning for the last time of the season, make sure
the Fabric is clean and dry to prevent mildew from forming over the winter.
Replacing the battery in your remote transmitter:
Please note that you will most likely need to replace the battery in your remote
control after 3 years, or less if the remote stops working.
Test your remote control by keeping one of the buttons on the remote pressed; the
LED indicator should flash for at least 5 seconds, if this is not the case, the battery
needs to be replaced right away.
25 Brasilia Europa February 2021 Multiple Awnings You should be able to find this type of lithium battery (3V, CR2430) in just about
every hardware or electronics store.
To replace the battery, you will need to push and slide out the battery cover the back
of the remote. Remove the battery cover; check the orientation of the old battery: this
will indicate you the correct polarity, remove the old battery and put in place the new
battery while making certain to respect the polarity. Re-install the battery cover.
26 Brasilia Europa February 2021 Multiple Awnings6 Appendices
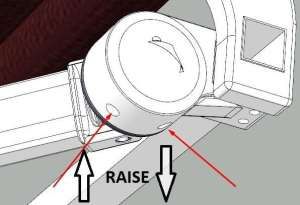
6.1 Adjusting the pitch
Fully open the awning using your hand crank or remote transmitter, as applicable. On
motorized awnings, unplug the power cord from the outlet after opening the awning.
WARNING: RAISING THE FRONT BAR WILL REDUCE THE PITCH (ANGLE) OF THE FABRIC THUS
INCREASING THE RISK OF RAIN WATER POOLING ON THE FABRIC. TO PREVENT THE
AWNING FROM COLLAPSING DUE TO RAIN WATER LOAD, YOU MUST ALWAYS RETRACT
THE AWNING WHEN UNATTENDED. FAILURE TO DO SO COULD RESULT IN PERSONAL
INJURY AND MATERIAL DAMAGE.
Figure 16
Note: Depending on the awning size and model, the weight of the front bar varies (wider
awnings will have heavier front bars). This will affect how high you can raise the front bar,
using the adjustment capabilities of the arm clamps. If you reach the maximum adjustment
27 Brasilia Europa February 2021 Multiple Awningsand are still not happy with the height of the front bar, you can shim the wall brackets
upward to raise the front bar further.
Remove the protective cover on the arm support. You only have to pull on it. This way you
will see if the awning is close to its upper or lower limits.
Have your helper lift the front bar several inches above the desired height. There are 2 set
screws under the arm support. The one closest to the house prevents the front bar from
going higher and the one farthest from the house prevents the front bar from going lower.
See figure 16.
To decrease the slope:
Use an allen key to lower the screw closest from the house, and then raise the
screw that is farthest from the house.
Ask your helper to gently release the front bar to see if it reached the desired height.
To increase slope:
Use and allen key to lower the screw that is farthest from the house, then raise the screw
that is closest from the house.
Ask your helper to gently release the front bar to see if it reached the desired height.
Once you have set the arm at the desired height, adjust the other arm the same way. Make
sure that the front bar is level.
You are now done with the installation. Put the plastic cap back on. If you purchased a
motorized Awning, connect the power cord into the AC (GFI) outlet and enjoy your Awning.
6.2 Programming the awning limits
You will need the green plastic adjustment tool included with your awning.
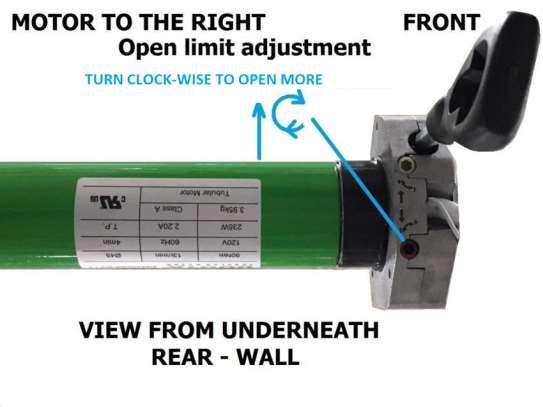
28 Brasilia Europa February 2021 Multiple Awnings6.2.1 Programming the open limit
Awning with the motor on the right side
Plug in the AC power cable to your motor.
Press the top of the remote’s button and let it go; if the motor is still running after
the awning is fully closed, stop it by pressing the middle button on the remote.
Regardless of the arrows directions shown besides the adjustment, the endless
screw, which is the closest from the wall, controls the open limit.
Turn the endless screw, which is the closest to the wall clockwise to change the
open limit of your Awning. If the Awning does not move, continue turning the
screw until the Awning moves.
Once the limit is properly set, cease any adjustment and press the middle button on your remote
control.
29 Brasilia Europa February 2021 Multiple AwningsAwning with the motor on the left side
o Plug in the AC power cable to your motor.
o Press the top of the remote’s button and let it go; if the motor is still running after
the awning is fully closed, stop it by pressing the middle button on the remote.
o Regardless of the arrows directions shown besides the adjustment, the endless
screw which is the farthest from the wall controls the open limit.
o Turn the endless screw which is the farthest to the wall counter-clockwise to
change the open limit of your Awning. If the Awning does not move, continue
turning the screw until the Awning moves.
Once the limit is properly set, cease the adjustment and press the middle button on your
remote control.
30 Brasilia Europa February 2021 Multiple AwningsIMPORTANT NOTE: The fabric should be rolling over the top of the roller bar, not
underneath. If the fabric is rolling from the bottom of the roller bar, continue unrolling the
fabric until it rolls over the top of the roller bar. Then roll up the fabric until both lateral arms
‘lock’ and the fabric becomes tight.
6.3 Motor and remote resetting and synchronization
Note: This procedure describes the steps necessary to restore communication between the
motor and the remote control unit supplied with your motorized awning. This procedure must
be performed only if the remote control does not operate the motorized awning. Review the
steps below to familiarize yourself with the procedure before attempting to complete it.
1. Make sure that the red light on the remote control is lighting up when you are
pressing a button. If the red LED does not light up at all or flashes for less than five
seconds, you will need to replace the battery (see Maintenance section).
2. Disconnect the power cord (120V AC) for 10 seconds
3. Reconnect the power cord.
4. Press the P2 button twice. You will need a paper clip or pencil to press the P2
button since it is recessed at the back or the remote controlback of the
remote control.
5. Press the UP button. The motor must beep repeatedly.
6. The motor has been reinitialized and communication re-established
7. Check the motor rotation direction and calibrate the awning closing and opening limits
once again.
WARNING: Wait 4 seconds between each action on the remote otherwise the motor
might keep the old parameters.
31 Brasilia Europa February 2021 Multiple Awnings6.4 D. Wind sensor
The Wind Sensor is not a safety device capable of eliminating damage to the awning due
to strong winds, water snow or ice accumulations (indeed, a simple power failure can
prevent the awning being automatically retracted). The sensor is rather part of an
automation capable of protecting the awning and facilitating its use.
IMPORTANT NOTICE: The manufacturer does not assume any liability for personal
injuries nor material damages caused by atmospheric events like high winds, water
snow or ice accumulations undetected by the device’s sensors.
The Wind Sensor is equipped with an integrated radio transmitter and autonomous power
provided by a small solar panel at the top of the device. The product functions by detecting
in real time the force generated by wind. When the value detected by the sensor exceeds
the set intervention threshold, the sensor sends a radio signal to the receiver on the motor,
which in turn issues a command to CLOSE your Awning.
6.5 New Wind Sensor installation
NOTE: THIS PROCEDURE ONLY APPLIES IF YOU NEED TO REPLACE YOUR ORIGINAL
WIND SENSOR
1. Open the sensor by pushing the cover in the direction of the arrow, the
cover will slide about ¼’’, you will then be able to remove the cover. See
figure 17.
Figure 17
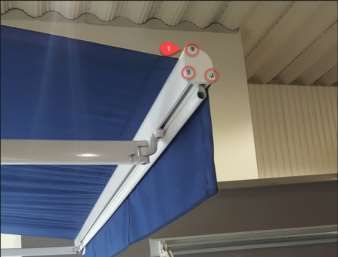
2. IMPORTANT– The Dooya wind sensor must be installed on the inner face of the front bar
of the awning but it must not interfere with the total closing of the awning. The sensor must
be positioned near the right-hand or left-hand corner of the front bar of the awning, not
near the center.
3. Secure the upper shell of the sensor (the one with the electronics) on the front
bar of the awning, using a strip of double-sided tape, so that it can easily be
moved during programming, if it is necessary to improve radio communication
with the motor.
32 Brasilia Europa February 2021 Multiple Awnings4. Perform wind sensor memorization in the motor receiver (see section 7.F.) and Wind
sensor calibration (see sections 7.F.1 and 7.F.2.).
5. Mark the position of the sensor on the bar of the awning; then remove the sensor
and the strip of double-sided tape.
6. Secure the base of the replacement sensor in the position marked on the bar while
making sure that it is the right side up (an arrow is molded in the base, the arrow
needs to point upwards). Use the supplied screws to fix the base to the front bar.
CAUTION! – Final installation of the replacement wind sensor requires drilling the front bar
of the free standing awning. See figure 18. If the replacement wind sensor is a similar model
than your original one, you can use the existing screw holes to attach your replacement
wind sensor to the front bar of your awning.
7. Finally, place the detector's top shell on the base and push it in the opposite
direction of the arrow to secure it in place. See figure 17.
Figure 18
NOTE: After the Awning has been closed by the wind sensor, you will need to wait 10
minutes before you are able to open it again. In this case, you will also need to wait for
the 40 second delay before proceeding with the next step (after the Awning has stopped
moving).
33 Brasilia Europa February 2021 Multiple Awnings6.6 F. Memorizing the wind sensor in the motor receiver
As for any other transmitter or remote control, The Dooya wind sensor’s radio code must be
memorized in the receiver of the motor it controls.
Figure 19
Figure 19.1
Figure 20
The Dooya DC-510 has 9 levels of sensitivity available through the threshold regulating
dial. A small flat screwdriver is required to change the sensitivity settings. 1 is the most
sensitive setting, 9 is the least sensitive setting, 0 has no sensitivity setting. To access
the setting buttons, push the cover in the direction of the arrow and remove the cover.
CAUTION! This procedure may only be used if one or more remotes have already been
memorized in the system.
34 Brasilia Europa February 2021 Multiple Awnings1. Connect the AC power to the motor and open the awning halfway. On the new wind
sensor, put the threshold sensitivity dial to ‘0’. See figures 19 and 19.1. Install the
batteries while respecting the polarity: the sensor will emit a ‘beep’ to indicate it is
functional.
2. On an already memorized remote control, press the P2 button 2 times, the P2
button is on the back of the remote control. See figure 20.
3. On the new wind sensor, press the multifunction button once, the sensor will emit a
‘beep’ to indicate that it is associated with the motor.
4. Set the sensor’s sensitivity level with the threshold sensitivity dial. Set it to 5, (see
figure 19.1) which is the mid sensitivity position and press the multifunction button
once; the awning will close completely.
5. Set the sensor’s sensitivity level to nine and press on the multifunction button
once; the awning will open completely.
6. Set the sensor’s sensitivity level to four, the wind sensor is now programmed. See
section 7.F.2. For the complete instruction on regulating the sensitivity to wind.
6.7 Calibrating the wind sensor
Once the wind sensor has been memorized, it must be calibrated as follows.
Figure 22
35 Brasilia Europa February 2021 Multiple Awnings6.8 Regulating the sensitivity to the wind
The sensor is provided with a calibration that is pre-set in the factory. Nevertheless, after
installation and implementation, it is mandatory to test the sensitivity of the awning to the
wind, based on local wind conditions.
Very important! – During this operation, there must be absolutely NO wind.
You can then test the sensitivity in the following way:
1. Open completely the Awning.
2. Before modifying the base factory settings, you need to check whether these settings
may be OK as they are. To do so, shake the front bar of the awning manually to make
it vibrate strongly (the force of the action must be comparable to that produced by
gusts of wind).
3. Based on the result (too sensitive/not sensitive enough), you must modify the
factory base settings on the threshold sensitivity dial (see figure 22).
4. Lastly, repeat the test conducted in point 2.
PLEASE NOTE THAT the sensitivity adjustment is graded from 1 to 9; 1 being the most
sensitive and 9 being the least sensitive setting.
If necessary, repeat the procedure several times until you find the best setting.
NOTE: After the wind sensor has closed the Awning, you will need to wait 10 minutes
before you are able to open it again.
6.9 Memorizing a new remote control
This procedure applies if you have lost your original remote control and need to have the
new one memorized by the motor.
1. Remove the AC power to the motor.
2. Push and slide out the battery cover of the new remote, make sure that the battery
is properly installed and locate the P2 button underneath the remote control. See
figure 23.
36 Brasilia Europa February 2021 Multiple Awnings3. Put back the AC power to the motor and then press the P2 button twice, you should
now hear the motor emitting a ‘beep’ which indicates that the new remote has been
memorized by the motor.
Figure 23
6.10 Protecting the awning when it is moving
The wind sensor detects vibrations, even during the extension and retraction movements.
During these movements, the system uses a threshold value a little higher than the one that
was set.
6.11 Timeout after a “wind alarm”
If the awning has closed due to a “wind alarm”, it can only be opened again after a timeout of
about 10 minutes. During this timeout, any command for opening will not work.
6.12 Removing the awning from the brackets
Before removing the awning from the wall, or the eaves, it is imperative to close it completely,
to unplug it from the AC and to tie it down in the closed position with some rope or bungees.
Once this is done, remove the stoppers, you awning is now ready to be removed from the
brackets.
CAUTION: The arms of the EUROPA are equipped with a strong spring in the elbow and
will tend to force an opening. The motor keeps them closed, but in case of damage during
the manipulation, they could open without warning and cause bodily injuries.
37 Brasilia Europa February 2021 Multiple Awnings7 Troubleshooting Guide
Installation issues
Problem Can I hardwire my awning directly to my house’s
electric system?
Solution It is indeed possible to hardwire your awning’s motor
directly to your house’s electrical system; for that
matter, you will need to cut out the AC plug at the end
of the cable, but do bear in mind that this will void the
warranty on the motor and can also cause the
programming of the motor to become more difficult. If
you really need to go this route: NEVER CUT THE WIRE
MORE THAN 30 cm FROM THE MOTOR SINCE THIS
COULD POSSIBLY CUT THE ANTENNA WIRE. ALSO,
PLEASE MAKE SURE TO HAVE A POWER SWITCH
ACCESSIBLE NEAR THE ASSEMBLY TO FACILITATE THE
PROGRAMMING PROCEDURE.
Problem What is the minimum and maximum slope of my
awning?
Solution Maximum 15 degrees: Even if it is possible to put the
front of your awning higher, you have to make sure that
it has a sufficient slope from back to front to allow the
rain water to drain completely. The more abrupt the
slope is ensures that the water will not pool on the
fabric of your awning since it is not meant to support
water nor snow accumulation as this will damage the
fabric and also possible damage the arms.
38 Brasilia Europa February 2021 Multiple AwningsAppearance issues
Problem The fabric of my awning makes small wrinkles, all in
the same direction.
Solution 1 This means that the awning’s fabric is off center. You
have to make certain that it is equally positioned and
centered on the roller AND on the front bar.
You will need to open fully, if it is motorized, you
have to open it past its limit using the manual crank.
The fabric will become loose and you will see the
roller`s metal through the opening of the casing.
Pull the fabric towards the side to which the awning
stayed partially opened when the awning is fully
closed. Position the fabric on the roller equally as on
the front bar.
Close the awning and proceed with a test.
Solution 2 If the fabric is not perfectly at right angle, you will need
to use velcro as a wedge to thicken the roller on the
side which is too long. Contact us for further details.
Problem The fabric of my awning makes small wrinkles, on each
side of the seams, but not elsewhere.
Solution This is normal. These small folds are caused by the
sewing which causes the fabric to be slightly thicker
than the rest of the fabric.
Problem My awning closes completely on one side but it always
remains open a little on the other side.
Solution 1 This means that the awning’s fabric is off center. You
have to make certain that it is equally positioned and
centered on the roller AND on the front bar.
You will need to open fully, if it is motorized, you have
to open it past its limit using the manual crank. The
Pull the fabric towards the side to which the awning
stayed partially opened when the awning is fully closed.
Position the fabric on the roller equally as on the front
39 Brasilia Europa February 2021 Multiple Awningsbar.
Solution 2 the fabric is not perfectly at right angle, you will need to
use Velcro as a wedge to thicken the roller on the side
which is too long which corresponds to the side that
Remains a bit opened. Contact us for further details.
Problem When my awning is open, one side of the front bar is
always higher than the other.
Solution 1 Although for the fact that the awning is adjusted at the
factory, a difference of a few millimeters in the
positioning of the brackets will have an impact resulting
in many centimeters on the final slope result. Therefore,
you will need to re-adjust the awning’s slope; please
note that the slope is adjustable independently on each
of the two arms. See appendix 7.A for further details.
Functions issues
Problem I have a wind sensor but my awning does not close
when it is windy.
Solution 1 Verify if the Awning opens and closes with the remote
control, if positive, replace the batteries of the wind
sensor with new ones. UNPLUG THE MOTOR FROM THE
If this is not the case, see ‘My remote does not make
My Awning open or close.
Solution 2 Proceed with testing the wind sensor to see if it is
Programmed as it should be.
See section 7.F.
Solution 3 Is the wind sensor properly installed inside the front
bar? If this is not the case, see section 7.D.1 for
installation instructions. The wind sensor must be
aligned properly with the arrow molded in the base
pointing upwards.
40 Brasilia Europa February 2021 Multiple AwningsProblem I have a wind sensor and my awning closes even when
it is not windy.
Solution 1 The Awning closes every 30 minutes; replace the wind
Sensor’s batteries with new ones. Unplug the AC to the
motor before changing the batteries.
Solution 2 The wind sensor’s sensitivity is adjusted too high.
Calibrate the wind sensor following the steps in section
7.F.
Problem My remote control does not make my awning open or
close.
Solution 1 If your awning is almost closed but not fully, it can
sometimes refuse to close completely. You just need to
open it a bit and close it again completely.
Solution 2 If your awning stops while opening or closing or
immediately after it has moved, this could indicate that
the overheating protection has been triggered; if this is
the case, wait for at least 20 minutes (could be longer if
it is hot outside) and do a second attempt.
Solution 3 When the wind sensor triggers the awning to close, the
awning will refuse to open for the next 10 minutes.
After this 10 minutes delay has expired, the awning will
be operational again.
Solution 4 Check if the AC outlet used is functional by plugging
something else like a lamp into it.
If the AC outlet is indeed functional but the awning
still refuses to work, verify the remote control.
Verify if the remote control batteries are working;
press on one of the remote’s buttons: does the LED
illuminate? A remote control with weak batteries
will take more time to light up the LED and will also
have a reduced range.
If the remote’s LED does not light up, replace the
batteries with new ones.
If the issue persists, see section 7C, Motor and remote
resetting.
41 Brasilia Europa February 2021 Multiple AwningsProblem My motor is not responding but it was working just
minutes ago.
Solution 1 If your awning is almost closed but not fully, it can
sometimes refuse to close completely. You just need to
open it a bit and close it again completely.
Solution 2 If your awning stops while opening or closing or
immediately after it has moved, this could indicate that
the overheating protection has been triggered; if this is
the case, wait for at least 20 minutes (could be longer if
it is hot outside) and do a second attempt.
Solution 3 When the wind sensor triggers the awning to close, the
awning will refuse to open for the next 10 minutes. After
this 10 minutes delay has expired, the awning will be
operational again.
Problem The fabric is rubbing on the inferior part of the
structure.
Solution 1 The fabric is rolling upside down (coming out from
beneath the fabric roll) on the fabric roller; fabric should
be coming from the top of the fabric roller. If the Awning
is motorized, unplug the motor from the AC. For both
Motorized and manual Awnings, use the hand crank and
roll out the fabric until it becomes completely loose.
Continue turning the hand crank until the fabric becomes
tight again and starts rolling from the top of the fabric roll
and close the Awning completely. Be very careful when
re-tightening the fabric so that it does not catch in the
arms. Make sure that the fabric does not come loose
again and rolls upside down, the rubbing will cause
premature wear and tear to your fabric.
Problem Can I add more than one remote control?
Solution Yes, the Dooya motor can memorize many transmitters
(including wind sensors).
Problem I have lost my remote control and cannot program my
new remote control.
Solution Refer to section 7.C. to program the new remote
control.
42 Brasilia Europa February 2021 Multiple AwningsProblem The awning stops before it is completely opened or it
opens too much and the fabric becomes loose.
Solution The open limit needs to be adjusted, refer to sections
7.B.1. and 7.B.2.
Problem Can other remote controls interfere with my awning?
Solution No, each remote needs to be ‘added’ to the awning.
Garage door openers and other remote controls cannot
communicate with your awning.
Contact us:
Multiple Awnings Inc
1505A rue de l’Industrie
Beloeil, QC, Canada
J3G 0S5
www.multipleawnings.com
www.zonepatio.ca (Canada)
www.zonepatio.com (USA)
Email : csd@multipleawnings.com
Toll free : 1-866-441-4182 (Canada)
1-800-736-0906 (USA)
43 Brasilia Europa February 2021 Multiple AwningsYou can also read