DebiCheck : How to Load a Transaction on Transaction Upload (Website) quick guide - V1.1 - This document is protected by Altron - labelled as ...
←
→
Page content transcription
If your browser does not render page correctly, please read the page content below

DebiCheck :
How to Load a Transaction on Transaction Upload
        (Website) quick guide – V1.1

 This document is protected by Altron - labelled as General Business Information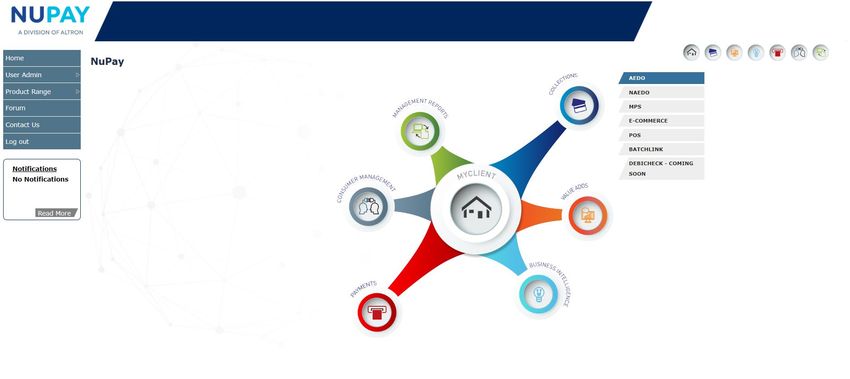
Logging In
Step 1: Log into the NUPAY website by entering the following URL link into the browser
Link: https://www.nupayments.co.za/
Step 2: Log in – Complete the required fields, see Fig 1.
Enter your User ID & Password
Accept the Terms and Conditions (Ensure that you familiarise yourself with
the content herein)
Click on the “Log in” button
(N.B If you cannot remember your password, click on the “Forgot Password?” tab and the
system will assist you in creating a new password)
Fig 1: Login screen - NuPay Website
This document is protected by Altron - labelled as General Business Information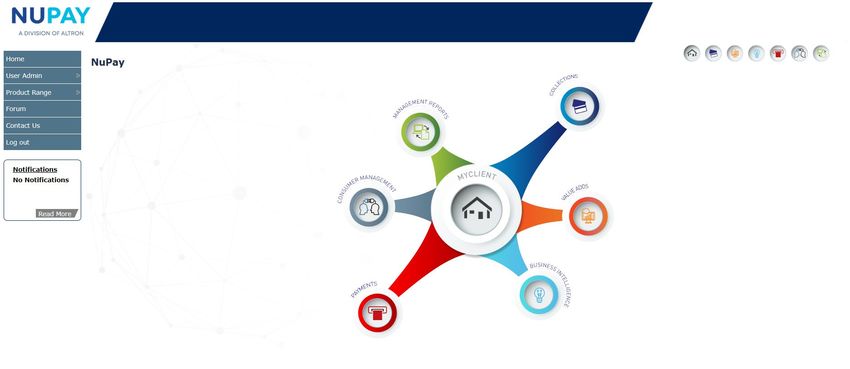
Once you have entered the correct “Log in” details, you will be directed to the following
homepage, see Fig 2.

                                  Fig 2: Homepage - NuPay Website

Step 3: Click the Collections icon for the NUPAY Product List and select DebiCheck, see
Fig 3.

                                 Fig 3: Product List - NuPay Website

             This document is protected by Altron - labelled as General Business Information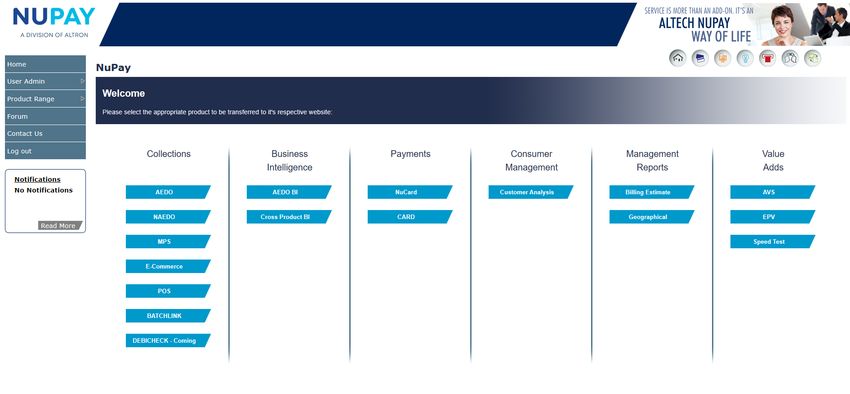
You can also “Log in” by ticking the Alternate landing page option and click Log in, see Fig
4.

                             Fig 4: Alternate Login page - NuPay Website

Step 4: The alternate landing page will be displayed, select DebiCheck, see Fig 5.

                            Fig 5: Alternate Landing page - NuPay Website

             This document is protected by Altron - labelled as General Business Information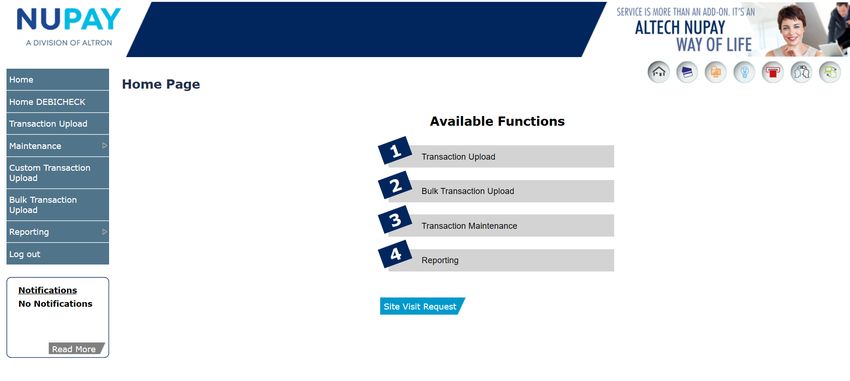
Step 5: Select the Merchant number (The unique number that is allocated to the Merchant
by NUPAY) in the Access Selection screen, and click Continue, see Fig 6.

                               Fig 6: Access Selection - NuPay Website

You will be directed to the DebiCheck Home Page. Select Transaction Upload, on the far
left of the screen or by clicking the Transaction Upload tab under Available Functions, see
Fig 7.

                           Figure 7: DebiCheck Homepage - NuPay Website

             This document is protected by Altron - labelled as General Business Information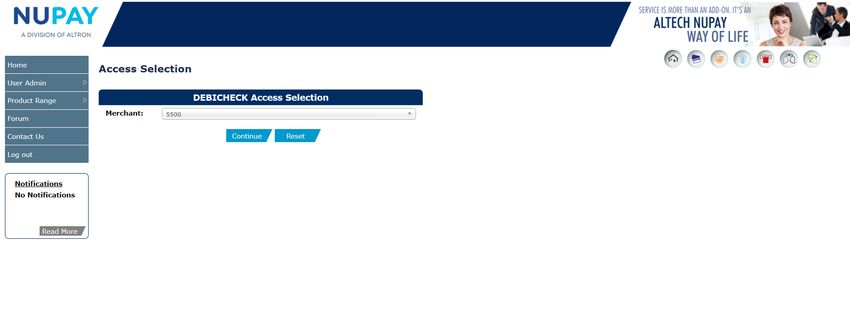
Purpose: The Transaction Upload screen will enable the User/Payee (merchant) to initiate
the mandate.
Step 6: Capture the Payer/Debtors (client) information in the relevant fields and once the
fields are completed click Submit, see Fig 8.

                            Fig 8: Initiating a Mandate – Transaction Upload

The below table can be used as a guide when completing the fields shown in Figure 8

           Field                                   Required information
                               The unique number that is allocated to the User/Payee
   Merchant
                               (merchant) by NUPAY

                               The User/Payee can choose:
                               TT1 - Delayed
                               TT1 - Real Time
                               TT3 - Pre-stage ( The mandate is captured on the website
                               and a reference number is generated, the Payer/Debtor
   Authentication Type
                               (merchant) can swipe, use card and pin, to authenticate at a
                               later date)
                               TT3 - TCC Online terminal (The mandate is captured on the
                               website and is real time, there is no reference number
                               generated)

              This document is protected by Altron - labelled as General Business Information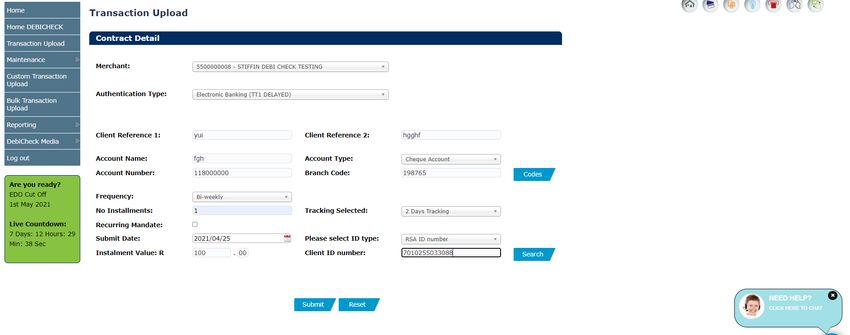
User/Payee(merchant) input field. The client reference number is only
Client Reference 1            displayed on the User/Payee's (merchants) reports as well as the
                              Payer/Debtors (clients) bank statements

                              User/Payee(merchant) input field. The client reference number is only
Client Reference 2
                              displayed on the User/Payee's (merchants) reports on the website

Account Name                  The account holders (debtor/clients) name

                              The Payer/Debtor (clients) account type, i.e. Savings, Cheque,
Account Type
                              Transmission Account (Choose from the drop-down options provided)

                              The Payer/Debtor (clients) bank account number which will be debited for
Account Number
                              the duration of the contract

                              The branch code where the Payer/Debtors (clients) bank account is held
Branch Code                   at (Click on the codes tab and select the required bank as per the drop-
                              down options provided)
                              The agreed frequency in which the Payer/Debtor (client) will make
                              payment, until the full debt is paid up i.e. Weekly, Bi-Weekly, Monthly,
Frequency
                              End of the month, Last Friday of the Month (Choose from the drop-down
                              options provided)

                              The number of instalments that the Payer/Debtor (client) has agreed to, to
No. of instalments
                              pay up the full debt amount

                              A recurring mandate has no end date, the no. of instalments will default to
Recurring Mandate
                              9999

                              User/Payee (Merchant) dependant, the option ranges from 0-10 days
                              tracking (Choose on the drop-down options provided)
Tracking Indicator
                              Note: if the frequency is selected as weekly, the maximum no. of tracking
                              days is 7

Submit Date                   The date in which the collection (instalment) will be presented

                              The Payer/Debtor's (client) SA ID or Passport number (Choose from the
ID Type
                              drop-down options provided)

Client ID number              The Payer/Debtors (client) 13-digit SA ID no. or the 8-9-digit Passport no.

                              The fixed amount to be paid by a Payer/Debtor (client) to the User/Payee
                              (merchant) on a specified date. Instalments are used to pay off both
Instalment Value
                              interest and principal debt each month, so that over a specified number of
                              years, the loan/fees etc. is paid off in full.

                   This document is protected by Altron - labelled as General Business Information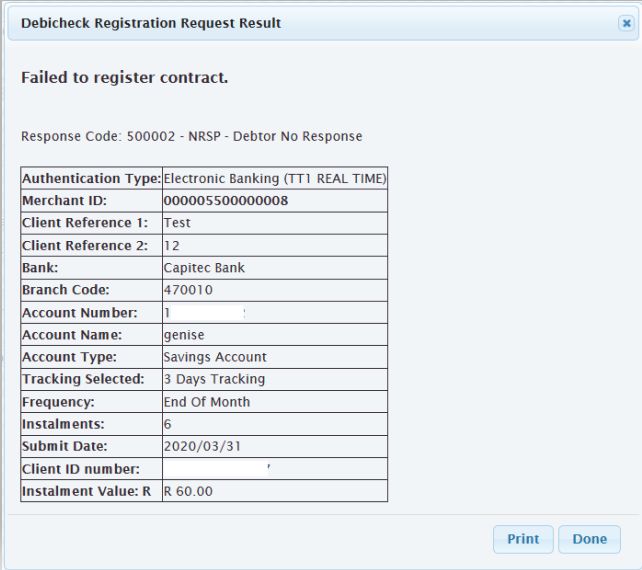
Step 7: A confirmation screen will be displayed, click Submit, see Fig 9.

                       Fig 9: Confirm Transaction screen – Transaction Upload

The Merchant will receive either a Failed or a Successful response from the bank.

             This document is protected by Altron - labelled as General Business Information
Addendum A: Examples of bank responses.
Below are a few examples of bank responses received on Transaction Upload mandate
initiation.
TT1 Real Time – Success response
TT1 Delayed – Authorization Pending response
This document is protected by Altron - labelled as General Business InformationTT1 Real Time – Failure response with a reason code
TT3 Pre-Stage – Successful Registration and pending Authentication
Note: The Contract Reference will be required when authentication takes place.
This document is protected by Altron - labelled as General Business InformationYou can also read