LED TV RECEIVER USER MANUAL - MODEL
←
→
Page content transcription
If your browser does not render page correctly, please read the page content below
LED TV RECEIVER
                USER MANUAL

                                             MODEL:
                                             L3D42D25N

Please read this manual carefully before
using your television and keep this manual
in a good place for future reference.
Contents

Contents

 Caution                   1
 Safety Information        2-3

 Accessories               4
 Technical Specification   4

 Product Introduction      5
  Front View               5
  Rear View                5

 Connections               6

 Remote Control            7-8

 Basic Operation           9

 OSD Menu                  10-17
  1. CHANNEL menu          10-11
  2. PICTURE menu          12
  3. SOUND menu            13
  4. TIME menu             14
  5. OPTION menu           15
     Hotel Mode            16
  6. PC Steup menu         17

 Multimedia Operation      18-20

 3D Imaging                21-22

 Smart TV                  23-33
  1. Install Wizard        23-25
  2. Main Launcher         26-31
  3. Exception handling    32-33

 Simple Troubleshooting    34
Caution

     Caution

               The lightening flash with arrowhead symbol, within an equilateral triangle
               is intended to alert the user to the presence of un-insulated “dangerous
               voltage” within the products enclosure that may be of sufficient magnitude
               to constitute a risk of electric shock to the persons.

               The exclamation point within an equilateral triangle is intend to alert the
               user to the presence of important operating and maintenance (servicing)
               instructions in the literature accompanying the appliance.

               Correct disposal of this Product
               (Waste Electrical & Electronic Equipment (WEEE)
               Your product is designed and manufactured with high quality materials and
               components which can be recycled and reused.
               This symbol means that electrical and electronic equipment, at their end-
               of-life should be disposed of separately from your household waste.
               Please dispose of this equipment at your local community waste collection/
               recycling center.
               In the USA there are separate collection systems for used electrical and
               electronic products. Please help us to conserve the environment we live in!

                                             1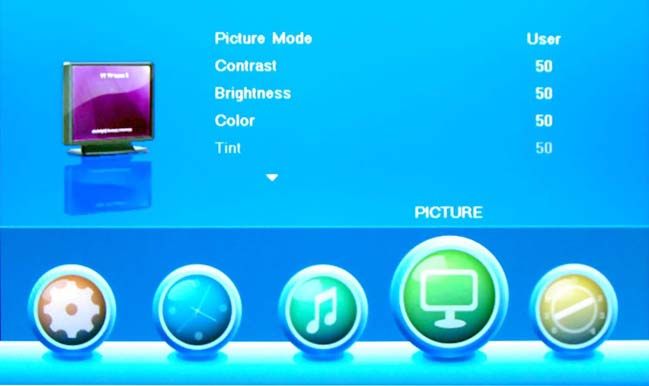
Safety information

Safety information

Safety information
Mains supply
This television is designed to operate from a 100-240 Volts 50Hz AC mains supply. Other power sources
may damage it. Check that the rating plate states 100-240V AC before you plug it in for the first time. The
manufacturer accepts NO liability for damage or injury caused by using the product with the wrong mains
voltage.
Mains plug
We have fitted this television with a standard mains plug.
 If for any reason you cut off the mains plug, please destroy the old plug as it would be dangerous if inserted
 into a live power outlet. Carefully follow the wiring instructions supplied with the new plug.
               fitted to the plug, remove the fuse before throwing the plug away.
                                                        r.
 The mains plug shall be the main disconnect device and shall be operable at all times.
 Safe use and care of your television
 We have designed and made this television to meet European safety standards, but as with any electronic
 equipment you must take care to stay safe and get the best results. Here is some good advice to help you
 do this.
 Don’t continue to use your television if you have spilt liquids in it, if it is damaged in any way or if it does not
 work normally. Immediately unplug the television and get expert advice.
 Switch off mains power or pull out the power plug when you leave the television unattended, unless the function
 of the television requires a continuous power supply.
 Protect the screen from fingerprints.
 Ventilation
 Place the television on a hard flat surface away from direct sunlight and heat sources. If it is in a cabinet,
 allow at least a 10cm gap all around. Don’t obstruct the ventilation slots, including those underneath, with soft
 furnishings. Overheating will shorten the life of the television and increase the risk of fire.
 Cleaning
 Disconnect the mains supply and use only a lightly dampened soft cloth. Do not use chemical solvents or
 strong detergents as these may damage the cabinet or screen.
 Never allow water droplets to remain on the screen as moisture can cause permanent discolouration. Greasy
 marks must only be removed with a commercial cleaner specifically recommended for LE D screens.

                                                             2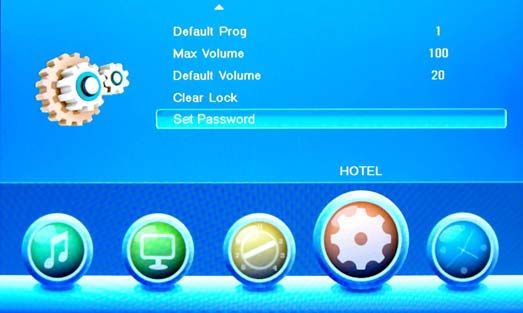
Safety information

  Safety information
  Batteries
  Remove batteries when the television is not to be used for a long time. Batteries left in equipment may cause
  damage through deterioration and corrosive leakage, invalidating the guarantee. To protect the environment,
  use local recycling facilities for battery disposal.
  Protect the mains lead. You must ensure the mains lead cannot be walked on, crushed, chafed, cut,
  trapped.
  Avoid harsh conditions such as wet or damp places, high humidity, strong vibration, extremely high or low
  temperatures, strong sunlight, places which are very dusty.
  Never fit makeshift stands or legs to the television.
  Never push objects into holes and ventilation slots.
  Don’t touch the LED display as it gets warm when operating, this is normal and is not a fault.
  To prevent electric shock, do not remove any cover.
  If anything goes wrong, don’t try and fix it yourself, get a qualified service agent to look at it.
  To prevent injury this television must be securely attached to the wall or it’s supplied stand in accordance
  with the installation instructions.
  Pull the mains plug out of the wall socket and disconnect the aerial lead during thunderstorms.

  Eye Fatigue
  When using this product as a computer monitor, health and safety experts recommend short frequent
  breaks
  rather than occasional, longer breaks, for example a 5-10 minute break after an hour of continuous screen
  work is likely to be better than a 15 minute break every 2 hours.
  Do not use the monitor against a bright background or where sunlight or other bright light source will shine
  directly on the screen.

  CAUTION:

  WARNINGS:
   The apparatus shall not be exposed to dripping or splashing and that no objects filled with liquids, such as
  vases, shall be placed on the apparatus.
               flame sources, such as lighted candles, should be placed on the apparatus.
    To prevent injury, this apparatus must be securely attached to the floor / wall in accordance with the installation
  instructions.
   The mains plug shall be the main disconnect device and shall be operable at all times.
   This appliance is intended for domestic / household use only, and should not be used for any other purpose.
  Any other use may invalidate the warranty and might be dangerous.
   If the supply cord is damaged, it must be replaced by the manufacturer, its service agent or similarly qualified
  persons in order to avoid a hazard.

                                                           3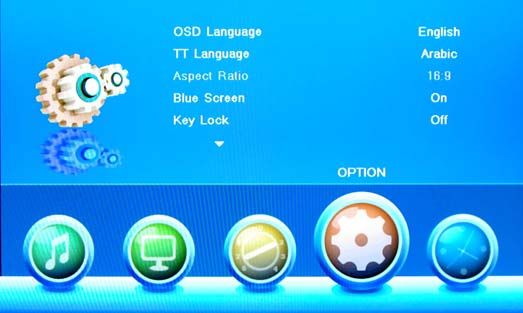
Accessories & Technical Specification

Accessories

                                                        SOURCE

                             FAV      FAV-       FAV+

                            ASPECT
                            ZOOM                             ROOT
                                                            NICAM/A2
                                      A-B      GOTO

                                     ABC/123 NOTIFICATION

                                                                                                Converter cable
   User’s Manual       Remote control                                           Batteries      for YPBPR video

                                                                                                Converter cable
   Power cord                                                          3D glasses                  for AV

Technical Specification
- TV System                          PAL BG/DK/I SECAM BG/DK
- Screen Size                      42 inch (diagonal)
- Resolution                       1920 x 1080
- Aerial input
- Audio output power                 2x8W
- Power Consumption                100-240V                                50/60Hz 160W

Remote Control
Type                                 infrared
Control distance                     5m
Control angle                        30 0 (horizontal)
Batteries                            2 x 1.5V, size AAA

                                                                       4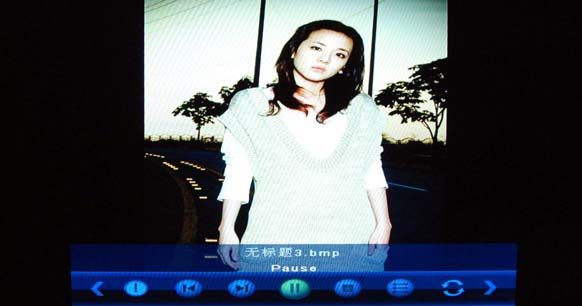
Product Introduction

     Product Introduction
     Front View

                                                                    Display the input source menu.

                                                                    Display/exit the OSD menu.
                                                                      CH
                                                             VOL
                                                                    Scan through channels.

                                                              CH        VOL
                                                                    Adjust the volume.

                                                                    Turn on/standby the TV set.

       LED indicator       Remote Control window(keep clear)
       (IR) Infrared Receiver: Receives IR signals from the remote control.
       (Power on/Standby) LED indicator: Press           to turn on and off.
                     Indicator on(Red)              Standby mode
                     Indicator on(Green)            Power on mode
        The effective receiving range for the signal is 5-8 metres from the front of the remote
        control window, and 300 to the left or right side and 200 above or below the control
        window.

      Rear View
                                         200mm
         200mm

                                                                                       Connections
                                                                                       See next page

                                                         AC Power cable- Connect to AC power supply

                                                     5
Connections

Connections

                         Recovery: Press revcovery button and hold onˈturn on TV enter the
                                   recovery mode.
                         RJ45: Ethernet connector.
       SD Card

                         SD Card: SD card slot.
  USB2
  USB1

                         USB1/2: Connect to USB device for multimedia
                                 (Used under andriod)
       USB

                         USB: Connect to USB device for multimedia
                              (Used under the media channel)
       COAXIAL

                         COAXIAL: Output to audio amplifier

                              Headphone:Connect Headphone
       ANT IN

                         ANT IN: Connect to antenna or cable source.
  YPbPr2 AV2
   mini mini

                         Mini AV 2: Connect to the Video & Audio output on external devices with
                                    the converter cable. (Audio outputs are shared with YPbPr 2)
                         Mini YPbPr 2: Connect to the YPbPr output on external devices with the
                                       converter cable.
       1
       R-AUDIO-L

                         (AUDIO)L/R IN 1: Audio signal input for AV. (Shared with YPbPr 1)
       VIDEO

                          Video 1: Connect to the video output of external devices.
  AUDIO
   PC

                         PC audio: PC audio input

                   HDMI1 IN    HDMI2 IN        Y     Pb       Pr   1         PC

HDMI 1/2 IN: Connect to the HDMI socket of your DVD or Satellite Box.
YPbPr 1: Connect to the YPbPr output on external devices.
PC: Connect to the PC VGA output to display PC graphics

                                                          6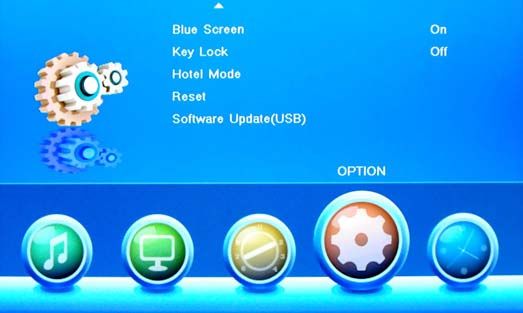
Remote Control

Remote Control

                               SOURCE         POWER: Turn the TV on/standby.
                                              SOURCE: Press to display the input source menu.

                                              NUMBER BUTTONS
                                              Press 0-9 and -/-- to select a TV channel directly when you
                                              are watching TV.
                                                    Return to the previous channel viewed.

                                              FAV: Display the favorite program list.
                                              FAV+/-: Scan the favourite channels.
    FAV      FAV-       FAV+

                                              VOL+/- : Adjust the volume.
                                              CH+/- : Scan through channels.
                                              MUTE: Press to mute the sound, press again or press
                                                    VOL+ to unmute.
                                              EXIT: Exit the OSD menu.
                                              MENU: System setup menu.
                                              CURSOR KEYS                OK
                                              Allows you to navigate the on-screen menus and adjust the
                                              system settings to your preference.

   ASPECT
    ZOOM                            ROOT
                                   NICAM/A2
             A-B      GOTO

            ABC/123 NOTIFICATION

                                                                  7
Remote Control
Remote Control
SOURCE
Buttons for Android
SLEEP: Standby timer.
PICTURE: Select the picture mode.
SOUND: Select the sound mode.
FAV FAV- FAV+
DISPLAY: Means information, to display brief information
concerning the current channel or disc you are wathching.
ASPECT: Cycles among screen display modes.
NICAM/A2: TV Nicam/A2 select.
TV/TXT: Turn off/on the Teletext display.
HOLD: Hold or carry on the current subpage.
SUBPAGE: Press to enter subpages, press again to cancel.
INDEX: Go to index.
SIZE: Press to see top half of page double size,
Press again to see the bottom
half of page double size. Press again for normal size.
REVEAL: Reveal any hidden text.
Color Buttons: Short cuts-follow the coloured links in the text.
: Switch to keypad/mouse or remote control.
ASPECT
ZOOM ROOT ABC/123: Switch to digital numbers or letters.
NICAM/A2
A-B GOTO
ZOOM: Zoom in/out the picture.
ROOT: Return to root menu.
ABC/123 NOTIFICATION
Repeat: Repeat playing the title or chapter.
A-B: Select and play the preferable paragraph of the program by
pressing the button twice at the beginning and end of it.
GOTO: Play your favorite title/chapter/track.
: Play/Pause program.
: Stop program.
: Fast reverse.
: Fast forward.
: Previous chapter.
: Next chapter.
8Basic Operation
Basic Operation
Power on/off
1. Connect to the power supply with the power cord.
2. -To turn on the TV
Press POWER button on the TV or remote control.
-To turn off the TV
Press POWER button on the TV or remote control.
Input Source select
Press SOURCE button on the TV set or remote control to display input
source menu, and use button on the TV set or button
on remote control to select the input source, press OK button on the
remote control to enter.
Note: Before you select the input source, make sure the
connections are prepared.
Basic OSD Menu operation
Press MENU button to display the OSD menu as below:
Submenu
Main menu (Chanel menu
CHANNEL for example)
PICTURE
SOUND
TIME
OPTION
Use / button to select the main menu, and press button to enter the submenu.
In the submenu, use / button to select the function item, press / button to adjust/setup,
or press OK button to enter the submenu.
* (Press MENU button to return to the previous menu.)
* (Press EXIT button to exit the menu display.)
Note1: Only when you input the suitable signal, the relevant items can be activated
Note2: Please operating the OSD menu according to hint on the bottom of the banner.
9OSD Menu
OSD Menu
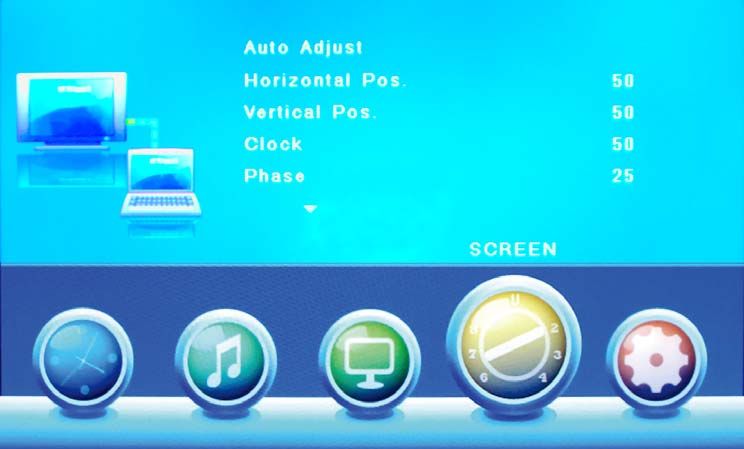
1. CHANNEL menu
See [Basic Operation] for using the menu system.
Auto Tuning
Press OK button to start Auto Tuning.
You could press MENU/EXIT button to exit the process
of tuning, there will be a hint on the screen, and you should
press < button to confirm, or press > button to cancel the
operation.
ATV Manual Tuning
Press OK button to enter the ATV Manual Tuning menu.
Current CH:
Select a Channel for storing the programme.
Color System:
Select from PAL and AUTO
Sound System:
Select from I, BG, DK
Fine Tune:
Press < / > button to fine-tune.
AFC:
Automatic Frequency control ON/OF
Search:
Press < / > button to manual search.
10OSD Menu
OSD Menu
Programme Edit
Press OK button to enter the Program Edit menu.
Delete: Highlight a channel and press the RED button, a red X will appear on the right of the
program edit menu next to the channel you have chosen, then press RED button
again, the program will be deleted. However if you decide not to continue to delete
press the menu button to quit.
Rename: Select an analogue TV channel and press the GREEN button to change the name
of the channel using buttons.
Move: Select an analogue TV channel, and press the YELLOW button, then you can use
and buttons to change the position of the program, press YELLOW again to
confirm the change. Press menu to automatically save the channel list.
Skip: Select a channel and press the BLUE button to label the channel, as long as the
channel has a skip label it will be skipped when searching through the channels with
the CH+/- buttons. Skipped channels can be selected directly using the numeric buttons
on the remote.
FAV: Select a program, press FAV button to set or delete the program as the favorite
channel.
11OSD Menu
OSD Menu
2. PICTURE menu
See [Basic Operation] for using the menu system.
Picture Mode: Choose from Dynamic,Standard,Mild and User, Set this to your preference using
thebuttons. Press OK to memorise.
Note: Contrast, Brightness, Color and sharpness can be adjusted in the User mode only.
They are set in the same way as picture mode.
Contrast: Controls the difference between the brightest and darkest regions of the picture.
Brightness: Controls the overall brightness of the picture.
Color: Control the color saturation.
Tint: Controls the tint ( NTSC mode only).
Sharpness: Increase this setting to see crisp edges in the picture; decrease it for soft edges.
Color Temperature: Choose from Medium, Cool and Warm.
Noise Reduction: Choose interference noise modes form Off, Low, Middle and High.
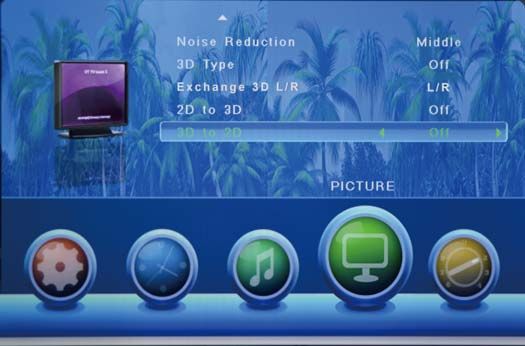
3D Option
3D to 2D Off
3D Type: Choose from Off, Side Byside, Top Botton, Line By Line.
Exchange 3D L/R: Choose from L/R, R/L.
2D to 3D: Choose from Off, On.
3D to 2D: Choose from Off, Side Byside, Top Botton.
12OSD Menu
OSD Menu
3. SOUND menu
See [Basic Operation] for using the menu system.
Sound Mode: Allows you to select among: Standard, Music, Movie, Sports and User.
Set this to your prefered setting.
Treble(Could be adjusted when the sound mode is User): Controls the relative intensity of
higher pitched sounds.
Bass (Can be adjusted when the sound mode is set to User): Controls the relative intensity of
lower pitched sounds.
Balance: To adjust the balance of the left and right sound track, or turn off the volume of the
left and right sound track.
Auto Volume: Control the volume of the program automatically when you turn on the function
by selecting “On”.This function lowers the volume of loud passages of sound to avoid disturbing
the neighbours late at night for example.
SPDIF MODE: Allows you to select among: Off, PCM and Auto.
This function will allow connection to a 5.1 digital surround sound amplifier via the
COAX output socket. OFF will turn off the digital sound output PCM will select pulse
code modulation digital sound and AUTO will select other sound formats if the
decoder recognises them. Set this option to AUTO for default settings.
13OSD Menu
OSD Menu
4. TIME menu
See [Basic Operation] for using the menu system.
Clock: Use the and buttons to select the clock icon, then use the and buttons to
Select a sub menu setting the use buttons to change the setting,press EXIT to
quit the menu.
Note: The time is set from the DTV signal automatically and cannot be set manually.
TIME OPERATION
Off Time: Press OK button to enter the submenu, you can set the time when the TV set will
turn off automatically, you can also set the off time repeat.
On Time: Press OK button to enter the submenu, you can set the time when the TV set will
turn on automatically, you can also set the on time repeat, volume and program.
NOTE: Repeat can be set to OFF, ONCE, EVERY DAY, MON~FRI, MON~SAT,SATERDAY
~SUNDAY or SUNDAY.
Sleep Timer: Allows you to set the sleep timer to: 10min, 20min, 30min, 60min, 90min,
120min,180min, 240min and off. When the set time has elapsed,the TV will switch off.
V
Auto Sleep: Press OK to enter this sub menu, then use the V and buttons to select the time.
This unit will switch off itself automatically if no change in status within the last 3/4/5
hours of operation.
V
OSD Timer: Press OK to enter this sub menu, then use the V and buttons to select the time
for the OSD menu display on the screen.
14OSD Menu
OSD Menu
5. OPTION menu
See [Basic Operation] for using the menu system.
OSD Language: Allows you to select menu language.
TT Language: Seclet the Teletext language.
Aspect Ratio: Choose from 4:3, 16:9, Zoom1, Zoom2 and Panorama.
Blue Screen: Turn on/off the blue screen function when there’s no signal.
Key Lock: Turn on the function, and the buttons on the TV will be invalid.
Hotel Mode: See next page.
Reset: Press OK button to restore factory default.
Software Update(USB): Press OK button to enter the software update menu.
15OSD Menu
OSD Menu
Hotel Mode (You have to enter the code 1001 to enter the Hotel menu as below)
Hotel Mode: Turn on/off the Hotel Mode.
Source Lock: Enable the input source you turn on.
Default Source: Select the input source, and the TV will play the programs in the source you
select when it is turned on.
Default Prog.: Select the Start Channel Number, and the TV will program the channel you
select when it is turned on.
Max Volume: Set the max volume value for the TV.
Clear Lock: Clear all the locks you set above.
Set Password: Set the password for your limiting.
TV to USB: Clone all the hotel settings of the TV to the USB device.
USB to TV: Change all the hotel settings of the TV by the USB device you have cloned.
16OSD Menu
OSD Menu
6. PC Steup menu (in PC mode)
Description
Auto Adjust : Press button to setup the parameter of the screen automatically.
H/V Position: Adjust the transverse/vertical position of the screen.
Clock: Adjust the pixel clock frequency, until the image size is maximized for the screen.
Phase: Adjust the phase of the ADC sampling clock relative to the sync signal, until a stable
image is obtained.
17Multimedia Operation
Multimedia Operation
Basic Operation
1). Press the SOURCE button on the remote control to display the input source menu, select Media
using the / / buttons, and press OK to enter the Multimedia menu seen below.
2). Insert USB device, you will see the name of the device displayed on the screen.
USB device list
MAIN MENU
PHOTO MUSIC MOVIE TEXT
3). Press / button to select the kind of the files you want to display from a choice of PHOTO,
MUSIC, MOVIE or TEXT. Press / button to select the device and press OK button to enter.
Preview
Return to
device list
Information
Up Folder
Press / / / buttons to move , and press OK button to select a file or open a folder,
Then press button to select files.
You can display the option table on the bottom of the screen by pressing OK, press button to hide.
Press again to stop and exit fully.
18Multimedia Operation
Multimedia Operation
1. Photo
Play the photo
Press / button to select an option on the menu, and press OK button to select it.
Pause: Play/pause the photo view.
Prev./Next: View the previous/next photo.
Stop: Stop the photo view.
Repeat: Select the repeat mode from Repeat All, Repeat 1, Repeat None.
Music: Play/Pause the music.
Playlist: Display the playlist on the screen and play the file by Ĥ / ĥ button and OK button, you can
press button to select “CANCEL”, and press OK button to cancel the list displaying.
Info: Display the information of the file.
Rotate: Rotate the photo clockwise/counterclockwise.
Zoom Out/In: Zoom out/in the photo.
Move View: Move the photo in Zoom in mode.
2. Music
Play the music
Ĥ
ĥ
Press / button to select the option on the menu, and press OK button to change.
Pause: Play/pause the music.
FB/FF: Fast backward/fast forward.
Prev./Next: Play the previous/next file.
Stop: Stop the music.
Repeat: Select the repeat mode from Repeat All, Repeat 1, Repeat None.
Mute: Mute the sound.
Playlist: Display the playlist on the screen and play the file by Ĥ / ĥ button and OK button, you can
press button to select “CANCEL”, and press OK button to cancel the list displaying.
Info: Display the information of the file.
Goto Time: Play the music from the time you set.
19Multimedia Operation
Multimedia Operation
3. Movie
Play the movie
Ĥ
ĥ
Press / button to select the option on the menu, and press OK button to change.
Pause: Play/pause the music.
FB/FF: Fast backward/fast forward.
Prev./Next: Play the previous/next file.
Stop: Stop the music.
Repeat: Select the repeat mode from Repeat All, Repeat 1, Repeat None.
Set A-B: Select and play the preferable part of the file by setting A and B at the beginning and end.
Press OK button to cancel.
Playlist: Display the playlist on the screen.
Info: Display the information of the movie.
Slow Forward: Play the movies at slow speed, press button to cancel.
Step Forward: Step quickly through the movie by using this option
Goto Time: Program the movie form the time you set.
Zoom out/in: Zoom out/in the movie screen.
Aspect Ratio: Select the aspect ratio of the screen display.
Move View: Move the photo in Zoom in mode.
4. Text
Play the text
Ĥ
ĥ
Press / button to select the option on the menu, and press OK button to change.
Previous/Next page: Turn to previous/next page of the text.
Prev./Next: Turn to previous/next file.
Stop: Stop auto turning pages.
Music: Play/pause the music programme.
Playlist: Display the playlist on the screen.
Info: Display the information of the text.
203D Imaging
3D Imaging
3D Technology
This TV can display in 3D via 3D broadcasting or when the TV is connected to a compatible
device, such as a Blu-ray 3D Player. You need such a device to watch the TV in 3D. The 3D
TV displays two separate pictures formatted for each eye. The viewer needs to wear 3D glasses
in order to see these images in 3D format.
v?PMV_I\KPQVO,QUIOM[aW][PW]TLUIQV\IQVILQ[\IVKMWNI\TMI[\\_QKM\PM[KZMMV_QL\PIVLaW]
should also be able to see all of the screen at eye level.
v1NaW]_I\KP\PM,QUIOQVO\WWKTW[MTaWZNWZITWVOXMZQWLWN\QUMQ\UIaPIZUaW]ZMaM[QOP\
v?I\KPQVO\PMWZXTIaQVO^QLMWOIUM[\PI\QVKWZXWZI\M,QUIOQVO_Q\P\PM,OTI[[M[NWZITWVO
XMZQWLWN\QUMKIVKI][MLZW_[QVM[[PMILIKPM[WZNI\QO]M\WaW]IVLWZaW]ZMaM[1NaW]PI^MI
headache, or otherwise feel fatigued or drowsy, stop watching the TV and take a rest.
v8ZMOVIV\_WUMV[MVQWZ[XMZ[WV[_Q\PPMIZ\XZWJTMU[WZXMZ[WV[_PWM`XMZQMVKMNZMY]MV\
drowsiness should refrain from watching 3D TV.
v;WUM,QUIOQVOUIaKI][MaW]\WL]KSWZLWLOM\PMQUIOMLQ[XTIaMLQV\PM^QLMW3D Imaging
3D Imaging
v Additional 3D glasses are sold separately. Please contact AVL@avl21c.com.
v,WVW\][M\PM,OTI[[M[\WZMXTIKMaW]ZKWZZMK\Q^MOTI[[M[[]VOTI[[M[WZXZW\MK\Q^MOWOOTM[
v,WVW\[\WZM\PM,OTI[[M[QVPW\WZKWTLTWKI\QWV[
v,WVW\LZWXWJRMK\[WV\W\PM,OTI[[M[,WVW\LZWXWZJMVL\PMOTI[[M[
v;QVKM\PMTMV[M[WN\PM,OTI[[M[IZMMI[QTa[KZI\KPMLUISM[]ZM\WKTMIVWVTa_Q\PI[WN\KTW\P
;PISMWNNIVaL][\JMNWZM][QVO\PMKTW\P[QVKM\PMOTI[[M[IZMMI[QTa[KZI\KPML
3D Imaging Viewing Range
TV size ^QM_QVO angle & W\PMZ cirK]U[\IVces may KPIVOM \PM ^QM_QVO distance and \PM angle WN vie_.
Top VQM_ ;QLM VQM_
10°
KU
35°
10°
KU
35°
Watching 3D TV
1. ;\IZ\I,^QLMW
6W\M"Smart TV
Smart TV
1. Install Wizard
Reminder
Reminder
23Smart TV
Smart TV
Reminder
Reminder
24Smart TV
Smart TV
25Smart TV
Smart TV
2. Main Launcher
FUNCTION DESCRIPTION
The Media Player lets you enjoy all of your musics, videos and
pictures from system memory or storage devices
The Settings screen contains most of the customizing and con-
and network settings
The AppManager lets you launch selected applications, such as
Weather, Calendar ,News
26Smart TV
Smart TV
27Smart TV
Smart TV
Setup settings Brief description
Wireless & networks Check to turn on Wi-Fi so you can connect to Wi-Fi networks
Check to receive an alert when an open Wi-Fi network
becomes available
Opens a dialog where you can add a Wi-Fi network by
entering its SSID (the name it broadcasts) and security type
Ethernet Check to turn on Ethernet so you can connect to Ethernet
networks
Applications
Compatibility Mode
Manage applications
Running services
Storage use
Reset to factory defaults
To also clear music, pictures, and other data, the SD card
needs to be erased
28Smart TV
Smart TV
Setup settings Brief description
Storage settings Total space
Available space
Erase USB storage
Available space of internal storage
Language & Keyboard Select language
User dictionary
Android keyboard
System updates Updating system
Date & time Automatic
Set date
Select time zone
Set time
Use 24-hour format
Select date format
About module Status
Model number
Android version
Baseband version
Kernel version
Build number
Wi-Fi IP address
Wi-Fi MAC address
Ethernet IP address
Ethernet MAC address
29Smart TV
Smart TV
30Smart TV
Smart TV
31Smart TV
Smart TV
3. Exception handling
32Smart TV
Smart TV
33Simple Troubleshooting
Simple Troubleshooting
If the display fails or performance dramatically deteriorates check the Display in accordance
with the following instructions.Remember to check the peripherals topinpiont the source of the
failure.
If the display still fails to perform as expected,connect your helpline for assistance.
No power
- Check all connections to the TV.
- Press either the power button or the Standby button on the Remote control.
No picture or sound
- Ensure that the TV is plugged in and the power is on.
- Ensure that the aerial is connected.
- Try a different program.
Poor picture quality
- Check the aerial connections.
- Check that the channel is tuned in properly.
- Adjust the picture settings:brightness,color,sharpness,contrast,hue.
- Make sure that the TV is not located close to electrical appliances that may emit radio
frequency interference.
No colour
- Adjust the color setting.
- Check that the programme is broadcast in color.
- Check that the channel is tuned properly.
TV does not respond to remote control
- Check that there are no obstructions between the remote control and the unit.
- Check that the remote control is within range of the unit.
- Check that the batteries in the remote control and not weak or exhausted.
This TV is for household use and registered as harmless on electromagnetic waves.
Therefor,you can use it in every location as well as residential areas.
34APPENDIX
APPENDIX
VIDEO INPUT TV Receiving Range 49MHz - 863MHz
Input impedance 75Ω
Video System PAL/SECAM
Sound System B/G,D/K,I,M
NICAM/A2
Max storage 200CH
Channels
TELETEXT(only
1000Pages
for MAD6E182)
PC-RGB Format Up to SXGA@75Hz
Video System PAL/NTSC/SECAM
CVBS Video level 1.0 Vp-p ±5%
Component 480i,480p,576i,576p,720p,1080i,1080p
HDMI 480i,480p,576i,576p,720p,1080i,1080p
File Codec
Media Remark
Ext. Video Audio
Max Resolution And Frame Rate:
MJPEG 640×450@30rps
.avi Max Date Rate: 10 Mbps
Xvid,MPEG-2,
MPEG-4,H.264
MP3,WMA,AAC
MPEG-2, Max Resolution And Frame Rate:
.mp4 MP2,PCM 1920×1080@30rps
MPEG-4,H.264
Max Date Rate: 20 Mbps
.ts/
.trp MPEG-2,H.264
Movie
.mkv/
.mov MPEG-4,H.264
.mpg MPEG-1,MPEG-2
Max Resolution:352×288
.dat MPEG-1
Max Date Rate: 20 Mbps
MP2
.vob MPEG-2 Max Resolution:720×576
Max Date Rate: 20 Mbps
Max Resolution And Frame Rate:
.rm/ RV8,RV9,RV10 COOK 1280×720@30rps
.rmvb
Max Date Rate: 10 Mbps
.mp3 -- MP3 Sample Rate: 16K~48KHz
Bit Rate: 16K~320Kbps
.wma -- WMA Channel: Mono/Stereo
Music
Sample Rate: 16K~48KHz
.m4a/ -- AAC Bit Rate: 32K~442Kbps
.aac Channel: Mono/Stereo
.jpg/ Progressive JPEG Max Resolution: 8195×8195
.jpeg Beseline JPEG Max Resolution: 8195×8195
Photo .bmp Max Resolution: 9600×6400
--
Pixel Depth: 1/4/8/16/24/32 bpp
.png Non-Interlaced Max Resolution: 9600×6400
Interleced Max Resolution: 1800×1800
File system: FAT32,FAT16,NTFS(NTFS compressed file is not supported).You can also read