Oculus Rift Getting Started Guide - Version 0.6.0.0
←
→
Page content transcription
If your browser does not render page correctly, please read the page content below
Oculus Rift Getting
  Started Guide

     Version 0.6.0.0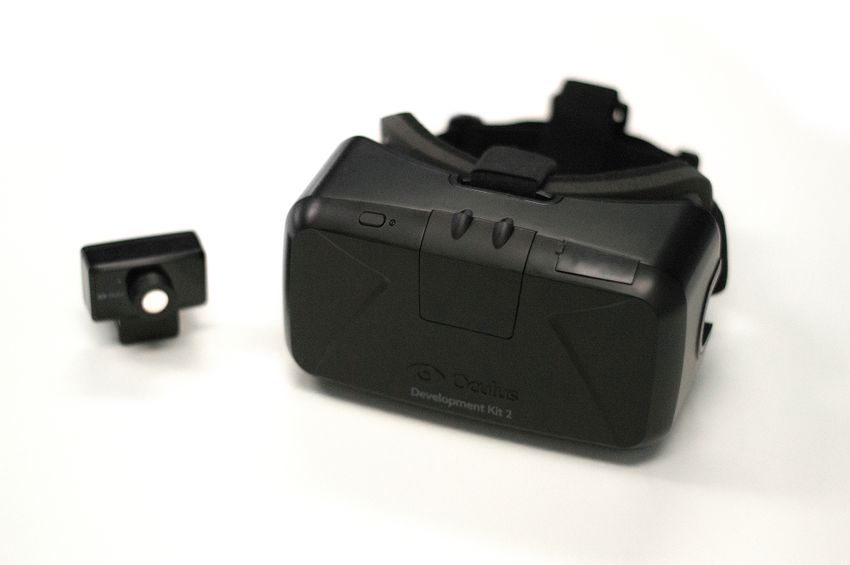
2 | Introduction | Oculus Rift

           Copyrights and Trademarks
           ©   2015 Oculus VR, LLC. All Rights Reserved.

           OCULUS VR, OCULUS, and RIFT are trademarks of Oculus VR, LLC. (C) Oculus VR, LLC. All rights reserved.
           BLUETOOTH is a registered trademark of Bluetooth SIG, Inc. All other trademarks are the property of their
           respective owners. Certain materials included in this publication are reprinted with the permission of the
           copyright holder.

2| |
Oculus Rift | Contents | 3

Contents

Getting Started with the SDK..............................................................................5
Introduction.......................................................................................................... 6
System Requirements...........................................................................................7
Overview of SDK 0.6........................................................................................... 8
Changes in SDK 0.6.............................................................................................9
Migrating from SDK 0.5 to SDK 0.6..................................................................11
Oculus Rift Hardware Setup.............................................................................. 16
   Oculus Rift DK2............................................................................................................................................... 16
   Oculus Rift DK1............................................................................................................................................... 17

Oculus Rift Driver Setup.................................................................................... 18
   Installing the Runtime Package....................................................................................................................... 18
       Windows..................................................................................................................................................... 18
       Mac............................................................................................................................................................. 18

Display Setup..................................................................................................... 19
   Monitor.............................................................................................................................................................19
   Rift Display Mode............................................................................................................................................ 20
   Updating the DK2 Headset Firmware............................................................................................................. 20

Getting Started.................................................................................................. 22
   Device settings.................................................................................................................................................22
   User Settings....................................................................................................................................................23
   Advanced Settings...........................................................................................................................................23

Testing the Rift using the Demo Scene............................................................ 25
Getting Started with the SDK............................................................................26
Oculus Rift SDK Setup.......................................................................................27
   Installation........................................................................................................................................................ 27
   Directory Structure...........................................................................................................................................27
   Compiler Settings............................................................................................................................................ 27
   Makefiles, Projects, and Build Solutions......................................................................................................... 27
   Terminology..................................................................................................................................................... 28

Getting Started with the Demos....................................................................... 29
   Getting Started................................................................................................................................................ 29
      OculusWorldDemo Controls...................................................................................................................... 29
      OculusWorldDemo Usage..........................................................................................................................30
      Next Steps.................................................................................................................................................. 31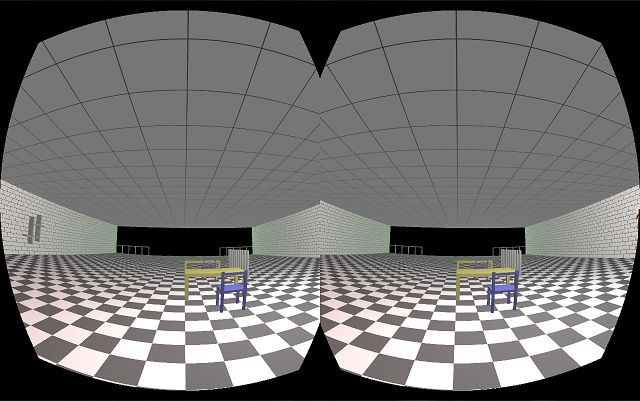
4 | Contents | Oculus Rift

           Oculus Rift SDK Setup.......................................................................................34
              Installation........................................................................................................................................................ 34
              Directory Structure...........................................................................................................................................34
              Compiler Settings............................................................................................................................................ 34
              Makefiles, Projects, and Build Solutions......................................................................................................... 34
              Terminology..................................................................................................................................................... 35

           Getting Started with the Demos....................................................................... 36
              Getting Started................................................................................................................................................ 36
                 OculusWorldDemo Controls...................................................................................................................... 36
                 OculusWorldDemo Usage..........................................................................................................................37
                 Next Steps.................................................................................................................................................. 38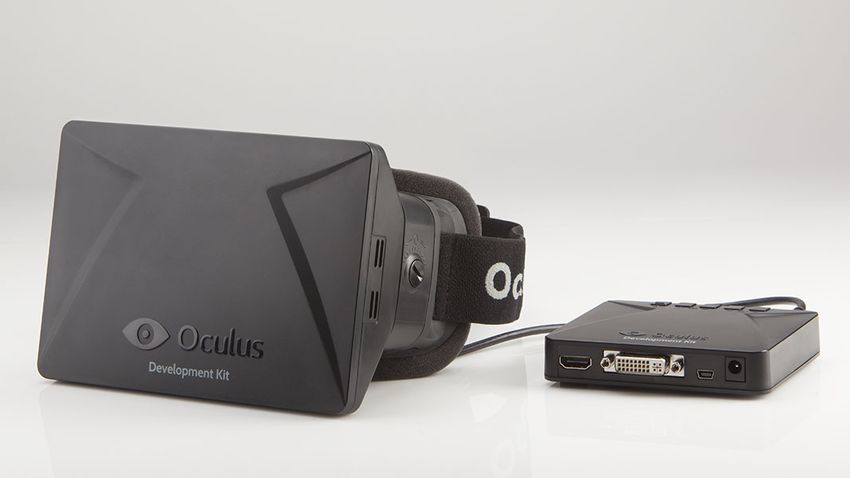
Oculus Rift | Getting Started with the SDK | 5

Getting Started with the SDK
Now that your Oculus Rift is plugged in and the drivers are installed, you are ready to install the SDK and try
the demos.
6 | Introduction | Oculus Rift

           Introduction
           Welcome to the Oculus Rift Developer Getting Started Guide.

           This guide describes how to prepare the Oculus Rift for development. This includes:

           •   Installing the Oculus Rift hardware.
           •   Installing the device driver.
           •   Configuring your user profile.
           •   Running the demo.

           After you set up the hardware, the Getting Started Guide describes how to:

           • Install the SDK.
           • Run the OculusWorldDemo.
Oculus Rift | System Requirements | 7

System Requirements
Although this section describes the minimum system requirements for Oculus Rift development, Oculus
recommends using high performance hardware for the highest-quality immersive experience.

Operating Systems
The Oculus SDK 0.4.0 currently supports Windows 7, 8 and 8.1 and MacOS (10.8, 10.9). There is also an
experimental Linux version that supports some Linux distributions.

Minimum System Requirements
There are no specific computer hardware requirements for the Oculus SDK. However, we recommend a
computer with a modern graphics card. A good benchmark is to try running Unreal Engine 3 and Unity at 60
frames per second (FPS) with vertical sync and stereo 3D enabled. If this is possible without dropping frames,
then your configuration should be sufficient for Oculus Rift development.

The following components are provided as a minimum guideline:

• Windows: 7, 8, or 8.1
•   MacOS: 10.8+
•   Linux: Ubuntu 12.04 LTS
•   2.5+ GHz processor
•   4 GB system RAM
•   DirectX 10 or OpenGL 3 compatible video card.

Many lower end and mobile video cards, such as the Intel HD 5000, have the graphics capabilities to run
minimal Rift demos. However, their rendering throughput may be inadequate for full-scene 75 FPS VR
rendering with stereo and distortion. Developers targeting this class of hardware will need to be very conscious
of scene geometry because low-latency rendering at 75 FPS is critical for a usable VR experience. Irregular
display updates are also particularly apparent in VR, so your application must avoid skipping frames.

If you are looking for a portable VR workstation, the Nvidia 650M inside of a MacBook Pro Retina provides
minimal graphics power for low end demo development.
8 | Overview of SDK 0.6 | Oculus Rift

          Overview of SDK 0.6
          The Oculus SDK 0.6 introduces the compositor, a separate process for applying distortion and displaying
          scenes and other major changes.

          There are four major changes to Oculus SDK 0.6:

          •   The addition of the compositor service and texture sets.
          •   The addition of layer support.
          •   Removal of client-based rendering.
          •   Simplification of the API.

          The compositor service moves distortion rendering from the application process to the OVRServer process
          using texture sets that are shared between the two processes. A texture set is basically a swap chain, with
          buffers rotated to allow game rendering to proceed while the current frame is distorted and displayed.
          Layer support allows multiple independent application render targets to be independently sent to the HMD.
          For example, you might render a heads-up display, background, and game space each in their own separate
          render target. Each render target is a layer, and the layers are combined by the compositor (rather than the
          application) right before distortion and display. Each layer may have a different size, resolution, and update
          rate.

          The API simplification is a move towards the final API, which primarily removes support for application-based
          distortion rendering. For more information on each of these, see the Developer Guide for this SDK release. API
          changes are discussed briefly below.
                  Note: Applications built with the 0.5 and 0.4 SDK are supported by the 0.6 runtime associated with this
                  SDK. However, these applications behave as they previously did and do not take advantage of the new
                  0.6 features.
Oculus Rift | Changes in SDK 0.6 | 9 Changes in SDK 0.6 This section describes changes to SDK 0.6. New Features The following are major new features for the Oculus SDK and runtime: • Added the compositor service, which improves compatibility and support for simultaneous applications. • Added layer support, which increases flexibility and enables developers to tune settings based on the characteristics and requirements of each layer. • Significantly improved error handling and reporting. • Added a suite of new sample projects which demonstrate techniques and the new SDK features. • Removed application-side DirectX and OpenGL API shims, which results in improved runtime compatibility and reliability. • Simplified the API, as described below. • Changed Extended mode to use the compositor process. Rendering setup is now identical for extended and direct modes. The application no longer needs to know which mode is being used. • Extended mode can now support mirroring, which was previously only supported by Direct mode. • Simplified the timing interface and made it more robust by moving to a single function: ovrHmd_GetFrameTiming. • Fixed a number of bugs and reliability problems. The following are major new features for Unity: • Disabled eye texture anti-aliasing when using deferred rendering. This fixes the blackscreen issue. • Eliminated the need for the DirectToRift.exe in Unity 4.6.3p2 and later. • Removed the hard dependency from the Oculus runtime. Apps now render in mono without tracking when VR isn't present. API Changes This release represents a major revision of the API. These changes significantly simplify the API while retaining essential functionality. Changes to the API include: • Removed support for application-based distortion rendering. Removed functions include ovrHmd_CreateDistortionMesh, ovrHmd_GetRenderScaleAndOffset, and so on. If you feel that you require application-based distortion rendering, please contact Oculus Developer Relations. • Introduced ovrSwapTextureSets, which are textures shared between the OVRServer process and the application process. Instead of using your own back buffers, applications must render VR scenes and layers to ovrSwapTextureSet textures. Texture sets are created with ovrHmd_CreateSwapTextureSetD3D11/ OpenGL and destroyed with ovrHmd_DestroySwapTextureSet. • ovrHmd_BeginFrame was removed and ovrHmd_EndFrame was replaced with ovrHmd_SubmitFrame. • Added a new layer API. A list of layer pointers is passed into ovrHmd_SubmitFrame. • Improved error reporting, including adding the ovrResult type. Some API functions were changed to return ovrResult. ovrHmd_GetLastError was replaced with ovr_GetLastErrorInfo. • Removed ovr_InitializeRenderingShim, as it is no longer necessary with the service-based compositor. • Removed some ovrHmdCaps flags, including ovrHmdCap_Present, ovrHmdCap_Available, ovrHmdCap_Captured, ovrHmdCap_ExtendDesktop, ovrHmdCap_NoMirrorToWindow, and ovrHmdCap_DisplayOff. • Removed ovrDistortionCaps. Some of this functionality is present in ovrLayerFlags.
10 | Changes in SDK 0.6 | Oculus Rift

          • ovrHmdDesc no longer contains display device information, as the service-based compositor now handles
            the display device.
          • Simplified ovrFrameTiming to only return the DisplayMidpointSeconds prediction timing value. All
            other timing information is now available though the thread-safe ovrHmd_GetFrameTiming. The
            ovrHmd_BeginFrameTiming and EndFrameTiming functions were removed.
          • Removed the LatencyTest functions (e.g. ovrHmd_GetLatencyTestResult).
          • Removed the PerfLog functions (e.g. ovrHmd_StartPerfLog), as these are effectively replaced by
            ovrLogCallback (introduced in SDK 0.5).
          • Removed the health-and-safety-warning related functions (e.g. ovrHmd_GetHSWDisplayState). The HSW
            functionality is now handled automatically.
          • Removed support for automatic HMD mirroring. Applications can now create a mirror texture (e.g. with
            ovrHmd_CreateMirrorTextureD3D11 / ovrHmd_DestroyMirrorTexture) and manually display it in a desktop
            window instead. This gives developers flexibility to use the application window in a manner that best suits
            their needs, and removes the OpenGL problem with previous SDKs in which the application back-buffer
            limited the HMD render size.
          • Added ovrInitParams::ConnectionTimeoutMS, which allows the specification of a timeout for ovr_Initialize to
            successfully complete.
          • Removed ovrHmd_GetHmdPosePerEye and added ovr_CalcEyePoses.

          Bugs Fixed Since the Last Release
          The following are bugs fixed since 0.5:

          • HmdToEyeViewOffset provided the opposite of the expected result; it now properly returns a vector to each
            eye's position from the center.
          • If both the left and right views are rendered to the same texture, there is less "bleeding" between the two.
            Apps still need to keep a buffer zone between the two regions to prevent texture filtering from picking
            up data from the adjacent eye, but the buffer zone is much smaller than before. We recommend about 8
            pixels, rather than the previously recommended 100 pixels. Because systems vary, feedback on this matter is
            appreciated.
          • Fixed a crash when switching between Direct and Extended Modes.
          • Fixed performance and judder issues in Extended Mode.

          Known Issues
          The following are known issues:

          • Switching from Extended Mode to Direct Mode while running Oculus World Demo causes sideways
            rendering.
          • Judder with Oculus Room Tiny Open GL examples in Windows 7.
          • The Oculus Configuration Utility can crash when the Demo Scene is repeatedly run.
          • Application usage of CreateDXGIFactory can result in reduced performance; applications should use
            CreateDXGIFactory1 instead. Support for CreateDXGIFactory is deprecated in this release and will be
            removed in a future release.
          • For Windows 7 in Extended Mode, any monitors connected to the computer go black when the headset is
            on and return to normal operation when the headset is removed.
          • For Windows 7 in Extended Mode, if the headset is placed above the monitor(s), all displays might go black.
            The workaround is to place the headset to the right or left of the monitor(s).
          • PC SDK applications will crash if the OVR service is not running.
Oculus Rift | Migrating from SDK 0.5 to SDK 0.6 | 11
Migrating from SDK 0.5 to SDK 0.6
The Oculus SDK 0.6 is significantly different than 0.5.
Texture Sets and Layers
Prior to Oculus SDK 0.6, the Oculus SDK relied on the game engine to create system textures for eye
rendering. To use the SDK, developers stored the API-specific texture pointers into the ovrTexture structure
and passed them into ovrHmd_EndFrame for distortion and display on the Rift. After EndFrame returned, a new
frame was rendered into the texture, repeating the process Oculus SDK 0.6 changes this in two major ways.
The first is by introducing the concept of ovrSwapTextureSet, a collection of textures that are used in
round-robin fashion for rendering. A texture set is basically a swap chain for rendering to the Rift, with
buffers rotated to allow the game rendering to proceed while the current frame is distorted and displayed.
Unlike textures in earlier SDKs, ovrSwapTextureSet and its internal textures must be created by calling
ovrHmd_CreateSwapTextureSetD3D11 or ovrHmd_CreateSwapTextureSetGL. Implementing these functions in
the SDK allows us to support synchronization and properly share texture memory with the compositor process.
For more details on texture sets, we advise reading the “New Features” section on them.
The second is with the introduction of layers. Instead of a single pair of eye-buffers holding all the visual data in
the scene, the application can have multiple layers of different types overlaid on each other. Layers are a large
change to the API, and we advise reading the “New Features” section on them for more details. This part of
the guide gives only the bare minimum instructions to port an existing single-layer app to the new API.
With the introduction of texture sets and layers, you need to make several changes to how your application
handles eye buffer textures in the game engine.
Render Target Creation Code
Previously, the app would have used the API's standard texture creation calls to make render targets for the eye
buffers - either one render target for each eye, or a single shared render target with the eyes side-by-side on it.
Fundamentally the same process happens, but using the ovrHmd_CreateSwapTextureSet function for your API
instead. So the code might have been similar to the following:
D3D11_TEXTURE2D_DESC dsDesc;
dsDesc.Width = size.w;
dsDesc.Height = size.h;
dsDesc.MipLevels = 1;
dsDesc.ArraySize = 1;
dsDesc.Format = DXGI_FORMAT_B8G8R8A8_UNORM;
dsDesc.SampleDesc.Count = 1;
dsDesc.BindFlags = D3D11_BIND_SHADER_RESOURCE | D3D11_BIND_RENDER_TARGET;
DIRECTX.Device->CreateTexture2D(&dsDesc, NULL, &(eye->Tex));
DIRECTX.Device->CreateShaderResourceView(Tex, NULL, &(eye->TexSv));
DIRECTX.Device->CreateRenderTargetView(Tex, NULL, &(eye->TexRtv));
Instead, the replacement code should be similar to the following:
D3D11_TEXTURE2D_DESC dsDesc;
dsDesc.Width = size.w;
dsDesc.Height = size.h;
dsDesc.MipLevels = 1;
dsDesc.ArraySize = 1;
dsDesc.Format = DXGI_FORMAT_B8G8R8A8_UNORM;
dsDesc.SampleDesc.Count = 1;
dsDesc.BindFlags = D3D11_BIND_SHADER_RESOURCE | D3D11_BIND_RENDER_TARGET;
ovrHmd_CreateSwapTextureSetD3D11(hmd, DIRECTX.Device, &dsDesc, &(eyeBuf->TextureSet));
for (int i = 0; i < eyeBuf->TextureSet->TextureCount; ++i)
{
ovrD3D11Texture* tex = (ovrD3D11Texture*)&(eyeBuf->TextureSet->Textures[i]);12 | Migrating from SDK 0.5 to SDK 0.6 | Oculus Rift
DIRECTX.Device->CreateRenderTargetView(tex->D3D11.pTexture, NULL, &(eyeBuf->TexRtv[i]));
}
Note:
The application must still create and track the RenderTargetViews on the textures inside the texture sets
- the SDK does not do this automatically (not all texture sets need to be rendertargets). The SDK does
create ShaderResourceViews for its own use.
Texture sets cannot be multisampled - this is an unfortunate restriction of the way the OS treats these
textures. If you wish to use MSAA eyebuffers, you must create the MSAA eyebuffers yourself as before,
then create matching non-MSAA texture sets, and have each frame resolve the MSAA eyebuffer target
into the respective texture set. See the OculusRoomTiny (MSAA) sample app for more information.
Before shutting down the HMD using ovrHmd_Destroy() and ovr_Shutdown(), make sure to destroy the
texture sets using ovrHmd_DestroySwapTextureSet.
Scene Rendering
Scene rendering would have previously just rendered to the eyebuffers created above. Now, a texture set is a
series of textures, effectively in a swap chain, so a little more work is required. Scene rendering now needs to:
• Increment the value of ovrSwapTextureSet::CurrentIndex, wrapping around to zero if it equals
ovrSwapTextureSet::TextureCount. This makes sure the application is rendering to a new texture, not one
that is currently being displayed.
• Select the right texture or RenderTargetView in the set with the new ovrSwapTextureSet::CurrentIndex.
• Bind that as a rendertarget and render the scene to it, just like existing code.
So previously, for each eye:
DIRECTX.SetAndClearRenderTarget(pEyeRenderTexture[eye]->TexRtv, pEyeDepthBuffer[eye]);
DIRECTX.SetViewport(Recti(eyeRenderViewport[eye]));
The new code looks more like:
ovrSwapTextureSet *sts = &(pEyeRenderTexture[eye]->TextureSet);
sts->CurrentIndex = (sts->CurrentIndex + 1) % sts->TextureCount;
int texIndex = sts->CurrentIndex;
DIRECTX.SetAndClearRenderTarget(pEyeRenderTexture[eye]->TexRtv[texIndex], pEyeDepthBuffer[eye]);
DIRECTX.SetViewport(Recti(eyeRenderViewport[eye]));
Note: The introduction of texture sets does not technically prevent the game from using its own texture
buffers for rendering; an application can use its own buffers and copy the data into the Oculus SDK
textures before submit. However, because this would incur the overhead of copying eye buffers every
frame, we recommend using the SDK-provided buffers whenever possible.
Frame Submission
The game then submits the frame by calling ovrHmd_SubmitFrame and passing in the texture set inside a layer,
which replaces the older ovrHmd_EndFrame function which took two raw ovr*Texture structures. The layer type
that matches the previous eye-buffer behavior is the “EyeFov” layer type - that is, an eyebuffer with a supplied
FOV, viewport, and pose. Additionally, ovrHmd_SubmitFrame requires a few more pieces of information from
the app that are now explicit instead of being implicit. Doing so allows them to dynamically adjusted, and
supplied separately for each layer. The new state required is:Oculus Rift | Migrating from SDK 0.5 to SDK 0.6 | 13
• The viewport on the eyebuffer used for rendering each eye. This used to be stored inside the ovrTexture but
is now passed in explicitly each frame.
• The field of view (FOV) used for rendering each eye. This used to be set/queried at device creation, but is
now passed in explicitly each frame. In this case we still use the default that the SDK recommended, which is
now returned in ovrHmdDesc::DefaultEyeFov[]
So previously the code read:
ovrD3D11Texture eyeTexture[2];
for (int eye = 0; eye < 2; eye++)
{
eyeTexture[eye].D3D11.Header.API = ovrRenderAPI_D3D11;
eyeTexture[eye].D3D11.Header.TextureSize = pEyeRenderTexture[eye]->Size;
eyeTexture[eye].D3D11.Header.RenderViewport = eyeRenderViewport[eye];
eyeTexture[eye].D3D11.pTexture = pEyeRenderTexture[eye]->Tex;
eyeTexture[eye].D3D11.pSRView = pEyeRenderTexture[eye]->TexSv;
}
ovrHmd_EndFrame(HMD, EyeRenderPose, &eyeTexture[0].Texture);
This is replaced with the following.
ovrLayerEyeFov ld;
ld.Header.Type = ovrLayerType_EyeFov;
ld.Header.Flags = 0;
for (int eye = 0; eye < 2; eye++)
{
ld.ColorTexture[eye] = pEyeRenderTexture[eye]->TextureSet;
ld.Viewport[eye] = eyeRenderViewport[eye];
ld.Fov[eye] = HMD->DefaultEyeFov[eye];
ld.RenderPose[eye] = EyeRenderPose[eye];
}
ovrLayerHeader* layers = &ld.Header;
ovrResult result = ovrHmd_SubmitFrame(HMD, 0, nullptr, &layers, 1);
The slightly odd-looking indirection through the variable “layers” is because this argument to
ovrHmd_SubmitFrame would normally be an array of pointers to each of the visible layers. Since there is only
one layer in this case, it's not an array of pointers, just a pointer.
Other SDK Changes
Before you begin migration, make sure to do the following:
• #include “OVR_CAPI_Util.h” and add OVR_CAPI_Util.cpp and OVR_StereoProjection.cpp to your project so
you can use ovr_CalcEyePoses(..).
• Allocate textures with ovrHmd_CreateSwapTextureSetD3D11(..) instead of
ID3D11Device::CreateTexture2D(..) and create multiple textures as described above.
In this release, there are significant changes to the game loop. For example, the ovrHmd_BeginFrame function
is removed and ovrHmd_EndFrame is replaced by ovrHmd_SubmitFrame . To update your game loop:
1. Replace calls to ovrHmd_GetEyePoses(..) with ovr_calcEyePoses(..):
ovrTrackingState state;
ovrHmd_GetEyePoses(m_hmd, frameIndex, m_offsets, m_poses, &state);
becomes:
ovrFrameTiming timing = ovrHmd_GetFrameTiming(m_hmd, frameIndex);
ovrTrackingState state = ovrHmd_GetTrackingState(m_hmd, timing.DisplayMidpointSeconds);14 | Migrating from SDK 0.5 to SDK 0.6 | Oculus Rift
ovr_CalcEyePoses(state.HeadPose.ThePose, m_offsets, poses);
2. Replace calls to ovrHmd_ConfigureRendering(..) with ovrHmd_GetRenderDesc(..) as described above:
ovrBool success = ovrHmd_ConfigureRendering(m_hmd, &apiConfig, distortionCaps, m_fov, desc);
becomes:
for (int i = 0; i < ovrEye_Count; ++i)
desc[i] = ovrHmd_GetRenderDesc(m_hmd, (ovrEyeType)i, m_fov[i]);
3. Swap the target texture each frame. Instead of rendering to the same texture or pair of textures each frame,
you need to advance to the next texture in the ovrSwapTextureSet:
sts->CurrentIndex = (sts->CurrentIndex + 1) % sts->TextureCount;
camera->SetRenderTarget(((ovrD3D11Texture&)sts->Textures[ts->CurrentIndex]).D3D11.pTexture);
4. Remove calls to ovrHmd_BeginFrame(..).
5. Replace calls to ovrHmd_EndFrame(..) with ovrHmd_SubmitFrame(..):
ovrHmd_EndFrame(m_hmd, poses, textures);
becomes:
ovrViewScaleDesc viewScaleDesc;
viewScaleDesc.HmdSpaceToWorldScaleInMeters = 1.0f;
ovrLayerEyeFov ld;
ld.Header.Type = ovrLayerType_EyeFov;
ld.Header.Flags = 0;
for (int eye = 0; eye < 2; eye++)
{
viewScaleDesc.HmdToEyeViewOffset[eye] = m_offsets[eye];
ld.ColorTexture[eye] = m_texture[eye];
ld.Viewport[eye] = m_viewport[eye];
ld.Fov[eye] = m_fov[eye];
ld.RenderPose[eye] = m_poses[eye];
}
ovrLayerHeader* layers = &ld.Header;
ovrHmd_SubmitFrame(m_hmd, frameIndex, &viewScaleDesc, &layers, 1);
Note:
Please refer to OculusRoomTiny source code for an example of how ovrTextureSets can be used to
submit frames in the updated game loop.
ovrHmd_SubmtiFrame on success can return a couple different values. ovrSuccess means distortion
completed successfully and was displayed to the HMD. ovrSuccess_NotVisible means the frame
submission succeeded but that what was rendered was not visible on the HMD because another VR app
has focus. In this case the application should skip rendering and resubmit the same frame until submit
frame returns ovrSuccess rather than ovrSuccess_NotVisible.Oculus Rift | Migrating from SDK 0.5 to SDK 0.6 | 15
The 0.6 simplifies the PC SDK, so you can remove a lot of functions that are no longer needed. To remove
functions:
1. Remove calls to ovrHmd_AttachToWindow(..).
2. Remove calls to ovrHmd_DismissHSWDisplay(..).
3. Remove calls to ovrHmd_GetHSWDisplayState(..).
4. Remove all references to ovrTextureHeader::RenderViewport and use your own per-texture ovrRecti
viewports.
Now that you have finished updating your code, you are ready to test the results. To test the results:
1. With the HMD in a resting state, images produced by 0.6 should match ones produced by 0.5.
2. When wearing the HMD, head motion should feel just as responsive as before, even when you twitch your
head side-to-side and up-and-down.
3. Use the DK2 latency tester to confirm your render timing has not changed.16 | Oculus Rift Hardware Setup | Oculus Rift
Oculus Rift Hardware Setup
Because VR is a new medium, you will need to do a lot of testing during development. Before installing the
SDK, Oculus recommends making sure the hardware is correctly configured and tested. If the Rift is already
configured, you can skip this section.
Oculus Rift DK2
Instructions for setting up DK2 hardware are provided in the Quick Start Guide that shipped with the device.
Figure 1: The Oculus Rift DK2
The DK2 headset incorporates a number of significant improvements over the DK1:
• Higher Resolution and Refresh Rate—1920x1080 (960x1080 per eye) resolution and a maximum refresh of
75Hz.
• Low Persistence OLED Display—helps reduce motion blur and judder, significantly improving image
quality and reducing simulator sickness.
• Positional Tracking—precise low latency positional tracking ensures all head motion is tracked.
• Built-in Latency Tester—constantly measures system latency to optimize motion prediction and reduce
perceived latency.
Additional instructions are provided in the Oculus User Guide, which is available at http://
developer.oculusvr.com.Oculus Rift | Oculus Rift Hardware Setup | 17 Oculus Rift DK1 Instructions for setting up DK1 hardware are provided in the Oculus Rift Development Kit manual that shipped with the device. Figure 2: The Oculus Rift DK1 Additional instructions are provided in the Oculus User Guide, which is available at http:// developer.oculusvr.com.
18 | Oculus Rift Driver Setup | Oculus Rift

           Oculus Rift Driver Setup
           Before you can use the SDK, you must set up the drivers for your operating system.

           If your drivers are already set up, you can skip this section. This content repeats the instructions in the Oculus
           Rift User Guide.

           Installing the Runtime Package
           If you do not have it yet, download the Oculus Runtime Installer from the Oculus website.

           The Runtime is available from https://developer.oculus.com/downloads/.
           This will install the following components:

           • Oculus Display Driver (Windows Only)
           • Oculus Positional Tracking Sensor Driver
           • Oculus Service Application
           • Oculus System Tray Application and Configuration Utility

           Windows
           This section describe how to install the Windows Runtime Package.

           To install the package:

           1. Download the runtime from https://developer.oculus.com/downloads/.
           2. In the Windows Control Panel, go to Programs -> Programs and Features and uninstall any existing
              components.
           3. Run the install executable found in this package. This will install all the components described above and
              prompt you to restart your computer.
           4. Restart your computer.

           Mac
           This section describe how to install the Mac Runtime Package.

           To install the package:
           1. Download the runtime from https://developer.oculus.com/downloads/.
           2. Run the installer application found inside the package. This will install all components described above for
              the current user only. You must run the installer for each user that wants to use the Rift.
           3. Since the MacOS does not currently support direct rendering, you must adjust your display settings to rotate
              the display by 90 degrees for the Oculus Rift DK2. The display settings are located in System Preferences ->
              Displays. Additionally, consider disabling display mirroring via the Mirror Displays check box on the display
              adjustment tab.
           4. If you want to remove the Runtime package for the current user, run the provided Uninstaller or run the
              OculusDirectory/Agent/uninstallAgent.sh shell script from the command line.
Oculus Rift | Display Setup | 19 Display Setup Now that the drivers are installed, you are ready to configure the display settings. Monitor Previously, when the Rift was connected to your computer it would be automatically recognized and managed as an additional monitor. With the introduction of the Oculus Display Driver, this is no longer necessary. However, you can revert to the old mode through the Rift Display Mode control panel by selecting the Extend Desktop or DK1 Legacy App Support modes. You can open the display mode control panel by double-clicking the Oculus system tray icon. When in the Extend Desktop legacy mode, the Rift appears as an additional monitor and you should make sure it is configured properly within the Operating System display settings. The Oculus DK1 can be set to either mirror or extend your current desktop monitor setup, while with DK2 is not set up for mirroring. We recommend using the Rift as an extended monitor in most cases, but it is up to you to decide which configuration works best. This is covered in more detail later. When configuring the Rift as a display for DK1, you should set the resolution to 1280 * 800. For the DK2, the resolution should be set to 1920 * 1080 (it might appear as 1080 * 1920) and it might be necessary to manually change the orientation to horizontal. The following figure shows the DK2 correctly configured in extended display mode in Windows. Figure 3: Extended Display Mode
20 | Display Setup | Oculus Rift
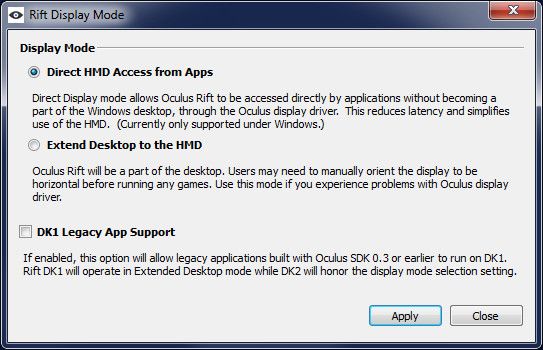
Rift Display Mode
The Rift Display Mode dialog box enables you to change the display mode for development and to run
different types of applications.
The following figure shows the dialog box:
Figure 4: Rift Display Mode Dialog Box
Select from the following:
• Direct HMD Access from Apps—this is the recommended mode. Rifts connected to the PC will not appear
as additional monitors and will be automatically used by Rift-enabled applications.
• Extend Desktop to the HMD—this is provided for debugging purposes in the event that there are problems
with the Direct HMD Access mode.
The dialog box also includes a DK1 Legacy App Support check box. When selected, DK1 owners can run Rift-
enabled applications built with the legacy Oculus SDK 0.3.1 or earlier; it does not permit these applications to
run on DK2 devices. Make sure to disable it for Rift-enabled apps built with Oculus SDK 0.4.1 or newer.
This panel is also available from within the Oculus Configuration Utility under the Tools menu.
Note: MacOS currently runs in extended mode; the direct and extended mode options are disabled.
Updating the DK2 Headset Firmware
Although the DK2 headset ships with firmware version 2.10, it must be updated to the latest firmware version.
To update the firmware:
1. Connect your DK2 and make sure that it shows up as connected in the Oculus Configuration Utility
2. Select Tools > Advanced > Update Firmware...
You are prompted to select a file.
3. Select a file (e.g., Firmware/DK2/DK2Firmware_2_12.ovrf).
The firmware begins updating.
4. After the update finishes, shut down and restart the Oculus Configuration Utility.Oculus Rift | Display Setup | 21 The update is complete.
22 | Getting Started | Oculus Rift
Getting Started
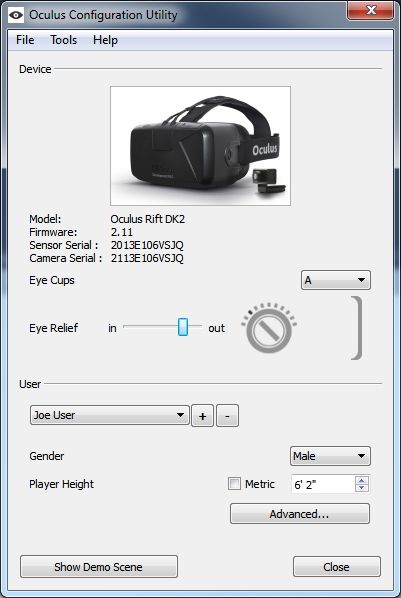
The Oculus Configuration Utility enables you to configure Oculus headsets and to generate device and user
profiles.
For added comfort, performance, and immersion, profiles enable users to personalize the VR experience across
all Rift-enabled applications. While a reasonable default experience is supplied by the Oculus SDK, Oculus
highly recommends that users use the Oculus Configuration Utility to fine-tune their own personal experience.
The following figure shows the main screen of the Oculus Configuration Utility. The top section contains Device
settings, and the bottom section contains User settings. You should see an image of your Rift. If not, plug it in
and turn it on.
Figure 5: Oculus Configuration Utility
The first time you run the Oculus Configuration Utility, create and configure a user profile.
To create a user profile, click + and type a username. Then, configure the settings. Any changes are
automatically saved.
Device settings
Device settings are part of each user profile; they describe a user's preferred hardware settings while wearing
the headset.
The following settings can be changed:
• Eye Cups—specifies the lenses that ship with the Oculus Rift; each type has a different height and focal
length. The number of lenses included varies depending on the Rift model. The DK1 ships with three types
(A, B, and C) while DK2 ships with two (A and B). In each case, the A type is pre-installed at the factory
and is designed for people with normal vision. Nearsighted users might prefer the B or C type. The Oculus
Configuration Utility should be set to each user's preferred type.
Note: Oculus recommends the use of the A cups unless the other cups give you a clearer image and
better experience.Oculus Rift | Getting Started | 23 • Eye Relief—the distance between surface of the lens and the user's eye (cornea). The Rift headset has a dial on either side of it that can be adjusted with a coin to lengthen or shorten this distance. Each user should experiment with this setting to find a distance that is comfortable. The Eye Relief slider in the Oculus Configuration Utility should be adjusted to match the dial setting on the hardware. The wheel and face-plate icons depict the right hand side of a headset that is facing to the right. The slider control can be used to turn the wheel. ``In'' refers to the setting where the lenses are closest to your eyes, and ``out'' refers to setting where they are farthest. User Settings User settings contain the physical characteristics of each person using the Rift, to customize the experience. It is important to set these correctly. Carefully tuning these values will increases and can lead to a better sense of presence. • Gender—adjust various body size parameters based on population statistics (optional). Applications can also use this parameter to set the gender of the player avatar. • Player Height—the height of the user. The height can be specified in either metric or standard units by selecting or clearing the Metric check box. Developers are encouraged to use this value to set the player avatar to the same height as the user's actual height and to set the cameras to the appropriate eye height. This leads to a familiar sense of size and embodiment when in VR. Advanced Settings Advanced settings can greatly improve the quality of the VR experience, but they are a bit more subtle than the basic settings and require a deeper level of understanding and patience to set properly. Advanced settings include: • Eye To Neck Distance—the Oculus SDK implements a neck model to simulate positional movement of the eyes as you turn your head while wearing a DK1. For example, if you nod your head up and down the center of rotation of the eyes is not at a point on your nose but at a point in your spine called the neck pivot. The vector between the neck pivot and the center of your eyes is defined by a vertical and horizontal distance. The vertical distance is approximately the distance from the corner of your eye to the bottom of your jaw. The horizontal distance is approximately the distance from the corner of your eye to the middle of your ear. These can serve as decent starting points, but each person is different and you should experiment in VR with different lengths to find values that feel correct. Since DK2 uses positional tracking, these parameters are not relevant for DK2 users. • Eye Position—the position of each eye with respect to the lens of the current device type (it is maintained separately for DK1 and DK2 should you own both). • IPD—the interpupillary distance (IPD) is the lateral distance between the pupils of each eye. This value can be measured by an optometrist or by hand and set directly. • Eye Relief—the distance between the headset lens and the cornea. This distance is defined both by the facial structure of the user, as well as the eye relief dial on the side of the headset. Adjusting the Eye Relief control on the main window will change this value. • Measure—a visual tool that is used to estimate the exact position of each eye and calculate the IPD and Eye Relief values. It requires that the user put on the headset and move vertical green lines to find the edge of their visible field of view. It measures each eye independently. It can detect and handle asymmetries in eye position. • Personalized Rendering—Many of the profile settings are designed to modify aspects of the rendering and provide a personalized visual experience. You can disable this feature by clearing the Enable Personalized
24 | Getting Started | Oculus Rift

              Rendering check box. When disabled, several of the profile settings will be ignored and a default generic
              rendering mode is used instead.
Oculus Rift | Testing the Rift using the Demo Scene | 25
Testing the Rift using the Demo Scene
After you have configured your user profile, you can view a sample VR scene that uses these settings.
The following figure shows the demo scene:
Figure 6: Demo Scene
To test the settings:
1. Sit comfortably in front of the keyboard and mouse.
2. Click Show Demo Scene and put on the headset.
A menu appears in front of you. If it does not appear, your real world forward direction isn't aligned with the
forward direction in the scene. To realign the forward direction, press the spacebar.
3. Click the Start button with the mouse.
A single room with familiar objects appears to give a sense of familiarity and scale.
4. Experiment with the following options:
• Recenter with the mouse—adjusts the scene for your nominal position.
• Show Camera Bounds—displays black lines showing the range and field of view of the Positional
Tracking Sensor. Adjust the sensor so the red line in the center is aimed at your face. Click Recenter (or
press the spacebar) until you are comfortably sitting in the center of the Sensor field of view. Then, turn
the tracker bounds off.
• Stamd—adjusts the VR view to a standing height.
5. If this scene does not feel natural or the scale of objects seems incorrect, consider using the advanced
settings. The Configuration Utility controls are duplicated in the demo scene, so you do not need to exit the
scene to change those settings.
6. When you are done viewing this scene, press the Esc key.26 | Getting Started with the SDK | Oculus Rift
Getting Started with the SDK
Now that your Oculus Rift is plugged in and the drivers are installed, you are ready to install the SDK and try
the demos.Oculus Rift | Oculus Rift SDK Setup | 27
Oculus Rift SDK Setup
This section describes how to set up the SDK.
Installation
The latest version of the Oculus SDK is always available from the Oculus Developer Center.
To download the latest package, go to http://developer.oculusvr.com.
SDK versions use a product.major.minor.patch format. For example, 0.5.0.1 means Product 0, Major 5, Minor 0,
Patch 1.
Note: The instructions in this section assume you have installed the Oculus Rift and Oculus runtime
package.
Directory Structure
The directory structure of the Oculus SDK package is straightforward.
It uses the following directory structure:
3rdParty—third party SDK components used by samples, such as TinyXml.
Doc—SDK Documentation, including this document.
Firmware—firmware files for the Oculus tracker.
LibOVR—libraries, source code, projects, and makefiles for the SDK.
LibOVR/Include—public include header files, including OVR.h.
LibOVR/Lib—pre-built libraries for use in your project.
LibOVR/Src—source code and internally referenced headers.
Samples—samples that integrate and leverage the Oculus SDK.
Tools—configuration utility.
Compiler Settings
The LibOVR libraries do not require exception handling or RTTI support.
Your game or application can disable these features for efficiency.
Makefiles, Projects, and Build Solutions
Developers can rebuild the samples and LibOVR using the projects and solutions in the Samples and LibOVR/
Projects directories.28 | Oculus Rift SDK Setup | Oculus Rift
Windows
Solutions and project files for Visual Studio 2010, 2012 and 2013 are provided with the SDK. Samples/
Projects/Windows/VSxxxx/Samples.sln, or the 2012/2013 equivalent, is the main solution that allows
you to build and run the samples, and LibOVR itself.
MacOS
The included Xcode workspace Samples/Projects/Mac/Samples.xcworkspace allows you to build and
run the samples, and LibOVR itself. The project is configured to build universal binaries (x86 and x86\_64) for all
recent MacOS versions (10.8 and newer).
Linux (Experimental)
A makefile is provided in the root folder that allows you to build LibOVR and the OculusWorldDemo sample.
The code is dependent on the udev and Xinerama runtime components. As a result, you must install the
relevant packages before building. You must also install a udev/rules.d file to set the correct access
permissions for Oculus HMD devices.
These steps can be performed by executing the provided script ConfigurePermissionsAndPackages.sh,
located in the root folder of the SDK.
Terminology
You should familiarize yourself with these terms, which are frequently used in the rest of this document.
Head-mounted display (HMD) A general term for any VR device such as the Rift.
Interpupillary distance (IPD) The distance between the eye pupils. The default
value in the SDK is 64 millimeters, which corresponds
to the average human distance, but values between
54 and 72 millimeters are possible.
Field of view (FOV) The full vertical viewing angle used to configure
rendering. This is computed based on the eye
distance and display size.
Tan Half FOV The tangent of half the FOV angle. Thus a FOV of
60 degrees has a half-FOV of 30 degrees, and a tan-
half-FOV value of tan(30) or 0.577. Tan half FOV is
considered a more usable form in this use case than
direct use of FOV angles.
Aspect ratio The ratio of horizontal resolution to vertical resolution.
The aspect ratio for the Oculus Rift DK2 is 1920x1080
(960 x 1080 per eye or 0.89). The aspect ratio for each
eye on the Oculus Rift DK1 is 640/800 or 0.8.
Multisampling Hardware anti-aliasing mode supported by many
video cards.Oculus Rift | Getting Started with the Demos | 29
Getting Started with the Demos
Now that the Rift is plugged in, the drivers are installed, and the SDK is installed, you are ready to begin using
the SDK.
Note: If you haven’t already, take a moment to adjust the Rift headset so that it’s comfortable for your
head and eyes. More detailed information about configuring the Rift can be found in the Oculus Rift
Hardware Setup this guide.
After the hardware is configured, the next step is to test the development kit. The SDK comes with a set of full-
source C++ samples designed to help you get started quickly. These include:
• OculusWorldDemo—A visually appealing scene with on-screen text and controls.
• OculusRoomTiny— A minimal C++ sample showing sensor integration and rendering on the Rift (only
available for D3DX platforms as of 0.4. Support for GL platforms will be added in a future release).
Getting Started
Oculus recommends running the pre-built OculusWorldDemo to explore the SDK. You can find a link to the
executable file in the root of the Oculus SDK installation.
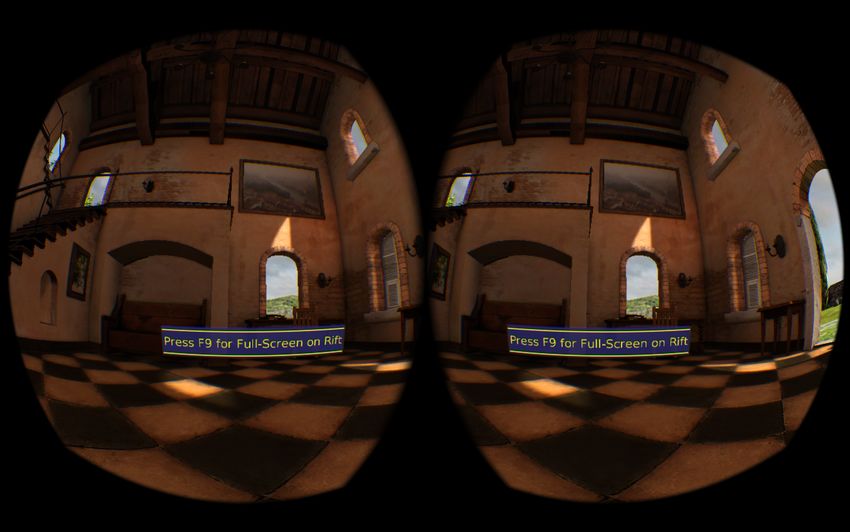
The following is a screenshot of the OculusWorldDemo application:
Figure 7: OculusWorldDemo Application
OculusWorldDemo Controls
The OculusWorldDemo uses a mix of standard and specialized controls.
The following table describes keys and devices that you use for movement:30 | Getting Started with the Demos | Oculus Rift
Table 1: Movement
Key or Input Movement
W, S Move forward, back
A, D Strafe left, right
Mouse Look left, right
Left gamepad stick Move
Right gamepad stick Turn
The following table describes keys that you use for functions:
Table 2: Functions
Key(s) Function
F4 Multisampling toggle
F7 Mono/stereo view mode toggle
F9 Hardware full-screen (low latency) *
F11 Windowed full-screen (no blinking) *
E Motion relative to head/body
R Reset sensor orientation
Esc Cancel full-screen
-, + Adjust eye height
L Adjust fourth view value
Tab Options Menu
Spacebar Toggle debug info overlay
T Reset player position
Ctrl+Q Quit
G Cycle grid overlay mode
U, J Adjust second view value
I, K Adjust third view value
; Cylce rendered scenes
+Shift Adjust values quickly
O Toggle Time-Warp
C Toggle FreezeEyeUpdate
V Toggle Vsync
* Only relevant in Extend Desktop display mode.
OculusWorldDemo Usage
Once you’ve launched OculusWorldDemo, you should see a window on your PC monitor similar to the previous
screenshot.Oculus Rift | Getting Started with the Demos | 31 Depending on the settings chosen in the Display Mode dialog of the Oculus system tray, you might also see the image displayed inside the Rift. If it is set to Direct Display, the Oculus display driver manages the Oculus Rift and will automatically display the rendered scene. If Extended Desktop is selected or you are using a DK1 and the DK1 Legacy Support check box is selected, the Oculus Rift display uses extended desktop mode. In this case, you should press F9 or F11 to switch rendering to the Oculus Rift as follows: • F9— switches to hardware full-screen mode. This will give best possible latency, but may blink monitors as the operating system changes display settings. If no image shows up in the Rift, then press F9 again to cycle to the next monitor. • F12—Instantly switches the rendering window to the Rift portion of the desktop. This mode has higher latency and no vsync, but is convenient for development. If you’re having problems (for example, no image in the headset, no head tracking, and so on), please view the Developer Forums. When the image is correctly displayed inside the Rift then take a moment to look around in VR and double- check that all of the hardware is working properly. If you’re using a DK2 then you should be able to see that physical head translation is now also recreated in the virtual word as well as rotation. Important: If you need to move the DK2 tracker for any reason after initial calibration, be sure to minimize the movement of the HMD for a few seconds while holding it within the tracking frustum. This will give the system chance to recalibrate the tracker pose. If you would like to explore positional tracking in more detail, you can press the semicolon (;) key to bring the “sea of cubes” field that we use for debugging. In this mode, cubes are displayed that allow you to easily observe positional tracking behavior. Cubes are displayed in red when head position is being tracked and in blue when sensor fusion falls back onto the head model. There are a number of interesting things to take note of the first time you experience OculusWorldDemo. First, the level is designed to scale. Thus, everything appears to be roughly the same height as it would be in the real world. The sizes for everything, including the chairs, tables, doors, and ceiling, are based on measurements from real world objects. All of the units are measured in meters. Depending on your actual height, you may feel shorter or taller than normal. The default eye height of the player in OculusWorldDemo is 1.61 meters (approximately the average adult eye height), but this can be adjusted using the using the ‘+’ and ‘-’ keys. Alternatively, you can set your height in the Oculus Configuration Utility (accessed through the Oculus System Tray Icon). OculusWorldDemo includes code that shows how to use values set in the player’s profile such as eye height, IPD, and head dimensions, and how to feed them into the SDK to achieve a realistic sense of scale for a wide range of players. The scale of the world and the player is critical to an immersive VR experience. More information about scale is available in the Oculus Best Practices Guide. Next Steps After trying the OculusWorldDemo, there are other samples and tools. Software Developers and Integration Engineers If you’re integrating the Oculus SDK into your game engine, Oculus recommend starting with the sample projects. Open the following projects, build them, and experiment with the provided sample code: • Samples/Projects/Windows/VSxxxx/Samples.sln • Samples/Projects/Mac/Samples.xcworkspace
32 | Getting Started with the Demos | Oculus Rift

          OculusRoomTiny
          This is a good place to start, because its source code compactly combines all critical features of the Oculus
          SDK. It contains logic necessary to initialize LibOVR core, access Oculus devices, use the player’s profile,
          implement head-tracking, sensor fusion, stereoscopic 3D rendering, and distortion processing.

          Figure 8: OculusRoomTiny

          OculusWorldDemo
          This is a more complex sample. It is intended to be portable and support many more features. These include
          windowed/full-screen mode switching, XML 3D model and texture loading, movement collision detection,
          adjustable view size and quality controls, 2D UI text overlays, and so on.

          This is a good application to experiment with after you are familiar with Oculus SDK basics. It also includes and
          overlay menu with options and toggles that customize many aspects of rendering including FOV, render target
          use, timewarp and display settings. Experimenting with these options may provide developers with insight into
          what the related numbers mean and how they affect things behind the scenes.

          Beyond experimenting with the provided sample code, Oculus recommends reading the rest of this guide. It
          covers LibOVR initialization, head-tracking, rendering for the Rift, and minimizing latency.

          Artists and Game Designers
          If you’re integrating the Oculus SDK into your game engine, Oculus recommends starting with the sample
          projects.

          If you’re an artist or game designer unfamiliar with C++, we recommend downloading UE3, UE4 or Unity along
          with the corresponding Oculus integration. You can use our out-of-the-box integrations to begin building
          Oculus-based content immediately.

          The Unreal Engine 3 Integration Overview document and the Unity Integration Overview document,
          available from the Oculus Developer Center, detail the steps required to set up your UE3/Unity plus Oculus
          development environment.

          We also recommend reading through the Oculus Best Practices Guide, which has tips, suggestions, and
          research oriented around developing great VR experiences. Topics include control schemes, user interfaces,
Oculus Rift | Getting Started with the Demos | 33 cut-scenes, camera features, and gameplay. The Best Practices Guide should be a go-to reference when designing your Oculus-ready games. Aside from that, the next step is to start building your own Oculus-ready game or application. Thousands of other developers are out building the future of virtual reality gaming. To see what they are talking about, go to developer.oculusvr.com/forums. To see what they are building, go to share.oculus.com.
You can also read