Wells, Fargo & Company 1861 Pony Express Issues - SCOTT R. TREPEL Published by Robert A. Siegel Auction Galleries, Inc.
←
→
Page content transcription
If your browser does not render page correctly, please read the page content below
Wells, Fargo & Company
1861 Pony Express Issues
        SCOTT R. TREPEL

             Published by
Robert A. Siegel Auction Galleries, Inc.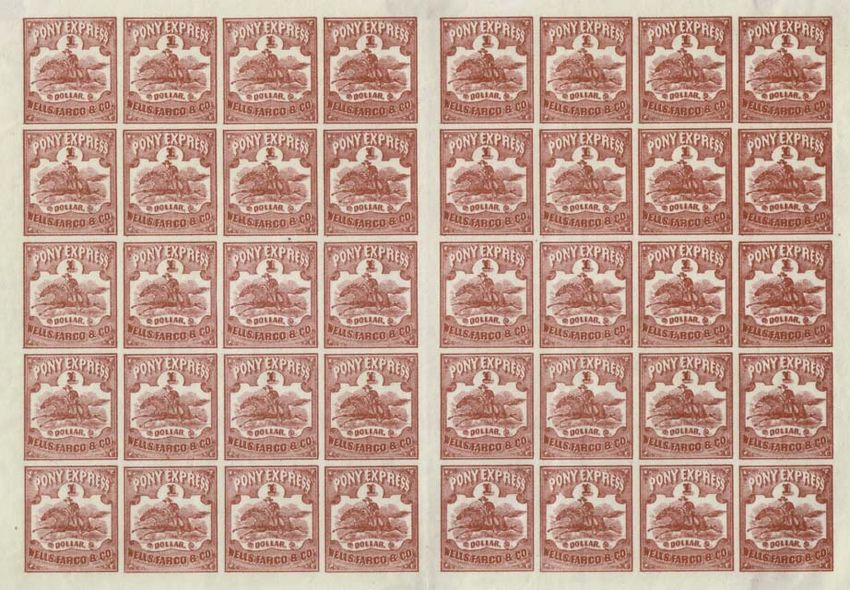
Wells, Fargo & Company
     1861 Pony Express Issues

            SCOTT R. TREPEL

               Published by
ROBERT A. SIEGEL AUCTION GALLERIES, INC.
Copyright © 2005 by Scott R. Trepel
              Printed in the United States

                   All rights reserved.
 This work may not be reproduced or electronically stored
in any form without written permission from the publisher.

                        Publisher:
         Robert A. Siegel Auction Galleries, Inc.
             60 East 56th Street, 4th Floor
              New York, New York 10022
                  Tel. (212) 753-6421
                  Fax (212) 753-6429
          e-mail: strepel@siegelauctions.com

             AUCTION GALLERIES, INC.
             www.siegelauctions.com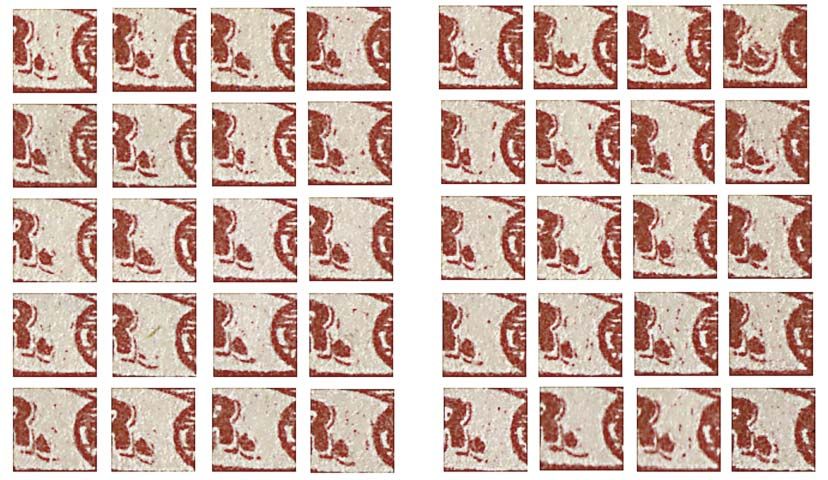
WELLS, FARGO & COMPANY 1861 PONY EXPRESS ISSUES
                                                        SCOTT R. TREPEL
  This treatise has three objectives. The first is to explain when and why the Wells, Fargo & Company’s Pony
Express stamps were issued. The second is to explain how the printing plates were prepared. The third is to identify
the features that make it possible to assign any given stamp to its original position in the sheet. Other authors have
concentrated their attention on the historical aspects of the Pony Express,1 while the technical aspects of the stamps
themselves have been generally ignored. Years ago, Elliott Perry published a plating study of the $2 and $4 Pony
Express stamps,2 but its usefulness is undermined by poor photos and the absence of plating details for the $1 stamp.
The Nathan-Boggs book devotes one chapter to plating,3 but it is fundamentally incorrect and should be ignored. Now,
144 years after the Pony Express stamps were issued, it is time to fill this void with a detailed guide to plating.
                                Wells, Fargo & Company’s Role in Issuing Stamps
The original owners and operators of the Pony Express were three experienced expressmen, William H. Russell,
Alexander Majors and William Waddell, who controlled The Central Overland California & Pikes Peak Express
Company (Central Overland). The company needed to win a lucrative government subsidy and launched the Pony
Express in April 1860 to promote the efficacy of the Central Route to members of the 36th Congress while they
were deliberating the Overland Mail contract.
The advertised Pony Express trip was ten days, although in reality many trips took 12 to 13 days, and sometimes
longer during the winter months. By linking with telegraph lines at the terminus stations, the Pony Express could
convey a message between coasts in as few as ten days. Compared with normal 21-23 day travel time by other
routes, this great leap forward in communication speed had practical benefits, but it was also part of Central
Overland’s public relations and lobbying strategy for winning the mail contract. Their efforts to convince Congress
to move the Overland Mail route to the Central Route in July 1860 were unsuccessful.
The failure to secure a significant mail subsidy in 1860 and the cost of operating the Pony Express pushed Russell,
Majors and Waddell to the brink, and in January 1861 they entered bankruptcy. Control of Central Overland went
to one of its major creditors, Ben Holladay, who continued operating the company as a separate entity.
In March 1861 the Overland Mail Company was authorized by Congress to run the Overland Mail route over the
Central Route (effective July 1). The contract also included the Pony Express. Effective April 1861, a three-way
arrangement between the Overland Mail Company, Central Overland and Wells, Fargo & Company evidently estab-
lished Wells Fargo as managing agents of the Pony Express, with Central Overland maintaining operations between
the terminus points.4 The circumstances in which the Pony Express stamps were issued explain why Wells Fargo’s
name appears in the designs.
                                        Pony Express Rates and Stamps
The 19-month period of operation of the Pony Express can be divided into four rate periods, as shown in the
table below. The reason for the different Westbound and Eastbound dates during the First, Second and Third Rate
Periods is the two-week delay in transmitting news of the rate changes from the home office in St. Joseph,
Missouri, to the offices in California. The Fourth Rate Period coincides with the commencement date of the
government contract, which was known well in advance of July 1 at both ends of the operation.

  Period           Rate                                Eastbound                                  Westbound
  First            $5.00 per half-ounce                April 3 to August 14, 1860                 April 3 to July 30, 1860
  Second           $2.50 per quarter-ounce             August 15, 1860, to April 14, 1861         July 31, 1860, to March 31, 1861
  Third            $2.00 per half-ounce                April 15 to June 30, 1861                  April 1 to June 30, 1861
  Fourth           $1.00 per half-ounce                July 1 to October 26, 1861                 July 1 to October 31, 1861

  1  Notably and most recently, The Pony Express; A Postal History, by Walske, Kramer and Frajola.
  2  The American Philatelist (October 1963, Vol. 77, No. 1 and October 1965, Vol. 79, No. 1).
   3 Nathan, M.C., and Boggs, W. S., The Pony Express, The Collectors Club of New York, 1962, pp. 77-83.
   4 “The authors have inferred the existence of this contract from the published notices and advertisements of
the period, in which the respective parties describe their roles.” The Pony Express; A Postal History, p. 50

                                                                   –1–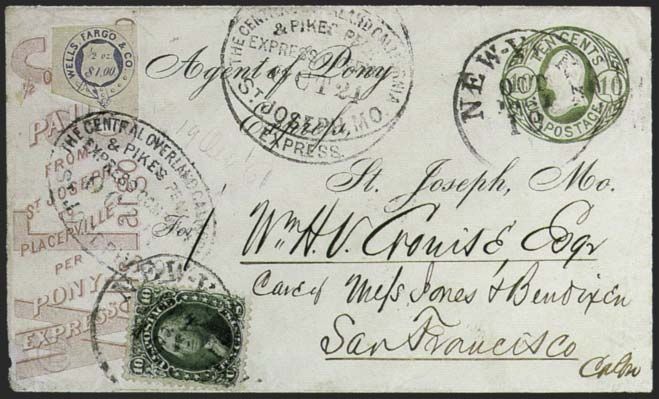
Figure 1 Figure 2
The $2 Red and $4 Green Horse and Rider stamps issued by Wells Fargo in April 1861 for the new rates.
The Pony Express stamps and franked envelopes were created to meet the rate requirements of the Third and
Fourth Periods. There were six adhesive stamps in total: the April 1861 (Third Period) and July 1861 (Fourth
Period) Horse and Rider issues for use on eastbound mail and the August 1861 (Fourth Period) “Garter” stamp for
westbound mail. Two franked Pony Express envelopes were issued for westbound mail: the April 1861 (Third
Period) Type I frank and August 1861 (Fourth Period) Type II frank. The Horse and Rider issues will be discussed
first, followed by the Eastern “Garter” stamp and franked envelopes.
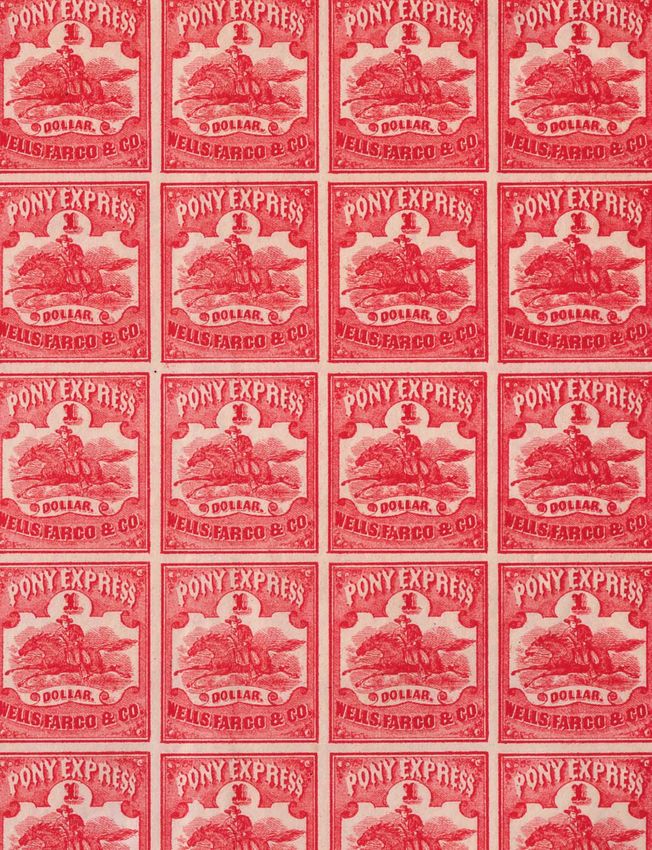
The April 1861 Horse and Rider issue comprised two stamps, the $2 Red and $4 Green, corresponding to the
single and double rates—see Figures 1 and 2). The earliest documented use of the April 1861 issue is a $2 cover
datestamped at Placerville on April 28, 1861 (a way usage on April 27 trip—not shown here).
The July 1861 issue added a $1 denomination for the new rate specified in the government contract. The Post
Office Order of March 12, 1861 (effective July 1), to the Overland Mail Company, specifically mandated Pony
Express service and the $1.00 rate:
“...And to be required also during the continuance of their Contract, or until completion of The Overland telegraph, to run
a Pony Express semi-weekly at a Schedule time of ten days eight months of the year and twelve days four months of the
year, and to convey for the Government free of charge five pounds of Mail Matter; with liberty of charging the public for
transportation of letters by said express not exceeding One dollar per half ounce...”5
The $1 was issued in a Red color similar to the $2 First Issue, while the $2 was re-issued in Green and the $4 in
Black (see Figures 3, 4 and 5). This color scheme indicates that Red was the designated color for a single rate and
Green for a double rate in both the Third and Fourth Rate Periods. An example of the $1 Red used on the first trip
under the new contract (July 3, 1861) is shown in Figure 6. The stamp paid the $1.00 Pony Express rate, while the
printed frank paid Wells Fargo’s separate 10c express charge for transport to the Placerville Pony terminus, and the
U.S. embossed stamp paid the required 10c government postage.
This strict adherence to a color scheme is one of several pieces of circumstantial evidence suggesting that Wells
Fargo may have intended to have their agents affix the stamps to envelopes as franks, rather than sell them to the
public in sheets. That scenario would fit the pattern established by the sale of their franked postal envelopes. Other
Figure 3 Figure 4 Figure 5
The $1 Red, $2 Green and $4 Black Horse and Rider stamps issued by Wells Fargo in July 1861 for new rates
under the official government contract. The Red single-rate and Green double-rate color scheme continued.
5 The Pony Express; A Postal History, p. 150
–2–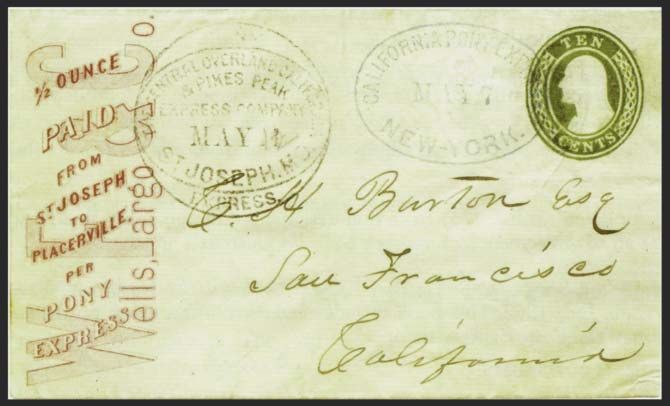
observations in support of this possibility are: i) the complete absence of used multiples (for example, two $1
stamps for a double rate); ii) the $2 or $4 April 1861 issue is not found on or off cover with a post-July 1 date; and
iii) the existence of covers with the Wells Fargo blue “Paid” oval covered by the stamp, a sequence of application
indicating that the Wells Fargo agent affixed the adhesive stamp.
  A similar pattern of usage is found in Wells Fargo’s operation of the Virginia City Pony Express from 1862 to
1865. Based on his study of the 10c and 25c Virginia City Pony Express stamps, James Gamett observed:6
  “...there is no overlap of use of the three stamps. There is also no cover existing that shows a late use of the 10c stamp in
  the 25c period. Apparently, the stamps were either redeemed for new stamps at the offices, or the stamps were only pur-
  chased at the time of mailing. Otherwise, you would expect to find a cover franked with three stamps overpaying the new
  rate, or a blue and a red stamp used together on one cover. If the stamps had been accepted for use after the period for which
  they were intended, you would also expect to find an overlap of the dates of use. However, none were found....”
The final circumstance indicating that the Horse and Rider Pony Express stamps (as opposed to the Eastern
“Garter” issue) never circulated outside of Wells Fargo’s West Coast offices is that all known usages are from the
West. Nothing in the records or advertisements states that the stamps were valid only on eastbound Pony Express
trips. If the stamps were sold in sheets to the public, one would expect to see covers or markings showing that some
stamps were sent East and used from there. That is not the case.
   Considering all of the evidence, the author is convinced that Pony Express stamps were sold in individual units,
for immediate application to a letter or pre-affixed to franked envelopes by Wells Fargo’s agents.

               Figure 6. First trip under the new government contract rate, showing the earliest possible
               use of the $1 Red. The blue oval Running Pony datestamp is dated July 3, 1861.

                                              The Lithographic Process
The word lithography means “stone writing” (from Greek, lithos, a stone, and graphein, to write). Lithography is
a planographic printing method, which uses a combination of mechanical and chemical (or photographic) means to
transfer ink from a uniformly flat surface to paper. For a detailed explanation of the different planographic processes
and the production of lithographic stones (or plates), the author recommends the Williams Brothers’ Fundamentals
of Philately.7
Lithographic platemaking can potentially reduce the number of steps required to transfer the original design to
multiple positions on the plate. This is accomplished through the use of intermediate transfers, which are some-
times called bloc-reports (or “stone-to-stone” transfers). For example, a printing stone of 100 can be made from
two transfers of an intermediate transfer group of 50. The 50-stamp intermediate transfer group can be made from
five transfers of a group of ten, which in turn can be made from ten transfers of the original design (or possibly
from another intermediate transfer group). In this example, 100 transfer steps are reduced to 17 steps (2 + 5 +10).
  6   Gamett, James M., Nevada Express, Western Cover Society, 2002, p. 32.
  7   Williams, L.N. & M., Fundamentals of Philately, American Philatelic Society, 1971, pp. 231-298.

                                                                   –3–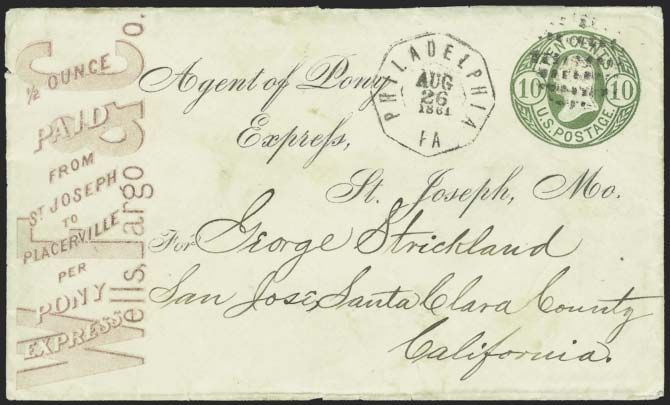
As each transfer (or re-transfer) is made, flaws present on the source are passed along to each new transfer, while
new flaws are introduced into each new transfer. This relationship between the primary and secondary transfers,
distinguishable through the presence (or absence) of flaws, is a critical factor in determining how a lithographic
printing stone was “built up.”
The printing stone itself is a thick slab of limestone or another variety of calcerous stone. Its surface is highly
polished to remove irregularities, but the porous nature of the stone is ideally suited for accepting the grease-based
image required for lithography. A picture of a lithographic stone is shown in Figure 7.8

                  Figure 7. A lithographic limestone (or another variety of calcerous stone) is three to
                  four inches thick and has a highly-polished surface.

To achieve a clean transfer of the image from the source to the stone, special transfer paper is used. If we call
the source image the Primary Matrix, let us assume it has been applied in grease-based ink to the stone. The stone
is then moistened and inked, and the grease-based lines of the image accept the ink, while the water-soaked blank
areas of the stone reject the ink (this effect is caused by the natural repelling reaction between grease and water).
The transfer paper is laid over the image, and the ink from the stone is transferred to the paper, which in turn is
used to transfer the image to another stone.
It must be remembered that the inked image on a printing plate creates a mirror impression on the receiving
surface, which is why printing plates are created with mirror images of the intended design. However, in the
lithographic transferring process described above, the use of transfer paper introduces an intermediate step, which
itself causes a mirror effect. Therefore, the steps of Primary Matrix > Transfer Paper > Secondary Transfer results
in a Positive > Mirror > Positive image transfer (or, alternatively, Mirror > Positive > Mirror).
Although the build-up process described has the potential to reduce the number of transfers required, it is not
always used advantageously. In the case of the Pony Express stamps, the printers, Britton & Rey of San
Francisco, wasted effort by not fully exploiting the transfer process. As the reader will see, the printing stones
used for the $2 and $4 stamps required many more steps than was necessary; and, although the $1 stone was built
up from intermediate transfers, the failure to change “Dollars” to “Dollar” at the earliest or intermediate stages
necessitated the retouching of all 40 positions on the final printing stone.
  8   Séfi, Alexander J., An Introduction to Advanced Philately, Rowler & Rowley, 1926, p. 47.

                                                                   –4–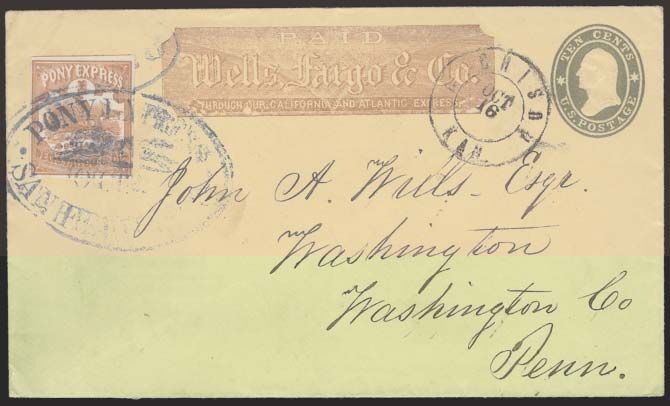
$2 and $4 Printing Stones
The April 1861 issue comprised the $2 Red and $4 Green, and the printing stones for these two values were the
first created by Britton & Rey. They were used again to print stamps in new colors for the July 1861 issue. There
are no surviving sheets of either value (in any color), but the existence of smaller multiples and sheet-margin
stamps makes it possible to reconstruct the 20 subjects on each stone in their original positions. Elliott Perry
correctly reconstructed the positions (with only one minor error), and his reconstructions were part of the Hall
collection.9 This author has had access to those reconstructions.
Although the $1 stamp was printed in sheets of 40—comprising right and left panes of 20 (4 across and 5 high)
with a gutter between the panes—the $2 and $4 were printed in sheets of 20 (5 across and 4 high). Rather than build
up the printing stone from intermediate transfer groups or from a Primary Matrix containing the denomination, the
printers used a blank matrix (see digital facsimile in Figure 8) to enter each subject on the stone for each value. This
required a total of 40 transfers (20 for each value). The denomination (shaded numerals “2” and “4”) then had to be
transferred to each subject on both stones in a separate operation, thus requiring another 40 separate transfers.
                                       It seems incredible to this author that experienced lithographers such as
                                       Britton & Rey did not simplify the process by using intermediate transfers. For
                                       example, they could have created two Primary Matrixes, one for each value,
                                       and then used those to make the separate transfers, thus eliminating the need
                                       for another 40 separate transfers of the denomination. Or, they could have
                                       made an intermediate group transfer from the stone with 20 denomination-less
                                       frames, thus eliminating the need to make another 20 transfers on the stone for
                                       the second value.
                                       Based on the fact that the $2 and $4 of the July 1861 issue were printed from
                                       the same stones as the April 1861 issue, it is certain that the printers had
                                       retained the two original stones. Lithographic stones were usually re-used by
                                       erasing the image and repolishing the surface, but in the case of the Pony
                                       Express stones, they were evidently preserved for future printings.
Figure 8. Primary Matrix               When the denomination was transferred to each subject on the stone, there
(blank value) from which 20            was some variation in the placement of the numeral and in the replication of
individual transfers were made         the shading lines. Figures 9 and 10 (on the following pages) provide a
on the printing stone for each of      comparison of the numerals for all 20 subjects on the $2 and $4 stones.
the $2 and $4 values.
                                        Relative Scarcity of $2 and $4 Stamps
Both Elliott Perry and the author worked with a large quantity of Pony Express stamps in their independent studies.
Perry observed the relative scarcity of the $2 Red, $4 Green, $2 Green and $4 Black in unused and used condi-
tion,10 as did this author, and the conclusions are similar. The four stamps are ranked below in descending order of
scarcity, divided by category (Unused, Used, Unused Multiples, Covers). The numbers in brackets refer to the
stamps seen by this author. The Unused and Used columns are probably low counts relative to the total population.
      Unused [Total 128]          Used [Total 28]                     Unused Multiples                     Covers (41 Recorded)11
         $2 Red [20]                $4 Green [3]                         $2 Red [none]                           $4 Green [1]
        $4 Green [26]               $4 Black [5]                    $4 Green [1 block of 4]                      $4 Black [2]
        $2 Green [37]               $2 Green [8]                 $4 Black [6-8 blocks of 4-6]                    $2 Green [2]
        $4 Black [45]                $2 Red [12]                $2 Green [8-10 blocks of 4-6]                     $2 Red [36]
Looking at the data, it is obvious that the workhorse stamp, the single-rate $2 Red, is by far the most common of
the four $2/$4 issues in used condition and on cover, but it is the rarest in unused condition (only 16% of unused
singles and not one multiple known). The two $4 (either Green or Black) and $2 Green multiple-rate stamps are
extremely rare used or on cover. The $4 Green is also quite scarce unused (20% of unused singles and only one mul-
tiple known). The abundance of unused $2 Green and $4 Black stamps is due to Wells Fargo’s practice of selling
off Pony Express stamp remainders to philatelists through the 1890’s when their supply ran out.
  9 The Hall Collection: Carriers, Locals and Western Expresses, Siegel Auction Galleries, Sale 830, Nov. 13-14, 2000
  10 Elliott Perry, personal correspondence to Eugene Costales, July 3, 1963
  11 The Pony Express; A Postal History, p. 173 (42 less one cover, E144, which has been certified by the P.F. as fake)

                                                                  –5–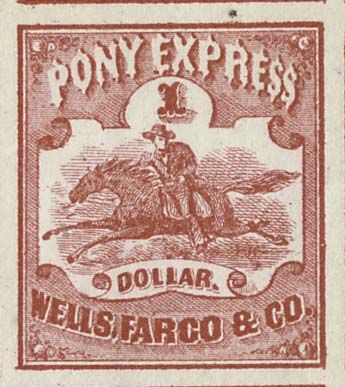
1                       2                       3                      4                      5

6                       7                       8                     9                       10

11                      12                     13                      14                     15

16                      17                     18                      19                     20

Figure 9 (above) and 10 (opposite). The numerals “2” and “4” were transferred one at a time to each of the
subjects on the $2 and $4 printing stones, which creates variation in the relative position and in the detail of the
shading lines. Numerals of all 20 subjects for each printing stone are shown.

                        SEE APPENDIX PAGES 22-25 FOR $2 PLATING DIAGRAMS

                                                        –6–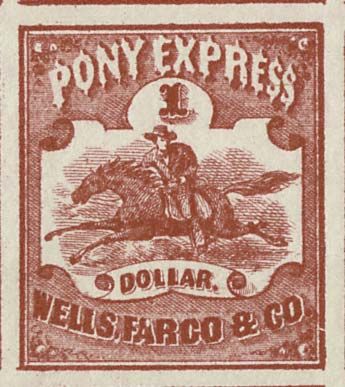
1     2               3                 4           5

6     7               8                 9           10

11    12              13                14          15

16    17             18                 19          20

                           Figure 10.

     SEE APPENDIX PAGES 26-28 FOR $4 PLATING DIAGRAMS

                              –7–
$1 Red Printing Stone
When Britton & Rey received Wells Fargo’s order for new stamps needed for the July 1861 rate change, they were
apparently instructed to produce a new $1 value in Red and to print more $2 and $4 stamps in different colors. Since
the printers still had the stones for the $2 and $4, it was a simple matter to make more impressions in Green ($2) and
Black ($4). Their approach to the $1 Red, evident in the product itself, is more complicated.
Instead of 20 subjects, there were 40 subjects on the $1 stone, which suggests that the print order anticipated a
much higher volume of usage. In fact, the average number of letters per eastbound trip jumped from 201 in the Third
Rate Period (prior to the government contract) to 305 in the Fourth Rate Period
(as a government contractor).12 The total number of eastbound letters, docu-
mented at 10,057, indicates that at least an equal number of $1 stamps were
printed, so doubling the size of the stone meant half the number of impressions
(250 vs. 500 for a print run of 10,000).
The printers also used the “Dollars” matrix previously used for the $2 and $4
transfers, which indicates that they retained the Primary Matrix from the original
issue. This time, they had the foresight to add the denomination to the Primary
Matrix (Figure 11), but they failed to remove the “s” from “Dollars” until the
printing stone was completely built up from the intermediate transfers. This was
a glaring oversight. Correcting it required someone to erase most of the “s” from
each subject so that the remaining portion resembled a period after “Dollar”.
At least four sheets of the $1 Red have survived, all from the same stone,
Figure 11. Primary matrix for
which facilitates plating and proves the layout. The author has surmised that
$1 Red with “Dollars” error.
the $1 stone was built up in a series of steps as follows (shown on pages 9-12):
Step 1: Primary Matrix modified by adding the numeral “1” (with “Dollars” error)
Steps 2-11: 10 transfers from Primary Matrix to printing stone, forming the Transfer Group A (10 subjects)
Step 12: Re-transfer of Group A to printing stone, forming Transfer Group B (10 subjects)
Step 13: Re-transfer of Groups A-B combined to printing stone, forming Transfer Group C (20 subjects)
Steps 14-53: 40 individual erasures of “s” from “Dollars” on printing stone
It is obvious that the “Dollars” error added another 40 steps to the process. These erasures were almost certainly
made on the printing stone itself after the right and left panes were laid down. The differences in the erasures can
be helpful in plating individual stamps, and an enlarged comparison photo of all 40 positions is shown on page 13.
The transfer groups identified by letters A, B and C were made on the printing stone in mirror image. All types and
position numbers used by the author refer to locations on the printed sheet. The $1 Transfer Group A diagrams (see
Appendix, page 30) identify the flaws in the first ten transfers, which are labelled Type I through X and occur four
times on the sheet. For each Transfer Type, the author shows diagrams of the four corresponding positions and
identifies the flaws unique to each position (Appendix, pages 31-40).
$1 Position R09—The “Broken Leg” Flaw
The most distinctive plate flaw found on any Pony Express stamp is the “Broken
Leg” (Figure 12). The horse’s front right leg is cut off where the background
shading lines end.
The Broken Leg flaw occurs only on Position R09 (Group A Type V). The fact
that it does not occur on the other three Type V positions (L09/11 and R11)
indicates that it was not present on the Transfer Groups A or B. It may have
occurred as the re-transfer of Group A/B was made on the printing stone, possibly
due to a flaw in the transfer paper. It also could have resulted from damage to the
printing stone, possibly during the erasure process to remove “s” from “Dollars”.
The author has seen eight examples of the Broken Leg, including four in
sheets, two in blocks, and two singles, all unused without gum. The author has
been unable to locate a used example on or off cover. One unresolved question is
whether Position R09 exists without the flaw, which would prove that some sheets Figure 12. Position R09, the
were printed before the flaw occurred on the printing stone. “Broken Leg” flaw.
12 The Pony Express; A Postal History, p. 92
–8–STEPS TO CREATE $1 PONY EXPRESS PRINTING STONE
Primary Matrix
No denomination
“DOLLARS”
Mirror
Numeral “1”added to
Step 1
Primary Matrix
Steps 2-11
Transfer paper used to
make 10 transfers of
the Primary Matrix
to the printing stone
Primary Matrix
Numeral “1” Added
“DOLLARS”
Mirror
Transfer Group A
“DOLLARS”
10 x Primary Matrix
Mirror
–9–Step 12
Transfer paper used to make re-transfer of Group A on printing stone. Secondary transfer identified as Group B.
Group A Group B
Transfer Group A/B
“DOLLARS”
Mirror
–10–Step 13
Transfer paper used to make re-transfer of Group A/B on printing stone. Secondary transfer identified as Group C.
Group A/B Group C
Printing Stone (Unretouched)
“DOLLARS”
Mirror
–11–Steps 14-53
“S” of “DOLLARS” erased from each position on printing stone.
Printing Stone (Retouched)
“DOLLAR”
Mirror
–12–Left Pane Right Pane
Printed Sheet from Retouched Stone — Deleted “S” of “DOLLARS” Shown Below
Pos L01 Pos L02 Pos L03 Pos L04 Pos Pos Pos Pos
Pos L05 Pos L06 Pos L07 Pos L08 Pos Pos Pos Pos
Pos L09 Pos L10 Pos L11 Pos L12 Pos Pos Pos Pos
Pos L13 Pos L14 Pos L15 Pos L16 Pos Pos Pos Pos
Pos L17 Pos L18 Pos L19 Pos L20 Pos Pos Pos Pos
–13–Cancellations on Horse and Rider Pony Express Stamps
Wells Fargo’s agents on the West Coast always cancelled Pony Express stamps with their office marking. Every
recorded eastbound cover has the stamp cancelled by either a datestamp or a dateless office handstamp. The only
marking used to cancel stamps at the San Francisco office is the distinctive large Running Pony oval. Sacramento
also used a special “Pony Express” oval (and, in one case, their large double circle). Other offices that cancelled
Pony Express mail used whatever type of device they regularly applied to express mail.
Figure 13. $1 Red tied by Running Pony datestamp over blue “Paid” in oval.
The Wells Fargo blue “Paid” in oval is found on several Pony
Express covers, but it is always struck on the envelope, not on
the stamp. On more than one cover, the stamp is positioned over
the blue “Paid”, proof that the stamp was affixed after the “Paid”
was applied by the Wells Fargo office (see Figure 13). The
author has never seen a stamp on or off cover with the “Paid”
oval used as a cancel.
Counterfeit Pony Express stamps exist with forged markings,
some of which are crude and easily detected. A deceptive San
Figures 14-15. Counterfeit Pony Express Francisco Running Pony oval is shown in Figures 14 and 15.
stamps with a forged Running Pony oval. Both stamps are counterfeit.
Genuine Pony Express stamps are also found with forged
cancels. A few are extremely deceptive and have been certified
as genuine by expertizing services. Figure 16 shows a Wells
Fargo San Francisco oval datestamp that has been seen on
several genuine Pony Express stamps in blue, black or red. This
type of marking was not used by the San Francisco office on
Pony Express mail, but it is identical to markings on Wells
Fargo express covers from the mid-1860’s. It may have been
applied to remainders sold to collectors by the Wells Fargo office.
Prospective buyers of used Pony Express stamps are advised to
obtain reliable expert certification to protect against forgeries or Figure 16. This type of Wells Fargo San
non-contemporary cancels, especially when the cancel is not the Francisco oval was not used on Pony Exress
usual Running Pony oval. mail. It is either a forgery or applied by favor.
–14–Pony Express Horse and Rider Issue Multiples
Multiples of the Pony Express Horse and Rider issues only exist in unused condition. No used pairs are known
on or off cover. The total absence of used multiples is one of the pieces of evidence indicating that Wells Fargo
probably sold the Pony Express stamps one unit at a time, possibly
pre-affixing many of the stamps to franked envelopes (see pages 2-
3 for more information about this pattern of usage).
Only one multiple is recorded for the April 1861 issue ($2 Red
and $4 Green), It is the $4 Green block of four shown in Figure 17.
This block comes from Positions 14-15/19-20 at the lower right
corner of the sheet of 20. It has a large part of its original gum still
intact. Elliott Perry recorded this item as the only known block of
the $4 Green, and this author has not located any other multiple.
The July 1861 issue is more abundant in unused multiples, which
makes sense considering the abrupt end of the Pony Express in
October 1861, which left a remainder supply in Wells Fargo’s hands.
More than a half-dozen unused blocks each of the $2 Green and $4
Black exist. Four complete sheets of the $1 Red are recorded. All of
these unused July 1861 issue multiples are without gum. Some of
the single stamps from both issues are found with what appears to
be original gum (they are scarce in such condition). Figure 17. $4 Green block of four.
1897 Reprints
All of the Pony Express stamps that reached stamp collectors prior to April 1897 came from supplies on hand
at Wells Fargo’s offices. The first and only reprints were made in April 1897 by the original printers, Britton &
Rey of San Francisco. The Nathan-Boggs book summarizes the contemporary reports,13 so there is no reason to go
into further detail here.
Proof impressions in black were pulled from the composite matrix located by the printer in their archives
(Figure 18) and from the printing stone used to make the reprints (Figure 19). The printing stone was laid down
with all of the values, including the 10c and 25c Virginia City Pony Express issues. Prints were made in a variety
of colors before and after two major modifications were made to the stone: first, the correction of “Dollars” to
“Dollar” in the four $1 subjects; and, second, the defacement of the $4 subjects with X’s.
The $1 reprints exist with and without the plural “Dollars” error, which proves that the “S” was erased from the
stone after a print run. The $4 without “X” defacement exists in multiples with the $1 “Dollars” and corrected
“Dollar”. However, all known multiples with the $4
“X” defacement show the $1 “Dollar” correction (none
is known with “Dollars”).
Studying the surviving reprints, it can be surmised
that the stone with the “Dollars” error was used to print
stamps in Blue and Black. The “s” correction was made,
then other colors were printed. Finally, the “X” deface-
ments were made and additional prints were pulled.
Figure 18. 1897 Reprint composite matrix. Figure 19. Proof impression of 1897 reprint stone.
13 Nathan, M.C., and Boggs, W. S., The Pony Express, pp. 67-104
–15–$1 “Garter” Issue and Franked Envelopes for Westbound Pony Express Mail
The Horse and Rider issues were never used on westbound Pony Express mail. In the Third Rate Period, Wells
Fargo introduced a special franked envelope for westbound mail, but its use was extremely limited. On July 1, 1861,
the new contract rate went into effect. On August 12, 1861, Wells Fargo announced in the New York papers that
“Pony Express Envelopes” were “Now ready and for sale at our office.”14 Although this
announcement refers only to “envelopes”, in fact both the franked entires and $1
adhesive stamps were put on sale in August 1861.
The small belt-shaped “Garter” stamp looks nothing like the Horse and Rider issues
and omits the words “Pony Express”. Although Nesbitt was identified as the maker of
the franks and Garter issue in an 1867 article,15 subsequent writers mistakenly attrib-
uted the Garter printing to Britton & Rey. Around the year 2000 a Garter stamp was
found with the imprint “G. F. Nesbitt & Co. N.Y.” (see Figure 20).
The Scott Catalogue and other sources incorrectly state that the Garter was printed in
sheets of 16. The author has surmised that the Garter was printed from a lithographic
stone of 20 subjects, arranged 5 across and 4 high, based on
the corner margin strip (Figure 21) and three blocks printed
Figure 20. $1 Garter
on card with the word “Sample” written across them (Figure
with Nebitt imprint.
22). A digital reconstruction of the sheet layout is shown in
Figure 23.
Figure 21. Strip of three from the top left corner of the sheet.
Figure 22. Card proofs with “Sample” overprint.
The Garter stamp is extremely rare in any
form. The strip of three shown above is the only
recorded multiple of the stamp on regular paper.
Only four covers are recorded, including two
used from New York City and two from Boston,
dated from August 24 to October 26, 1861.16 One
of the covers from Boston is a quadruple-rate
usage with a vertical strip of four of the $1
Garter. The cover generally regarded as the finest
of the Garter usages is shown in Figure 24 on the
following page.
Garter stamps are often found with a pen line,
either vertical or horizontal, in blue or red ink.
These are probably marked samples.
Several types of Garter counterfeits exist,
which usually have a horizontal line bisecting
the shield.
14 Perry, Elliott, Pat Paragraphs, October 1931, p.73
15 The Stamp Collector’s Magazine, May 1, 1867 Figure 23. Digital reconstruction of $1 Garter sheet of 20 with
16 The Pony Express; A Postal History, p. 75 Nesbitt imprint below the bottom center stamp.
–16–Figure 24. $1 Garter on double-rate ($2.00) Pony Express entire from New York. It was carried on the last Pony
trip, leaving from St. Joseph on October 24, 1861. The 10c embossed stamp and 10c 1861 pay the double U.S. rate.
The first Pony Express franked entires were issued during the Third Rate Period, when the charge for a single-
rate letter was $2.00. The $2 Type I frank is printed in red on the 10c Green on White Nesbitt entire and reads
“1⁄2 OUNCE/PAID/FROM/ST. JOSEPH/TO/PLACERVILLE,/PER/PONY/EXPRESS.” The word “Placerville” is
followed by a comma in the Type I frank. Several unused examples are known, but only two used Type I franks
are recorded. Both are datestamped with the New York office oval, one on May 7, 1861 (Figure 25) and the other
on June 22, 1861. The absence of a specific rate was probably deliberate, because by March 12, 1861, the Overland
Mail Company and Wells Fargo knew that the government contract at $1.00 per letter would commence on July 1.
Without a stated value, the envelopes could be sold for $2.00 until June 30 and $1.00 thereafter. As it turned out,
circumstances required a new envelope printing, so the old 10c Nesbitt Type I franks became obsolete.
Figure 25. Type I printed frank (comma after “Placerville”) at the unstated $2.00 rate on 10c Green on White
Nesbitt entire sent from New York on May 7, 1861, for the May 12 Pony trip out of St. Joseph.
–17–Figure 26. Hand-annotated “essay” entire for the new July 1861 issue submitted for approval to Postmaster
General Montgomery Blair by the Overland Mail Company. The pencil additions read “To Agent, Pony Exp, St.
Jos, for” and in ink “John Doe, San Francisco, Cal.” The transmittal letter is shown in Figure 27.
On June 21, 1861, the treasurer of the Overland
Mail Company in the New York office wrote to
Postmaster General Montgomery Blair to seek
approval of the Pony Express frank and to obtain
clarification of the postage requirements on mail
posted at the Placerville terminus. The sample is a
Type I frank with annotations (Figure 26), and
the original letter (Figure 27) reads:
“We beg to enclose a sample envelope which we
wish to use for Pony Express.
You will see it has a Govt. 10c Stamp, and also the
stamp of our agents Wells F & Co. upon it, and is
directed
To Agent of Pony Express
St. Joseph Mo.
For John Doe
San Francisco
California.
Now, the object of the present is to ask of the
Department that such envelope may be mailed
here, delivered to Pony Express Agent at St.
Joseph, and by Pony Express mailed again at
Placerville, for its destination, without an addi-
tional stamp.
If this is consistent with your reading of the law,
will thank you to issue the proper order to aid us
in carrying out such rule.
As the service is to commence on 1st July, we
would beg for an early reply to this.
[Signed Frederick Cook, Treasurer, Overland Mail
The slightly modified Type II frank was print-
Figure 27. Letter dated June 21, 1861, from Frederick Cook, ed in red on the new 10c 1861 “Pumpkin” entire.
Treasurer, Overland Mail Company, to Postmaster General The address portion is printed in black, using a
Montgomery Blair. script-style font (see Figure 28).
–18–Figure 28. Type II frank on 10c 1861 “Pumpkin” entire. This is the only recorded Pony Express usage from
Philadelphia. The letter entered the regular U.S. mails there and was delivered to the Pony Express agent at St.
Joseph. It was carried on the September 1, 1861, westbound trip.
The part-printed address on the Type II frank was added (per the June 21, 1861, letter and sample) to facilitate a
new mail-handling procedure. Previously, westbound Pony Express mail was forwarded in packages to the St.
Joseph post office. On arrival the letters were unbundled and counted before they were given to the Pony Express
agent. Beginning in mid-August with the introduction of the new Type II franks, individual letters were mailed at
the post office of origin and transmitted through the regular government mails to the Pony Express agent in St.
Joseph, who gave them to the next departing Pony Express rider. After the Pony terminus was moved to Atchison
in September, the St. Joseph agent bagged the letters he received by mail and placed them on board the train to
Atchison, where they were given to the departing Pony rider.17
According to a report evidently based on reliable sources, the Nesbitt firm was specifically asked to provide
franked envelopes on thinner, tougher paper than that used for the regular stamped envelopes, presumably to
reduce weight for the Pony riders.18 Comparing the Type II franks with other entires, the envelopes do appear to
be a thinner, less opaque and slightly more brittle paper.
There are 19 recorded Type II franked entires, including three with the $1 Garter paying the extra rate. The
earliest date is August 14, 1861, from New York City, two days after Wells Fargo’s New York office announced
the availability of new “Pony Express Envelopes”. The latest usages were posted from New York on October 26
and datestamped at St. Joseph on October 31.
A convincing case has been made that the covers arriving by mail at St. Joseph after the Pony trip on October
24 may have travelled westward by regular stage rather than by Pony rider.19 This argument is based on two
circumstances. First, contemporary reports of two “Pony Express” mails arriving in San Francisco on November
18 and 20 correlate with typical stagecoach transit time (21 and 22 days). Second, considering that the completion of
the telegraph line on October 24 rendered the Pony Express obsolete, it seems unlikely that the company would
continue to run its money-losing operation for another week.
However, another plausible scenario is that the last two trips (October 27 and 31) were a mix of stage and Pony
riders, depending on which relay stations were still up and running. The arrival of a bag of mail containing letters
for which $1.00 each had been paid for Pony Express service may have been sufficient impetus to keep the horses
running another week, at least for part of the route. The actual truth may never be known.
17 The Pony Express; A Postal History, pp. 51-58
18 U.S. Envelope World, May/June/July/August 1958, p. 91
19 The Pony Express; A Postal History, pp. 58-59 and p. 99
–19–Scott Catalogue Treatment of Pony Express Franked Envelopes and Stamps
The Type I frank is a privately-issued form of prepayment of the $2.00 Pony Express rate. Its successor, the Type II
frank, was a government-authorized form of prepayment of the $1.00 rate for a sub-contracted United States mail
route. Inexplicably, these two franked entires have been omitted from the Scott U.S. Specialized Catalogue. At the
very least, they belong with the other Wells Fargo issues. Technically, the April 1861 issue ($2 Red, $4 Green and
Type I envelope) should be classified as “Locals” (private emissions), while the July 1861 issue ($1 Red, $2 Green,
$4 Black, $1 Garter and Type II envelope) should be classified as “Semi-Officials” (government contractor
emissions).
Acknowledgements
The author wishes to express his gratitude to the following individuals and organizations for their assistance in
preparing this publication: The Philatelic Foundation, The Collectors Club of New York, The U.S. Philatelic
Classics Society, Dr. Norman S. Hubbard, Carl Walske, Steven C. Walske and Kenneth Lawrence. Certain images
of stamps and covers are reproduced with permission of the publishers and owners.
Bid.
Buy.
Sell.
Explore.
Learn.
www.siegelauctions.com
America’s premier stamp auctioneer... past, present and future.
AUCTION GALLERIES, INC.
–20–APPENDIX
PLATING GUIDES:
$2 Horse & Rider
Shown in Green; printed in Red and Green (plating marks can be difficult to locate on Red stamps)
$4 Horse and Rider
Shown in Black; printed in Green and Black (plating marks are clear in both printings)
$1 Horse & Rider
Printed in Red (plating marks are usually clear)
–21–$2 PLATING GUIDE
Positions 1-5 (Row 1 of 4)
Dot
Line in “N” Dot in “S”
Dot on
frame
Dot in “R”
Dots to right of “2”
Scratch in background
Dot
Pos 01 Pos 02 Pos 03
Dots below frame
Dash
Line in colorless border
Spur
Dot
Dots in “P”, “R”,
“2” touches frame
Pos 04 Pos 05
–22–$2 PLATING GUIDE
Positions 6-10 (Row 2 of 4)
Dot Dot Dots outside of frame
Dot in “R”
Dots in “X”, “P”
“2” touches frame
2 dots to right of “2”
Dash below tail
Spur on frame
Spur on frame
Dot
Pos 06 Pos 07 Pos 08
Spur on frame Spur on inner frameline
2 dots in “R”
Dot in “P”
Jagged protrusion
Defects in ornament and “D”
Pos 09 Pos 10
Dots outside of frame
–23–$2 PLATING GUIDE
Positions 11-15 (Row 3 of 4)
White line
Scratch in “ON” Dot above ornament
Many dots in “Pony Ex”
Dot in “Y”
Dot Dots in “O”, “Y”, “E”
“2” touches frame
Spur on frame
Vertical line on face
Dots between “LL”
Pos 11 Pos 12 Pos 13
Tiny spurs on
frameline
Malformed “N”
Dots in “R”,
Dot in “S”
Dots to right of “2”
Pos 14 Pos 15
Dots outside of frame Dots
–24–$2 PLATING GUIDE
Positions 16-20 (Row 4 of 4)
Dot in colorless border
Spur
Dots in “N”, “R”, “S”
Flaw on face
Diagonal line above “LL”
White
spot in
White flaw in background frame
Flaw below “FA”
Pos 16 Pos 17 Pos 18
Dots outside of frame Dots outside of frame Numerous dots below frame
Dot
Numerous dots in “Pony Express”
Dots in “Y”, “R”, “S”
Dot
Flawed shading
around “2”
Pos 19 Pos 20
Dots outside of frame
–25–$4 PLATING GUIDE
Positions 1-5 (Row 1 of 4)
Nick in frame and dot above corner Marks outside of frame
Dot
Diagonal
line in “4”
Spur
Dot
Dot
Pos 01 Pos 02 Pos 03
Dot
Marks outside of frame Spots in
colorless border
Line outside of frame
Dot
Dots Dot in “S”
Dot
Dot
Pos 04 Pos 05 Spot on
Spur
Dot inner frame
–26–$4 PLATING GUIDE
Positions 6-10 (Row 2 of 4)
Spot in
Dots around framelines colorless border
Dot Dot
in “S”
Line
Dots 3 dots to
in “P”
right of “4”
Spur
Dot
Line above “L” Dot in “LL” in
Pos 06 Pos 07 Pos 08 Dot
Dots around framelines Spots around frameline
Dot
Dot
Dot
Dot
Dots to Dot
right of “4”
Dot
Dot above “L”
Dot
Pos 09 Pos 10
Marks in colorless border
–27–$4 PLATING GUIDE
Positions 11-15 (Row 3 of 4)
Line above Line above
Spur frameline frameline
Dot
Dot Line
Dot in “E” Spots in “X”
Dot
Dot
Dot
Spur
Dot Dot
Pos 11 Pos 12 Pos 13
Dot Dots around framelines
Nick in frame
Dot in “Y”
Spur
Dot in “E”
Dot above “L”
Pos 14 Dot Pos 15
Dot
Dot in colorless border
–28–$4 PLATING GUIDE
Positions 16-20 (Row 4 of 4)
Dots around frameline and
Dot Dot in letters “N”, “X”, “E” Dots above frameline
Dots in “Y”, “X” Dots in “X”, “E”
Dot below leg
Pos 16 Pos 17 Pos 18
Dot in color- Dot in color- Dot Mark in colorless border
less border Spur less border
Spur
Spur
Dot in “N”
Dot in “S”
Dot
Dot above “D” Dot
Pos 19 Pos 20
–29–IDENTIFYING THE TEN TYPES OF TRANSFER GROUP A
Green circles identify repetitive flaws for each Group A Type (except as noted). To match a stamp to a specific position
on the printing stone, identify the Type first, then go to corresponding group of four to identify unique plating marks.
R01/03 only
TYPE I TYPE II
Pos L01/03, R01/03 Pos L02/04, R02/04
See page 31 See page 32
Except
R06
Except L06
TYPE III TYPE IV
Except R06
Pos L05/07, R05/07 Pos L06/08, R06/08
See page 33 See page 34
Except R07
L10/12 only
Except L10
TYPE V TYPE VI
Pos L09/11, R09/11 Pos L10/12, R10/12
See page 35 See page 36
Except R13 Faint
Faint on R13
TYPE VIII
TYPE VII Pos L14/16, R14/16
Pos L13/15, R13/15 See page 38
See page 37
Fainter on L16, R14, R16
Except R19
TYPE IX TYPE X
Pos L17/19, R17/19 Pos L18/20, R18/20
See page 39 See page 40
–30–TYPE I
I II I II I II I II
Positions L01/03, R01/03 L01 L02 L03 L04 R01 R02 R03 R04
Green circles identify repetitive flaws for each
Group A Type (except as noted). III IV III IV III IV III IV
L05 L06 L07 L08 R05 R06 R07 R08
V VI V VI V VI V VI
L09 L10 L11 L12 R09 R10 R11 R12
VII VIII VII VIII VII VIII VII VIII
L13 L14 L15 L16 R13 R14 R15 R16
IX X IX X IX X IX X
L17 L18 L19 L20 R17 R18 R19 R20
White dot
Traces of “S”
Dots
Pos L01 Pos L03
R01/03 only R01/03 only
Dot
Dot
Dot
Smaller
on R03
Dot
Pos R01 Pos R03
–31–TYPE II
I II I II I II I II
Positions L02/04, R02/04 L01 L02 L03 L04 R01 R02 R03 R04
Green circles identify repetitive flaws for each
Group A Type (except as noted). III IV III IV III IV III IV
L05 L06 L07 L08 R05 R06 R07 R08
V VI V VI V VI V VI
L09 L10 L11 L12 R09 R10 R11 R12
VII VIII VII VIII VII VIII VII VIII
L13 L14 L15 L16 R13 R14 R15 R16
IX X IX X IX X IX X
L17 L18 L19 L20 R17 R18 R19 R20
Spot in “X”
Dot
Dots
L04/R04
Dot
Dots
L04/R04
Dot
Traces of “S”
Pos L02 Pos L04
Dot
Dot
Dot Dots Dot
Dots
L04/R04
Dot
Large half-moon Dots
L04/R04
Dash
Pos R02 Dot below frame Pos R04
–32–TYPE III
I II I II I II I II
Positions L05/07, R05/07 L01 L02 L03 L04 R01 R02 R03 R04
Green circles identify repetitive flaws for each
Group A Type (except as noted). III IV III IV III IV III IV
L05 L06 L07 L08 R05 R06 R07 R08
V VI V VI V VI V VI
L09 L10 L11 L12 R09 R10 R11 R12
VII VIII VII VIII VII VIII VII VIII
L13 L14 L15 L16 R13 R14 R15 R16
IX X IX X IX X IX X
L17 L18 L19 L20 R17 R18 R19 R20
Dot Dot and spur
Dot
Dot
Dot to right
of hat
Dots above “L” and “A”
Dot
Except R07 Except R07
Pos L05 Line in background Pos L07
Line in “E”
Line
Dot to right
of hat
Dot
Traces of “S”
Except R07 No dot
Pos R05 Pos R07
–33–TYPE IV
I II I II I II I II
Positions L06/08, R06/08 L01 L02 L03 L04 R01 R02 R03 R04
Green circles identify repetitive flaws for each
Group A Type (except as noted). III IV III IV III IV III IV
L05 L06 L07 L08 R05 R06 R07 R08
V VI V VI V VI V VI
L09 L10 L11 L12 R09 R10 R11 R12
VII VIII VII VIII VII VIII VII VIII
L13 L14 L15 L16 R13 R14 R15 R16
IX X IX X IX X IX X
L17 L18 L19 L20 R17 R18 R19 R20
Except R06 Except R06
Dot in “P”
Tiny dots in letters
No dot Dot (except L06)
Dot
Except R06 Except R06
Marks below frame Dot
Pos L06 Pos L08
No dots 2 Dots Except R06
Dot (except L06) Dot (except L06)
No dot Except R06
Traces of “S”
Spots
Pos R06 Pos R08
–34–TYPE V
I II I II I II I II
Positions L09/11, R09/11 L01 L02 L03 L04 R01 R02 R03 R04
Green circles identify repetitive flaws for each
Group A Type (except as noted). III IV III IV III IV III IV
L05 L06 L07 L08 R05 R06 R07 R08
V VI V VI V VI V VI
L09 L10 L11 L12 R09 R10 R11 R12
VII VIII VII VIII VII VIII VII VIII
L13 L14 L15 L16 R13 R14 R15 R16
IX X IX X IX X IX X
L17 L18 L19 L20 R17 R18 R19 R20
Dot L09/R09 Dash L11/R11
Broken “1”
Dot
Dot
Pos L09 Pos L11
Dot L09/R09 Dash L11/R11
Broken leg flaw
Two dots
Dot Break
Pos R09 Pos R11
–35–TYPE VI
I II I II I II I II
Positions L10/12, R10/12 L01 L02 L03 L04 R01 R02 R03 R04
Green circles identify repetitive flaws for each
Group A Type (except as noted). III IV III IV III IV III IV
L05 L06 L07 L08 R05 R06 R07 R08
V VI V VI V VI V VI
L09 L10 L11 L12 R09 R10 R11 R12
VII VIII VII VIII VII VIII VII VIII
L13 L14 L15 L16 R13 R14 R15 R16
IX X IX X IX X IX X
L17 L18 L19 L20 R17 R18 R19 R20
Spur on left pane only Spur on left pane only
No dots Dot in “P”
Dots outside
of frame
(except L10)
Line outside frame Mark below frame
Pos L10 Pos L12
No spur No spur
Dot
Dot
Curved line Traces of “S”
Dot
Pos R10 Pos R12
Dot
–36–TYPE VII
I II I II I II I II
Positions L13/15, R13/15 L01 L02 L03 L04 R01 R02 R03 R04
Green circles identify repetitive flaws for each
Group A Type (except as noted). III IV III IV III IV III IV
L05 L06 L07 L08 R05 R06 R07 R08
V VI V VI V VI V VI
L09 L10 L11 L12 R09 R10 R11 R12
VII VIII VII VIII VII VIII VII VIII
L13 L14 L15 L16 R13 R14 R15 R16
IX X IX X IX X IX X
L17 L18 L19 L20 R17 R18 R19 R20
Faint on R13 Faint Faint on R13 Faint
Missing Missing
on R13 on R13
White spot
Dot above “L” on L15/R13
Dot Dot below frame
Pos L13 Pos L15
Faint on R13 Faint Faint on R13 Faint
No dot Missing
on R13
Dot
Dot above “L” on L15/R13
Dot
Pos R13 Pos R15
–37–TYPE VIII
I II I II I II I II
Positions L14/16, R14/16 L01 L02 L03 L04 R01 R02 R03 R04
Green circles identify repetitive flaws for each
Group A Type (except as noted). III IV III IV III IV III IV
L05 L06 L07 L08 R05 R06 R07 R08
V VI V VI V VI V VI
L09 L10 L11 L12 R09 R10 R11 R12
VII VIII VII VIII VII VIII VII VIII
L13 L14 L15 L16 R13 R14 R15 R16
IX X IX X IX X IX X
L17 L18 L19 L20 R17 R18 R19 R20
Line outside frame
Dot Broken “1”
Small line of “S”
Pos L14 Fainter on L16, R14, R16 Pos L16 Fainter on L16, R14, R16
Marks outside frame
Line on scroll
Dot
Pos R14 Fainter on L16, R14, R16 Pos R16 Fainter on L16, R14, R16
–38–TYPE IX
I II I II I II I II
Positions L17/19, R17/19 L01 L02 L03 L04 R01 R02 R03 R04
Green circles identify repetitive flaws for each
Group A Type (except as noted). III IV III IV III IV III IV
L05 L06 L07 L08 R05 R06 R07 R08
V VI V VI V VI V VI
L09 L10 L11 L12 R09 R10 R11 R12
VII VIII VII VIII VII VIII VII VIII
L13 L14 L15 L16 R13 R14 R15 R16
IX X IX X IX X IX X
L17 L18 L19 L20 R17 R18 R19 R20
Dot
Shows on L17/19 and Shows on L17/19 and
R17 but not on R19 R17 but not on R19
Dot
Dot
Dot
Pos L17 Pos L19
Dot
Shows on L17/19 and No marks
R17 but not on R19
Dot above “L” Dot above “L”
R17/R19 R17/R19
Dot
Nick
Pos R17 Pos R19 Dot
–39–TYPE X
I II I II I II I II
Positions L18/20, R18/20 L01 L02 L03 L04 R01 R02 R03 R04
Green circles identify repetitive flaws for each
Group A Type (except as noted). III IV III IV III IV III IV
L05 L06 L07 L08 R05 R06 R07 R08
V VI V VI V VI V VI
L09 L10 L11 L12 R09 R10 R11 R12
VII VIII VII VIII VII VIII VII VIII
L13 L14 L15 L16 R13 R14 R15 R16
IX X IX X IX X IX X
L17 L18 L19 L20 R17 R18 R19 R20
Break in frameline
White dot
Traces of “S”
Pos L18 Pos L20
Dot
Dot
Dot
Pos R18 Pos R20
–40–You can also read