GUIDE ON FUNCTIONALITY OF THE

FIDELITY FUND CERTIFICATES APPLICATION SYSTEM

    - GENERATING A CERTIFICATE

    - ACCESSING ISSUED CERTIFICATE
←
→
Page content transcription
If your browser does not render page correctly, please read the page content below
GUIDE ON FUNCTIONALITY OF THE
FIDELITY FUND CERTIFICATES APPLICATION SYSTEM
- GENERATING A CERTIFICATE
- ACCESSING ISSUED CERTIFICATE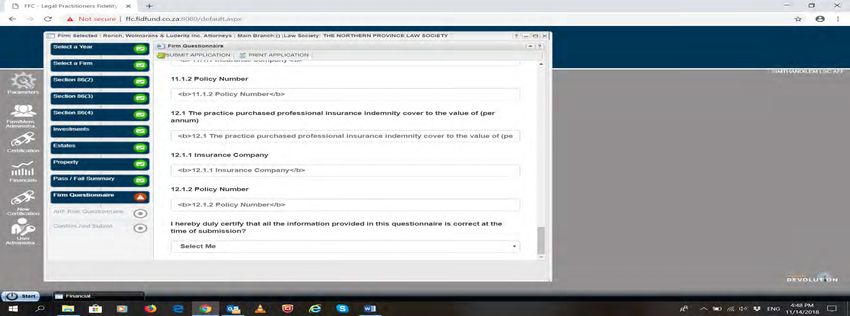
1.   Go to https://ffc.fidfund.co.za

2.   Logging in:

     2.1. For first-time log in:
         2.1.1. Go to First Time Login/forgot password
             2.1.1.1.   Insert the member’s ID number
             2.1.1.2.   Insert member’s email address (the same one provided to the Legal Practice Council)
             2.1.1.3.   Click on send my details

          2.1.2. Receive an email with login credentials (Username, Usercode
             and Password)
             2.1.2.1.   Go to Login

                                                                                               Page 2 of 23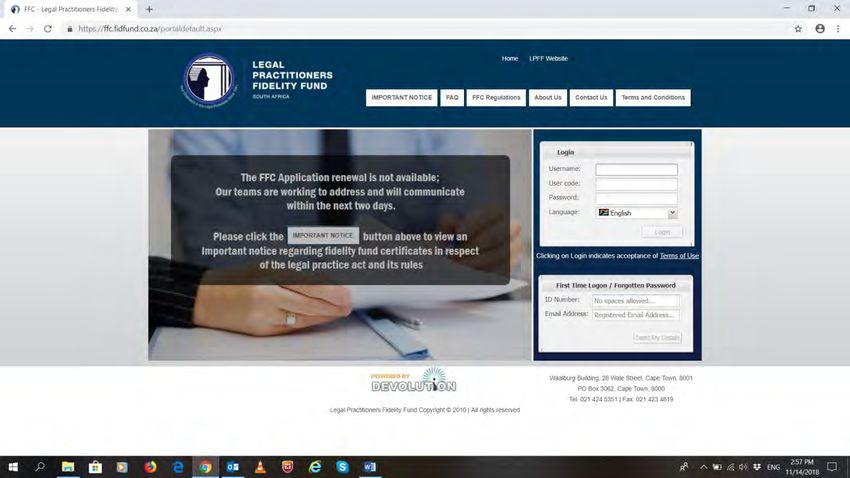
2.1.2.2.   Capture your login details – your user name, user code, and password
2.1.2.3.   Click “Login” (beneath the login credentials space provided)

2.1.2.4.   On the next pop up, check that the system correctly identifies you under “Group” as
           either a “Member” or a “Responsible Member”

                                                                                  Page 3 of 23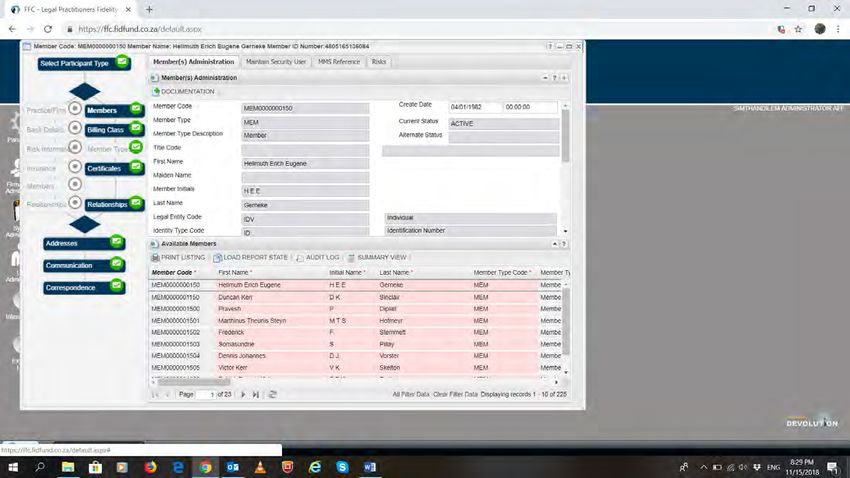
2.1.2.5.     Click “Continue”

       2.1.3. The system will require you to change the password
          2.1.3.1.     On old password, capture the password you received from the FFC system
          2.1.3.2.     On new password, put in your own password which must comply with the following:
          2.1.3.2.1.   It must have no less than six (6) characters
          2.1.3.2.2.   It must contain at least one (1) alphabet in capital letters
          2.1.3.2.3.   It must contain at least one special character (e.g. &, @, !, *, #, etc)
          2.1.3.3.     Click on change password

2.2.    If you are not logging in for the first time, follow steps under 2.1.2.1
        – 2.1.2.5

                                                                                          Page 4 of 23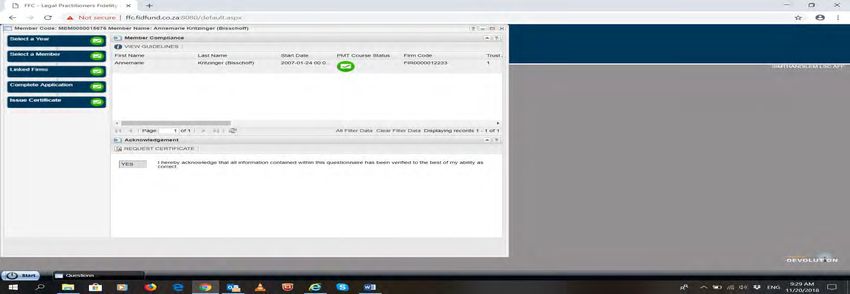
3.   Once you are logged in, go to the Financials Module (can be completed by
     the firm representative)

     3.1.      Click once on the module and a window will come up:

            3.1.1.   Select the year for which you wish to generate a certificate under “Year Code”

                                                                                                      Page 5 of 23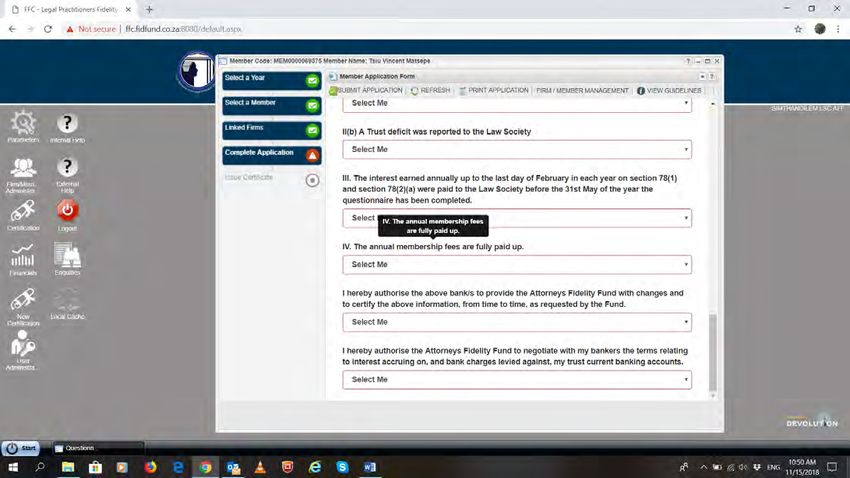
3.1.2.      Follow the exclamation mark, and click on select a firm.

            3.1.3.      Select your firm appearing on the right of the window:

The tabs from Section 86(2) going down will become available for you to interact with each one of them as soon as
you have completed the balances for the available one. An available tab is denoted by a red circle with an exclamation
mark.

                                                                                                         Page 6 of 23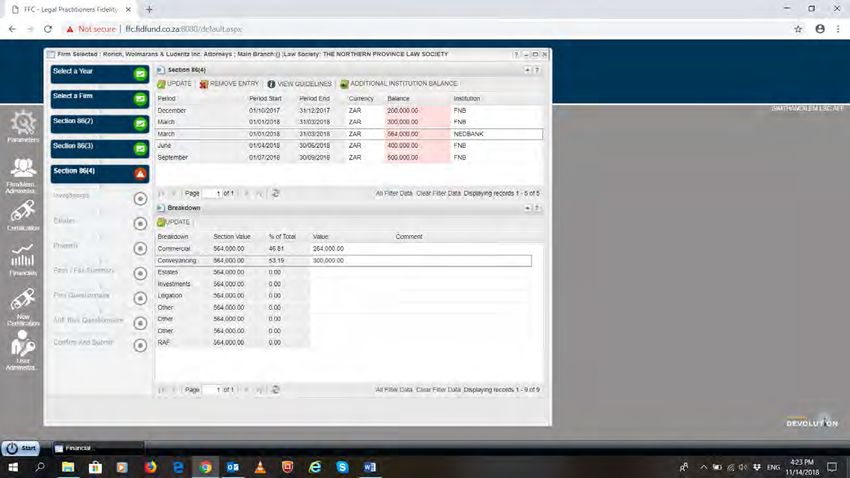
All financials tabs are mandatory to complete, except for Section 86(3). However, if there is an account number
populated for Section 86(3), you must provide balances for that account. For instance, you cannot complete s86(4) if
s86(2) is not completed, and if there is s86(3) balances required, that must also be completed before you can complete
s86(4) balances, and so on. Engage with each one of them by clicking once on each tab to capture the balances.

             3.1.3.1.   Section 86(2)

Capture balances as reflected on the account bank statement and interest rates as provided by the bank for all the
quarters, for all Section 86(2) trust accounts populated. Remember to click on “Update” once balances and interest
rates for each bank account per quarter are captured. You will be able to proceed to either s86(3) or s86(4), where
there is no s86(3).

             3.1.3.2.   Section 86(3)

Capture balances and interest rates for all the quarters, for all Section 86(3) (if any). Remember to click on “Update”
once balances and interest rates for each bank account per quarter are captured.

                                                                                                          Page 7 of 23
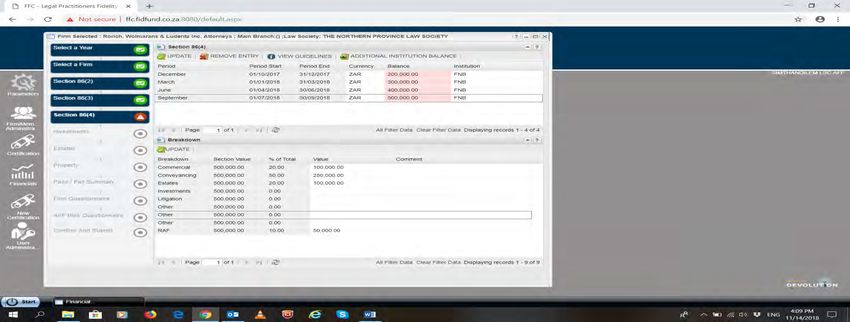
3.1.3.3.   Section 86(4)

Capture consolidated balances for all financial institutions with which Section 86(4) accounts were opened. To get the
financial institutions, select from the drop-down the name of the financial institution for which a consolidated balance
is reported, for all quarters. Once all quarters captured, click “Update” to save the captured information.

                                                                                                           Page 8 of 23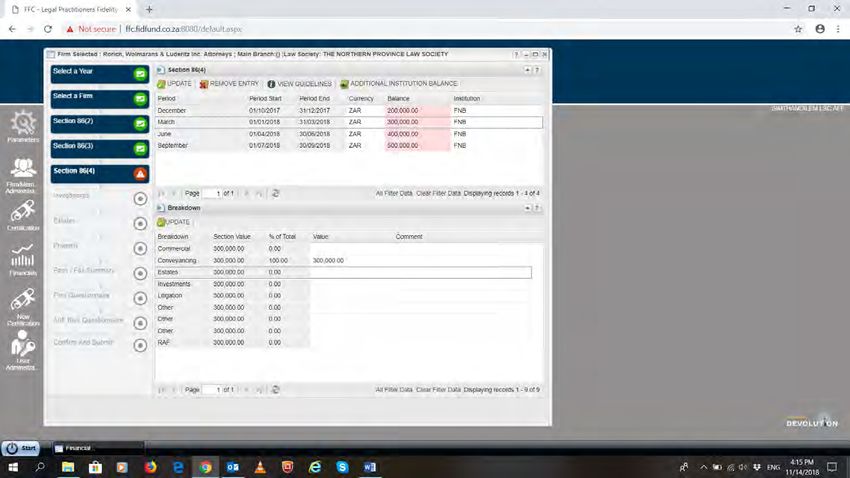
3.1.3.3.1. Where balances more than “ZERO” are reported, complete the breakdown section at the
           bottom with the breakdown of the reported balances, per quarter. This you do by clicking
           on the quarter for which you will provide a breakdown, the reported balance will populate
           itself at the bottom, in the breakdown section.
3.1.3.3.2. This breakdown is done with amounts (not percentages), which taken together must add
           up to 100% of the initially reported balance, per quarter. Should the breakdown not add
           up to 100% of the reported balance (up to the last cent), the system will not save the
           breakdown, and you will not be able to proceed any further.
3.1.3.3.3. For each completed breakdown, click “Update”, on the breakdown section, before
           selecting the next quarter.

                                                                                       Page 9 of 23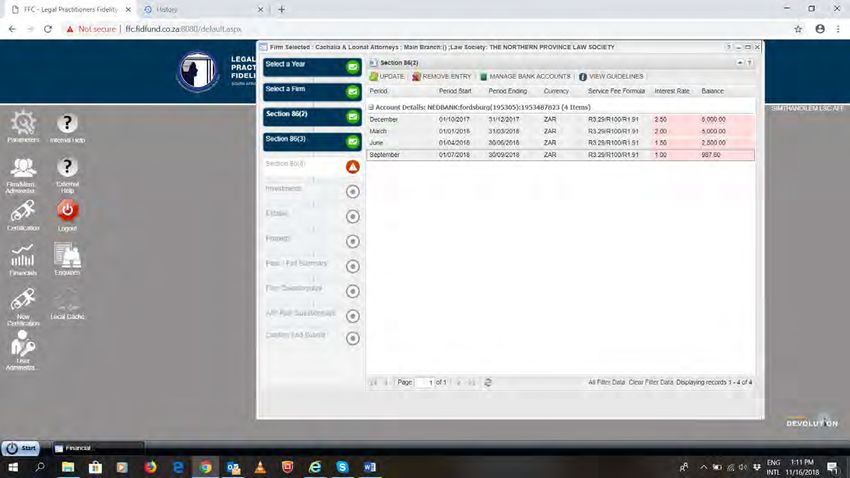
3.1.3.3.4. Should you wish to capture more balances in respect of other financial institution/s, for
           any of the quarters:
           3.1.3.3.4.1. Click on the quarter for which you need to provide the balance, then click on
                        the tab named “Additional Institutional Balance” upon which a new window
                        will pop up:
           3.1.3.3.4.2. Select the name of the financial institution from the drop down selection
           3.1.3.3.4.3. Confirm the currency (ZAR)
           3.1.3.3.4.4. Capture the balance.
           3.1.3.3.4.5. Click +Add to add the new record.
           3.1.3.3.4.6. Close the window, the new record will update on the balances.

                                                                                       Page 10 of 23
3.1.3.3.4.7. Repeat procedures 3.1.3.3.4.1 – 3.1.3.3.4.6 for additional financial
institutions for which you need to provide balances.
3.1.3.3.4.8. Repeat steps 3.1.3.3.1 – 3.1.3.3.3 for all added balances per financial
institution.
Page 11 of 233.1.3.4. Investments
Capture consolidated balances for all financial institutions with which the firm invested in terms of the rules. Select
the financial institution from the drop down, for all quarters.
Should you have balances with more than one financial institution, perform procedures 3.1.3.3.4.1 – 3.1.3.3.4.6 for
additional financial institutions.
Remember to click on “Update” once all balances for all the quarters are captured.
3.1.3.5. Estates
Capture consolidated balances for all financial institutions with which the firm opened Late Estate accounts. Select
the financial institution from the drop down, for all quarters.
Should you have balances with more than one financial institution, perform procedures 3.1.3.3.4.1 – 3.1.3.3.4.6 for
additional financial institutions.
Remember to click on “Update” once all balances for all the quarters are captured.
Page 12 of 233.1.3.6. Property
Capture consolidated balances for any other assets/property for all quarters.
Remember to click on “Update” once all balances for all the quarters are captured.
3.1.4. Click on Pass/Fail summary to see the audit approval status of the firm. An unfavourable audit report
status will render you unable to proceed past the questionnaire.
3.1.4.1. Scroll to the right at the bottom of the window to see the audit report status
Page 13 of 233.1.4.1.1. If the audit report was not received when it should have been submitted, the
firm will fail and member will not get a certificate
3.1.4.1.2. If the audit report was received but not approved, the firm will fail and
member will not get a certificate
3.1.4.1.3. If the audit report was not yet due at the time of completing the application,
the firm will pass
3.1.4.1.4. If the audit report was received and approved, the firm will pass
3.1.5. Click on “Firm Questionnaire”
3.1.5.1. Check that the form pre-populates the firm details, if not refresh the form.
Page 14 of 233.1.5.2. Complete the form until the end.
3.1.5.3. Submit the application form
3.1.6. Click on “AIIF Risk Questionnaire”
3.1.6.1. Complete the questionnaire until the end
3.1.6.2. Submit the form
Page 15 of 233.1.7. Proceed to “Confirm and Submit”
3.1.7.1. Acknowledge correctness of the completed questionnaire
3.1.7.2. Click on “Update” to complete the process
3.1.7.3. Verify that the “Confirm and Submit” tab gets a green tick before you can proceed to
“Certification”
Page 16 of 234. Go to “Certification” Module
4.1. Click once on “Certification”
4.1.1. Select the year for which you wish to generate a certificate under “Year Code”
4.1.2. Follow the exclamation mark, and click on Select a Member
Page 17 of 234.1.2.1. Select the member name appearing on the right of the screen (“Select Member” and
“Linked Firms” tabs will turn blue with green ticks)
4.1.2.2. Verify the information under member by scrolling at the bottom of the window to the right,
specific attention must be paid to the “PMT Course” and “Certification Payment”. For PMT
to pass the test, the colour coding must either be green (meaning completed or exempted)
or blue (meaning due in the future); and the certification payment must have a green
colour coding.
4.1.3. Go to “Linked Firms” and:
4.1.3.1. Verify that all the firms that you are linked to, and for which audit reports are required,
reflect
Page 18 of 234.1.3.2. Check that all the audit reports in respect of all firms linked to were received and approved
by Council (by scrolling at the bottom of the window to the right), except if the report was
not yet due. Failure by any of the firms to meet the requirement will render the application
unsuccessful.
4.1.4. Go to “Complete Application”
Page 19 of 234.1.4.1. Check that the application form prepopulates the member details, if not, use the refresh
button
4.1.4.2. Complete the application form until the end (this is in respect of all the firms linked to)
4.1.4.3. Click on “Submit Application” to submit the completed form
4.1.5. Go to “Issue Certificate”
4.1.5.1. Verify that your name reflects on the right of the window
4.1.5.2. Acknowledge correctness of the completed questionnaire
4.1.5.3. Click on “Request Certificate” to complete the process
Your request for a certificate will be received by the Legal Practice Council and processed further. The outcome of the
application will be communicated via email once the Legal Practice Council has concluded processing the application.
Page 20 of 235. Accessing the issued certificate
5.1. Go to Firm/Member Administration
5.1.1.Click on Firm/Member Administration
5.1.1.1. Select “MEM” – Member under Participation Type Code and Participation Type Description
Page 21 of 235.1.1.2. Follow the exclamation mark and click on “Members”
5.1.1.3. Select your name appearing on the bottom right of the window
5.1.1.4. All tabs under “Members” will become available and turn blue with green ticks
5.1.1.5. Click on “Certificates”
5.1.1.6. All issued certificates since inception of FFC system will reflect
5.1.1.7. Select the certificate you require
5.1.1.8. You can now download, and/or view and print the certificate
Page 22 of 23Page 23 of 23
You can also read