Hatch cover maintenance - A Master's Guide to: Standard Club
←
→
Page content transcription
If your browser does not render page correctly, please read the page content below
A Master’s Guide to:

Hatch cover
maintenance

                       |1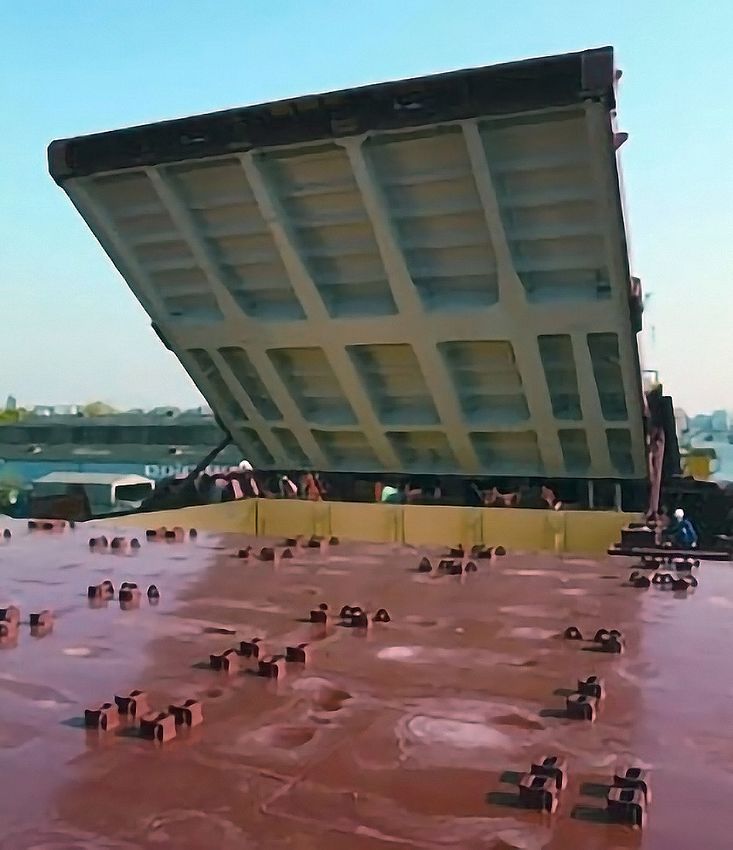
About this Guide
The purpose of this guide is to explain the key issues of hatch cover security
and to steer mariners towards active maintenance. Ensuring hatch covers are
well maintained reduces the number and cost of cargo wet damage claims.
As part of the Loss Prevention department’s continuing commitment to safety at sea, a
number of ‘Master’s Guides’ have been produced. They focus on delivering best practice
advice on key areas of vessel operations to avert avoidable claims and prevent accidents,
casualties and incidents at sea. These guides were created by harnessing the professional
knowledge of members in the Loss Prevention team who have served at sea.

A Master’s Guide to Hatch cover maintenance is an original Standard Club document,
first produced in 2002. This revised version provides further information about the
type of hatch covers commonly used on merchant vessels, emphasizes the importance
of vessel’s cargoworthiness and shares loss prevention advice on preventing cargo
damage resulting from hatch cover defects. Appendices are included which provide
checklists for routine operation, inspections, repair and maintenance.

This guide sets out to promote industry best practice and was written in
collaboration with Lloyd’s Register, one of the world’s leading providers
of professional services for engineering and technology.

Captain Yves Vandenborn, Director of Loss Prevention

 2 | A Master’s Guide to Hatch cover maintenance
Contents

01. Introduction                                 4        Maintenance of the double drainage system   25
02. Hatch covers and their function              5        Maintenance of non-return drain valves      25
    Hatch cover construction                     5        Maintenance of hatch cleats and wedges      26
    Hatch cover function                         5        Maintenance of locators                     28
03. Types of hatch covers                        6        Maintenance of stoppers                     28
    Folding hatch covers                         6   	Maintenance of hydraulic systems
    Side-rolling hatch covers                    6     and components                                 28
    Lift-away hatch covers                       6   	Maintenance of rubber seals on hold
                                                       access doors, access hatches and ventilators   29
    Single-flap hatch covers                     7
                                                     11. Heavy weather precautions                    30
    Piggy-back hatch covers                      7
                                                     12. Safety when working with hatch covers        31
    Stacking hatch covers                        7
                                                     13.	Appendix 1 – Procedures to open and
04. Basic advice                                 8
                                                          close hatch covers                          32
05. Common false beliefs about hatch covers     11
                                                     14. Appendix 2 – Hatch cover inspection
06. Leakage problems                            13       checklist                                    33
07. Use of sealing tape and foam fillers        14   	Checklist 1 (for single pull, side rolling,
08. Leak detection tests                        15     folding type hatch covers)                     33
09. Monitoring and inspection                   17   	Checklist 2 (for pontoon type hatch covers
10. Maintenance and repair                      20     with tarpaulin)                                34
    Maintenance of the hatch cover structure    20   15. Appendix 3 – Hatch cover operation checklist 35
    Maintenance of hatch cross joints           20   16. Appendix 4 – Sample form for ultrasonic
    Maintenance of hatch coamings               20       weathertightness test of hatch covers        36
	Maintenance of the landing pads
  (steel-to-steel contact surfaces)             22   List of figures                                  38
    Maintenance of hatch wheels and trackways   22   Authors                                          39
    Maintenance of rubber packing
    – surface damage                            23
	Maintenance of rubber packing
  – permanent deformation                       23
    Maintenance of rubber packing
    – aged gaskets                              23
    Maintenance of compression bars             24
    Maintenance of gasket channels              24

                                                                                                      |3
01. Introduction

The most common cause of cargo wet damage claims on dry cargo ships is attributed
to leaking hatch covers.

Hatches leak for a variety of reasons, but mainly        be within a weathertight standard; in practice, no
because of poor maintenance or failure to close          leakage is the standard for weathertightness. For
them properly. Leaking or badly maintained hatch         this reason, we include guidance on procedures for
covers can lead to more serious consequences             conducting leak detection tests on hatch covers.
than wet cargo, including flooding, accelerated
corrosion or even loss of the ship. It is crucial for
                                                         Our research shows that many mariners consider
safety at sea and protection of the environment
                                                         hatches to be robust, monolithic structures and
to maintain hatch cover weathertightness and
                                                         thereby fail to appreciate the small tolerances
strength. These issues are addressed in the guide.
                                                         on panel alignment and gasket compression. In
                                                         fact, hatch covers are complex, precision-made
The requirements for hatch covers are laid out in        structures that need to be handled with care.
the International Convention on Load Lines, and the
structural strength requirements are laid down in the
                                                         For example, 4mm of wear on the steel-to-steel contact
SOLAS Convention and Classification Rules. Compliance
                                                         is enough to damage the rubber sealing gaskets beyond
with these requirements is confirmed during periodical
                                                         repair and a 5mm sag along the cross joint can cause a
ship surveys but may also be confirmed at any time by
                                                         large gap between the compression bar and the gasket.
Port State Control Officers during an intervention.

                                                         The club’s condition surveys and claims analysis
There is a common misconception and a
                                                         indicate that, in many cases, hatch cover
degree of confusion throughout the industry
                                                         maintenance is not considered to be important
as to whether hatches are constructed to be
                                                         and, when maintenance is carried out, it is
watertight or weathertight. A watertight closure
                                                         often not done in line with the manufacturers’
is designed to withstand water pressure from
                                                         guidance or industry best practice.
both sides of the structure, while weathertight
means that regardless of the sea conditions,
water will not penetrate into the ship.                  Repairs are often only carried out after a ship has
                                                         failed a hatch cover tightness test at the load port.
                                                         In such cases, maintenance is often done in haste,
Hatch covers are constructed to be weathertight,
                                                         in an unplanned manner and without proper care.
which means that, in any transient condition, water
                                                         Proper maintenance and repair requires a systematic
shall not penetrate through the covers or the
                                                         approach, but often crew cut corners in an effort to
double drainage system. However, it is apparent
                                                         pass the tightness test as soon as possible, without
that minor leakage into a cargo hold during a
                                                         giving proper regard to the quality of repairs.
hatch cover test is often erroneously considered to

4 | A Master’s Guide to Hatch cover maintenance
02. Hatch covers and their function

Hatch covers on bulk carriers have two basic functions: in open position, they provide
access to the holds for loading/discharging cargo; and in closed position, they prevent
water ingress by sealing the hatchway in a weathertight condition, so that there is no
leakage into the cargo hold in any sea condition.

Hatch cover construction                                   Hatch cover function
Typically, hatch covers are lightweight steel grillages,   Hatch covers provide a primary structural and
either of open or closed box-type construction. Modern     weathertight barrier to prevent water ingress into
design methods using finite element technology             cargo holds. Although hatch covers might look big
enable more efficient material distribution, which         and heavy, they are sensitive to misalignment.
results in lighter (thinner) structures. Construction
from high-tensile steel results in even thinner plate
                                                           During the life of the ship, hatch covers are
being used. For this reason, these lightweight
                                                           subjected to the various forces caused by the
structures must be ‘handled with care’. Prevention
                                                           ship’s movement, wave accelerations, and load
of corrosion is essential as safety margins are finite.
                                                           and stress factors (such as racking and sheering
                                                           forces, bending moments and hogging/sagging).
                                                           Rigorous inspection, regular maintenance and
                                                           prompt repair of damaged covers, including securing
                                                           and supports, are essential to ensure they:
                                                           •    aintain sufficient strength to resist green seas in
                                                               m
                                                               extreme weather
                                                           •    aintain a barrier against ingress of water during
                                                               m
                                                               normal seagoing weather conditions.

                                                           Failure to maintain hatch covers correctly can lead
                                                           to physical loss of a cover in extreme weather as
                                                           well as hold flooding and possible foundering. Minor
                                                           leakages can cause cargo damage and, if they occur
                                                           over a prolonged period, damage to the ship’s
                                                           internal structure. Long-term structural decline
                                                           can lead to structural collapse and total loss.

Figure 1: Hatch cover construction

                                                                                                                       |5
03. Types of hatch covers

Folding hatch covers                                     Side-rolling hatch covers
Folding hatch covers are commonly used on general        Side-rolling hatch covers are commonly used on the
cargo ships, multipurpose vessels or smaller bulk        large bulk carriers, such as panamax and capesize
carriers, such as handysize, handymax and supramax       vessel types. They consist of two panels per hatch,
vessel types. They consist of two (or more) panels,      with each rolling sideways on a pair of transverse
which are connected by hinges to form a folding pair.    ramps. This minimises the obstacles to be considered
In many cases, the hatch cover comprises two folding     by the shore crane or other loading/unloading
pairs. One pair is stowed at the aft end of the hatch    device operator when loading and unloading.
and the other pair is stowed at the forward end. The
folding pair is operated by hydraulic cylinders acting
directly on the end hinge arms, which are connected
at stools on the deck. When the cylinders push the
end panel up from the closed position, the cover
folds and the second panel, fitted with wheels, rolls
on rails to a stowage position. The panels are usually
secured in the open position by semi-automatic
locking devices interacting with the wheel arms.

                                                         Figure 4: Side-rolling hatch covers

                                                         Lift-away hatch covers
                                                         Lift-away hatch covers are commonly used on
                                                         containerships and multipurpose vessels to facilitate
                                                         quick and flexible cargo-handling operations.
                                                         Lift-away panels are handled with a spreader
                                                         using either shoreside container cranes or the
                                                         vessel’s own cranes. The panels can be stacked
Figure 2: Folding hatch cover                            together on the quay and/or on the ship’s deck.

Figure 3: Multi-folding hatch covers                     Figure 5: Lift-away hatch cover

6 | A Master’s Guide to Hatch cover maintenance
Piggy-back hatch covers
Piggy-back hatch covers are used when the available
deck space is insufficient to accommodate folding
or rolling hatch covers. This system comprises
two panels, with one panel being raised high
enough for the other to roll underneath and to
support the lifted panel on to its ‘back’. Both
panels can then be rolled back and forth.
Figure 6: Lift-away (pontoon) hatches
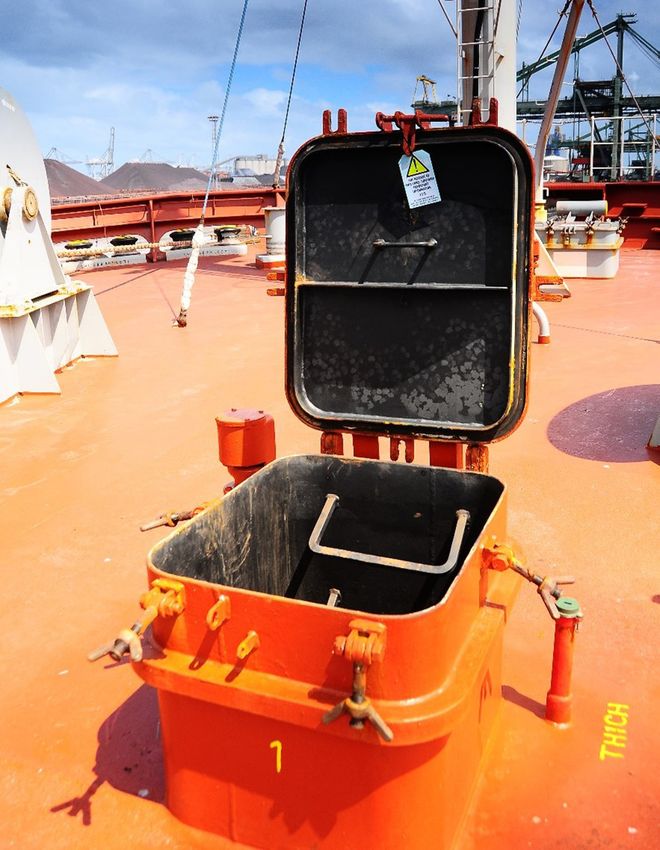
Single-flap hatch covers
This is a hydraulically operated single-flap cover, which
can be supplied to a length of more than 40 feet. The
design uses a short lever arm together with a powerful
hydraulic system for safe operation. Two trailing
arms secure the hatch cover in its opened position.
Two single-flap hatch covers (one forward, one aft) Figure 8: Piggy-back hatch covers
can be supplied to accommodate long hatches.
Stacking hatch covers
Stacking hatch covers for weather decks are usually
all hydraulic in operation and the panels move into
stowage or closure positions in a specific sequence.
A set will comprise several panels – each of which
is fitted with a towing device that can be connected
to move the panels to and from a stacking position
by a continuous chain drive mechanism. The chain-
driven stacking hatch cover system employs the
same hoisting principles as the piggy-back system.
Figure 7: Single-flap hatch cover Figure 9: Stacking hatch covers
|7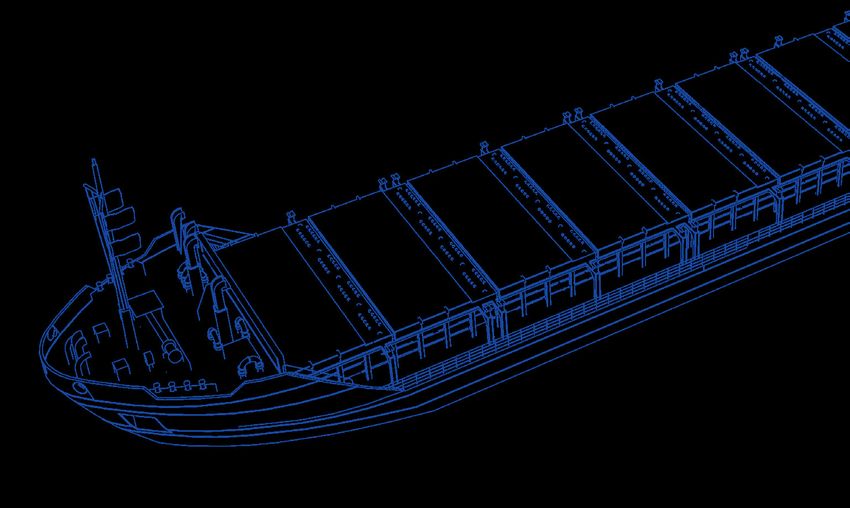
04. Basic advice

The following best practice procedures and advice will help to keep your ship’s hatch
covers in good condition.

                         Always:
                         •   carry out regular examinations of the hatch covers, internal structure (where possible)
                             and coamings to identify:
                             -   general levels of corrosion (check with your classification society for corrosion allowances)
                             -   localised corrosion at welded connections (grooving)
                             -   cracks in joints and weld metal
                             -   permanent distortion of plating and stiffeners
                             -   misalignment between panels
                         •   call a class surveyor and carry out repairs as soon as possible when there are:
                             -   indications of excessive corrosion, eg holes or local buckling of the top plate
                             -   cracks in main structural joints
                             -   areas of significant indentation, other than localised mechanical damage
                             -   areas of distortion or buckling on the top plate, side and end plates, and internal structure
                         •   be particularly vigilant after heavy weather
                         •   rectify any steel-to-steel fault before renewing rubber packing. If steel-to-steel contact
                             points are defective, expensive rubber packing will be ruined after only a few months of
                             use. Refer to the manufacturer’s manual for the design and wear limits/tolerances
                         •   replace missing or damaged hatch gaskets (rubber packing) immediately. The minimum
                             length of replaced gasket should be one metre
                         •   keep hatch coaming tops clean and the double drainage channels free of obstructions.
                             (Open hatch covers to clean coaming tops and the double drainage channels after
                             loading bulk cargo through grain or cement ports)
                         •   keep cleats, wedges and locking devices in serviceable condition and correctly adjusted
                         •   keep hauling wires and chains adjusted correctly
                         •   attach locking pins and chains to open doors and hatches
                         •   keep wheels, cleats, hinge pins, haul wires and chain tension equipment well-greased
                         •   test hydraulic oil regularly for contamination and deterioration
                         •   keep hydraulic systems oil-tight
                         •   ensure the oil tank of the hydraulic system is kept filled to the operating level and
                             with the correct oil
                         •   clean up oil spills. If the leak cannot be stopped immediately, construct a save-all to
                             contain the oil and empty it regularly
                         •   engage tween deck hatch cover cleats when the panels are closed (where applicable)
                         •   give notice that maintenance is being performed so that no one tries to open/close the hatch
                         •   remember that continuing and regular maintenance of hatches is more effective and
                             less expensive than sporadic inspections and major repairs.

8 | A Master’s Guide to Hatch cover maintenance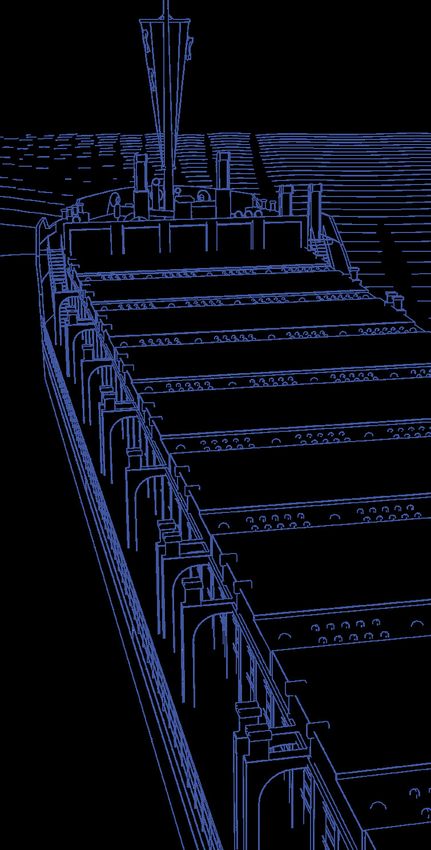
Never:
•   treat temporary repairs as if these were permanent. The strength of the cover, and
    ultimately the ship, will depend on the quality of the repairs carried out
•   ignore serious corrosion, cracking or distortion in the covers and supports. These are
    signs of weakness and are potentially hazardous
•   allow grooves to form in the coaming top, especially where the hatch side or end
    panel rests when the hatch is closed
•   apply petroleum-based grease or paint to rubber packing
•   remove the rubber ball from a non-return drain valve
•   use anything other than the recommended hydraulic oil
•   leave cleats unfastened when proceeding to sea
•   attempt to open or close any hatch that has a load or cargo on it, or has any cleats
    or wedges engaged
•   open hatch covers at sea unless absolutely essential
•   leave open covers unattended and unsecured when at sea
•   tighten down the cleats so that the hatch cover is unable to move on the
    coaming top.

                                                                                             |9
Basic advice continued

                                                                                    Quick acting cleat
                                       Wedge cleat
                                                                                                         Safety locking hook & chain

                                                                   Steel-to-steel
                                                                   contact

                                                                   Double drainage
                                   Double drainage                 Drain valve
                             Steel-to-steel contact
                                                                             Section AA

                                                                                                     A

                                                                                                     A

                                             Jacks/Pot-lift cylinders

Figure 10: Typical arrangement of a multi-panel hatch cover

                                                                                                                          Balancing roller

                                                                                                                       Quick acting cleat

           Double drainage
           Compression bar
           Steel-to-steel contact

Figure 11: The double drainage channel and ‘steel-to-steel’ contacts are shown

10 | A Master’s Guide to Hatch cover maintenance
05. Common false beliefs about
hatch covers
• Hatch covers are non load-bearing – they are • Hatch covers will always leak in heavy weather.
only there to keep the water out. Hatch covers are designed to withstand the rigours
Hatch covers can be subjected to very high-pressure of the sea. Provided the cleats are correctly
loadings during heavy weather. This in turn induces adjusted, the hatch gaskets are in good condition
significant shock loadings and in-plane stresses in and the construction material is sound, then hatch
the component plating, girders and stiffeners. covers should not leak, regardless of the weather.
• Leakage is an inconvenience resulting in • Screwing cleats down hard will ensure
cargo wetting. weathertightness.
Leakage can, where unchecked, cause serious flooding No amount of tightening of cleats beyond
and, ultimately, endanger the ship and its personnel. their correct position will improve hatch cover
weathertightness. Hatch cover manufacturers
usually test for weathertightness without engaging
• Internal cracking at joints, corrosion/cracking in
cleats. The weight of a hatch is sufficient to create
welding and distortion of plating do not affect
the required gasket compression.
the hatch cover function.
Such problems change the way a structure works and
can significantly reduce the load carrying capacity. The primary function of the cleats is to hold the
panels down when the ship is at sea. However,
as there will be relative movement between the
• Hatch covers constructed of high-tensile steel are
panels and coaming, cleats should also cater for
more robust than those made from mild steel.
some movement. Excessive tightening of cleats will
This is not the case. A cover constructed from high-
make the system too rigid relative to ship structural
tensile steel will normally comprise thinner plating
movement – consequently damaging the cleats and
than one constructed from mild steel.
the rubber packing.
• It is the rubber seal that keeps the water out of
the cargo.
The double drainage system is as important in
keeping water away from cargo.
• Renewing a worn rubber seal is all that is needed
to keep a hatch weathertight.
Worn rubber is usually the result of worn steel-
to-steel contact surfaces or a deformed structure.
Rubber renewal alone is futile unless the steel-to-
steel contact surface is repaired.
• The hatch cover side plate when closed should Figure 12: Damaged cleat
rest on the coaming top.
If the weight of a hatch panel is sufficient to cause • The use of hatch cover tape and foam fillers will
distortion of its side plate (hatch skirt), then landing ensure weathertightness.
pads should be fitted to the panel to transfer the The use of sealing tape and/or foam fillers gives
weight evenly across the coaming top. a false sense of security. In bad weather, they can
(and do) wash off. Hence, their use should never be
solely relied upon to prevent water ingress.
| 11Common false beliefs about hatch covers continued
• Drain valves are not important; therefore, it does • Tween deck cleats are not essential because the
not matter if they are blocked. tween deck covers are not weathertight.
Drain valves are an essential feature of the double Cleats on tween deck covers should always be
drainage system as they allow water that has engaged when the covers are closed. This is because
penetrated the hatch gasket (rubber packing) they stop tween deck panels from jumping when
to drain away. If the drainage system or valve is a ship pitches or slams, ensuring maintenance of
blocked or closed, water will spill from the drainage tween deck strength. When cargo is stowed on a
channel into the cargo hold. tween deck panel, the panel must be secured to the
ship’s structure.
Figure 13: Blocked drain channel
Figure 14: Tween deck panel
• When carrying a cargo on top of a hatch cover, it
is not necessary to fasten cleats. • Any rubber gasket can be used, provided the
Cleats prevent excessive movement of the hatch gasket fits the channel.
cover as a ship bends and flexes in a seaway. They No, only use the gasket type recommended by the
allow limited movement to ensure correct contact hatch cover manufacturer.
between the cover and its coaming, preventing
hatch cover damage. Cargo loaded on the hatch
does not secure the hatch cover to its coaming.
12 | A Master’s Guide to Hatch cover maintenance06. Leakage problems
Most leakage problems occur because of poor maintenance. Although robust, hatch
covers will leak if compression surfaces are not aligned correctly, if gaskets are
damaged or worn, if there are cracks or holes in the plating, or if there is permanent
overall distortion of the covers.
The quality of sealing is affected by lack of alignment for signs of leakage such as rust staining or drip
and poor gasket compression. When hatch covers marks. Regular adjustment and repair by ship’s
are opened at the end of an ocean voyage, look staff will reduce the overall cost of maintenance.
Steel-to-steel worn
Worn wheel rim,
track and spindle
Worn hinge pin
Figure 15: Typical defects that will cause poor sealing
| 1307. Use of sealing tape and foam fillers
The use of sealing tape and/or high expansion foam fillers could be considered as an
extra precaution, but these are not substitutes for having well-maintained hatch covers.
Hatch cover sealing tape is a short-term temporary Further, the usage of sealing tape and/or high-
measure that is used to stop water from entering cross expansion foam fillers may indicate that the ship
or side joints. However, the prolonged use of tape is aware of the potential leakage of the hatch
increases corrosion in the cross joint and side plate. covers. If the cargo receivers are presented with
such an evidence, shipowners would be in a weak
and disadvantageous position in cargo claim
High-expansion foam fillers are used to fill the air
negotiations. The hatch covers should be well
space that is formed along the cross joint of two
maintained and their weathertightness should
closed panels. In heavy weather, foam fillers could
be ensured without additional measures.
be washed away. Hence, their use should never
be solely relied upon to prevent water ingress.
The use of sealing tape and foam fillers should be
limited to:
• emergency use (after commencement of voyage),
when hatches are known or thought to be leaking
and there is insufficient time or opportunity to
complete satisfactory permanent repairs
• charterers’ requirement. Charterers may require
owners to additionally apply sealing tape when
highly water-sensitive cargoes are carried
• fumigation. Fumigation tape is usually applied to
hatch covers during fumigation. The tape is not
heavy duty and should be removed when fumigation
has finished.
Members should avoid using sealing tape and/
or high-expansion foam fillers as these give a false
sense of security and can be easily washed away Figure 16: Hatch cover sealing tape
by waves. The club does not recommend using
sealing tape or foam fillers as a permanent means
of achieving weathertightness of hatch covers.
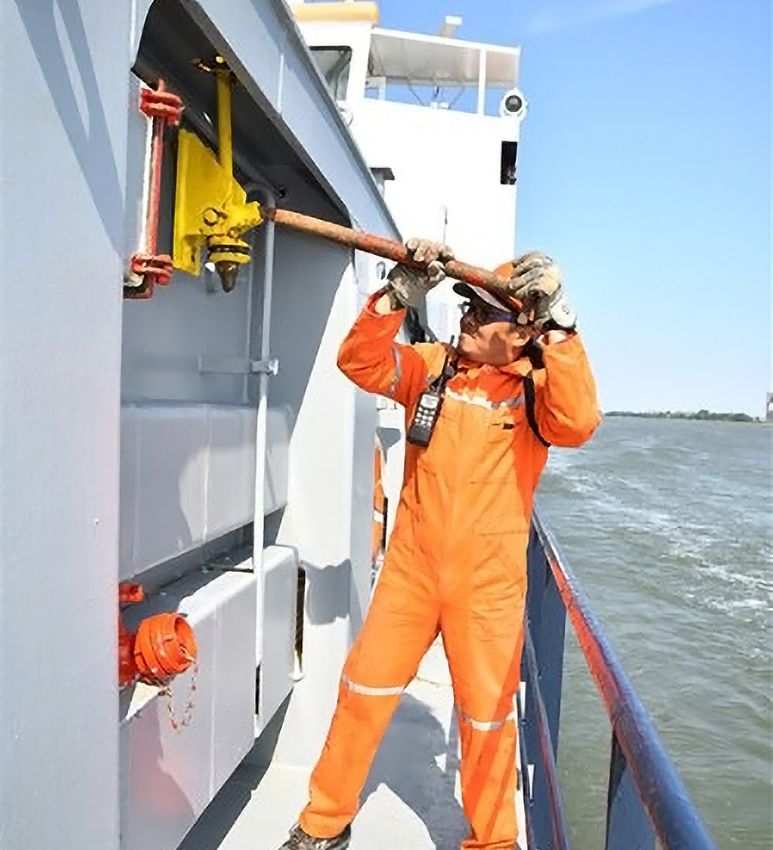
14 | A Master’s Guide to Hatch cover maintenance08. Leak detection tests
Testing of hatch cover weathertightness can be performed by different methods. The
two most common leak detection tests are the water hose test and the ultrasonic test.
Ultrasonic testing is the preferred method because areas of inadequate hatch sealing
are accurately located.
There are other methods such as light test, chalk Water hose leak detection test
test, air test and putty or moulding test, but these Water hose tests are commonly used to determine
cannot generate measurable results. Light testing hatch cover leaks. The general procedure for hose
is potentially dangerous because personnel are testing is to apply a powerful jet of water from a 20-
in a closed, dark hold looking for light infiltration 50mm diameter hose fitted with a 12mm diameter
between panels, while chalk testing gives only nozzle held at a distance of 1-1.5 metres from a hatch
an indication of poor compression and potential joint, moving along the joint at a speed of 1 metre
leaks. Chalk testing is not a leak detection test. every 2 seconds. The pressure in the hose nozzle should
be maintained at not less than 2.0 bar during the test.
Chalk testing
When performing a chalk test, the top edge of every The drawbacks of hose testing are:
compression bar is covered with chalk. Hatches are • the hold needs to be empty
then fully closed and reopened. The rubber packing
• it cannot be performed in sub-zero conditions
is examined for a chalk mark, which should run
continuously along the packing’s centre. Gaps in the • it causes large amounts of water to be washed onto
chalk mark indicate lack of compression. Chalk testing the deck and into sea (potentially causing pollution)
merely indicates whether hatch panels are aligned and • the test cannot pinpoint leaks on the cross joint or
compression is achieved. It does not show whether side joint accurately
compression is adequate and, therefore, it is not a test • two people are needed to supervise the test. Care
for weathertightness. should be taken to avoid excessive nozzle back-pressure.
Figure 17: Chalk test Figure 18: Water hose leak detection test
| 15Leak detection tests continued
Ultrasonic leak detection test It has been noted that abundant quantities of
Ultrasonic leak detection is the best way to generate Vaseline or grease are often applied to the packing
measurable and reliable results, as it accurately locates rubbers and/or compression bars in order to pass the
potential points of leakage. This is necessary to determine weathertightness test and satisfy (actually mislead) the
whether the hatch covers are in an acceptable condition. attending surveyor, so that the order to begin loading
can be given without any further delay. This entails a
big risk as hatch covers treated and prepared in such a
The International Association of Classification Societies
way might pass a test in port but will allow water entry
(IACS) has developed standards and criteria under IACS
when at sea. In such cases, although the ship passed
UR Z17 ‘Procedural Requirements for Service Suppliers’
a hatch test whilst in port, the cargo is frequently
for firms engaged in ultrasonic testing. This ensures
delivered in the discharge port with wet damage.
that service suppliers engaged to support surveyors in
the checking of hatch covers for class and statutory
purposes are familiar with the theory of ultrasound, and Whenever a substantial claim is filed against the ship,
have practical testing experience and basic knowledge surveyors will be instructed to attend on board and
of hatch-cover design, maintenance and repairs. carry out an investigation into the cause of the damage.
This typically reveals that quick or improper temporary
repairs were carried out in the load port, which were not
Ultrasonic leak detection tests should be carried out
sufficient to withstand the rigours of an ocean voyage.
by approved service suppliers. The assigned operator(s)
Moreover, these types of improper or quick repairs raise
must present their service supplier approval certificate
another important issue, namely that of due diligence.
and equipment calibration certificates.
Under the due diligence principle, owners are required
The test involves closing and securing the hatches, and
to carry out a reasonable inspection to ensure that
placing an electronic signal generator inside the cargo
the hatch covers are in good condition. If a defect
hold. A sensor is then passed around the outside of all
is found during this inspection, repairs should be
compression joints. Readings taken by the sensor indicate
carried out in line with industry good practice in
points of low compression or potential points of leakage.
order to restore the condition of the hatch covers.
Prior to the closed hatch test, an Open Hatch Value
Whilst hose tests give an idea of the physical contact
(OHV) for ultrasonic reception should be established,
between a packing rubber and its compression bar/
with the hatch covers in the open position. The
mating surface, ultrasonic tests give an idea of areas
acceptable range of leakage is less than 10% of the
where the compression of the sealing system is
OHV. During the closed hatch test, any anomalies
compromised. Contact and compression are two different
registering greater than 10% of the OHV indicate
things; consequently, the test results of hose tests
potential leakage, which should be examined further.
and ultrasonic tests cannot be compared in practice.
Ultrasonic testing overcomes most of the limitations
associated with hose testing and can be carried out
when holds are loaded.
The drawbacks of ultrasonic leak detection tests are:
• the equipment requires an experienced and
specialist operator to interpret the readings
• the equipment requires regular calibration
• the equipment is not normally part of the Figure 19: Ultrasonic leak detection test
ship’s equipment.
16 | A Master’s Guide to Hatch cover maintenance09. Monitoring and inspection
Hatch covers and their fittings should be inspected at the end of every cargo voyage
and all findings should be recorded. The IMO resolution MSC.169(79) list a number of
hatch cover items that should be inspected on each voyage cycle. As certain items can
be inspected only while the covers are open or semi-open, eg the sealing and draining
arrangements, other items may be inspected during the voyage to reduce interference
with cargo operations as far as possible.
A hatch cover inspection and maintenance routine • Hinge pins. Look for wear, particularly at cross joints
that fits chronologically into the hull inspection and hydraulic cylinders. Worn hinge pins can cause
and maintenance plan should be implemented. hatches to slew and misalign at the cross joint(s).
Inspections should be planned and held in time for Misaligned hatch panels will leak.
repairs to be completed before the next cargo voyage. • Drive chain tensioners. Check their condition and
Cargo spaces should be emptied of all cargo and adjustment.
combustible material if welding and burning torches
• Cleats and wedges. Check for physical damage,
are used. The checklist in Appendix 2 can be followed.
corrosion and tension when locked.
The overall objective is to implement an efficient
inspection and maintenance routine that is
cost-effective and allows the crew to conduct a
thorough examination rather than just ticking
a check box due to time constraints.
Inspect and check
• Hatch condition. Covers and coamings should be
well painted and free from significant corrosion,
cracks and distortion. During an inspection look for:
- holes and permanent distortion in the plating
Figure 20: Inspect condition of cleats and panel for distortion
- distortion of beams and/or stiffeners on the
underside of the top plate
Drive chains – check their length
- corrosion around the welded connections of
Drive chains and associated equipment are fitted in
beams or stiffeners
pairs, opposite one another. The side towing chains,
- cracking of connecting joints and welds. sprockets and hydraulic cylinders on opposite sides
• Hatch movement. This should be smooth. If violent should match. Adjust the tension of chains between
movement is observed, investigate and remove panels so that the chains on both sides are exactly
the cause. the same length. Do this by removing or adding
• Towing and backhaul wires. These should be free of chain links. If the entire length of chain needs to
kinks or broken strands. Repair or replace damaged be replaced, then replace the chains on both sides
or worn wires. Use extreme care when handling at the same time. Always consult the hatch cover
wires to avoid injury. manufacturer for details of chain length. As a rule,
chain sag, measured from the assumed horizontal
• Hydraulic system. Check for leakage.
at mid-point along the chain, should be a fist wide.
| 17Monitoring and inspection continued
Figure 21: Check chain length Figure 23: Hatch wheels – check for alignment
Steel landing pads – check for wear Rubber seals – check for elasticity, mechanical
Worn landing pads will damage hatch gaskets and damage and permanent deformation
cause leakage. When newly fitted and closed in When hatches are opened, rubber seals should
the sea position, the top plates of adjacent hatch regain their original shape. If they do not, check
panels should be level. Any deviation from level is an for ageing. Permanent deformation should not
indication of landing pad wear or permanent distortion. exceed 50% of the design compression.
If noted, investigate fully and repair immediately.
Figure 22: Landing pads – check if they are worn down
Design compression = 25% of thickness = 10mm
Discard criteria = 50% of design compression = 5mm
End stop pads – check for damage
71mm
End stop pads prevent hatch panels from overrunning
when hatches are fully open. Look for physical damage.
40mm
Hatch wheels – check for alignment
Hatch wheels should align squarely with the hatch
trackway. If the wheel axle is worn, the wheel will
loll. If the wheel lolls, repair it immediately.
Figure 24 (a and b): Rubber packing – check damage and deformation
18 | A Master’s Guide to Hatch cover maintenanceLocking devices and hydraulic cut-outs – It is recommended to always use the manufacturer’s
check that they operate approved spare parts. While it may be tempting to
Locking devices are often pins or hooks, these order spares that are cheap or do repairs that are not
should engage when the hatch is open. Look in line with the manufacturer’s guidelines, it should
for physical damage, rusting and seizure. not be forgotten that well-maintained hatch covers
Hydraulic cut-outs should move freely. can make the difference between a profitable or a
loss-making voyage. Claims resulting from cargo wet
damage due to leaking hatch covers rank high on the
Spares
overall loss figures on dry cargo ships and can weigh
It is essential to maintain sufficient spares of cleats,
heavily on the owner’s operational budget and profit.
wedges and different shapes of rubber packing
(linear, L-shaped end pieces, flat corners and vertical
corners, as applicable) to complete planned routine
maintenance. Rubber packing and adhesives have
a limited shelf life, so check the date stamp and
discard them if they are beyond the use-by date.
Figure 25 (a and b): Spare rubber packings
| 1910. Maintenance and repair
Poor maintenance of hatch covers can cause leakages, leading to cargo damage, and
represents a hazard to the ship and its crew. Although hatch covers are simple and
durable, their sealing gaskets are easily damaged.
Based on the club’s experience, continuing and regular Maintenance of the hatch cover structure
maintenance of hatches is more effective and less Corrosion reduces the strength of a hatch cover.
expensive than sporadic inspection and major repair. Reduced strength gives rise to increased deflections
and possible loss of the steel-to-steel contact
Always keep a detailed record of maintenance. when a cover is loaded (green seas or cargo). If
In the event that a claim for wet damage is filed advanced, corrosion can weaken a hatch cover to
against the ship, well-documented records will be the point where normal loading causes permanent
of great value in defending the owner’s interest deformation and permanent loss of the steel-to-steel
and proving that due diligence was exercised. contact. Good contact is an essential prerequisite for
weathertightness. Accelerated pitting corrosion leads to
holes in the top plate, and cracks may appear, generally
Take care during extensive hatch cover repair progressing from the landing pad into the coaming.
to avoid cover distortion. Major repairs, such as
inserting large sections of plating or stiffening,
are best done with the hatch covers removed Corrosion occurs mainly at the panel ends
from the ship in order to minimise distortion. along the cross joint or where access is difficult,
but it can also occur on the underside of a
panel, especially along hatch beams. Regular
A good maintenance strategy includes proper maintenance and painting are necessary.
record-keeping. Maintenance-related documents,
such as test reports, work orders, spare part
orders, work schedules, hatch manual and
drawings, onboard checklists and inspection
reports, etc. should be properly kept and filed.
It is recommended that the routine inspection and
maintenance regime conforms with the manufacturer’s
instructions and IMO resolution MSC.169(79).
It should be recorded in the ship’s Planned
Maintenance System (as required by the ISM Code),
with ship-specific hatch cover checklists developed,
if manufacturer’s instructions are not available.
Continuous maintenance should be Figure 26: Maintenance of the hatch cover structure
scheduled, according to the manufacturer’s
guidelines and at least:
Whilst doublers might, under certain circumstances,
• after every cargo operation
be acceptable as a temporary repair, they should
• every three months never be considered as a substitute for a proper insert
• every 12 months. repair. Doublers will cover up damage and prevent
20 | A Master’s Guide to Hatch cover maintenancewater ingress, but they will not restore the required Maintenance of hatch coamings
strength or stop the corrosion process. Welding work Look for cracks at coaming corners, particularly in
on hatch covers should be carried out by trained the structural joints. Also look for grooving abrasion
and qualified personnel, as excessive heat during caused by the steel wire ropes of cranes. If damage is
welding may cause distortion of the panel structure. found, consult the ship’s classification society before
commencing repairs in case the coaming or deck needs
It is recommended to consult with the ship’s to be reinforced.
classification society before commencing repairs.
Hatch covers with a double skin, in the form of a closed
box, are filled with inert gas. After structural repair,
the inner spaces must be re-inerted. This is done by
inserting special tablets (available from the hatch
cover manufacturer) into the space and welding it shut.
Never allow water to penetrate the box construction.
Maintenance of hatch cross joints Hold
It is essential for the cross joint to be in good condition and
properly aligned. Maintenance and repair should focus on:
• examining the cross joint structure for corrosion
• examining the joint hinges for pin wear, blade
cracking or weld failure (regrease the hinge pin
bushes, making sure grease reaches the hinge pins)
• examining the steel-to-steel inter-panel blocks
and locators for wear (check the top plate of hatch
panels, which should be level when closed) Coaming
• checking the gap between panels when they are
closed (misalignment could be caused by an
incorrectly adjusted cylinder or the wheel tracks
could be worn).
Hatch cover
& coaming
Figure 27: Maintenance of hatch cross joints Figure 28: Known areas where cracks may occur
| 21Maintenance and repair continued
Examine coaming support brackets for corrosion where When the horizontal coaming plate or hatch landing pad
they connect with the ship’s deck for signs of grooving is worn, pressure on the hatch gasket (rubber packing)
and cracking. Make sure coamings and their support increases. If this wear is greater than 4mm, increased
brackets are painted. pressure on the gasket will cause damage. In this case, repair
of the landing pad is essential. Before considering such a
repair, the manufacturer’s manual should be consulted or the
Coamings can be damaged by cargo equipment during
manufacturer should be contacted for advice.
loading or discharge. Look out for damage and repair
the coamings if damaged.
The size and dimensions of a landing pad are dependent
on the size and weight of the hatch cover. Landing pads
are normally located adjacent to cleats. The pads are
fitted to the top of the coaming and to the side of the
hatch panel. Landing pads should always be repaired to
their original design height. Correct adjustment of them
can only be achieved during repair when the ship is out
of service. Some ships are provided with cassette-type
landing pads, which are easily replaceable.
Maintenance of hatch wheels and trackways
Hatch wheel spindles and bearings (where fitted) need to
be greased regularly. Re-grease them every month, and
Figure 29: Maintenance of hatch coamings
always apply new grease.
Maintenance of the landing pads (steel-to-steel Check the wheel spindle for wear and the wheel housing
contact surfaces) for physical damage. Repair the spindle if it is worn or if
Hatch covers are designed to make steel-to-steel the wheels are out of alignment.
contact between a defined part of the hatch cover
and coaming when closed. This steel-to-steel contact
Trackways can corrode. They are weakened by abrasive
determines the amount of compression between the
wear and tear. When weakened, trackways can distort
hatch gasket and the compression bar. Contact might
and break, affecting hatch movement and alignment.
be nothing more than the hatch skirt sitting on the
Deterioration is visible to the naked eye. Repair by
horizontal coaming plate, although some hatches are
replacing the worn or damaged material with sufficient
fitted with metal landing pads.
new material to restore strength. Always keep hatch
wheel trackways clean and painted.
Figure 30: Maintenance of the landing pads Figure 31: Maintenance of hatch wheels and trackways
22 | A Master’s Guide to Hatch cover maintenanceMaintenance of rubber packing – surface damage Where these are not known, a rule of thumb to
Rubber packing that is physically damaged, cut, estimate design compression is to use 25% of the
perished or chafed should be renewed immediately. packing’s thickness. Permanently impressed rubber
Keep clean and free from paint. Specific right- packing indicates worn steel-to-steel contact surfaces.
angled corner sections should be used where Never replace permanently impressed gaskets without
specified by the manufacturer. The use of silicon checking the steel-to-steel contact points for wear and
fillers is considered to be evidence of poor repairs. repairing these if they are worn.
It is often noted that short inserts are used to make up
the gaps in between the rubber packing. The minimum
length of replaced packing should be one metre. Specific
right-angled corner sections should be used where
specified by the manufacturer. The rubber packing may
be cut with slanting edges to ensure satisfactory sealing.
Figure 33: Rubber packing with permanent set
Maintenance of rubber packing – aged gaskets
Ozone will age rubber, so that it becomes hard and loses
elasticity. The entire length of an aged gasket should
Figure 32 (a and b): Maintenance of rubber packing
be replaced.
Maintenance of rubber packing –
permanent deformation
Rubber packing is designed to be compressed to a
certain depth, referred to as the design compression,
which should be specified in the manufacturer’s manual
or indicated in the drawings. Rubber packing that is
permanently impressed to 50% of its design compression
should be completely replaced. Always follow the
manufacturer’s instructions when renewing gaskets.
Figure 34: Replacement of the entire length of aged gasket
| 23Maintenance and repair continued
Maintenance of compression bars
Effective sealing is only possible with a straight,
undamaged and non-corroded compression bar. The
rubber packing does not slide over the compression bar
but acts on the compression bar surface with significant
force. As such, the compression bars, particularly the
conventional raised type of compression bar, should be
of strong construction. Compression bars that are not
in this condition should be repaired or replaced, with
care taken to align the bars properly.
To achieve a tight seal, packing rubbers need to be
compressed up to their design compression and, as
Figure 35: Compression bar – straight, undamaged and non-corroded
such, they need to act against a compression surface.
The sealing surface of the compression bar should be
Maintenance of gasket channels
smooth, as a rough surface causes rapid deterioration
of the rubber packing. Whilst on older ships the If gasket channels are badly corroded, causing the
standard was to have a mild steel compression bar, hatch packing to hang loose, the packing should
more modern designs use stainless steel. be removed and the channel should be repaired by
welding new metal strips, which should be painted and
dried before fitting new rubber. Always follow proper
In order to ensure that the packing rubber interacts fire prevention safety procedures. Make sure that cargo
correctly with the compression bar or sealing surface, spaces are free of cargo and combustible material.
contact must be made in the correct position and,
therefore, compression bars or sealing surfaces need
to be properly aligned. Whilst some limited tolerances
are allowed with regards to straightness (these should
be stipulated in the manufacturer’s manual), waviness
(either + or -) will lead to over or under compression of
the seal, both of which should be avoided.
Taking into consideration that design compression
is a matter of millimetres (generally in the range of
10-12mm), even slight unevenness or waviness by a
few millimetres represents a significant percentage of
under or over compression.
Sharp edges can easily cause damage to the packing
rubber. This is the reason why the sealing surface of the
compression bars will be rounded rather than square
in form. Replacing damaged sections of compression
bars with ordinary steel flat bars should be avoided. In
such cases, it is best to weld a stainless-steel strip on
the coaming table as the smooth surface will contribute
to the longevity of the seal during its in-service life.
Remember to carry out a chalk test to check alignment,
both during and after repair. Figure 36: Maintenance of gasket channel
24 | A Master’s Guide to Hatch cover maintenanceMaintenance of the double drainage system These screw plugs (or caps) fitted on the drains assist
Hatches are designed to drain away water that has in maintaining the gas-tight integrity of the cargo
penetrated the gasket or that lies in the inner channel holds, ie in case of a fire, they prevent outside air from
after hatch opening. Drainage channels should entering in and ensure that the extinguishing medium
always be cleaned before hatches are closed and (CO2) does not escape out from the cargo holds.
should be kept free from rust scale and cargo debris.
Damaged channels should be repaired immediately. When the cargo is fumigated, these caps should be
Painting double drainage channels will help to closed to seal off the cargo spaces. However, in the
prevent corrosion. Drainage channels are located event that some seawater penetrates the gasket during
along the cross joint and on the coaming between the heavy weather, it is important that the water does not
compression bar and the inner coaming. enter the cargo hold. Hence, it is recommended to
open these caps regularly during the voyage (weather
permitting) to drain any water. The crew should be
mindful of the fumigant gases and use appropriate
precautions and PPE (personal protective equipment)
to prevent exposure.
Damaged, missing or defective non-return drain valves
and associated piping should be repaired or renewed.
Figure 37: Poorly maintained drain channel
Maintenance of non-return drain valves
Hatch coaming non-return drain valves are an essential
feature of the hatch double drainage system. They let
water that has come through the hatch cover drain
away and prevent ingress of water from outside.
The drainpipes are often small in diameter and easily
susceptible to clogging. They are fitted with a non-
return device (eg a ball float) in order to avoid seawater
finding its way into the cargo hold through the drains.
Non-return valves easily clog up, so they must be
frequently cleaned. The float and internal sealing
Drain valve with ball
rubber may degrade and require replacement.
inside acting as non-
return system
Drain valve screw plugs (or caps), if fitted, should be
attached by chain, but not closed. They must be kept
ready for quick deployment in case of a fire in the hold
or when sealing is required during fumigation of cargo Fire caps
in the hold.
Figure 38 (a and b): Non-return drain valves
| 25Maintenance and repair continued
Maintenance of hatch cleats and wedges Cross-joint wedges require less maintenance than
Cleats and wedges hold the hatch in position with cleats, and provided the wedge side spring is in place,
adequate gasket compression. Cleats are fitted with the wedge will work efficiently. Check the springs
a rubber washer or ‘grommet’ to aid compression. regularly and replace them if they are damaged or
Compression of the washer determines tension in the missing. On a closed hatch, the wedge should make
cleat. Washers are prone to both physical damage and contact with its strike plate on the opposite hatch
age hardening (weathering). When damaged or aged, panel. If there is a gap, it is likely that the panel is
the washer loses its elasticity and should be replaced. distorted. The steel-to-steel contact may be worn.
Some operators protect the washer and screw threads Repair and alignment of the hatch panel is necessary.
with a layer of grease or by applying ‘denzo’ tape. Never repair the strike plate by building it up with weld
metal above its original design height.
It is important for compression washers to be adjusted
correctly. A locking nut for adjusting compression is
situated at the base of the cleat. The procedure to
alter compression is as follows:
1. close hatch and secure for sea
2. place the cam of the cleat in the hatch socket as
if to lock it, but leave it unlocked (the cam should
move freely and fit snugly in its housing)
3. adjust the locking nut until the compression washer
touches the underside of the hatch coaming or its
steel washer
4. turn the locking nut one full turn to achieve the
desired tension
5. do not over-tighten
6. protect the thread on completion.
When closing and securing a hatch for sea passage,
check the tension in the side cleats.
Cleats should never be adjusted in isolation, adjust all
cleats along the hatch skirt at the same time.
In addition, cleats should be checked for seizure,
for other damage and whether they are complete in
number. Cleat crutches and other parts to which cleats
may be connected (eg coaming table, snugs/panel side
plating, etc) should regularly be inspected for damage
and wastage.
Figure 39 (a and b): Maintenance of hatch cleats
26 | A Master’s Guide to Hatch cover maintenancea) Assemble cleat in snug and crutch b) Screw nut on spindle until it touches washer
c) Tighten one complete turn of the nut d) Disengage cleat with quick release lever
Figure 40: Procedure to adjust a quick acting cleat
| 27Maintenance and repair continued
Maintenance of locators The use of hydraulics (which often operate at pressures
Locators guide the hatch cover panel into its of up to 250 bar) in combination with heavy moving
correct closing position and ensure that panels objects presents a safety hazard for operators and
are kept in position during the voyage. Correct crew in the vicinity of the hatch covers. Therefore, both
positioning is important to avoid problems with operators and assisting crew should be well informed
opening systems, wheels, hinges, cross-joint drains, and familiar with the safe operation of the system.
securing mechanisms, etc, and slight wear on
the locators in one place may result in significant The cleanliness and viscosity of hydraulic oil must be
loss of compression or improper positioning at checked. Samples of the oil should be sent to a chemist for
another place. Therefore, locator wear should also testing (use the same company that checks and tests your
be regularly monitored. More recent designs of fuel and lubricating oil). The hydraulic system is provided
locators have replaceable mating surfaces and with bleed points from which samples can be taken.
allow for the use of shim plates, which facilitates
installation and adjustment in case of wear down.
Hydraulic oil should be changed every five years or after
there have been significant repairs, such as piping or
Maintenance of stoppers cylinder replacement.
While a ship is at sea, hatch covers are exposed
to severe loads and accelerations, which have
Hydraulic oil filters should be changed every 12 months.
the potential to dislocate them from their
Do not contemplate repairing the hydraulic system
correct sealing positions. Failure to restrict hatch
without the proper components and skilled fitters.
cover movement can lead to excessive loads
acting on component parts of the hatch covers,
accelerating wear and damage as a result.
Stoppers (or restraints) are used to restrict this
movement. Whilst some degree of movement is
allowed, stopper wear should be closely monitored. It
is recommended to consult the manufacturer’s manual
to obtain information on the allowable wear limits.
Maintenance of hydraulic systems and components
Depending on the hatch cover design, differing types
of opening/closing mechanisms are used. Apart from
lift-away type hatch covers, consisting of pontoons
that rely on shore gear to be lifted on and off, all other
systems are operated with the ship’s own equipment
or have their own operating system. In many cases,
and in view of the weights involved, hydraulic systems
are the most appropriate to drive the hatch cover
opening/closing system, and most of these hydraulic
systems incorporate cylinders, control valves, motors
and pump units, all of which should be properly
inspected and maintained. Hydraulic systems should
also be inspected for leakages, which could result in
pollution as well as present a slip and fall hazard. Figure 41 (a and b): Maintenance of hydraulic systems and components
28 | A Master’s Guide to Hatch cover maintenanceMaintenance of rubber seals on hold access doors,
access hatches and ventilators
Water can enter the cargo hold through access
doors, hatches and ventilator covers. Maintain them
in the same way as you would hatch covers.
Figure 42 (a and b): Maintenance of rubber seals on access hatches and ventilators
| 2911. Heavy weather precautions
The following precautions should be taken in rough or heavy weather or when high
swells are expected or when it is likely that water will be shipped on deck.
Prior to rough weather: After rough weather:
• Check that hatch cleats are properly secured and • Inspect all cleats, drain valves, guides and hydraulic
adjusted. In rough weather, hulls are subjected to components for damage. If hydraulic components
high racking forces, so it is essential that hatch have been damaged, do not attempt to open the
covers are held in place but allowed to flex. covers. The emergency opening procedure should
• Check that all drain valves are operating correctly be followed until the hydraulic components have
and that they are not clogged. Drain valves are been checked and tested.
the last defence against water entering the cargo • Check hatch covers for buckling or distortion.
space. The drainage and non-return system will • When opening the hatch covers, check for uneven
be needed during heavy weather, so it must be movement and any unusual noises that may
fully operational. indicate damage.
• As a precaution, briefly pressurise the hydraulic • Wheel spindles, cleat spindles, hinge pins, hydraulic
system to ensure that it is fully charged and that cylinder protective sheaths, cleat wedges, drive
the piping is filled with oil. This has two benefits: chain sprockets, toothed rack and cylinder spherical
firstly, it prevents the possibility of seawater bearings need to be kept well greased. It is
entering loose couplings or seals; and secondly, it recommended to check all grease points after the
eliminates any creep that may have occurred. ship has passed through heavy weather and re-
grease if necessary.
If the cargo is fumigated, the hatch cover non-
return drain valve caps should be closed to seal off
the cargo spaces. In the event that some seawater
penetrates the gasket during heavy weather, it is
important that the water does not enter the cargo
hold. Hence, it is recommended to open non-return
drain valve caps regularly during the voyage (weather
permitting) to drain any water. The crew should be
mindful of the fumigant gases (if applicable) and
use appropriate precautions and PPE (personal
protective equipment) to prevent exposure.
Figure 43: Hatch covers are designed to withstand the rigours of the sea
30 | A Master’s Guide to Hatch cover maintenance12. Safety when working with
hatch covers
The avoidance and prevention of injuries is of paramount importance. Before working
on a hatch, a risk assessment should be completed to identify all hazards. Control and
safety procedures should be examined and modified so that hazards are reduced to
minimal levels.
The following points should be borne in mind:
• always wear the correct protective clothing, boots
and hard hats
• always test the hold atmosphere before entering
• never stand on a moving hatch cover
• never stand on a hatch coaming when the hatch
is open
• never work on a hatch cover when the locking pin or
hook is not fitted and secure
• never open or close a hatch cover without ensuring
the coaming is clear of debris and checking that
all personnel are clear of the moving hatch and its
channels or wires
• when opening or closing a hatch, never attempt to
clear an obstruction with your hands
• when hatches are opened at sea, always secure
them to the coaming top by lowering the wheels
into a guide pocket, or by fixing restraining wires.
| 31You can also read