Infinitely Invertible Infinity - The Bridges Archive
←
→
Page content transcription
If your browser does not render page correctly, please read the page content below
Bridges 2020 Conference Proceedings

 Infinitely Invertible Infinity
 Ellie Baker,1 Daniel Baker,2 and Charles Wampler3
 1
 Cambridge, MA, U.S.A.; ellie.baker@post.harvard.edu
 2
 Romeo, MI, U.S.A.; danny.r.baker@comcast.net
 3
 University of Notre Dame, Notre Dame, IN, U.S.A.; cwample1@nd.edu

 Abstract
 We present our experiences crafting cloth objects with intriguing inversion properties and tell a story about how
 the design aspirations of a seamstress can drive a mathematical inquiry.

 Introduction
If you haven’t spent much time contemplating what happens when you turn things inside out, we think
you’ve been missing out. Of course, turning cloth objects inside out is something people do routinely,
especially when folding laundry…so perhaps it doesn’t strike you as a topic that is particularly mysterious
or interesting. For example, it’s not hard to predict what will happen when you invert a standard pillowcase.
It looks pretty much the same afterwards, except the inside surface fabric becomes the outside surface, and
vice versa. But suppose you have a donut-shaped seat cushion. And further suppose, as shown in Figure 1,
it is constructed with a removable foam cylinder inside a zippered donut-shaped pillowcase, so that you can
remove the foam and wash the pillowcase separately. Aside from the change in exterior surface fabric, will
this pillowcase look the same if it gets accidentally turned inside out in the wash? If you are a topologist,
you might assert that the answer is “Yes, it will look the same.” But if you are a geometer, or perhaps a
seamstress, you’ll likely have to concede that oftentimes the answer is an emphatic “No, it will not look the
same at all! ”
 Our explorations began with just such a question, which led to a variety of related inversion questions.
This paper is about that process, the design aspirations that motivated us, and the engaging sequence of
puzzles that emerged from it. We discuss what we learned along the way and how it enabled us to produce
a series of cloth objects (some of them wearable art) with intriguing and non-intuitive inversion properties.

 cylindrical foam stuffer for
 the pillowcase

 zipper slit for removing the foam cylinder

 Figure 1: A toroidal pillowcase with cylindrical foam insert.

 Inversion Woes: A First Encounter
Our first experiments began several years ago with what seemed like a simple project – sewing an “infinity”
scarf like the commercially available one shown in Figure 2a. For our purposes (and sometimes in fashion
lingo) an infinity scarf is defined as a hollow cloth torus, similar to the toroidal pillowcase in Figure 1, but
unstuffed and whose hole is large enough to fit over the head so that it can be looped around a neck one or
more times. The mathematical definition of a topological torus suggests a method for sewing such a scarf
from a rectangular piece of fabric by sewing together its opposite edges (Figure 3). Initially, all we wanted
was to stitch it together on a sewing machine in such a way as to hide the raw seam edges on the interior.

 83
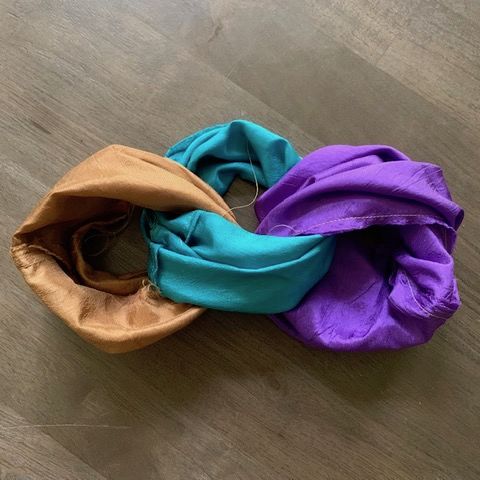
Baker, Baker, and Wampler

To accomplish this, we tried a standard sewing strategy: stitch the desired object with the “back” side of
the fabric facing outward, but with a small slit left in one seam, through which it is later inverted to hide
the raw seams on the interior (Figure 2b left). But the strategy failed! When inverted to expose its “front”
side, our scarf’s shape looked mystifyingly wrong and entirely unwearable (Figure 2b right). The question
about what went awry and how to correctly execute this strategy on an infinity scarf sewn from a rectangular
piece of fabric was later published as a puzzle in Gary Antonick’s New York Times Numberplay blog [3].

 With our initial tangible failure in hand, the mathematics behind the problem became clearer: When a
torus is inverted, its meridians (rings going through the torus hole) and longitudes (rings going around the
torus hole) swap roles, as shown in Figure 4. Reimagining Figure 3 such that the red edges (instead of the
blue) are sewn together first makes it clear how either set of opposite edges can play either role. The sewing
strategy –in this case the choice of initial sewing seam –determines which is which…at least until you invert
it. Additional discussion is provided in the blog post[3], but the crux of the solution is simply to sew it
inside out in its strange “wrong” form so that, once inverted into its “right” form, it will look and function
as desired with the raw seams hidden on the interior.

 (a) (b)
 Figure 2: (a) A commercial infinity scarf by Lily Pulitzer. (b) A trial doll-sized scarf showing what went
 wrong when sewn inside out (left) and then inverted (right) to hide the raw seam edges.

 Figure 3: A topological torus: a stretchy shrinkable square whose opposite edges are understood to be
 connected.

Figure 4: Stages of a punctured, stretchy, shrinkable torus being turned inside out. These are still images
 from an online animated gif by Surot [1] showing how the meridians (circles going through the torus’
 hole) become longitudes (circles going around the torus’ hole) on inversion, and vice versa.

 84
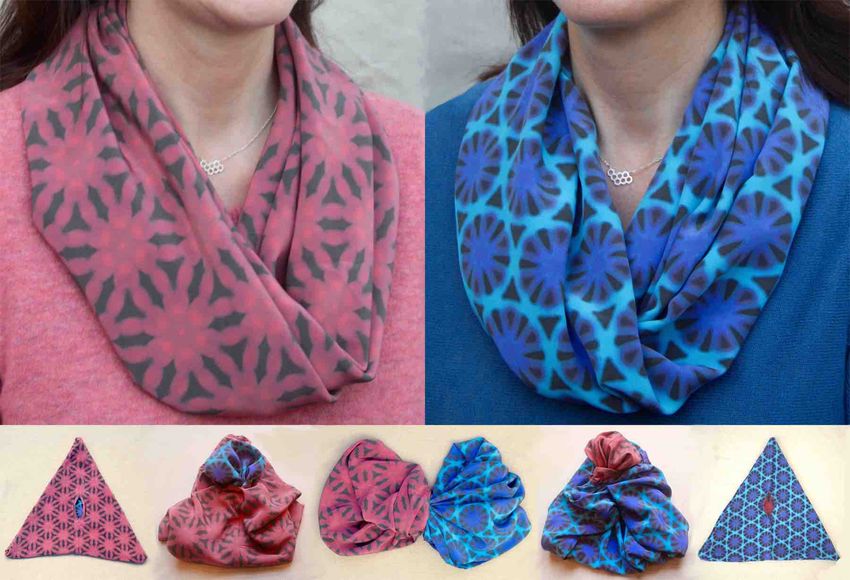
Infinitely Invertible Infinity

 Another Inversion Lament
The solution to the seam-hiding problem was satisfying and effective, but the experience gave rise to a new
lament. At the fabric store, we’d noticed some lovely reversible fabrics with different colors and patterns
on each side -- how sad that it did not seem viable to use them to make a fully reversible toroidal scarf that
could be worn with either surface showing. Of course, this would create a new issue about where to hide
the seam flaps, but the bigger problem –which felt like a deal-breaker –was the shape change on inversion.
We contemplated a scarf made from a square layout, which would preserve its shape when inverted, but
rejected that as lacking proper proportions for an infinity scarf. Was a non-square reversible infinity scarf
really impossible?

 What we discovered in pondering this question is that there is one other toroidal geometry that inverts
to the same shape. Described in detail in our Bridges 2017 paper [5], it can be made by sewing together the
opposite edges of a hexagon. Although proportionally close to a square, this hexagonal layout turns out to
have some useful and interesting properties that make it more suitable for a toroidal scarf, such as a
Moebius-like twist (which makes a scarf with a single loop drape nicely on a human figure) and the ability
to fold flat into a six-layer equilateral triangle (which makes it store neatly and compactly). Using it, we
created something new that we’d never seen before – a truly functional invertible infinity scarf! (All
references to “reversible infinity scarves” that we have found turn out to be two-sided bands whose different
sides were both potentially visible when worn. By “invertible infinity scarf” we mean a cloth torus whose
alternative surface is revealed by turning it inside out.) Sewn with custom fabric designed to echo the
hexagonal structure of the scarf so that the printed patterns match up at the seams, it was presented in the
mathematical art shows at Bridges and JMM in 2017 (Fig. 5).

 Figure 5: A rendition of the hexagonal scarf, “Invertible Infinity,” shown at the Joint Mathematics
Meetings 2017 exhibit of mathematical art. The “filmstrip” at the bottom shows the inversion progressing
 from one equilateral triangle folding to the other.

 Those Pesky Seams
Despite these successes, one aspect of our design remained aggravating. With its hexagonal structure, both
inversions of the scarf were now functional, but this also meant we’d lost the hiding place for the raw seam
edges. As a workaround for our first reversible scarves like the one in Figure 5, we used French seams,
which conceal the ragged edge but still leave a visible flap on one side. While tidier looking than a raw-
edged flap, this wasn’t as neat as a standard hidden seam and it also disrupted the perfect symmetry on
inversion that we aspired to. The problem could be mitigated somewhat with delicate hand-stitching to sew
the flaps flat or to otherwise minimize the appearance of excess fabric on one side. But that required tricky

 85
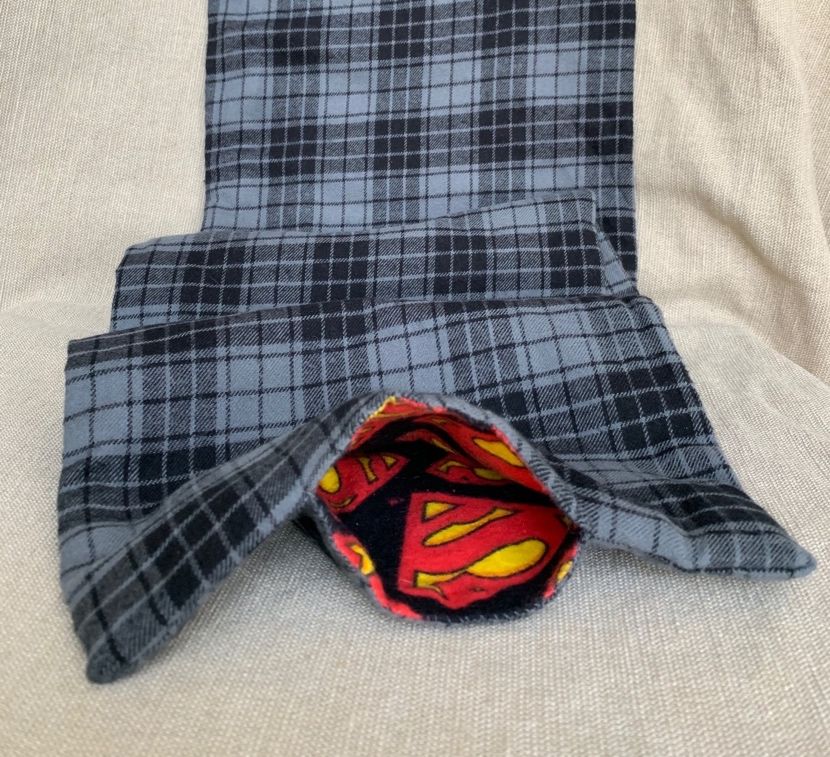
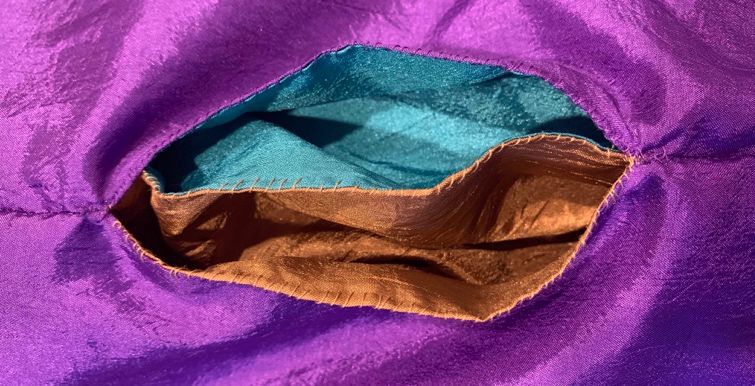
Baker, Baker, and Wampler

extra construction work and still violated our symmetry-seeking aesthetic. However, after sewing a number
of French seams, a new possibility emerged.

 Since the available options in stores for reversible fabrics were limited, and because our pattern design
aspirations for them became more specific and ambitious, we began creating our own reversible fabrics by
stitching together two custom printed fabric layers back to back. At first the extra bulk of a double layer
seemed disadvantageous over the store-bought reversible fabrics, in which the front and back patterns are
woven together into a single layer. However, especially with lightweight fabrics, it worked well…and at
some point we noticed a promising hypothetical. Between our two layers, where the wrong sides of the
fabric touched, was a hidden region that didn’t exist in single-layer reversible fabric. So, at least in principle,
there was an unused space in which to conceal the seam flaps –if only we could figure out how to access it
with a sewing machine. (We jokingly began referring to this hidden region as the “inner sanctum.”)

 For a more traditional planar rectangular scarf (i.e., the kind typically worn by snowmen), there is an
easy solution for constructing a reversible two-layer version with hidden seams. Figure 6a shows a
straightforward approach in which two long rectangular “pillowcase” shapes are sewn separately and one
is then stuffed inside the other, back-to-back (i.e., seam-flap sides together) to nest them. This method was
used to create the reversible Superman/Clark-Kent design with hidden seams shown in Figure 6c. However,
it isn’t obvious how to translate this approach to a toroidal scarf (Figure 6b) because you can’t nest two tori
simply by stuffing one inside a slit in the other. If you try, rather than nesting properly and looping around
the hole, the inner torus winds up scrunched in a ball on one side of the interior tunnel of the outer torus.

 (a)

 (c)

 (b)

 Figure 6: A nesting method (stuffing one scarf inside a slit in the other) that works if the two scarves are
 topological spheres (a), but not if they are tori (b). This method was used to create the reversible scarf
 with hidden seams for Superman/Clark Kent shown in (c).

 There is more than one approach to this problem, but we found a particularly elegant solution that
takes advantage of the role swapping of the toroidal meridians and longitudes on inversion. The trick is to
construct the two tori separately, inside-out, but linked. When two tori are linked, the longitudes of one loop
around the meridians of the other and vice versa. Whereas when two tori are nested, their meridians and
longitudes align, one inside the other. Thus, if we sew the two tori linked, as in the configuration in the
middle of Figure 7, and then invert one through a small slit, the un-inverted torus winds up nested perfectly
inside the inverted one. Seeing this happen is so strange and counterintuitive that there is no substitute for
the tactile learning experience of trying it out yourself. We highly recommend this experiment if you have
a couple of old cloth napkins and a needle and thread (or sewing machine) on hand. Keep in mind that the

 86
Infinitely Invertible Infinity

technique is most easily demonstrated using tori whose shape is preserved on inversion. Otherwise, you
might wind up trying to nest two very differently proportioned tori, which can be a bit like trying to dress
a short fat man in a tall thin man’s clothes or vice versa. (For example, consider nesting the two torus shapes
in Figure 2b –although, if linked in the shape configurations shown, these two would actually nest nicely
because one is the inversion of the other!) Using two equal size square napkins is one easy way to guarantee
that your tori will fit together nicely when nested. Another important detail of the construction is that the
two slits should be aligned so that you can access the inner torus slit directly through the outer torus slit,
which makes it possible to go back and forth between the two nested states without passing again through
the linked state. This works because inverting an interior nested torus forces the simultaneous inversion of
the outer torus as well. After sewing and nesting, we typically stitch together the edges of the two aligned
slits, so that it is no longer possible to invert just the outer torus and re-enter the linked state in which the
fabric backsides and raw seam edges are exposed. After this, without a seam-ripper, re-entrance to the
“inner sanctum” is locked off! The graph in Figure 7 shows the possible states of two linked tori, with
colored directional links indicating the new state when the torus of that color is inverted.

Figure 7: The nodes in this graph represent the possible states of two linked tori, and the links represent
inversion actions. The colored directional links point to the new state when the torus of that link color is
 inverted. Note that inverting an interior nested torus forces the inversion of the exterior torus as well.
 Forced inversions are denoted by a dot (the color of the torus being forced to invert) at the base of the
 link arrowhead. Dashed lines represent torus fabric “back” side out and solid lines “front” side out.

 Appendix A gives instructions using this technique to sew two nested tori with fully hidden seams. To
present the idea in its simplest form, the instructions are shown for a scarf made from a square layout with
no Moebius twist. However, this same basic technique can also be applied to construct the invertible scarf
with hexagonal structure shown in Figure 5. As described in [5], multiple layouts (including a rectangular
one) can be used to sew this scarf –and all of them produce a scarf that is equivalent in structure to a hexagon
with its opposite edges sewn together (although the seams are in different locations). For these, the linked
construction strategy is the same, but other details of the construction are of course different. For example,
because the scarf in Figure 5 has a Moebius-like half twist, care must be taken to apply the twist in the same
direction for both linked tori (if not, the nested result will seem a bit like trying to put a left-handed glove
on your right hand).

 How About a Triply Invertible?
Encouraged by our discoveries about the usefulness of inverting linked tori, another challenge was
suggested by one of us as a kind of a lark – could we make a toroidal scarf that is triply invertible, using
three different fabric patterns/layers? Our technique for creating nested tori could easily be applied
recursively to produce any number of nested tori, Russian doll style. Might a triple nesting work as a three-
way invertible scarf?

 One way to convince yourself that it will not work is to construct such a triple nesting and try it out.
One can also do this as a thought experiment, as outlined in the graph in Figure 8. To create a triple nesting,
begin with a nesting of two tori linked to a third torus; then invert the third torus to create the triple nesting.
The graph in Figure 8 shows an exhaustive investigation of all possible inversion actions starting this way.

 87

Baker, Baker, and Wampler

Since it is a complete accounting, the graph demonstrates that there is no sequence of inversions in which
the middle torus of a triple nesting (in this case, the green one) is able to make its way to the visible exterior
in one of the triply nested states. In other words, only two (not three) triply nested states are possible and,
in both, the green torus remains hidden in the middle.

 Furthermore, additional nestings won’t help. Readers may wish to consider how to generalize the proof
to nestings of arbitrary size N, but the basic idea is that, for larger N, the graph in Figure 8 stretches to
include more linked states in the middle, but the two ends states remain the only ones that are fully nested.

 Figure 8: A graphical proof (that can be confirmed experimentally with sewn fabric) that three fully
 nested tori can never enter a state (via inversion through a single slit in each) in which the “middle”
 torus (shown here in green) moves to the visible exterior. The graph shows all possible states and all
 possible inversion actions from each state. Dashed lines represent a torus whose fabric B side is out and
 solid lines a torus whose fabric A side is out. Colored directional links point to the new state reached
 when the torus of that link color is inverted. Note that inverting an interior nested torus forces the
inversion of all tori surrounding it in the nesting as well. Forced inversions are denoted by dots (the color
 of the torus forced into an inversion) at the base of the link arrowhead.
 So Is a Triply Invertible Impossible?
Once again our design aspirations at first seemed stymied, but we went on to consider whether any other
sort of linkage involving three tori might work. We began by studying the 3-component links in Robert
Scharein’s knot zoo (Figure 9 [6]). The links we presumed potentially useful were those with symmetry
such that the link relationship between any one torus and the other two is the same regardless of which one
you choose. This important symmetry property for a triply invertible scarf guarantees that the nested
configuration is identical regardless of which torus is inverted and moved into the exterior position. It was
readily apparent that the leftmost three links in Figure 9 all have this property, so those seemed like a good
starting place for our investigation. Each of them presents an interesting puzzle in its own right: What
happens if you sew three fabric tori linked in the configuration illustrated (Figures 10a-c), and then invert
one of them? Figures 10e-g show the solution for each, which can also be confirmed experimentally by
sewing and trying it out. The results are shown as X-ray vision drawings to illustrate how the inner tori are
positioned after any one torus in the link is inverted.

 As it turns out, all three of these linkages can in principle be used to produce a triply invertible scarf,
but they are not all equal from a practical design standpoint. To be useful and aesthetically pleasing as a
scarf, we also wish to minimize the bulk created by the two inner nested tori, so that the scarf drapes
smoothly and is not too lumpy looking. Quantifying this goal more explicitly, we want a nesting
configuration in which the fabric of the inner two tori can be distributed as uniformly as possible within the
tunnel of the outer torus.

 88
Infinitely Invertible Infinity

Figure 9: A section of Robert Scharein’s Knot Zoo[6] showing three-ring linkages. Each link in the zoo is
 #
 labeled " , where X indicates the crossing number[1], Y the number of components, and Z an archive
number among links with that crossing number and component number (Alexander-Briggs notation [2]).

 a b c d

 ?
 e f g
 Figure 10: The 6%& , 6&' , and 6&& links constructed with cloth tori (a-c) and, below each, an X-ray vision
 drawing of it after one torus is inverted (not drawn to scale, for illustration purposes) (e-g). A chained
 link (d) lacks the symmetry required for a triply invertible and thus has more than one possible nested
 configuration after an inversion. We leave its possible configurations as a puzzle for the reader.

 Ideally the inner bulk would be distributed in the perfectly even layered manner of a Russian-doll-
style triple-nesting, as in Figure 8, but we’ve already shown this configuration doesn’t work as a triply
invertible (one reason it fails is because it lacks the required symmetry property discussed earlier). Short of
that, we want to consider the comparative merits of the linkages in Figures 10e-g and determine which one
does the best job of evenly distributing the scarf’s inner bulk. It is interesting that the two inner tori in
Figures 10e and 10g are topologically linked in the same way, but the outer torus of the 6%& link prevents the
blue inner torus from untwisting, making this linkage less evenly distributed than the 6&& link. The interior
tori of the 6&' link (Figure 10f) have a different linkage arrangement; in fact, they are not linked at all. (Two
rings are not linked if either can be shrunk to a point without passing through the other, as is the case here.)
The lack of linkage in this case can be neatly demonstrated by placing two rubber bands in the illustrated
configuration. Figure 9 shows that we should expect this result because removing any one loop from the 6&'
link frees the other two to separate. When one torus of Figure 10b is inverted, it becomes the outer torus
of Figure 10f, which then prevents the inner tori from separating (despite being unlinked) in such a way
that their bulk is reasonably well-distributed, making this link a possible contender as a decent triply
invertible. Even so, the 6&& link emerges as the clear top contender because its linked interior tori can easily
be arranged to distribute in a perfectly even fashion along the interior tunnel of the outer torus (Figure 10g).
This “perfect” arrangement is most easily seen when the two tori are positioned to touch each other along
a (1,1) torus knot [1,4] running along the surface of each (as an example of this positioning, see the two
bottom tori in Figure 12d). Thus the 6&& link is an excellent choice for our triply invertible.

 89
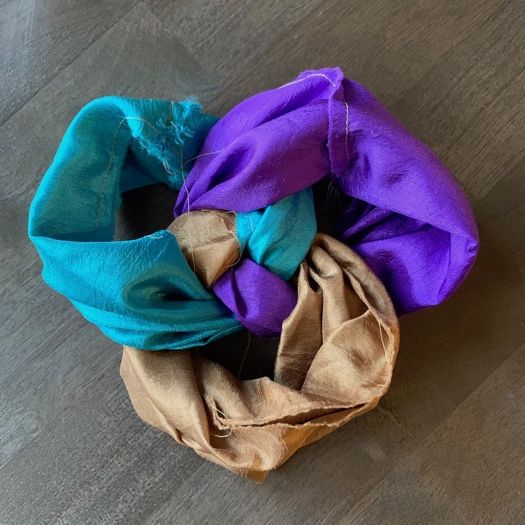
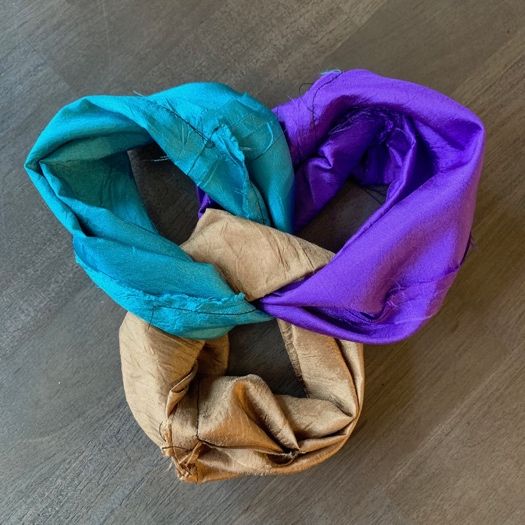
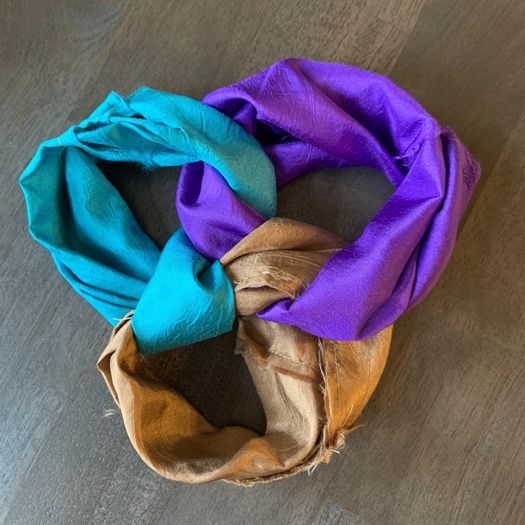
Baker, Baker, and Wampler

 More Practical Details
So far, we have only discussed attaching the linked tori together at their slits. On a triply invertible, after
one torus is inverted, this creates a double-slotted slit (Figure 11), in which the wearer has a choice about
which side of the slit to use for the next inversion. However, other than at the slits, the tori may be left free-
floating with respect to one another. A drawback to a free-floating configuration is that the inner tori tend
to bunch up during inversions and it can sometimes take a lot of effort to smooth everything out again. We
also want to align the slits so the fabric doesn’t get torqued when the slit edges are sewn together. The
doubly invertible scarf has easy solutions to these problems because its two layers of fabric are always
positioned flush back to back and thus can be quilted together at any surface location, or, most readily,
along their corresponding seams. Likewise, it is also easy to align their slits (e.g., the method in Appendix
A). However, for a triply invertible, which does not use this Russian Doll style of nesting, the layers cannot
be quilted together just anywhere, and there is a related issue about where to place the slits. To align its
slits, we make use of the configuration illustrated in Figure 12b, where the three tori are positioned so they
all touch (or at least come very close to touching) along a (1,1) torus knot on each. Using a parallelogram
layout, one can create a seam that falls directly on such a (1,1) torus knot. The Figure 5 invertible scarf has
a parallelogram layout (see [5]) in which one seam can be engineered to fall along a (1,1) torus knot, if the
Moebius twist runs in the correct direction. The triply invertible scarf in Figure 13 is made this way. Placing
the slits along this seam –and then tacking together all three tori along it (while they are “wrong” side out)
– solves the slit alignment problem and helps to keep the fabric evenly distributed during inversions. Some
shaking out and smoothing by hand after inversions is still needed, however, and we continue to investigate
whether there are other better approaches to keeping the inner tori in place during inversions.

 Figure 11: On a linkage for a triply invertible scarf, with one torus inverted and all three slits aligned,
 the slit edges may be stitched together. This creates a double-slotted slit through which you can choose
 which of the two inner tori to invert and expose next.

 Impractical Applications: Scaling Up…to Infinity?
The obvious next question is whether we can scale up. Can we make a quadruple invertible? A quintuple?
Is there a limit? In our experience, a triply invertible is at the limit of bulkiness that feels wearable for a
scarf – and only works well if made with very thin fabric. But the scalability question is still interesting to
consider theoretically, if we imagine infinitely thin fabric. Figure 12 shows a clay model of the same 6&&
link in different “poses.” The Figure 12c pose suggests how the link can be scaled up while still maintaining
the symmetry and inversion properties needed for an invertible scarf. Figure 12d shows how the third ring
links through the other two. (Note that this configuration looks the same regardless of which ring we denote
as the “third” one because the linkage has our required symmetry property.) We could likewise add a fourth
link in the same manner (looped through the other three) by placing it through the hole shown in the center
of Figure 12c. And this same operation can be repeated to add a fifth link, and so on. Thus, at least in
principle, the 6&& link scales up to an “N-vertible” for any N, while also maintaining both its symmetry
property and capacity for even distribution of the (N-1) interior tori.

 90
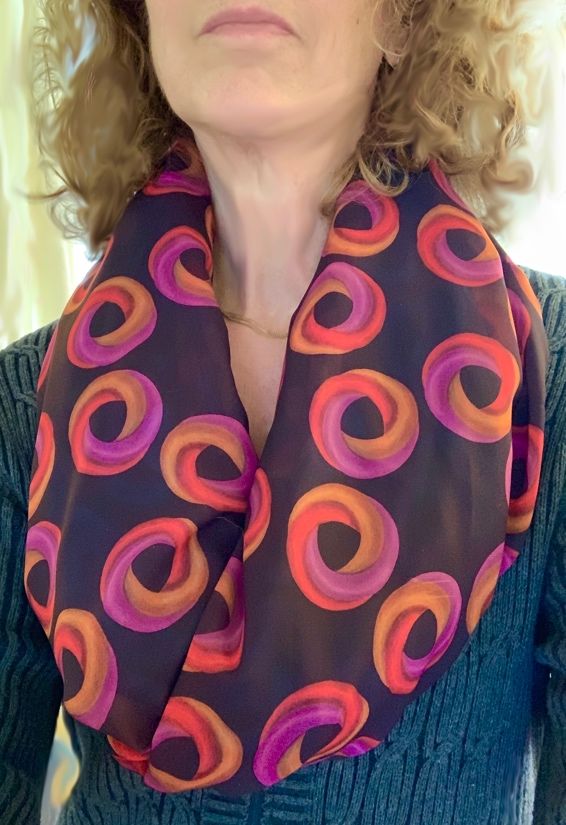
Infinitely Invertible Infinity

 a b c d

 Figure 12: Multiple arrangements (or “poses”) of the same 6&& link using a clay model.

 Conclusions and Future Work
Our design aspirations led to a series of puzzles that we found entertaining and educational as we figured
out how to craft the fabric objects we imagined. Despite its possible impracticality fashion-wise, it would
be interesting to try out a quadruple or higher number invertible. Perhaps this or other sewing experiments
with linked or knotted tori will lead to deeper understanding or reveal more interesting inversion properties
of other knots in the “zoo.” And while the scarves are great fun, we are seeking ideas for additional possible
applications that might exist for multiply invertible objects. We’re also curious whether any of these ideas
and experimental methods with fabric might be usefully applied to research in knot theory or other areas of
mathematics. Finally, we’re working on fabric designs that are especially suitable or apropos for triply
invertible scarves. Figure 13 shows our first custom designs and a triply invertible scarf made from them
that illustrates its own structure –with three fabric patterns depicting three different 6&& link “poses,” inspired
by the clay model in Figure 12.

 Thank you to Kent Christman and Michael Klugerman for their astute observations and helpful
conversations.

 Figure 13: A triply invertible scarf and fabrics designed for it that illustrate the scarf’s linked structure.
 The design motifs were hand-drawn and organized as a repeating pattern using the app iOrnament.

 91
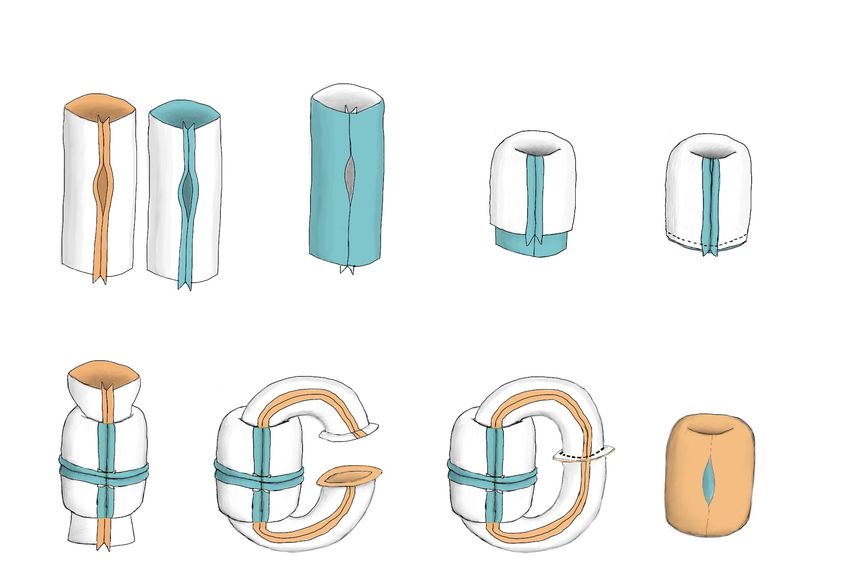
Baker, Baker, and Wampler

 References
[1] C. C. Adams. The Knot Book: An Elementary Introduction to the Mathematical Theory of Knots.
 American Mathematical Society. 2004.
[2] J. W. Alexander and G. B. Briggs. “On types of knotted curves.” Ann. Math. 28, 1927, 562–586.
[3] G. Antonick. “Ellie Baker and the Seamstress’s Conundrum,” The New York Times Numberplay
 Blog, August 24, 2015.
[4] E. Baker and S. Goldstine. Crafting Conundrums: Puzzles and Patterns for the Bead Crochet Artist.
 AK Peters/CRC Press. 2014.
[5] E. Baker and C. Wampler. “Invertible Infinity: A Toroidal Fashion Statement.” Bridges Conference
 Proceedings, Waterloo, Ontario, Canada, July 27–31, 2017, pp. 49–56.
[6] R. Scharein, Knot Zoo: https://knotplot.com/zoo/ (as of January 23, 2020)
[7] Surot. Public domain animated gif at: https://en.wikipedia.org/wiki/Torus#/media/File:Inside-
 out_torus_(animated,_small).gif (as of January 14, 2020)

 1. Sew together the opposite edges of
 two square pieces of fabric to form 2. Invert one of the cylinders 4. Align the top and bottom
 two “cylinders,” leaving an open slit so that it is right-side out. 3. Cuff it over to bring the edges and stitch them together all
 midway on both seams. top edge of the cylinder the way around to create the first
 toward the bottom edge. (inside out) torus.

 7. …with the right-sides of the
 5. Place the remaining fabric touching to form a flange.
 6. Bring the cylinder top and 8. Invert one torus through its
 cylinder through the hole of Stitch in place all the way around
 bottom edges around in an slit to nest them. Align the
 the torus you have just made. the flange to create a pair of
 arc to meet each other… two slits and stitch the slit
 linked inside-out tori. edges together.

Appendix A: Instructions for sewing an invertible torus with hidden seams made from two square pieces
 of fabric. For illustration purposes to show the seam joint more clearly, the gold torus in the two bottom
center figures is obviously not drawn to scale (it’s stretched longer). Note that using these instructions, in
 the linked configuration, the slit on one torus winds up on a longitudinal seam while the slit on the other
 torus winds up on a meridian seam –this aligns the slits in the nested configuration.

 92
You can also read