Getting Started with Ubuntu 16.04
←
→
Page content transcription
If your browser does not render page correctly, please read the page content below

Copyright © 2010–2016 by The Ubuntu Manual Team. Some rights reserved.
cba

This work is licensed under the Creative Commons Attribution–Share
Alike 3.0 License. To view a copy of this license, see Appendix A, visit
http://creativecommons.org/licenses/by-sa/3.0/, or send a letter to Creative
Commons, 171 Second Street, Suite 300, San Francisco, California, 94105,
USA.

Getting Started with Ubuntu 16.04 can be downloaded for free from http://
ubuntu-manual.org/ or purchased from http://ubuntu-manual.org/buy/
gswu1604/en_US. A printed copy of this book can be ordered for the price
of printing and delivery. We permit and even encourage you to distribute a
copy of this book to colleagues, friends, family, and anyone else who might
be interested.

http://ubuntu-manual.org

Revision number: 125       Revision date: 2016-05-03 22:38:45 +0200
Contents

    Prologue 5
      Welcome 5
      Ubuntu Philosophy 5
      A brief history of Ubuntu 6
      Is Ubuntu right for you? 7
      Contact details 8
      About the team 8
      Conventions used in this book   8

1   Installation 9
      Getting Ubuntu 9
      Trying out Ubuntu 10
      Installing Ubuntu—Getting started   11
      Finishing Installation 16

2   The Ubuntu Desktop 19
      Understanding the Ubuntu desktop 19
      Unity 19
      The Launcher 21
      The Dash 21
      Workspaces 24
      Managing windows 24
      Unity’s keyboard shortcuts 26
      Browsing files on your computer 26
      Files file manager 27
      Searching for files and folders on your computer 29
      Customizing your desktop 30
      Accessibility 32
      Session options 33
      Getting help 34

3   Working with Ubuntu 37
     All the applications you need 37
     Getting online 39
     Browsing the web 46
     Reading and composing email 55
     Using instant messaging 59
     Microblogging 64
     Viewing and editing photos 65
     Watching videos and movies 68
     Listening to audio and music 69
     Burning cds and dvds 73
     Working with documents, spreadsheets, and presentations 77

4   Hardware 79
      Using your devices 79
      Hardware identification   79
      Displays 79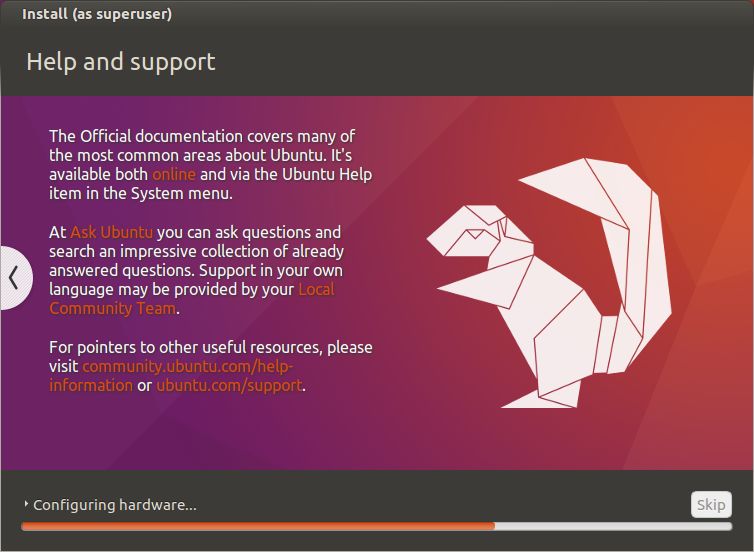
4   getting started with ubuntu 16.04

       Connecting and using your printer   81
       Sound 82
       Using a webcam 83
       Scanning text and images 84
       Keyboard and mouse 84
       Other devices 85

5    Software Management 87
       Software management in Ubuntu 87
       Using Software Center 88
       Managing additional software 91
       Manual software installation 94
       Updates and upgrades 94

6    Advanced Topics 97
       Ubuntu for advanced users 97
       Introduction to the terminal 97
       Ubuntu file system structure 99
       Securing Ubuntu 100
       Why Ubuntu is safe 100
       Basic security concepts 101
       Users and groups 101
       System updates 104
       Firewall 104
       Encryption 105
       Running Windows Programs on Ubuntu       106

7    Troubleshooting 111
       Resolving problems 111
       Troubleshooting guide 111
       Getting more help 116

8    Learning More 117
       What else can I do with Ubuntu? 117
       Open source software 117
       Distribution families 117
       Choosing amongst Ubuntu and its derivatives 118
       Finding additional help and support 120
       The Ubuntu community 121
       Contributing 122

A    License 123
       Creative Commons Attribution–ShareAlike 3.0 Legal Code   123
       Creative Commons Notice 129

     Glossary 131

     Credits   135

     Index 137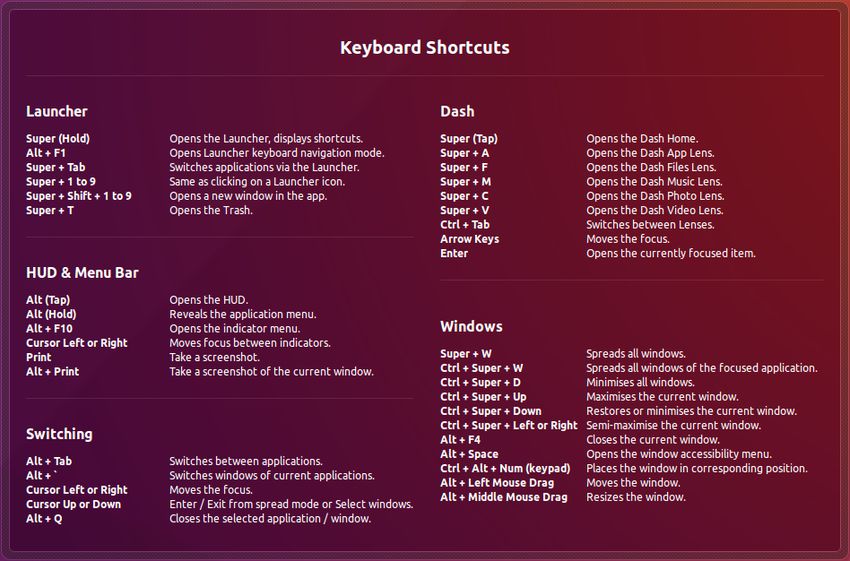
Prologue
Welcome

Welcome to Getting Started with Ubuntu, an introductory guide written to
help new users get started with Ubuntu.
   Our goal is to cover the basics of Ubuntu (such as installation and work-
ing with the desktop) as well as hardware and software management, work-
ing with the command line, and security. We designed this guide to be
simple to follow, with step-by-step instructions and plenty of screenshots,
allowing you to discover the potential of your new Ubuntu system.
   Canonical releases new versions of Ubuntu every six months; every
fourth release is a so-called long-term support (lts) version. Each Ubuntu
release has a version number that consists of the year and month number
of the release, and an alliterative code name using an adjective and an an-
imal. Code names are in consecutive alphabetic order, allowing a quick
determination of which release is newer. Ubuntu 16.04 (code-named Xenial
Xerus) is considered a so-called lts version and is supported by Canon-
ical with patches and upgrades for five years. The previous lts version
is Ubuntu 14.04 (Trusty Tahr), and has support for five years (until April
2019). Whenever a new LTS version of Ubuntu is released, we will incorpo-
rate updates and changes into our guide, and make a new version available
at http://www.ubuntu-manual.org.
   Getting Started with Ubuntu 16.04 is not intended to be a comprehensive
Ubuntu instruction manual. It is a quick-start guide that will get you do-
ing the things you need to do with your computer easily, without getting
bogged down with technical details. With the help of this guide, it should
not take long before new users get used to the Unity desktop environment.
Unity includes the Launcher, the Dash, the hud, indicators, and an on-
screen display notification system (osd). All these features will be explained
in this guide.
   For more detailed information on any aspect of the Ubuntu desktop, see
the “Ubuntu Desktop Guide,” which can be obtained in any of the following
ways:
‣ in the Dash, type help.
‣ in the indicator area, click Session indicator ‣ Ubuntu Help.
‣ go to https://help.ubuntu.com, Ubuntu 16.04 LTS ‣ Desktop HTML.
   There are also many excellent resources available on the Internet. For
example, on https://help.ubuntu.com you will find documentation on in-
stalling and using Ubuntu. At the Ubuntu Forums (http://ubuntuforums.org)
and Ask Ubuntu (http://askubuntu.com), you will find answers to many
Ubuntu-related questions.                                                        You can find more information about Ubuntu’s
   If something isn’t covered in this manual, chances are you will find the      online and system documentation in Chapter 8:
                                                                                 Learning More.
information you are looking for in one of those locations. We will try our
best to include links to more detailed help wherever we can.

Ubuntu Philosophy
                                                                                 People sometimes wonder how to pronounce
The term “Ubuntu” is a traditional African concept originating from the          Ubuntu. Each u is pronounced the same as in
                                                                                 the word put except for the last u which is
Bantu languages of southern Africa. It can be described as a way of con-         pronounced the same as in the word due.
6   getting started with ubuntu 16.04

necting with others—living in a global community where your actions
affect all of humanity. Ubuntu is more than just an operating system: it is
a community of people coming together voluntarily to collaborate on an
international software project that aims to deliver the best possible user
experience.

The Ubuntu Promise

‣ Ubuntu will always be free of charge, along with its regular enterprise
  releases and security updates.
‣ Ubuntu comes with full commercial support from Canonical and hun-
  dreds of companies from across the world.
‣ Ubuntu provides the best translations and accessibility features that the
  free software community has to offer.
‣ Ubuntu’s core applications are all free and open source. We want you to
  use free and open source software, improve it, and pass it on.

A brief history of Ubuntu

Ubuntu was conceived in 2004 by Mark Shuttleworth, a successful South
African entrepreneur, and his company Canonical. Shuttleworth recognized         To learn more about Canonical, go to http://
the power of Linux and open source, but was also aware of weaknesses that        www.canonical.com.

prevented mainstream use.
   Shuttleworth set out with clear intentions to address these weaknesses
and create a system that was easy to use, completely free (see Chapter 8:
Learning More for the complete definition of “free”), and could compete
with other mainstream operating systems. With the Debian system as a
base, Shuttleworth began to build Ubuntu. Using his own funds at first,          Debian is the Linux operating system that
installation cds were pressed and shipped worldwide at no cost to the            Ubuntu is based upon. For more information
                                                                                 visit http://www.debian.org/.
recipients. Ubuntu spread quickly, its community grew rapidly, and soon
Ubuntu became the most popular Linux distribution available.
   With more people working on the project than ever before, its core
features and hardware support continue to improve, and Ubuntu has gained
the attention of large organizations worldwide.
   While large organizations often find it useful to pay for support services,   For information on Ubuntu Server Edition,
Shuttleworth has promised that the Ubuntu desktop operating system               and how you can use it in your company, visit
                                                                                 http://www.ubuntu.com/server.
will always be free. Ubuntu is installed on an estimated 2% of the world’s
computers. This equates to tens of millions of users worldwide, and is
growing each year. As there is no compulsory registration, the percentage
of Ubuntu users should be treated as an estimate.

What is Linux?

Ubuntu is built on the foundation of Linux, which is a member of the Unix
family. Unix is one of the oldest types of operating systems, and together
with Linux has provided reliability and security for professional applica-
tions for almost half a century. Many servers around the world that store
data for popular websites (such as YouTube and Google) run some variant
of Linux or Unix. The popular Android system for smartphones is a Linux
variant; modern in-car computers usually run on Linux. Even OS X is based
on Unix. The Linux kernel is best described as the core—almost the brain
—of the Ubuntu operating system.
   The Linux kernel is the controller of the operating system; it is responsi-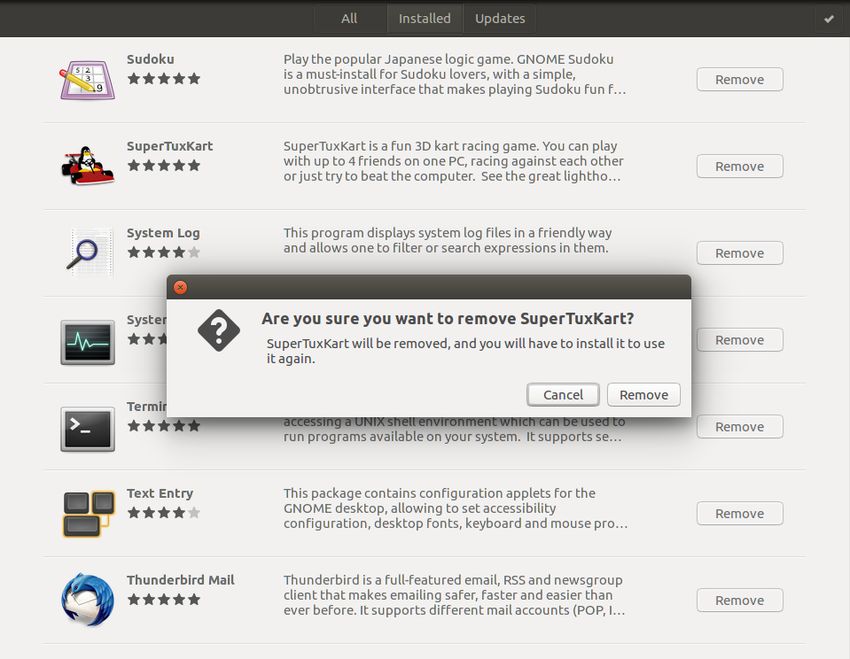
prologue 7

ble for allocating memory and processor time. It can also be thought of as
the program which manages any and all applications on the computer itself.
    While modern graphical desktop environments have generally replaced
early command line interfaces, the command line can still be a quick and
efficient way of performing many tasks. See Chapter 6: Advanced Topics
for more information, and Chapter 2: The Ubuntu Desktop to learn more
about gnome and other desktop environments.
    Linux was designed from the ground up with security and hardware
compatibility in mind, and is currently one of the most popular Unix-based
operating systems. One of the benefits of Linux is that it is incredibly flex-
ible and can be configured to run on almost any device—from the smallest
micro-computers and cellphones to the largest super-computers. Unix was
entirely command line-based until graphical user interfaces (guis) emerged
in 1973 (in comparison, Apple came out with Mac os ten years later, and
Microsoft released Windows 1.0 in 1985).
    The early guis were difficult to configure, clunky, and generally only
used by seasoned computer programmers. In the past decade, however,
graphical user interfaces have grown in usability, reliability, and appear-
ance. Ubuntu is one of many different Linux distributions.                       To learn more about Linux distributions, see
                                                                                 Chapter 8: Learning More.

Is Ubuntu right for you?

New users to Ubuntu may find that it takes some time to feel comfortable
when trying a new operating system. You will no doubt notice many sim-
ilarities to both Microsoft Windows and OS X as well as some differences.
Users coming from OS X are more likely to notice similarities due to the fact
that both OS X and Ubuntu originated from Unix. The Unity shell, which
is the default in Ubuntu, is a completely new concept, which needs some
exploring to get used to it. See Chapter 2: The Ubuntu Desktop for more
information about the Unity shell.
    Before you decide whether or not Ubuntu is right for you, we suggest
giving yourself some time to grow accustomed to the way things are done
in Ubuntu. You should expect to find that some things are different from
what you are used to. We also suggest taking the following into account:

Ubuntu is community based. That is, Ubuntu is developed, written, and
  maintained by the community. Because of this, support is probably
  not available at your local computer store. Fortunately, the Ubuntu
  community is here to help. There are many articles, guides, and manuals
  available, as well as users on various Internet forums and Internet Relay
  Chat (irc) rooms that are willing to assist beginners. Additionally, near
  the end of this guide, we include a troubleshooting chapter: Chapter 7:
  Troubleshooting.
Many applications designed for Microsoft Windows or OS X will not run on
  Ubuntu. For the vast majority of everyday computing tasks, you will
  find suitable alternative applications available in Ubuntu. However,
  many professional applications (such as the Adobe Creative Suite) are
  not developed to work with Ubuntu. If you rely on commercial software
  that is not compatible with Ubuntu, yet still want to give Ubuntu a try,
  you may want to consider dual-booting. Alternatively, some applications        To learn more about dual-booting (running
  developed for Windows will work in Ubuntu with a program called                Ubuntu side-by-side with another operating
                                                                                 system), see Chapter 1: Installation.
  Wine. For more information on Wine, see Chapter 6: Advanced Topics.
Many commercial games will not run on Ubuntu. If you are a heavy gamer,
  then Ubuntu may not be for you. Game developers usually design games
8   getting started with ubuntu 16.04

    for the largest market. Since Ubuntu’s market share is not as substantial
    as Microsoft’s Windows or Apple’s OS X, fewer game developers allocate
    resources towards making their games compatible with Linux. If you just     See Chapter 5: Software Management to learn
    enjoy a game every now and then, there are many high quality games          more about Ubuntu Software.

    that can be easily installed through the Ubuntu Software application.
    There are also a lot of games available at http://store.steampowered.com/
    browse/linux/.

Contact details

Many people have contributed their time to this project. If you notice any
errors or think we have left something out, feel free to contact us. We do
everything we can to make sure that this manual is up to date, informative,
and professional. Our contact details are as follows:
‣   Website: http://www.ubuntu-manual.org/
‣   Reader feedback: feedback@ubuntu-manual.org
‣   irc: #ubuntu-manual on irc.freenode.net
‣   Bug Reports: https://bugs.launchpad.net/ubuntu-manual/+filebug
‣   Mailing list: ubuntu-manual@lists.launchpad.net

About the team

Our project is an open-source, volunteer effort to create and maintain qual-
ity documentation for Ubuntu and its derivatives.

Want to help?

We are always looking for talented people to work with, and due to the size
of the project we are fortunate to be able to cater to a wide range of skill
sets:
‣   Authors and editors
‣   Programmers (Python or TEX)
‣   User interface designers
‣   Icon and title page designers
‣   Event organizers and ideas people
‣   Testers
‣   Web designers and developers
‣   Translators and screenshotters
‣   Bug reporters and triagers
  To find out how you can get started helping, please visit http://ubuntu-
manual.org/getinvolved.

Conventions used in this book

The following typographic conventions are used in this book:
‣ Button names, menu items, and other gui elements are set in boldfaced
  type.
‣ Menu sequences are sometimes typeset as File ‣ Save As…, which means,
  “Choose the File menu, then choose the Save As….”
‣ Monospaced type is used for text that you type into the computer, text
  that the computer outputs (as in a terminal), and keyboard shortcuts.
1 Installation
Getting Ubuntu
Before you can get started with Ubuntu, you will need to obtain a copy of Many companies (such as Dell and System76)
the Ubuntu installation image for dvd or usb. Some options for doing this sell computers with Ubuntu preinstalled. If
you already have Ubuntu installed on your
are outlined below. computer, feel free to skip to Chapter 2: The
Ubuntu Desktop.
Minimum system requirements
If you are unsure whether it will work on your computer, the Live dvd is a
great way to test things out first. Below is a list of hardware specifications
that your computer should meet as a minimum requirement.
‣ 1 GHz x86 processor (Pentium 4 or better)
‣ 1 gb of system memory (ram)
‣ 8.6 gb of disk space (at least 15 gb is recommended)
‣ Video support capable of 1024×768 resolution
‣ Audio support (recommended, but not required)
‣ An Internet connection (highly recommended, but not required)
Downloading Ubuntu
The easiest and most common method for getting Ubuntu is to download
the Ubuntu dvd image directly from http://www.ubuntu.com/download.
Choose how you will install Ubuntu:
‣ Download and install
‣ Try it from a dvd or usb stick
Download and Install / Try it from a DVD or USB stick
For the Download and install, or Try it from a dvd or usb stick options, select
whether you require the 32-bit or 64-bit version (see the following section if
you are unsure), then click “Start download.”
32-bit versus 64-bit
Ubuntu and its derivatives are available in two versions: 32-bit and 64-bit.
This difference refers to the way computers process information. Comput- 32-bit and 64-bit are types of processor
ers capable of running 64-bit software are able to process more information architectures. Most new desktop computers
have a 64-bit capable processor.
than computers running 32-bit software; however, 64-bit systems require
more memory in order to do this. Nevertheless, these computers gain per-
formance enhancements by running 64-bit software.
‣ If your computer has a 64-bit processor, install the 64-bit version.
‣ If your computer is older, a netbook, or you do not know the type of
processor in the computer, install the 32-bit version.
If your computer has a 64-bit processor, select the “64-bit” option before
you click “Start download.”10 getting started with ubuntu 16.04
Downloading Ubuntu as a torrent
When a new version of Ubuntu is released, the download servers can get Torrents are a way of sharing files and informa-
“clogged” as large numbers of people try to download Ubuntu at the same tion around the Internet via peer-to-peer file
sharing. A file with the .torrent extension is
time. If you are familiar with using torrents, you can download the torrent made available to users, which is then opened
file by clicking “Alternative downloads,” and then “BitTorrent download.” with a compatible program such as uTorrent,
Downloading via torrent may improve your download speed, and will also Deluge, or Transmission. These programs
download parts of the file from other people all
help to spread Ubuntu to other users worldwide. around the world.
Burning the DVD image
Once your download is complete, you will be left with a file called ubuntu- While the 64-bit version of Ubuntu is referred
16.04-desktop-i386.iso or similar (i386 here in the filename refers to the 32-bit to as the “AMD64” version, it will work on Intel,
AMD, and other compatible 64-bit processors.
version. If you downloaded the 64-bit version, the filename contains amd64
instead). This file is a dvd image—a snapshot of the contents of a dvd—
which you will need to burn to a dvd.
Creating a bootable USB drive
If your pc is able to boot from a usb stick, you may prefer to use a usb
memory stick instead of burning a dvd. Scroll down on the download
webpage to the “Easy ways to switch to Ubuntu” section and you will find
a link to instructions on how to create a bootable usb stick in your current
operating system. If you select this option, your installation will be running
from the usb memory stick. In this case, references to Live dvd, will refer to
the usb memory stick.
Trying out Ubuntu
The Ubuntu dvd and usb stick function not only as installation media, but
also allow you to test Ubuntu without making any permanent changes to
your computer by running the entire operating system from the dvd or usb
stick.
Your computer reads information from a dvd at a much slower speed In some cases, your computer will not recognize
than it can read information off of a hard drive. Running Ubuntu from that the Ubuntu DVD or USB is present as it
starts up and will start your existing operating
the Live dvd also occupies a large portion of your computer’s memory, system instead. To run Ubuntu from the Live
which would usually be available for applications to access when Ubuntu is DVD or USB, we want the computer to look
running from your hard drive. The Live dvd/usb experience will therefore for information from the Live DVD or USB
first. Changing your boot priority is usually
feel slightly slower than it does when Ubuntu is actually installed on your handled by BIOS settings; this is beyond the
computer. Running Ubuntu from the dvd/usb is a great way to test things scope of this guide. If you need assistance with
out and allows you to try the default applications, browse the Internet, and changing the boot priority, see your computer
manufacturer’s documentation for more
get a general feel for the operating system. It’s also useful for checking that information.
your computer hardware works properly in Ubuntu and that there are no
major compatibility issues.
To try out Ubuntu using the Live dvd/usb stick, insert the Ubuntu dvd
into your dvd drive, or connect the usb drive and restart your computer.
After your computer finds the Live dvd/usb stick, and a quick load-
ing screen, you will be presented with the “Welcome” screen. Using your
mouse, select your language from the list on the left, then click the button
labelled Try Ubuntu. Ubuntu will then start up, running directly from the
Live dvd/usb drive.
Once Ubuntu is up and running, you will see the default desktop. We
will talk more about how to actually use Ubuntu in Chapter 2: The Ubuntu
Desktop, but for now, feel free to test things out. Open some applications,installation 11
Figure 1.1: The “Welcome” screen allows you to
choose your language.
change settings and generally explore—any changes you make will not be
saved once you exit, so you don’t need to worry about accidentally breaking
anything.
When you are finished exploring, restart your computer by clicking Alternatively, you can also use your mouse to
the “Power” button in the top right corner of your screen (a circle with double-click the “Install Ubuntu 16.04” icon that
is visible on the desktop when using the Live
a line through the top) and then select Restart. Follow the prompts that DVD. This will start the Ubuntu installer.
appear on screen, including removing the Live dvd and pressing Enter
when instructed, and then your computer will restart. As long as the Live
dvd is no longer in the drive, your computer will return to its original state
as though nothing ever happened!
Installing Ubuntu—Getting started
At least 8.6 gb of free space on your hard drive is required in order to install Clicking on the underlined “release notes” link
Ubuntu. We recommend 15 gb or more. This will ensure that you will will open a web page containing any important
information regarding the current version of
have plenty of room to install extra applications later on, as well as store Ubuntu.
your own documents, music, and photos. To get started, place the Ubuntu
dvd in your dvd drive and restart your computer. Your computer should
load Ubuntu from the dvd. When you first start from the dvd, you will
be presented with a screen asking you whether you want to first try out
Ubuntu or install it. Select the language you want to view the installer
in and click on the Install Ubuntu button. This will start the installation
process.
If you have an Internet connection, the installer will ask you if you
would like to “Download updates while installing Ubuntu.” We recommend
you do so. The second option, “Install third-party software for graphics
and Wi-Fi hardware, Flash, MP3, and other media” includes the Fluendo
mp3 codec, and software required for some wireless hardware. If you are
not connected to the Internet, the installer will help you set up a wireless
connection.
The “Preparing to install Ubuntu” screen will also let you know if you
have enough disk space and if you are connected to a power source (in case
you are installing Ubuntu on a laptop running on battery). Once you have
selected your choices, click Continue.12 getting started with ubuntu 16.04
Figure 1.2: Preparing to install.
Internet connection
If you are not connected to the Internet, the installer will ask you to choose
a wireless network (if available). We recommend that you connect to the
Internet during install, although updates and
1. Select Connect to this network, and then select your network from the third-party software can be installed after
installation completes.
list.
2. If the list does not appear immediately, wait until a triangle/arrow ap-
pears next to the network adapter, and then click the arrow to see the
available networks.
3. In the Password field, enter the network wep or wpa key (if necessary).
4. Click Connect to continue.
Figure 1.3: Set up wireless.
Allocate drive space
The Ubuntu installer will automatically detect any existing operating sys- If you are installing on a new machine with no
tem installed on your machine, and present installation options suitable for operating system, you will not get the first
option. The upgrade option is only available if
your system. The options listed below depend on your specific system and you are upgrading from a previous version of
may not all be available: Ubuntu.
‣ Install alongside other operating systems
‣ Upgrade Ubuntu … to 16.04installation 13
‣ Erase … and install Ubuntu
‣ Something else
Install alongside other operating systems.
For more complicated dual-booting setups, you will need to configure the parti-
tions manually.
Figure 1.4: Choose where you would like to
install Ubuntu.
Upgrade Ubuntu … to 16.04
This option will keep all of your documents, music, pictures, and other
personal files. Installed software will be kept when possible (not all of your
currently installed software may be supported on the new version). System-
wide settings will be cleared.
Erase disk and install Ubuntu
Use this option if you want to erase your entire disk. This will delete any
existing operating systems that are installed on that disk, such as Microsoft
Windows, and install Ubuntu in its place. This option is also useful if you
have an empty hard drive, as Ubuntu will automatically create the neces-
sary partitions for you.
Formatting a partition will destroy any data currently on the partition.
Be sure to back up any data you want to save before formatting. More
information and detailed instructions on partitioning are available at:
https://help.ubuntu.com/community/HowtoPartition.
After you have chosen the installation type, click Continue, or Install
Now.
Confirm Partition choices and start install
If you chose Something else, configure the partitions as you need. Once
you are happy with the way the partitions are going to be set up, click the
Install Now button at the bottom right to move on.
To reduce the time required for installation, Ubuntu will continue the
installation process in the background while you configure important user14 getting started with ubuntu 16.04
details—like your username, password, keyboard settings and default time-
zone.
Where are you?
Figure 1.5: Tell Ubuntu your location.
The next screen will display a world map. Using your mouse, click your
geographic location on the map to tell Ubuntu where you are. Alternatively,
you can type your location in the field below the map. This allows Ubuntu
to configure your system clock and other location-based features. Click
Continue when you are ready to move on.
Keyboard layout
Figure 1.6: Verify that your keyboard layout is
correct.
Next, you need to tell Ubuntu what kind of keyboard you are using.
In most cases, you will find the suggested option satisfactory. If you are
unsure which keyboard option to select, you can click the Detect Keyboard
Layout button to have Ubuntu determine the correct choice by asking you
to press a series of keys. You can also manually choose your keyboard
layout from the list of options. If you like, enter text into the box at the
bottom of the window to ensure you are happy with your selection, then
click Continue.installation 15
Who are you?
Ubuntu needs to know some information about you so it can set up the
primary user account on your computer. When configured, your name will
appear on the login screen as well as the user menu, which we discuss in
Chapter 2: The Ubuntu Desktop.
On this screen you will need to tell Ubuntu:
‣ your name
‣ what you want to call your computer
‣ your desired username
‣ your desired password
‣ how you want Ubuntu to log you in
Figure 1.7: Setup your user account.
Enter your full name under Your name. The next text field is the name
your computer uses, for terminals and networks. You can change this to
what you want, or keep the predetermined name. Next is your username,
the name that is used for the user menu, your home folder, and behind the
scenes. You will see this is automatically filled in for you with your first
name. Most people find it easiest to stick with this. However, it can be
changed if you prefer.
Next, choose a password and enter it into both password fields. When
both passwords match, a strength rating will appear to the right that will
show you whether your password is “short,” “weak,” “fair,” or “good.” You
will be able to continue the installation process regardless of your password
strength, but for security reasons it is best to choose a strong one. This is
best achieved by having a password that is at least nine characters long,
with a mixture of uppercase and lowercase letters, as well as numbers
and symbols. Avoid words that can be found in a dictionary and obvious
passwords such as your birth date, spouse’s name, or the name of your pet.
Login Options
Finally, at the bottom of this screen you have two options regarding how
you wish to log in to Ubuntu. You may also choose to have Ubuntu encrypt
your home folder.
‣ Log in automatically
‣ Require my password to log in
– Encrypt my home folder16 getting started with ubuntu 16.04
Log in automatically
Ubuntu will log in to your primary account automatically when you start
up the computer so you won’t have to enter your username and password.
This makes your login experience quicker and more convenient, but if
privacy or security are important to you, we don’t recommend this option.
Anyone who can physically access your computer will be able to turn it on
and also access your files.
Require my password to login
This option is selected by default, as it will prevent unauthorized people
from accessing your computer without knowing the password you cre-
ated earlier. This is a good option for those who, for example, share their
computer with other family members. Once the installation process has
been completed, an additional login account can be created for each family
member. Each person will then have their own login name and password,
account preferences, Internet bookmarks, and personal storage space.
Encrypt my home folder
This option provides you with an added layer of security. Your home folder
is where your personal files are stored. By selecting this option, Ubuntu
will automatically enable encryption on your home folder, meaning that
files and folders must be decrypted using your password before they can
be accessed. Therefore if someone had physical access to your hard drive
(for example, if your computer was stolen and the hard drive removed), they
would not be able to see your files without knowing your password.
If you choose this option, be careful not to enable automatic login at a later date.
It will cause complications with your encrypted home folder, and will potentially
lock you out of important files.
Finishing Installation
Ubuntu will now finish installing on your hard drive. As the installation
progresses, a slideshow will give you an introduction to some of the default
applications included with Ubuntu. These applications are covered in more
detail in Chapter 3: Working with Ubuntu. The slideshow will also highlight
the Ubuntu support options.
After approximately twenty minutes, the installation will complete and
you will be able to click Restart Now to restart your computer and start
Ubuntu. The dvd will be ejected, so remove it from your dvd drive and
press Enter to continue.
Wait while your computer restarts, and you will then see the login win-
dow (unless you selected automatic login).
Login Screen
After the installation has finished and your computer is restarted, you will
be greeted by the login screen of Ubuntu. The login screen will present you
with your username and you will have to enter the password to get past it.
Click your username and enter your password. Once done, you may click
the arrow or press Enter to get into the Ubuntu desktop. Ubuntu’s logininstallation 17
Figure 1.8: Ubuntu community support options.
Where to get help for Ubuntu.
Figure 1.9: You are now ready to restart your
computer.
screen supports multiple users and also supports custom backgrounds for
each user. In fact, Ubuntu automatically will pick up your current desktop
wallpaper and set it as your login background.
The login screen allows you to update your keyboard language, volume
intensity and enable/disable accessibility settings before you log in to your
desktop. It also displays date/time and battery power for laptops. You can
also shut down or restart your system from the login screen.
Figure 1.10: Login Screen.2 The Ubuntu Desktop
Understanding the Ubuntu desktop
Initially, you may notice many similarities between Ubuntu and other op-
erating systems, such as Microsoft Windows or Apple OS X. This is because
they are all based on the concept of a graphical user interface (gui)—i.e.,
you use your mouse to navigate the desktop, open applications, move files,
and perform most other tasks. In short, things are visually oriented. This
chapter is designed to help you become familiar with various applications
and menus in Ubuntu so that you become confident in using the Ubuntu
gui.
Figure 2.1: The Ubuntu 16.04 default desktop.
Unity
All gui-based operating systems use a desktop environment. Desktop envi-
ronments contain many features, including (but not limited to):
‣ The look and feel of the system
‣ The organization of the desktop
‣ How the user navigates the desktop
Ubuntu uses Unity as the default desktop environment. The Unity desk- To read more about other variants of Ubuntu,
top is comprised of the desktop background and two bars—a horizontal refer to Chapter 8: Learning More.
one located at the top of your desktop called the menu bar and a vertically
oriented bar at the far left called the Launcher.20 getting started with ubuntu 16.04
The desktop background
Below the menu bar at the top of the screen is an image covering the entire
desktop. This is the default desktop background, or wallpaper, belonging to
the default Ubuntu 16.04 theme known as Ambiance. To learn more about
customizing your desktop (including changing your desktop background),
see the section on Customizing your desktop below.
The menu bar
The menu bar incorporates common functions used in Ubuntu. The icons on
the far right of the menu bar are located in an area of the menu bar called
the indicator area, or notification area. Each installation of Ubuntu may
contain slightly different types and quantities of icons based on a number of
factors, including the type of hardware and available on-board peripherals
upon which the Ubuntu installation is based. Some programs add an icon
to the indicator area automatically during installation. The most common
indicators are: For more about:
‣ the Messaging indicator see Using instant
Network indicator ( or ) manages network connections, allowing you to messaging on page 59;
‣ the Network indicator see Getting online on
connect quickly and easily to a wired or wireless network. page 39;
Text entry settings ( ) shows the current keyboard layout (such as En, Fr, ‣ the Session indicator see Session options on
Ku, and so on) and, if more than one keyboard layout is chosen, allows page 33.
you to select a keyboard layout. The keyboard indicator menu contains
the following menu items: Character Map, Keyboard Layout Chart, and
Text Entry Settings.
Messaging indicator ( ) incorporates your social applications. From here,
among others, you can access instant messenger and email clients.
Sound indicator ( ) provides an easy way to adjust the sound volume as
well as access your music player and sound settings.
Clock displays the current time and provides a link to your calendar and
time and date settings.
Session indicator ( ) is a link to the system settings, Ubuntu Help, and
session options (like locking your computer, user/guest session, logging
out of a session, restarting the computer, or shutting down completely).
Every application has a menuing system where different actions can be Figure 2.2: The indicators of the menu bar.
executed in an application (like File, Edit, View, etc.); the menuing system
for an application is appropriately called the application menu. It is located Note that some older applications may still
in the left area of the menu bar. By default in Unity, the application menu display their menu within the application
window.
isn’t on the title bar of the application as is commonly the case in other gui
environments.
To show an application’s menu, just move your mouse to the desktop’s
menu bar (at the top of the screen). While your mouse is positioned here,
the active application’s menu options will appear in the desktop’s menu bar,
Figure 2.3: To show an application’s menu, just
allowing you to use the application’s menuing options. When clicking on move your mouse to the desktop’s menu bar (at
the desktop, the desktop’s menu bar reappears. This capability in Unity to the top of the screen).
display the application’s menu only when needed is especially beneficial
for netbook and laptop users with limited viewable screen space. You can
disable this feature via Session Indicator ‣ System Settings ‣ Appearance.
In the Behavior tab, under Show the menus for a window, select In the
window’s title bar.the ubuntu desktop 21
The Launcher
The vertical bar of icons on the left side of the desktop is called the Launcher.
The Launcher provides easy access to applications, mounted devices, and
the Trash. All running applications on your system will place an icon in the
Launcher while the application is running. To change the Launcher icon
size, go to Session Indicator ‣ System Settings ‣ Appearance, tab Look.
The first icon at the top of the Launcher is the Dash, a component of
Unity. We will explore the Dash in a later section of this chapter. By default,
other applications appear in the Launcher, including the Files file manager,
LibreOffice, Firefox, any mounted devices, and the Trash, which contains
deleted folders and files, at the bottom of the Launcher.
Holding the Super key, also known as the Windows key (Win key),
located between the left Ctrl key and Alt key, will cause Ubuntu to super-
impose a number onto the first ten applications in the Launcher and also
display a screen full of useful shortcuts. You can launch an application with
a number n on it by typing Super+n.
If you open more applications than can be shown in the Launcher, the
Launcher will “fold” the application icons at the bottom of the Launcher.
Simply move your mouse to the bottom of the Launcher, and you’ll see
the Launcher icons “slide” and the folded application icons unfold for easy
Figure 2.4: The Ubuntu Launcher on the left
access. with a sample of applications on it.
Running applications
To run an application from the Launcher (or cause an already-running
application to appear), just click on the application’s icon.
Applications that are currently running will have one or more triangles
on the left side of the icon indicating the number of application windows
open for this application. Running applications also have a back-lit icon on
the Launcher. Some also refer to an application in the
The application in the foreground (i.e., the application that is on top of all foreground as being in focus.
other open application windows) is indicated by a single white triangle on
the right side of its icon.
You can also run an application through the Dash which will be explored
in the upcoming The Dash section. Figure 2.5: The triangles on each side of the
Firefox icon indicate Firefox is in the foreground
and only one window is associated with Firefox
Adding and removing applications from the Launcher at this time.
There are two ways to add an application to the Launcher:
‣ Open the Dash, find the application you wish to add to the Launcher, and
drag its icon to the Launcher.
‣ Run the application you want to add to the Launcher, right-click on the
application’s icon on the Launcher, and select Lock to Launcher.
To remove an application from the Launcher, right-click on the applica-
tion’s icon, then select Unlock from Launcher.
The Dash
The Dash helps you quickly find applications and files on your computer. For more information about the Dash and its
If you’ve used Windows in the past, you’ll find the Dash to be similar to lenses, see https://wiki.ubuntu.com/Unity.
the Windows Start menu or the Start Screen in Windows 8. OS X users will
find the Dash similar to Launchpad in the dock. If you’ve used a previous22 getting started with ubuntu 16.04
version of Ubuntu or another gnome Linux distribution, the Dash serves
as a replacement for the various gnome 2 menus. The Dash allows you
to search for information both locally (installed applications, recent files,
bookmarks, etc.) and remotely (Twitter, Google Docs, etc.).
Figure 2.6: The Dash.
To explore the Dash, click on the topmost icon on the Launcher; the icon
contains the Ubuntu logo on it. After clicking the Dash icon, the desktop
will be overlaid by a translucent window with a search bar on top as well as
a grouping of recently accessed applications, files, and downloads. Ubuntu
also includes results from popular web services. The search bar provides
dynamic results as you enter your search terms.
Lenses
Lenses act as specialized search categories in the Dash: searching is accom-
plished by utilizing one or more lenses, also known as scopes, and each lens
is responsible for providing a category of search results through the Dash.
The six lenses installed by default at the bottom are: Home lens ( ),
Applications lens ( ), Files and Folders lens ( ), Videos lens ( ), Music
lens ( ), and Photos lens ( ).
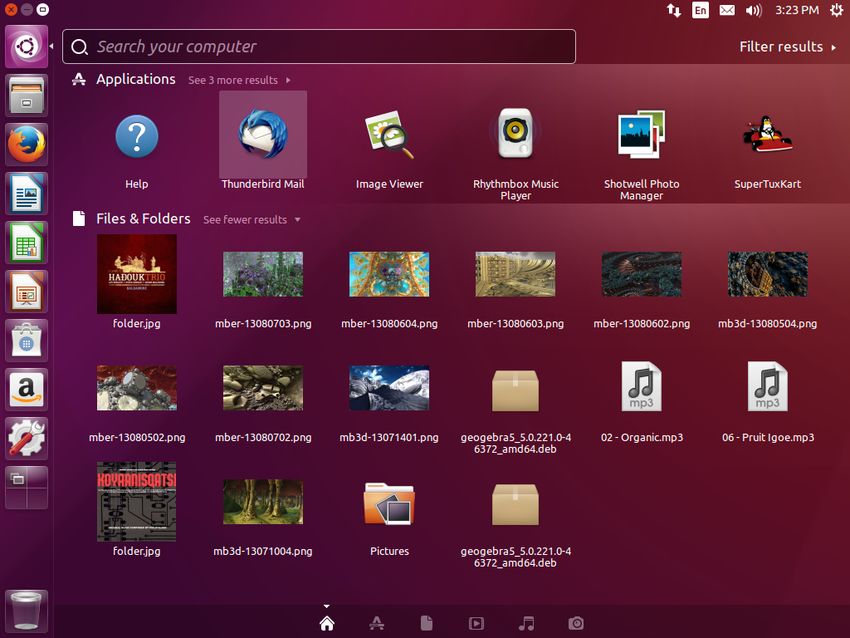
Search for files and applications with the Dash
The Dash is an extremely powerful tool allowing you to search your com-
puter for applications and files.
Find files/folders
The Dash can help you find names of files or folders. Simply type a portion
of the file or folder name. As you type, results will appear in the Dash. The
Files and Folders lens will also assist in finding files or folders—showing
you the most recently accessed files as well as the most recent downloads.
You can use the filter results button in the top-right corner of the Dash tothe ubuntu desktop 23
filter results by attributes such as file or folder modification times, file type
(.odt, .pdf, .doc, .txt, etc.), or size.
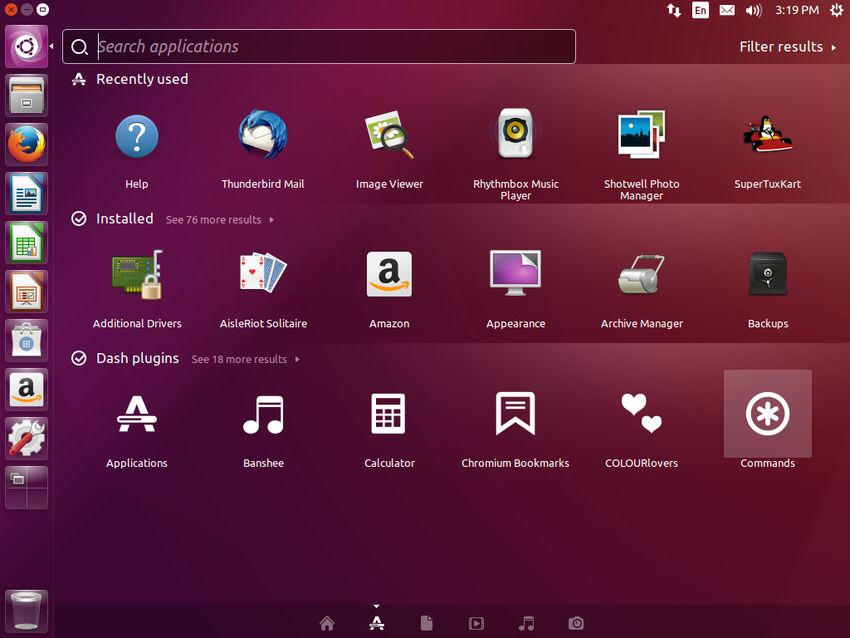
Find applications
A standard Ubuntu installation comes with many applications. Users can
additionally download thousands of applications from the Ubuntu Software
application. As you collect an arsenal of awesome applications (and get The Ubuntu Software application and software
a bonus point for alliteration!), it may become difficult to remember the management will be discussed in detail at
Chapter 5: Software Management.
name of a particular application; the Applications lens on the Dash can
assist with this search. This lens will automatically categorize installed
applications under “Recently used,” “Installed,” or “Dash plugins.” You can If you are new to the world of Ubuntu, be sure
also enter the name of an application (or a part of it) into the search bar in to read Chapter 3: Working with Ubuntu. It
will provide you with assistance in choosing
the Dash, and the names of applications matching your search criteria will application(s) to suit your needs.
appear. Even if you don’t remember the name of the application at all, type
a keyword that is relevant to that application, and the Dash will find it. For
example, type music, and the Dash will show you the default music player
and any music player you’ve used.
Figure 2.7: You can see the default results when
you press the Applications lens.
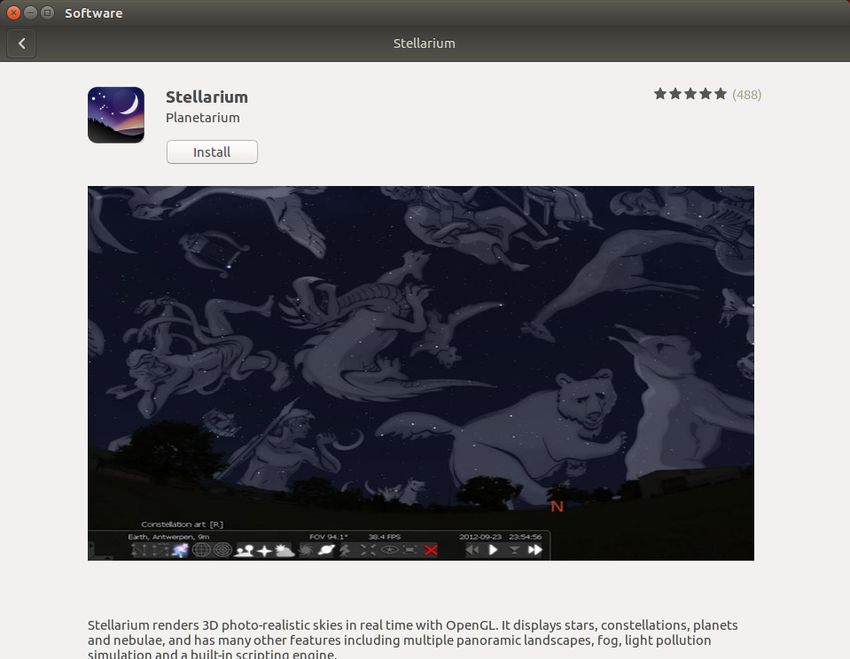
External search results
In addition to searching your local computer for applications and files, the
Dash can also search various online resources (e.g., Amazon.com). Results
pertinent to your search criteria are returned to you in the Dash. The online
search results within the Dash are turned off by default during installation.
If you want external search results, go to System Settings ‣ Security &
Privacy ‣ Search and set the “Include online search results” switch to the On
position.24 getting started with ubuntu 16.04
Workspaces
Workspaces are also known as virtual desktops. These separate views of
your desktop allow you to group applications together, and by doing so,
help to reduce clutter and improve desktop navigation. For example, you
can open all of your media applications in one workspace, your office suite
in another, and your web browser in a third workspace. Ubuntu has four
workspaces by default.
The workspaces feature is not activated by default in Ubuntu. To activate
workspaces, click on Session Indicator ‣ System Settings ‣ Appearance then
click on the Behavior tab and click on the Enable workspaces box. When
this box is checked, you’ll notice that another icon is added to the bottom of
the Launcher that looks like a window pane. This is the workspace switcher.
Switching between workspaces
If you’ve activated the workspace switcher as described above, you can
Figure 2.8: The workspace switcher on the
switch between workspaces by clicking on the workspace switcher icon Launcher.
located on the Launcher. This utility allows you to toggle through the
workspaces (whether they contain open applications or not) and choose the
one you want to use. You can also launch the workspace switcher by typing
Super+s and choose a workspace by using the keyboard arrows followed by
RET (the Return / Enter key).
Managing windows
When opening a program in Ubuntu (such as a web browser or a text editor
—see Chapter 3: Working with Ubuntu for more information on using appli-
cations)—a window will appear on your desktop. Simply stated, a window is
the box that appears on your screen when you start a program. In Ubuntu,
the top part of a window (the title bar) will have the name of the applica-
tion to the left (most often, the title will be the same as the application’s
name). A window will also have three buttons in the top-left corner. From
left to right, these buttons represent close window, minimize window, and
maximize window. Other window management options are available by
right-clicking anywhere on the title bar.
Closing, maximizing, restoring, and minimizing windows
To close a window, click on the close button ( ) in the upper-left corner of
the window—the first button on the left-hand side. Figure 2.9: This is the top bar of a window,
The button immediately to the right of the close button is the minimize named title bar. The close, minimize, and
button ( ), which hides the window from view and minimizes it to the maximize buttons are in the top-left corner of
the window.
Launcher. When an application is minimized to the Launcher, the left-side
of the icon in the Launcher will display an additional triangle. Clicking the
icon of the minimized application will restore the window to its original
position.
Finally, the right-most button is the maximize button ( ) which causes
the application to completely fill the desktop space. If a window is maxi-
mized, its top-left buttons and menu are automatically hidden from view.
To make them appear, just move your mouse to the menu bar. Clicking the
maximize button again will return the window to its original size.the ubuntu desktop 25
Moving and resizing windows
To move a window around the workspace, place the mouse pointer over the
window’s title bar, then click and drag the window while continuing to hold
down the left mouse button. You can also move a window by holding the
Alt key and then clicking and holding the left mouse button while pointing
anywhere in the window and dragging the window to a new location. To
resize a window, place the pointer on an edge or corner of the window so
that the pointer turns into a larger, two-sided arrow (known as the resize
icon). You can then click and drag to resize the window.
Switching between open windows
In Ubuntu, there are many ways to switch between open windows:
‣ If the window is visible on your screen, click any portion of it to raise it
above all other windows.
‣ Use Alt+Tab to select the window you wish to work with. Hold down
the Alt key, and keep pressing Tab until the window you’re looking
for appears highlighted in the pop-up window. Then, release the Alt
key, and the application highlighted in the pop-up will move to the
foreground of your desktop.
‣ Click on the corresponding icon on the Launcher by moving your mouse
to the left side of the screen and right-clicking on the application’s icon.
If the application has multiple windows open, double-click on the icon in
order to select the desired window.
Press Ctrl+Super+D to hide all windows and display the desktop; the same
works to restore all windows.
Moving a window to a different workspace
To move a window to a different workspace, verify that the window isn’t
maximized. If it is maximized, click on the right-most button on the left
side of the title bar to restore it to its original size. Then right-click on the
window’s title bar and select: You can also use Shift+Control+Alt in
combination with the arrow keys to move a
‣ Move to Workspace Left, to move the window to the left workspace window to a different workspace.
‣ Move to Workspace Right, to move the window to the right workspace
‣ Move to Workspace Down, to move the window to the bottom workspace
‣ Move to Another Workspace, and then choose the workspace to where
you wish to move the window.
Note that the options available when moving windows to different
workspaces depends on which workspace contains the window you are
moving. If the window exists in the lower-right workspace, you will not see
a Move to Workspace Down because there is no workspace available below
the lower-right quadrant of a four quadrant workspace.
Window always on the top or on visible workspace
At times, you may want to force a window to always be in the foreground
so that it can be seen or monitored while you work with other applications.
For example, you may want to browse the web and, at the same time, view
and answer an incoming instant message. To keep a window always in
the foreground, right-click on the window’s title bar, then select Always
On Top. This window will now be on the top of all windows opened in26 getting started with ubuntu 16.04
the current workspace. If you want to have a window always on the top
regardless of the workspace, right-click on the window’s title bar, then
select Always on Visible Workspace. This window will now be on top of all
other windows across all workspaces.
Unity’s keyboard shortcuts
When you long-press the Super key (also known as the Win key) for a few
seconds, Unity will display a list of useful keyboard shortcuts, some of
which have been mentioned above.
Figure 2.10: Common keyboard shortcuts as
displayed by Unity.
Browsing files on your computer
There are two ways to locate files on your computer—search for them or
access them directly from their directory. You can search for a file using
the Dash or the Files file manager. You can also use the Dash or Files file
manager to access commonly used directories (such as Documents, Music,
Downloads) as well as the most recently accessed files.
Your home directory
The home directory is used to store all of your personal files (rather than The terms “directory” and “folder ” are often
system files, such as applications). used interchangeably.
In Ubuntu, by default, the contents of your home directory are acces-
sible for and can be read by other users who have an account on your
PC.
The name of your home directory matches your login name and is cre-
ated when your user account is created. When opening your personal
directory, you will see a collection of several directories, including Desk-
top (which contains any files that are visible on the desktop), Documents,
Downloads, Music, Pictures, Public, Templates, and Videos. These directo-
ries are created automatically during the installation process. You can add
more files and directories as needed.the ubuntu desktop 27
Files file manager
Just as Microsoft Windows has Windows Explorer and OS X has Finder to
browse files and directories, Ubuntu uses the Files file manager by default.
The Files file manager window
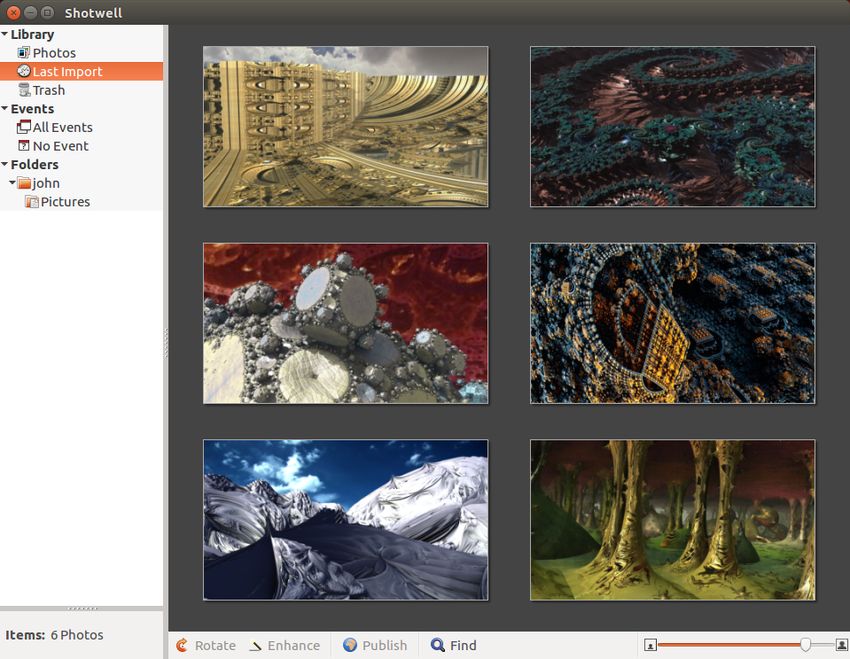
When you select the Files shortcut in the Launcher, click on a directory in
the Dash, or double-click a directory on the desktop, Ubuntu will open the
Files file manager. The default window contains the following features:
Figure 2.11: Files file manager displaying your
home directory.
menu bar The menu bar is located at the top of the screen. The Files menu
allows you to modify the layout of the browser, show, browse and re-
move bookmarks, open a Help document, open a new window, connect
to a server, or quit. Choosing Enter Location will open the Locations
text field where you can enter any location directly.
title bar The title bar shows the name of the currently selected directory. It
also contains the Close, Minimize, and Maximize buttons.
toolbar The toolbar displays your directory browsing history (using two
arrow buttons), your location in the file system, a search button, and
options for your current directory view.
Figure 2.12: The toolbar of the Files application
while browsing the directory /var/log/apt/, with
the Search functionality activated.
- On the upper left corner of the toolbar, there are two arrow icons.
These are similar to the “Back” and “Forward” history functionality in
web browsers. The Files application keeps track of where you are and
allows you to backtrack if necessary. As such, the buttons Previous
visited location and Next visited location allow you to navigate
through your directory browsing history.
- In the middle of the toolbar, you will see a representation of your
current directory location.28 getting started with ubuntu 16.04
- Clicking on the Search icon opens a text field so you can search for a
file or directory by name.
- Clicking on the View items as a grid icon (the default setting) enables
you to see the files and directories as icons. In this view, previews of
photos and text files are also displayed.
- Clicking on the View items as a list icon allows you to see a list
of files and directories, along with their size, type, and date of last
modification. You may customize what information is displayed by
right-clicking on either Name, Size, Type, or Modified. This action
will display a checklist of available options.
left pane The left pane of the file browser has shortcuts to commonly used
directories. You can also bookmark a directory through the menu bar
by choosing Bookmarks ‣ Bookmark this Location. Once you have
bookmarked the directory, it should appear in the left pane. Regardless
of the directory you are currently browsing, the left pane will always
contain the same directories.
right pane The largest pane shows the files and directories within the
directory you are currently browsing.
To navigate to a directory in Files, click (or double-click) on its icon in
the right pane, the left pane, or the toolbar.
Opening files
A file, in its simplest form, is data. Data can represent a text document,
database information, or other media such as music or videos. To open a
file, you can double-click on its icon. Ubuntu will try to find an appropriate
application with which to open the selected file. In some cases, you may
wish to open the file with a different application than the one Ubuntu se-
lected. To select an application, right-click the icon and select one of the
Open With options.
Creating new directories
To create a new directory from within the Files file manager, right-click
in the blank area of the right pane and select New Folder from the pop-
up menu (this action will also work on the desktop). Replace the default
“Untitled Folder” title with your desired label (e.g., “Personal Finances”).
You can also create a new directory by pressing Ctrl+Shift+N.
Hidden files and directories
If you wish to hide certain directories or files, place a dot (.) in front of the
name (e.g., “.Personal Finances”). In some cases, it is impossible to hide files
and directories without prefixing them with a dot.
You can easily view hidden files by clicking View ‣ Show Hidden Files or
by pressing Ctrl+H. Hiding files with a dot (.) is not a security measure—it is
simply a way to help you organize your files.
Copying and moving files and directories
You can cut, copy, and paste files or directories in the Files file manager by
right-clicking on the item and selecting the corresponding button from the
pop-up menu. You can also use the keyboard shortcuts Ctrl+X, Ctrl+C, and
Ctrl+V to cut, copy, and paste files and directories, respectively.You can also read