Advice section Engineered wood flooring - Parador
←
→
Page content transcription
If your browser does not render page correctly, please read the page content below
Advice section Engineered wood flooring
ENGINEERED WOOD FLOORING II Content

Table of contents
Applications.......................................................................................................................... Page 3

The right choice.................................................................................................................... Page 3

Engineered wood flooring and indoor climate conditions..................................................... Page 5

Product structure.................................................................................................................. Page 6

Technology............................................................................................................................ Page 7

Accessories..................................................................................................................... Page 8 –10

Installation overview........................................................................................................... Page 11

Installation rules............................................................................................................ Page 12 –14

Subfloor requirements....................................................................................................... Page 15

Installation options............................................................................................................. Page 16

Assembly engineered wood flooring with Automatic-Click® system
› Basic 11-5; Classic 3025, 3060; Trendtime 3, 4, 6, 8; Edition Floor Fields................... Page 17 –19

Assembly engineered wood flooring with Allround-Click® system
› Trendtime 3 (herringbone)........................................................................................... Page 20 –21

Assembly engineered wood flooring with tongue and groove connection
› Edition New Classics.................................................................................................. Page 22 –23

Assembly engineered wood flooring with free and fixed tongue connection
› Edition Open Frameworks.......................................................................................... Page 24 –26

Value retention, cleaning and care, including floors with lacquer surface
extra matt professional.................................................................................................. Page 27 –28

Checklists

› Template acceptance protocol......................................................................................... Page 29

› Underfloor heating system......................................................................................... Page 30 – 31

› Whole-area glue-down..................................................................................................... Page 32

Allround-Click ®, Automatic-Click ®: Registered as a Union Trademark

You will find important information about installation on the pack leaflets or product packaging
or in available product-specific instructions. For special applications, additional information is also
available through Parador Application Technology.

Please also pay attention to the technical data sheets, declarations of performance, certificates,
and installation videos, which you will find on the Parador website www.parador.eu.

The following standards are also relevant for the use of Parador engineered wood flooring:
DIN 18202                      Tolerances in building construction
DIN 18299                      General conditions for construction work of any kind
DIN 18365                      Flooring work
BEB publication	Evaluation and preparation of subfloors; heated and unheated
                               floor constructions                                                                                              2
ENGINEERED WOOD FLOORING II Applications
Applications
Application possibilities
With Parador engineered wood flooring, your ideas are quickly and easily turned into reality,
as this high-quality engineered wood flooring can be installed in no time at all thanks to the
patented Automatic-Click® and Allround-Click® systems and long-established tongue and groove
connection. Parador engineered wood flooring combines naturalness individuality and durability.
The large selection of exquisite wood types in various board sizes, surface finishes, aesthetical
gradings and installation designs. Parador engineered wood flooring can be used in both residen-
tial and commercial buildings depending on use except wet rooms (please refer to our Chapter
‘Installation rules’ under the section heading ‘Installation in wet rooms’).
The right choice
Not all engineered wood flooring is the same: Prior to your purchase you should make sure that
your chosen engineered wood flooring suits your needs. In addition to the wood type, visual
requirements to grade of wood, the top layer thickness, the quality of the click connection, and
surface finishing are of particular importance. Parador gives you a choice between oil impregna-
tion, pure natural oil, and multi-layered lacquer finish. However, whether you choose a lacquered
or oiled floor, a specific wood type or a particular colour – the choice almost certainly comes
down to a matter of personal taste.
Oil impregnated (U.V. oil), natural oil and natural oil plus surface treatments for
engineered timber flooring
Parador oil impregnation (U.V. oil) is a very effective surface treatment, which unlike other oil or
oil and wax systems does not need any time-consuming care or treatment. Parador natural oil
is based on natural raw materials made from plants. The factory treatment means that the oil
penetrates the wood to allow the open-pored wood surface to retain its natural, resistant texture.
Parador’s natural oil ‘plus’ factory surface treatment does not require an additional maintenance
oil application on completion of the flooring installation and is ready to walk on immediately unlike
the natural oil factory surface treatment (only products in the Basic 11-5* product range) which
requires an additional coat of Parador natural oil maintenance product. Regular maintenance is
required for both natural oil and natural oil ‘plus’ depending on the amount of use that the floor
will have to withstand to retain the aesthetics of the floor. Please refer to the information from
the chapter Value retention, cleaning and care – Maintaining lacquered finishes and naturally
oiled / naturally oiled plus / oil impregnated surfaces (UV oil), the product-specific instructions as
well as the information from the associated technical data sheets (parador.de/en/services/down-
loads).
The benefit of a natural oil finish is basically that the treatment emphasises the natural look and
character of the wood. Unlike with an oil impregnated finish, with naturally oiled and naturally
oiled plus engineered wood flooring it is possible to renovate small areas, meaning that you can
repair small damaged areas just where it is necessary. On the flip side, natural oiled floors are
more susceptible to scratches and indentations compared to lacquered surfaces although they
are easier to repair. Liquids spills such as coffee and red wine can also be as easily removed on
a naturally oiled floor as on a lacquered floor. (Please refer to our cleaning and care instructions
in the chapter headed Value retention, cleaning and care.)
* For products in the Basic 11-5 engineered wood flooring range, Parador recommends a
maintenance oil application following flooring installation for long-term maintenance of the
original look (please use the profile care oil from the Parador range).
3ENGINEERED WOOD FLOORING II The right choice
The right choice
Lacquered engineered wood flooring
The Parador lacquer finish offers a very balanced protection of the wood with an elegant look
at the same time. Optimum protection with suitability for everyday use is possible only if the
lacquer is hard enough to ensure wear resistance, and resilient enough to avoid cracking under
a high load. Parador lacquer finish is perfectly balanced and guarantees appropriate suitability for
everyday use.
Wood grading
Wood grading encompasses specific inherent parts of a tree such as knots, sapwood, cracks,
medullary rays etc., that ultimately reflects in the visual appearance of the wood. Parador’s own
grading guidelines result in 5 different grades, Select, Natur, Classic, Living and Rustikal. This
results in a divergent visual appearance of Parador’s timber floors (for further information, please
refer to Parador’s technical data sheets).
Hardness of the wood types
Hardness is the resistance that the wood uses to resist the impact of a solid body under load.
The hardness essentially depends on the type of wood. The Brinell method is the most common
method for determining hardness. Brinell hardness HB is measured in N/mm2 at a wood mois-
ture level of 12%. The higher the value, the harder the wood.
Wood type Density Brinell hard- Hardness
g/cm3 ness N/mm2 class
Maple 0.72 48 4
Beech 0.68 34 3
Oak 0.71 34 3
Ash 0.72 39 4
Cherry 0.58 30 2
Larch (also smoked) 0.60 19 2
Californian walnut 0.64 26 2
Thermo oak 0.60 31 3
Walnut 0.60 31 3
The hardness of wood fluctuates based on the individual growing conditions. Values are therefore only
approximate values.
Class 1: very soft wood · Class 2: soft wood · Class 3: hard wood · Class 4: very hard wood
Changes of shades from incidence of light
Daylight causes chemical reactions in the wood, which cause the shade of the wood to change.
The shade changes only on the surface of the wood. Most wood types get darker over time,
although dark wood tend to brighten and light-coloured wood tend to become yellow. The colour
change causes the overall look of the flooring to become more even and balanced. Minor colour
differences are automatically equalised over time.
4ENGINEERED WOOD FLOORING II Engineered wood flooring and room climate
Engineered wood flooring and
indoor climate conditions
Wood is a hygroscopic material, which means that it can absorb and release moisture. On the
one hand, this can have a regulating effect, but it can also be a disadvantage because wood
swells when it absorbs moisture (gets bigger) or shrinks when it releases moisture (gets
smaller). Whether it swells or shrinks depends directly on the room climate. If the climate
is too warm and too dry, the wood shrinks; if it’s too moist, the wood swells.
Multi-layer engineered wood flooring also shrinks and swells, but significantly less so than solid
engineered wood flooring. Particularly in the winter months, when room humidity is often much
too low (see illustration), the natural shrinkage of the material can lead to the creation of gaps.
Conversely, when it is too damp, if the gap to the wall is not adequate or expansion joints are
missing, the floor area may start to bulge upwards.
Note: Beech shrinks significantly more than most other commonly used types of wood. That is
why more severe gaps may occur in the Beech engineered wood flooring in the winter
when the room climate is too dry.
Room climate throughout the year
90
80
70 too humid
60
Air humidity in %
50
Ideal value 30–65 %
40
30
too dry
20
10
0
Jan Feb Mar Apr May Jun Jul Aug Sep Oct Nov Dec
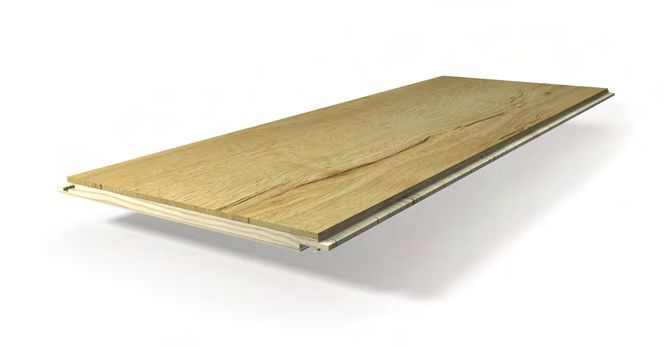
5ENGINEERED WOOD FLOORING II Product structure
Product structure
1
2
3
4
1 2 3
Top layer Softwood middle layer Balancing layer paper
High-quality solid wood with a thickness of The excellent dimensional stability of Manufactured in a resource-friendly peeling
up to 4 mm is finished with a lacquered or Parador engineered wood flooring even process, the balancing layer paper made
naturally oiled surface. The lamella under maximum load comes from the solid of solid spruce also supports the plank’s
impregnation on the head side as well as wood core with its vertical annual rings. dimensional stability.
the all-round impregnated top layer prevent The patented click mechanism milled into
moisture from penetrating and ensure the wood ensures a long-term stable
enhanced swell-protection. The gentle connection.
drying process prevents cracking.
4
Click connection Tongue and groove connection
The patented Parador click connections Tried and tested installation type with a
guarantee easy, fast, and simple installation classic connection for maximum installation
with maximum pull-out resistance and a options.
long-term stable connection to create
permanently beautiful flooring and a solid
bond between individual planks. Floating
installation and whole-area gluing is easily
possible because the planks are self-orient-
ing. The floor is ready to walk on as soon as
it has been installed.
6ENGINEERED WOOD FLOORING II Technology
Technology
Swell-protection Automatik-Click® Allround-Click® Tongue and groove
system system connection
Parador engineered wood Basic 11-5 Trendtime 3 (herringbone) Edition New Classics
flooring Classic 3025, 3060 Edition Open Frameworks (with
Trendtime 3, 4, 6, 8 loose tongue on the end edge)
Excellent swell protection Patented click mechanism
The lamella impregnation as well as the all-round impregnated top Installation is quick and easy without glue thanks to the patented
layer ensure enhanced swell-protection. Each individual strip is also Automatic-Click ® system with long and end edge locking mecha-
impregnated on the edges. For reliable protection against moisture, nism.
swelling, and soiling.
Innovative installation system with Trendtime 3 Classic tongue and groove connection / no-groove
herringbone tongue connection
The innovative Allround-Click ® system without left or right strips for The all-round tongue and groove profile is characterized by maximum
easy installation. fitting accuracy and ease of installation. The use of a loose tongue in
Open Frameworks offers countless installation options.
7ENGINEERED WOOD FLOORING II Accessories
Accessories
Underlays
A suitable underlay must always be used between the substrate and the floating engineered wood floo-
ring. Underlays reduce ambient noise and footfall sound, compensate for minor bumps and – depending
on the finish – can provide the necessary moisture protection for mineral substrates. For all existing subs-
trates, which consist e.g. of dry floorboards or chipboard, only footfall sound insulation is used. A vapour
barrier must not be used in these cases, otherwise mould may form in the underlay. A moisture barrier is
mandatory with all mineral substrates (screed, concrete, tile), as otherwise moisture from the substrate
may penetrate the flooring, which in turn may cause cupping or warping.
An ambient noise and footfall sound protection or a combination product must also be used.
Comprehensive information about underlays can be found in our catalogues and online under
www.parador.de/en.
Parador offers the right underlays for every application.
Akustik-Protect 50 Akustik-Protect 50
› integrated vapour barrier
Akustik-Protect 80 Akustik-Protect 80
› without integrated moisture protection, e.g. for installation on wooden substrates
Akustik-Protect 100
› integrated vapour barrier Akustik-Protect 100
› good footfall sound and ambient noise insulation*
› no additional moisture protection required (PE film)
Akustik-Protect 500 Akustik-Protect 500
› integrated vapour barrier
› even better characteristics than Akustik-Protect 50, 80 and 100
› no additional moisture protection required (PE film)
PE film PE-film
When installing on mineral substrates without the use of underlays with moisture protection, additional
moisture protection (PE film) is absolutely necessary.
Aluminium adhesive tape
› f or sealing the butt joints between the underlays for improved moisture protection
* Footfall sound is directed downwards, in other words is perceived in the rooms on the floor below;
Ambient noise is directed upwards and is perceived in the room where it occurs.
8ENGINEERED WOOD FLOORING II Accessories
Accessories
Skirting boards
For a perfect finish, the Parador product range includes the right decor skirting board to match every
floor design. It is attached to the wall using the Parador construction adhesive or the special plastic 24 h
clips with integrated cable conduit. Caps and corners complete the product range.
Skirting board assembly instructions
0h 24 h
The flooring is ready to walk on immediately after floating installation or after hardening of the glue for
Edition. Remove the Parador plastic spacer wedges and attach the Parador skirting board using the
patented clip technology or Parador assembly adhesive.
Aluminium profiles
Parador aluminium profiles combine, bridge and adjust and are suitable for stair edges. The basic
profiles are screwed into the subfloor or – in particular with an underfloor heating system – are glued
to the subfloor. Insert cover profiles or screw down aluminium profiles – done.
Aluminium profiles are suited for use with floor coverings with a thickness of 8 to up to 18 mm.
Note: Please refer to the application description on the product label.
Transition profile
8 - 18 mm/0,31 - 0,71 inch
Cover dimensions: 36 mm
The integrated slope adjustment enables a transition from floor coverings (carpet, tile, etc.) with
a thickness of 5 to 20 mm.
Adapting profile
8 - 18 mm/0,31 - 0,71 inch
Cover dimensions: 45 mm
0 - 20 mm/
0 - 0,78 inch
The integrated slope adjustment enables a transition from screed and / or floor coverings (carpet, tile,
etc.) with a thickness of 0 to 20 mm.
9ENGINEERED WOOD FLOORING II Accessories
Accessories
End profile
8 - 18 mm/0,31 - 0,71 inch
Cover dimensions: 26 mm
Note: For floor coverings with a thickness of 8 to 18 mm.
Stair edge profile
Cover dimensions: 28 mm and 23 mm to the step
8 - 18 mm/0,31 - 0,71 inch
Note: For floor coverings with a thickness of 8 to 18 mm.
Tool
You will need the following Parador tools and aids for installing Parador engineered wood flooring:
Tape measure or hinged ruler, cutter knife, pencil, handsaw, Parador plastic spacer wedges, Parador
MultiTool, hammer, drill and jigsaw, crosscut saw, or circular saw, and possibly glue for whole-area
gluing.
Other tools and materials may be required, depending on the application: “Gun” for construction
adhesive, metal saw for aluminium profiles; Parador glue D3.
Note: For a perfect result of your installed floor down to the last detail, you will need covers, e.g. to
cover movement joints around radiator pipes routed through the floor which can be sourced
from various specialist outlets.
10ENGINEERED WOOD FLOORING II Installation
Installation at a glance
Engineered wood flooring can be installed in two ways: whole-area gluing or floating installation.
Whole-area glued engineered wood flooring is comparably quiet because vibrations and hollow
spaces are chiefly excluded. The floating installation of Parador engineered wood flooring is fast and
easy even without prior knowledge thanks to the simple Automatic-Click® system – that’s why it’s
the most popular installation method.
Lay out the underlay on the prepared Centre/angle the installation area and adjust Use the plastic spacers to maintain a clear- ut the last plank of the first row to the
C
substrate. the first row of planks by cutting it to size. ance of at least 10 to 15 mm from all walls necessary length, considering the wall
and fixed objects in the room.. clearance. The cut piece of the plank is
used to start the second row.
tart the next row from the left. Simply click
S J oin head joints using a hammer and Use a remnant or the Parador MultiTool to Cover edge clearances using matching
the long sides of the planks together. The protective block. The long and head joints transfer the wall outline to the last row of skirting boards from the extensive Parador
planks must not be glued. will connect automatically. Continue this planks. product range.
installation throughout the whole room.
Detailed installation information is available starting on page 16.
The installation of engineered wood flooring Trendtime 3 (herringbone) and engineered wood
flooring Edition New Classics as well as Edition Open Frameworks deviate from this. Detailed
installation instructions can be found from page 21 onwards. Separate instructions for installing
Trendtime 8 Beech and Trendtime 8 Oak Multiplank engineered wood flooring can be found on
page 17. Before installation, please observe the installation rules listed on the following pages.
Compliance with these instructions is a requirement for successful installation and helps guaran-
tee that you can enjoy your new engineered wood flooring for a long time.
11ENGINEERED WOOD FLOORING II Installation rules
Installation rules
These installation rules and the assembly process shown below are generally applicable. Additional
special or different rules or notes may be listed in the pack leaflet of the relevant products. These
must be complied with as they are binding.
Installation video – Installing Parador
engineered wood flooring correctly
(incl. surface treatment oils)
Note: !
Click into the text “Video installation”,
QR code, or scan the QR code
1. Inspecting for material damages 1
Engineered wood flooring planks should be checked thoroughly for material defects before and
during installation (e.g. improper transportation) (Figure 1). Planks with visible defects or damage
must not be installed. Assembly should only take place in daylight or with adequate lighting, as any
damaged or faulty boards may not be detected.
2. Acclimatisation before installation
Engineered wood flooring planks must be acclimatised over a period of at least 48 hours at a room
temperature of at least 17°C and a relative humidity of 30–65% in the room where they are being
installed (Figure 2). That means that the sealed packages must adjust to the climate conditions in the
room. If there are major climate differences between the storage area and the room of installation, 2
the acclimatisation period should preferably be longer. If the climate conditions are almost the same,
the period can also be shorter.
Please store the packages on an even base without opening them. It is essential that you comply
with these points, especially in new builds where the humidity is usually very high.
3. Installation in damp rooms
No installation in permanently damp rooms / wet rooms
Engineered wood flooring must not be installed in areas where water is likely to lodge on the floor
(Figure 3). Standing water penetrates the wood and causes permanent damage.
In permanently damp areas or damp environments (sauna areas, small bathrooms etc.), engineered
wood flooring should not be installed, as the risk of moisture penetrating cannot be ruled out. 3
If engineered wood flooring is expected to be installed in larger bathrooms (recommendation: engi-
neered wood flooring with natural oil or natural oil plus surface and whole-area gluing), care must be
taken that it is not installed in close proximity to areas where water might lodge (shower, bathtub, toilet,
sink) and that the relative humidity of the room is kept within the recommended range of 30–65%.
The formation of puddles and the effects of damp must be prevented at the edges and in the joint
areas – including expansion joints (Figure 4). Water penetrating underneath the flooring may also
cause the formation of mould.
4. Subfloor condition
All existing subfloors must be level (max. 3 mm over 1 m length), dry, and sufficiently solid. In case
of bigger uneven patches, these must be filled with commercially available filler. The subfloor surface 4
should be without cracks, breaks, or gaps. Loose subfloors (PVC / carpet) must be removed. Mineral
subfloors / screed must be sufficiently dry. In this regard please also note the information in the
chapter “Subfloors”.
12ENGINEERED WOOD FLOORING II Installation rules
Installation rules
5. Vapour barrier for mineral subfloors
With dry, mineral subfloors, as a precautionary measure a 0.2 mm thick PE film or alternatively
a Parador underlay with integrated moisture protection must be placed underneath. However,
the PE film is only a vapour barrier and should be overlapped by approximately 30 cm and glued.
Under no circumstances should a PE film be used to waterproof a building!
See also the chapter Underlays.
6. Maintain expansion joints / wall clearance 5
As already described above, the natural material wood swells or shrinks depending on climatic
conditions. Therefore, installed engineered wood flooring requires a corresponding clearance
to all fixed components, i.e. walls, supports, heater pipes, etc. This is called the wall clearance
or expansion joint. Expansion joints are also required if a defined installation area is exceeded
(see Installation Rule 7). Insufficient wall clearance is the most common installation error. This is
frequently noticed in Summer, when increased air humidity and temperatures expand the engi-
neered wood floor during the summer months.
The expansion joint or wall clearance should be at least 10-15 mm on each side, more on larger
areas.
The general rule is:
Per meter of flooring at least 2 mm expansion joint on both sides of the room.
(Example: room width 5 m = min. 10 mm edge joint on each side).
Even if the installed material only abuts a single point in the room,the floating material may start
to push up and warp. “Popular” weak points in this case are door frames, joints to stairs, radia-
tors and end rails.
6
Heavy objects exceeding 350 kg placed on top of the flooring means that the flooring can move
on one side only which therefore requires that the wall clearance on the opposite wall is left
twice as large. Parador recommends that heavy objects or fitted furniture (such as kitchens,
fitted units, aquariums etc.) are sited or assembled before the installation of the flooring (in the
case of fitted units, the flooring can be installed just underneath the base). This will also allow the
flooring to be removed if necessary. Expansion gaps at the wall area can be covered with skirting
boards and in other areas with special flooring profiles. A permanent sealant may be used in
areas with steel frames.
Note: Gaps in the screed, so-called furrows, must not be included if the gap is glued (e.g. with
epoxy resin). It may be recommended to include heavy objects in planning the installation
of a floating engineered wood floor (tip: joint gaps can be avoided if end edges in the load
area are glued). 7
7. Layout of expansion joints
As engineered wood flooring will swell or shrink depending on climate conditions, further expan-
sion and movement joints of at least 10 mm are necessary under the following circumstances:
› larger areas (over 8 × 12 m)
› irregular shaped areas
› installation from room to room
These expansion joints are covered with corresponding transition profiles.
Note: The installer is always liable if expansion or movement joints are omitted.
13ENGINEERED WOOD FLOORING II Installation rules
Installation rules
8. Pattern and offset installation 8
Engineered wood flooring planks can be installed in a symmetric or asymmetric pattern.
In both cases the overlap or minimum offset of the head joints must be > 40 cm.
9. Installation direction / incidence of light
For optical reasons, the planks should be laid parallel from the incidence of light, i.e. the long
side runs in the same direction as the light entering the room. If there is more than one window,
please go by the largest window. If the floor plan of the room is very unusual, the direction of
installation should also be judged according to how the room is divided (see Installation Rule 10).
9
min. 40 cm
10. Installation direction / room floor plan
Also for optical reasons, the long sides of the floor should be at right angles to the long side of
the room. This makes the room appear squarer and bigger instead of long and “tube-like”.
Note: Installation should take place from the brighter areas of the room to the darker ones (e.g.
from the window towards the room).
11. Installation from multiple packages 10
Engineered wood flooring is a natural product that enhances its unique character with colour
and texture. These natural features are always different. Therefore, it is always necessary that
planks from different packages are mixed during installation in order to maintain a balanced
appearance.
Note: There is one exception with Trendtime 8 Oak Multiplank:
Here, the planks are already mixed at the factory and should be installed carton by car-
ton/always from one carton only. During installation, care should be taken to maintain the
mix of differently designed planks.
11a 11b 11c 11
+3
+2
1
+
2
2
+2
+2
1 +
2
2
14ENGINEERED WOOD FLOORING II Subfloors
Subfloor requirements
› The basic requirement for laying engineered wood flooring is a firm, clean, dry and even subfloor. 1
neven areas of more than 3 mm across 1 m must be evened out with a suitable filler (Figure 1).
›U
› When installing over old wood planks and particle boards, any loose planks / boards must be
screwed to the substructure to reduce any creaking. The floor should be laid at right angles to
the lengthways direction of the wood planks / boards underneath.
› For reasons of strength and from a hygienic point of view, carpets are not suitable as a subfloor
and must be removed (Figure 2).
› We only recommend an installation on older PVC, CV or linoleum coverings if the flooring is
glued in place, has no loose areas and there is no underfloor heating. 2
› Screeds must not exceed the following moisture level:
Anhydrite screed Cement screed
without underfloor heating max. 0.5 CM % max. 2.0 CM %
system
with underfloor heating max. 0.3 CM % max. 1.8 CM %
system
Generally speaking, the screed moisture must be tested using a suitable test measuring device.
A test sample must be taken from the bottom third of the screed composition, whereby the
thickness of the screed must be measured and documented at each test point. The figures
only apply to screeds without additives. For screeds with additives, or quick-drying screeds, the
figures specified by the manufacturer should be observed.
With mineral subfloors*, as a precautionary measure a 0.2 mm thick PE film must be placed
underneath as a moisture barrier (allow strips to overlap by at least 30 cm, apply adhesive tape,
allow to protrude at the edges to form a trough and cut off the excess with a knife after attaching 3
the skirting board). Or you can use Parador underlays with footfall sound insulation and integrated
moisture protection. If moisture keeps on rising from the subfloor you must seal the surface with
a suitable liquid sealant. Under no circumstances should a moisture barrier be used over wooden
sub-floors. (Figure 3).
* Mineral subfloors include concrete, screed, stone.
15ENGINEERED WOOD FLOORING II Installation options
Installation options
1. Floating installation
If the engineered wood flooring is installed without a fixed connection with the subfloor, i.e.
only the planks are joined to one another, we call that “floating installation”. The flooring can
move or float freely on the underlay. Thanks to the simple click technology, Parador engineered
wood flooring can be installed in this way with ease and without prior knowledge.
2. Whole-area gluing Engineered wood flooring on underlay Akustik-Protect100 /
mineral screed
Whole-area gluing is another installation type. Here, the complete engineered wood flooring is
glued on the screed using special adhesives. This installation is permanent, i.e. removal is very
time consuming. However, one advantage of this option is that noise is reduced significantly,
meaning that the floor is quieter to walk on. Installation on glue is easy when using products
with Automatic-Click® or Allround-Click® system. The planks must not be moved in the glue, as
is the case with other click connections. This guarantees an easier, cleaner, and faster installa-
tion than with common engineered wood flooring. Please also note the attached “Checklist for
whole-area gluing of Parador engineered wood flooring”.
Please always glue the following engineered wood floors over the whole area: Trendtime 3
Herringbone, Trendtime 8 Beech elephant skin. Engineered wood flooring on underlay Akustik-Protect 80 /
floorboards
3. Installation on underfloor heating
Parador engineered wood flooring is suitable to be installed floating or glued all-over on hot
water underfloor heating systems. The favourable heat transmission resistance allows under-
floor heating to be run economically. Further information about the heat transmission resistanc-
es of our engineered wood flooring can be found in our technical data sheets. When it comes
to installation/application, please also bear in mind the “Checklist for installation on hot water
underfloor heating” in the appendix. The maximum surface temperature of 29°C must not be Engineered wood flooring on underlay Akustik-Protect / PVC /
exceeded and a very fast heating process must be avoided. The Parador underlay Akustik-Pro- mineral screed
tect 80, 100 or 500 should always be used as the underlay for floating installations.
Note: The wood types beech and maple react sensitively to moisture and temperature fluctua-
tions. The formation of gaps can therefore not be ruled out.
Please note the following for installation on electronic underfloor heating systems:
› installation only with systems that have temperature sensors and controllers
› no installation on older design electric underfloor heating systems (installed before 2000)
› no installation on night storage heaters
Completely glued engineered wood flooring
4. Use of floor cooling
According to prevalent expert opinions, cooling a room by maximum 5 °C is easily possible at a
maximum relative humidity of 65 % (according to the workplace directive, the lower floor tem-
perature limit of 19 °C should also be maintained in “normal” residential housing. People are
more prone to ill health in areas with cold floors). Parador floor coverings can be used without
restrictions if these specified conditions are complied with (whilst bearing in mind the main
Parador installation and fitting instructions). When installing on underfloor heating or cooling sys-
tems, it is essential to check with the system manufacturer for compatibility with the flooring. Engineered wood flooring on underlay Akustik-Protect with
hot water underfloor heating system
The specified parameters for installation on such systems must be complied with. Installation
on heating systems with a night storage function is out of the question.
16ENGINEERED WOOD FLOORING II Assembly
Assembly
Engineered wood flooring Basic 11-5; engineered wood flooring Classic 3025,
3060; engineered wood flooring Trendtime 3, 4, 6, 8 and engineered wood floor-
ing Edition Floor Fields with Automatic-Click® system
Preparation
1
Once you have taken note of the installation rules and the underlay is installed, it is possible to
start with the actual installation of the engineered wood flooring. In order to achieve an even
appearance of the first and last row, measure the width of the room at right angles to the
direction of installation and work out the width of the planks. Install elements mixed from sev-
eral packs so that you get an even decorative appearance across the area. The last element of
each row is cut to length and the remaining piece, which should not be shorter than 15 cm, is
used to start the next row. The cross joints should be offset from row to row by at least 40 cm
(“random pattern”). Please check each plank for defects before installation and only lay planks
that are in perfect condition.
2
Note on Trendtime 8 Beech: Please note the following features and special characteristics.
As a prerequisite for the longevity of your flooring, please note the following points:
› Maintain a comfortable climate of 40-65% (use humidifiers, especially in the winter months,
with existing fireplaces and floor-to-ceiling windows with sunlight and conservatories).
› Parador engineered wood flooring Trendtime 8 Beech must be glued over the whole area.
(Please observe the specifications of the respective adhesive manufacturer).
› Natural characteristics of 3-layer engineered wood flooring beech include the formation of
gaps and varying degrees of concave or convex cupping.
› Store the packages in closed rooms with a climate suitable for the product. Please lay the 3
products from opened packages immediately. Seal packages that have been opened airtight.
GUID GUID
E
E
www.parador.de/guide-installation-download
Note on Trendtime 8 Oak Multiplank:
In the case of Trendtime 8 Oak Multiplank, the planks are already mixed at the factory and
should be installed carton by carton/always from one carton only. During installation, care 4
should be taken to maintain the mix of differently designed planks. See also page 14 (installa-
tion rules).
Assembly
Figure 1: First remove the tongue on the complete first row of planks using a saw, unless you
must cut the first row more narrow. Start the first row in the left-hand corner of the room and
place the cut side towards the wall. The required wall clearance of 10–15 mm is achieved with
the Parador plastic spacer wedges. If the wall is not straight, align the first row to be straight
and lock the head joints together, see p. 19, Figure 7. 5
Figure 2 and 3: Start from the left with the first plank of the second row and click it into the
long side of the first row. To do this, guide the tongue side of the plank into the groove of the
previous row at an angle of approx. 25° and then lower the plank. The plank clicks in when
lowered, resulting in a tight fit with no play.
Figure 4: The following plank, like all the rest, is then clicked in place in the same way on the
long side and pushed tight to the head end of the previous plank. The solid top layers must
abut!
Note: Parador recommends that products in the Trendtime 9 range should be installed using the 17
all-over gluing method in addition to gluing the end head-joints – this recommendation
will significantly reduce climatic changes of the tension in the product.ENGINEERED WOOD FLOORING II Assembly
Assembly 6
Basic 11-5; Classic 3025, 3060; Trendtime 3, 4, 6, 8 and engineered wood flooring
Edition Floor Fields with Automatic-Click® system
Figure 5 (p. 16), 6 and 7: The longitudinal joint along the complete plank must be locked from
the left to the right by simply pressing it in place and pushing it down. Before locking the head
joint it is important that the complete longitudinal joint is closed. Then lock the head joint by
joining the planks using a hammer and protective block. Be sure that the head ends are tightly
together because otherwise it is not possible to lock them. Install all other planks accordingly. 7
Figure 8: For disassembly, lift the complete row of planks up and pull it from the previous row
at an angle. Then lever the head joints apart starting at the last installed plank section. The lock-
ing mechanism remains intact and the planks can be reused.
Please note: Avoid tilting the planks as this may damage the locking mechanism.
Figure 9: Measuring the end piece using a square (place plank with groove side next to the
previous row) and saw off. Remember the wall clearance! When using a jigsaw, place the top
side of the plank facing down. When using a table saw, place the top side of the plank facing up.
Figure 10: Measuring the last row using a plank remnant. Remember 10–15 mm wall clearance.
8
9
10
18ENGINEERED WOOD FLOORING II Assembly
Assembly 11
Basic 11-5; Classic 3025, 3060; Trendtime 3, 4, 6, 8 and engineered wood flooring
Edition Floor Fields with Automatic-Click® system
Figure 11: Following removal of the plastic spacer wedges and attachment of skirting boards
with either clip technology or adhesive, in the case of a floating installation, the floor is ready
to walk on. In the case of a whole-area gluing, the adhesive must be allowed to dry (approx.
24 hours) before the floor can be walked on (please refer to recommended drying times on the 12
adhesive label).
Figure 12: Wall not straight: Align the first row straight, then follow the wall shape. Draw the
relevant width on the plank (as shown in the image) and then cut the plank along that mark.
Figure 13: Shortening a door frame: place a plank remnant (on the relevant underlay) against
the frame and cut the frame along the plank.
Figure 14: Pipe opening: Make the diameter of the pipe holes 20 mm larger than the pipe is.
Mark the holes, drill out and saw off at an angle of 45° as shown. Glue the sawn out piece in 13
place. Do not forget wall clearance.
Figure 15: Installation in hard to access areas: If you cannot insert the planks at an angle and
lock them, then we recommend removing the snap-in tongues on the bottom of the tongue and
to glue the planks. Place glue on the bottom edge of the groove and push the planks into each
other (common tongue and groove principle).
Figure 16 and 17: Glue information: If underlay requirements for regionally specific standards
are outside of the tolerance range for the specific engineered wood flooring with regard to
levelness (3 mm / 1 m) or relative humidity (30–65%), we recommend gluing (see Figure 16). 14
The same applies to the head side (Figure 17) if using on an underfloor heating system.
15
17 16
19ENGINEERED WOOD FLOORING II Assembly
Assembly 1
Engineered wood flooring with Allround-Click® system: Trendtime 3 (herring-
bone) for glue-down installation
Figure 1: Although it is possible to install Trendtime 3 (herringbone) using the ‘floating’
method, some settling noises may be apparent such as when using close to wet areas or in
the case of special stresses and strains. Parador therefore recommends Trendtime 3 (herring-
bone) to be fully glued over the sub-floor (concrete, screed etc.). 2
Please also refer to page 33 Chapter: Checklist for all-over gluing of Parador engineered wood
flooring.
Please also note the glue manufacturer’s information.
Preparation
Following familiarization of the installation guidelines and if an underlay is required and has
been fitted, installation of the floor-covering can commence.
3
Figure 2: When installing strips (herringbone), the room impression is highly dependent on
the installation type. In the 0° direction, installation is parallel to the room walls.
Figure 3: If herringbone pattern is installed diagonally across the room, this is the so-called
“45°” direction.
Figure 4: You require only the “universal” strip developed by Parador to install herringbone
patterns. You do not need left and right strip. With this strip, you can recreate the installation
patterns shown above, the installation direction is not pre-specified. You can start in 4
a corner of the room (then preferably by rows (Figure 4a)) or centred in the room
(then preferably by strips (Figure 4b)).
Figure 5: With the recommended installation direction it must be noted that the strips must
be installed so that the groove side of the strips is in the direction of installation and that the GUID
E
tongue is clicked into the groove. If the groove is clicked into the tongue, especially in the case
of all-over gluing, the strip or set of strips may lift.
Notes: P
lease note the handling instructions and the use and hardening times for engineered
5
wood flooring glue.
lease combine strips from different packs (Figure 2 and 3). This will reduce the
P
chances of similar looking strips being installed next to each other and is more likely
to achieve a more balanced overall appearance of the flooring.
20ENGINEERED WOOD FLOORING II Assembly
Assembly 6
Engineered wood flooring with Allround-Click® system: Trendtime 3 (herring-
bone) for glue-down installation
Installation principle
Figure 6: Please check each strip for defects before installation and only lay strips that are 7
in perfect condition.
Figure 7: Find the centre of the opposite wall to determine the main orientation. After shifting
this spot parallel by 3.5 cm, the axis is directly above the tips of the strip (as shown). This axis
can be marked with a line, if necessary. Adjust the edge strips. Saw cut under 45° or pursuant
to the wall contour. Please remember the wall clearance of 8–10 mm. This wall clearance all
around must also be maintained to built-in objects.
Figure 8: A custom-cut strip must be inserted into triangular free areas. This piece should be
held in position by a weight over its’ edge areas to avoid any protrusions, until the glue has 8
hardened.
Figure 9: Remove the plastic spacer wedges and attach the skirting board using either the
patented clip technology or Parador construction adhesive. The floor is ready to walk on as soon
as the glue has hardened (approx. 24 hours).
Figure 10: Shortening a door frame: place a plank remnant against the frame and cut the frame
along the plank. To do this, place the plank remnant on an approx. 2 mm high underlay to imitate
the height of the adhesive.
9
Figure 11: In areas where the strips cannot be swivelled into place (door frames, radiator pipes, 24 h
etc.), they must be inserted horizontally. For this, the snap-in tongues must be removed using a
knife.
Note: If Trendtime 3 is to be installed using the floating method, it is strongly recommended
that all four sides of the strip should be glued.
11 10
2
21ENGINEERED WOOD FLOORING II Assembly
Assembly 1
Engineered wood flooring Edition New Classics with tongue and groove connection
Preparation
Following familiarization of the installation guidelines and once any underlay has been fitted,
installation of the floor-covering can commence. 2
Figure 1: Engineered wood flooring Edition New Classics consists of two different modules to
achieve the chevron look. Only one type of module is used within one row to be installed.
Installation principle
Figure 2: The planks are whole-area glued on screed. Install by offsetting the end joints by one
half plank length in each row. This creates a calmer and more coordinated installation pattern.
3
A random pattern installation as shown in the bottom half of the figure is also possible. The
cross joints should be offset by at least 40 cm.
Please check each plank for defects before installation and only lay planks that are in
perfect condition.
Installation pattern
Figure 3: Different installation patterns and room effects are possible. 4
We would like to show you three options:
Option 1: common installation, 1 module type per row
Option 2: double braid, 2 rows each with one module type
Option 3: diagonal installation pattern, use only one module type throughout the complete room
Figure 4: For a mixed look, it is important to pay attention to the crossbar offset when inserting
a new row. The crossbar offsets can be optimized by shifting to the side. Please note that minor
offsetting is permissible here and is not avoidable. 5
Figure 5: To achieve an even appearance of the first and last row, measure the width of the
room at right angles to the direction of installation and calculate the width of the planks.
22ENGINEERED WOOD FLOORING II Assembly
Assembly 6
Engineered wood flooring Edition New Classics with tongue and groove connection
Figure 6: First remove the tongue on the complete first row of planks using a saw, unless you
need to cut the first row narrower. Start in the left-hand corner of the room. The required wall
clearance of 10–15 mm is achieved with the Parador plastic spacer wedges.
7
Figure 7: The last element of each row is cut to length and the remaining piece, which should
not be shorter than 15 cm, is used to start the next row.
Figure 8: The cross joints should be offset from row to row by at least 40 cm (“random bond”).
Figure 9: Use the hammering block and hammer to fit the planks together and push the plank
into the previous plank until the joint has closed.
8
9
23ENGINEERED WOOD FLOORING II Assembly
Assembly
Engineered wood flooring Edition Open Frameworks with loose and fixed
tongue connection for glue-down installation
Preparation
Following familiarization of the installation guidelines and once any underlay has been fitted,
installation of the floor-covering can commence.
Open Frameworks consists of four different modules (planks) and four different links.
Figure 1: This flooring is designed for whole-area gluing to the subfloor. 1
Tongues (free tongues and tongues on the planks) must not be glued inside the grooves.
Ensure that you have sufficient free tongues available (narrow planks and links one tongue each
and wide planks and links two tongues each).
Installation principle
The planks are whole-area glued on screed. The Parador tongue is responsible for the top flush
connection to connect the individual planks and links (adhesive has dried completely after
24 hours). The tongues are inserted into an end side plank / link groove or, depending on the
desired installation pattern, possibly also into the long side plank / link groove. Right and left
planks / links are therefore not required.
Figure 2: Please check each plank for defects before installation and only lay planks and
links that are in perfect condition.
2
Whole-area glued planks/links require the continuous review that all joints are closed. A pos-
sible displacement, for example, by using the hammering block or Parador MultiTool, before
the hardening time of the Parador glue is reached must be noted or the above review must be
performed and open joints must be closed.
Installation pattern
Figure 3 to 7: Different installation options are possible with the free and fixed tongue
connection. A few herringbone style options are shown as examples
3 4 5 6 7
Herringbone Straightforward Format mix Links Format mix with links
Single installation
A great variety of other installation options (e.g.: basic, ladder, block, etc.) is possible with
engineered wood flooring Edition Open Frameworks.
24ENGINEERED WOOD FLOORING II Assembly
Assembly
Engineered wood flooring Edition Open Frameworks with loose and fixed
tongue connection for glue-down installation
Assembly
The installation of Edition Open Frameworks in the standard lengthways installation is shown as
an example.
Figure 8: Please consider the room situation to receive an even installation, centre the area
accordingly, if necessary.
8
Figure 9: First remove the tongue on the complete first row of planks using a saw, unless you
need to cut the first row narrower. Start in the left-hand corner of the room. The required wall
clearance is at least 10 to 15 mm and is achieved using the Parador plastic spacer wedges.
Figure 10: Fit the tongues into the end groove (in case of narrow planks or small links,
1 tongue and in case of wide planks or large links 2 tongues).
Figure 11:The cross joints should be offset from row to row by at least 15 cm (for standard
lengthwise installation). 9
Figure 12: Saw off the respective last element of a row and the remainder, which must not be
shorter than 15 cm is used to start the next row. The last element is inserted with a drawbar
and a hammer. In case of cross joints, they should be offset by at least 15 cm.
Note: As a general rule, install the corresponding tongue for each plank and link.
10
0RGXO
/LQN
12 11
>15 cm/6
inch
25ENGINEERED WOOD FLOORING II Assembly
Assembly
Engineered wood flooring Edition Open Frameworks with loose and fixed
tongue connection for glue-down installation
13
Figure 13, 14, and 15: Use the hammering block or the Parador MultiTool and a hammer to fit
the planks together on the long and end edge and push the plank into the previous plank until
the joint has closed.
Remove the spacer wedges and attach the Parador skirting board using the patented clip tech-
nology or Parador construction adhesive. The floor is ready to walk on as soon as it has been
installed and the glue has hardened (approx. 24 hours).
14
15
26ENGINEERED WOOD FLOORING II Retain value, cleaning, and care
Retain value, cleaning, and care
Parador engineered wood flooring is easy to clean and care for thanks to finished surfaces. So that you
enjoy your floor for years to come, here is some information about value retention, cleaning and care:
Retain value 1
General information on retaining the value of your engineered wood flooring:
› 30-65% (exception: 40-65% for the wood type beech) relative humidity is optimal for Parador engi-
neered wood flooring and also recommended for people’s well-being.
› Avoid sand and dirt as both act like sandpaper.
› Immediately wipe up liquids lodging on the floor.
› Only wipe with a slightly damp cloth
› Do not use any abrasives, floor wax, or polishes. Among other things, they tarnish the floor’s
appearance 2
› F it chairs and tables with soft felt pads. Office chairs should have soft rollers, otherwise use suitable
floor mats in these heavily used areas
› Do not use steam cleaners.
› Please use cleaning and routine care products from the Parador product range
Avoid damages
As with all other floor coverings, you should protect your new engineered wood flooring from dirt parti-
cles by using suitable dirt-trapping zones (mats) (Figure 1). To protect the engineered wood flooring from 3
scratches, suitable soft felt pads must always be fitted under chair and table legs and under pieces of
furniture (Figure 2). Rollers on office chairs, file trolleys and roller containers should be fitted with soft
treads/rollers (type W pursuant to EN 12529) (Figure 3). There is also the option of protecting the floor
in these heavily used areas with suitable mats (available in office supply stores). It is not necessary to
wax lacquered engineered wood flooring or give it an additional seal, as such measures can in no way
improve the floor’s looks or benefits of use. We recommend that you clean your engineered wood
flooring regularly with a vacuum cleaner (attached bristles) or broom. Cleaning with a slightly
damp cloth should only be done in case of stubborn dirt. It is important in this case that the cloth
is well wrung out and that no puddles form with standing water.
Final construction cleaning
›R emove drilling dust and loose particles with a broom or vacuum cleaner with attached bristles.
› If necessary, wipe the floor with a damp cloth using standard detergents.
› Ensure that the floor is wiped only damp, never wet.
Routine cleaning
› Remove dust, fluff, and loose particles with a broom or vacuum cleaner with attached bristles.
› Dirty marks are wiped off with a damp cloth.
› For routine cleaning and value retention we recommend the Parador care set with special cleaning and
care products.
› In case of stubborn dirt, wipe the floor with a damp cloth using Parador cleaning products.
Use only cleaning and care products from the Parador product range suitable for the respective surface
of the engineered wood flooring.
Repairing more serious scratches and damages
› T he damaged areas can be repaired with the colour-coordinated Parador Premium repair set.
›U se the Parador varnish retouching pen to touch up light scratches.
27ENGINEERED WOOD FLOORING II Retain value, cleaning, and care
Retain value, cleaning, and care
Maintaining lacquered finishes and naturally oiled / natural oiled plus surfaces / oil impregnated sur-
faces (UV oil) / Professional (“contract lacquer”)
Note: The specified care rules also apply to engineered wood flooring with the surface finish extra matt lacquer profes-
sional. The care must not deviate from the specifications for the usual lacquered finishes.
Although various oil, oil / wax, or wax systems are available on the market (and a list of approved suppliers is listed below),
we recommend the use of maintenance products from the Parador range to maintain all Parador engineered wood flooring
surfaces. You should choose one system. If a system is used in combination with water or soaps, please be sure that the
flooring is always wiped damp, not wet, and that the cloth is always well wrung out. Avoid puddles and standing water.
Parador naturally oiled, natural oiled plus, and oil impregnated (UV oil) surfaces can be treated with all commercially availa-
ble cleaning and care products for air-drying or oxidatively drying natural oil surfaces and oil-impregnated (UV oil) surfaces.
In the case of the ready to use finish, depending on the use / load and to retain the floor’s value over the long term, an
initial care treatment is not necessary (excepting the natural oil surface used on products in the Basic 11-5 range).
Maximum oil absorption of engineered wood flooring surfaces is achieved in the plant (see exceptions below, engineered
wood flooring Basic 11-5).
Ongoing maintenance of the flooring at periodic intervals will be required depending on the amount of wear.
Please refer to the suppliers’ cleaning and maintenance instructions.
Complete renovation through sanding
If the engineered wood flooring will be renovated due to damages or other impairments, in case of lacquered and oil-im-
pregnated (UV oil) engineered wood flooring, the complete surface must be sanded. In case of naturally oiled and naturally
oiled plus flooring, it can also be sanded only partially. Approx. 0.5 mm are sanded off per sanding process. Engineered
wood flooring can therefore be sanded multiple times. You can use corresponding lacquer or oil products from specialty
trade for the subsequently required surface treatment. Various surface products are offered as lacquer, oil, or wax sealants.
You can use all systems recommended for engineered wood flooring by the respective manufacturer. A completely
sanded off floor can also be treated with Parador Pro care oil for real wood flooring from the Parador product range.
Maintenance of brushed / textured surfaces
Brushed or textured surfaces require more care and are more sensitive to dirt. Please pay particular attention to larger
dirt-trapping areas. Textured flooring should be cleaned in the direction of the texture.
* For products from the product range Basic 11-5 engineered wood flooring, Parador recommends initial care for long-term
maintenance of the original look (please use the profile care oils from the Parador product range).
28You can also read