Approach Terminal and Crash Cushion Guide - FDOT Office of Maintenance 2-10-2021 - eMaintenance - NET
←
→
Page content transcription
If your browser does not render page correctly, please read the page content below
eMaintenance

Approach Terminal
and Crash Cushion
Guide
Information on utilizing the ISPE system and field apps.

 FDOT Office of Maintenance
 2-10-2021
Contents
General Information ...................................................................................................................................................2
   System Summary ....................................................................................................................................................2
   Field App Functionality ...........................................................................................................................................2
   Field Apps by Operating System .............................................................................................................................3
   Workflow Summary ................................................................................................................................................4
Downloading Survey123 Forms ..................................................................................................................................4
Updating Survey123 Forms ........................................................................................................................................5
Downloading Survey123 Offline Areas .......................................................................................................................6
   Survey123 Offline Map Area Reference .................................................................................................................6
Updating Survey123 Offline Areas .............................................................................................................................7
Creating and Downloading Explorer Offline Areas .....................................................................................................8
Updating Explorer Offline Areas .................................................................................................................................9
Adding a Note .......................................................................................................................................................... 10
Adding an Approach Terminal or Crash Cushion..................................................................................................... 10
Adding an Incident................................................................................................................................................... 11
Submitting Survey123 Outbox Records ................................................................................................................... 12
Editing an Approach Terminal, Crash Cushion, Incident, and/or Note ................................................................... 13
General Information
System Summary
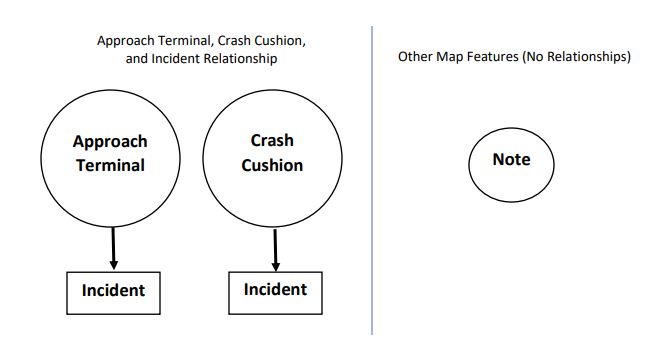
The In-Service Performance Evaluation (ISPE) system is comprised of multiple feature points and tables.
Approach Terminal and Crash Cushion points reflect a specific installation of a particular asset, which must be
coded as “Archived” upon being fully replaced in the field with a new point added to the database to reflect the
new inventory asset. Incidents are always related in the database to a specific Approach Terminal or Crash
Cushion point and specific asset installation, so that incidents and performance may be tracked to a particular
installation or repair of an asset. Other map features and notes may also be added to the map as standalone
points and are not related in the database to other features and tables.
Field App Functionality
The ISPE system data is populated from a workflow using multiple ESRI field apps available on Android, iOS, and
Windows 10. However, the data collection workflow is best supported from an Android and/or iOS device,
where ESRI has provided more effort to make improvements to the apps. Due to limitations with the ESRI
software on Windows 10, some functionality may not behave the same way on these devices.
1. Add Approach Terminals and Crash Cushions
Survey123
2. Add Incidents using link from Collector or Explorer
1. Add Notes
Collector 2. Edit Approach Terminals, Crash Cushions, Incidents, Notes
3. Access Survey123 link to add Incidents.
1. View Approach Terminals, Crash Cushions, Incidents, Notes while offline.
Explorer
2. Access Survey123 link to add Incidents while offline.Field Apps by Operating System
The apps available for each platform and utilized in the HWLO workflow are as follows:
ArcGIS Survey123 ArcGIS Collector Collector Classic ArcGIS Explorer
Android 3
iOS 3
Windows 10 1 2
1. There are two different versions of Survey123 for Windows 10. The version compatible with creating
lights related to a load center and for creating outage records is the version obtained from the Microsoft
Store (where users would also obtain Collector and Explorer). The version deployed by OIT or
downloaded and installed manually from ESRI’s website is not compatible with the full workflow and
users will only be able to add lights not related to a load center. Users are highly encouraged to obtain
the Windows Store version of Survey123 if collecting from a Windows 10 laptop or tablet that will be
utilized in the field for collection, since this version will also receive automatic app updates when
available through the store and will not rely on manually deployment of updated versions.
2. The Windows 10 version of Collector was not updated with the same enhancements and new features
as their Android/iOS counterparts. The Windows 10 version of Collector may be named “ArcGIS
Collector”, but it still retains the old functionality of “Collector Classic” and has not received any
enhancements. It is highly recommended that users obtain and utilize the newest version of “ArcGIS
Collector” available on Android and iOS devices, but the Windows 10 version of Collector may also be
utilized for data collection and editing.
3. There are now two versions of Collector available for Android and iOS devices. The old version has been
renamed as “Collector Classic” and the new version is available as “ArcGIS Collector”. Enhancements
have been made to the maps to take advantage of the new app, and users are highly encouraged to only
use the new version of Collector. The old version of Collector Classic is still available, but users may
encounter compatibility issues or bugs that may not be resolved as the apps are updated and the ISPE
system changes to continue supporting the latest versions of the apps.Workflow Summary
The general workflow and use of apps for collecting and adding new features are as follows:
Adding Approach Terminal or
Adding Note Point Adding Incident Record
Crash Cushion Point
Online Online/Offline Online Offline
Collector Explorer
↓ ↓
Collector Survey123 Survey123 Survey123
↓ ↓
Collector Explorer
All editing of existing data in the database is performed using the Collector application.
Comments:
1. Survey123 forms, Collector maps, and Explorer maps for the ISPE system are only accessible to users
defined to the “Maintenance Office – ISPE Editing” group in ArcGIS Online. If the signed-in user to the
field apps is not a member of this group, they will be unable to access or utilize these tools.
2. The field apps may randomly sign-out users after a specified time. Users should check that they are
signed-in to all apps and have access to all forms and maps intended to be used prior to collecting or
editing data to avoid any issues.
Downloading Survey123 Forms
Supported Devices: Android, iOS, Windows 10
Networking: Online
1. Open “ArcGIS Survey123”.
2. Select the icon with the signed-in users initials at the upper right corner of the screen.
3. Select “Download Surveys” from the menu that appears.
4. Scroll through the list or enter the name of the form to be downloaded.
5. From the list of forms, locate the form to be downloaded.
6. Select the cloud icon with a down arrow to begin downloading the form.
7. When completed, use the back arrow in the upper left corner of the screen to return to the list of forms
downloaded to the device.
Comments:
1. Forms will only appear in the “Download Surveys” list if the currently signed-in user is a member of the
editing group. Forms already downloaded to the device will not allow users to submit data if they do
not have permissions to make updates, such as being in the ISPE editing group.Updating Survey123 Forms
Supported Devices: Android, iOS, Windows 10
Networking: Online
1. Open “ArcGIS Survey123”.
a. If Survey123 was opened from a link in Collector or Explorer, the app may provide a notification
that an update is required to the form before it can be used. All forms may be checked for
updates by opening them, or by following the next steps in this section.
2. If a network connection is present, upon opening the app, the app will check for form updates and
present an “Updates Available” button at the top of the form list.
a. Select this button to see a list of updated forms.
b. If the list only includes eMaintenance forms, select the “Download Updates” button at the
bottom of the screen to update all forms at once.
c. If the list includes non-eMaintenance forms, select the circular refresh button next to each
eMaintenance form.
3. To manually check for updates and to update forms:
a. Select the icon with the signed-in users initials at the upper right corner of the screen.
b. Select “Download Surveys” from the menu that appears.
c. If updates are available, a “Download Updates” button will appear at the bottom of the screen.
d. If there are no updates automatically detected, users may scroll through the list or enter the
name of the form to be updated. From the list of forms, locate the form to be updated, and
select the circular refresh button next to each eMaintenance form.
Comments:
1. Central Office automatically updates the eMaintenance forms every weekday at 6:30 AM to ensure that
the latest extract data utilized by the forms are available to users. Users are strongly advised to check
for form updates before beginning collection of new Inventory and Incident records, to ensure that the
forms utilize the latest available data at the time of collection.
2. Forms will only show updates or appear in the “Download Surveys” list if the currently signed-in user is a
member of the editing group. If the list of forms includes any non-eMaintenance forms, the user should
check with the owner of those other forms before updating.
3. When attempting to open a form with an update, the Survey123 application should present a pop-up
stating that an update to the form is required. Users are strongly advised to check for form updates
before beginning collection of new Inventory and Incident records, to ensure that they have access to
the forms before going to an area with weak data connectivity or no connectivity at all.Downloading Survey123 Offline Areas
Supported Devices: Android, iOS, Windows 10
Networking: Online
1. Open “ArcGIS Survey123”.
2. Select the Inventory form.
a. If not available on the device, download the form before continuing.
3. Select the menu icon with three lines in the upper right corner of the screen next to the form title.
4. Select the “Offline Maps” button.
5. Select the cloud icon with a down arrow next to each offline map to be downloaded.
6. When complete, select the back button in the upper left corner of the screen to leave this menu.
Comments:
1. Offline maps are not shared between forms. Users must download each offline map for each form they
intend to use for offline data collection. Users must also download these maps prior to going offline, or
they may not be able to accurately place the pin on the map when using the form.
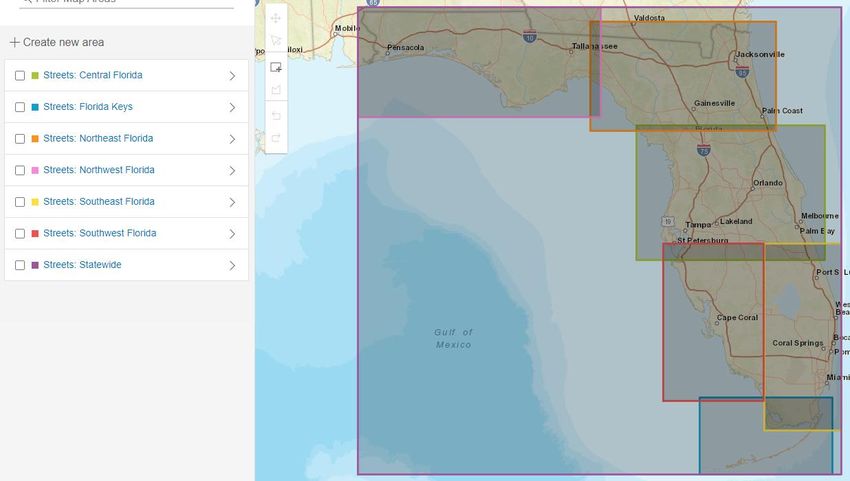
2. Offline maps will appear separately from other basemaps when using the Survey123 form to place a
location. The offline maps will be labeled as “Streets” (for roadways) or “Imagery” (for satellite imagery)
and the name of the region included in the map.
Survey123 Offline Map Area ReferenceUpdating Survey123 Offline Areas
Supported Devices: Android, iOS, Windows 10
Networking: Online
1. Open “ArcGIS Survey123”.
2. Select the Inventory form.
a. If not available on the device, download the form before continuing.
3. Select the menu icon with three lines in the upper right corner of the screen next to the form title.
4. Select the “Offline Maps” button.
5. For each map that states “Update Available”, select the button of two rounded lines pointing at each
other in a circle next to each offline map to be updated.
6. When complete, select the back button in the upper left corner of the screen to leave this menu.
Comments:
1. Offline maps are not shared between forms. Users must update each offline map for each form they
intend to use for offline data collection. Users should also update these maps prior to going offline, or
they may not have the latest map data with any new roads or updated images.Creating and Downloading Explorer Offline Areas
Supported Devices: Android, iOS, Windows 10
Networking: Online
1. Open “ArcGIS Explorer”.
2. Select the relevant District Map to be downloaded offline.
a. Select the “Streets” map to download data with the roadways basemap.
b. Select the “Imagery” map to download data with satellite images basemap.
c. If downloading both sets of basemaps, repeat the steps in this section for both maps.
3. If using one of the pre-defined default areas:
a. Click the download button next to the offline area.
4. If downloading a custom user defined area:
a. Select the menu button with three dots at the upper right corner of the screen.
b. Select “Add Offline Area”.
c. Specify the level of detail.
i. The closer the level of detail, the smaller the area that will be downloaded. If a user
wants to zoom in to see the roadway and asset in more detail, an extent of “Room” or
“Buildings” should be utilized. If a user wants more points in a single offline area and
does not plan to zoom in closer, a level of detail such as “Streets” or “Neighborhoods”
will span a much wider area, but zooming in closer may be blurry or not fully load.
ii. Depending on the amount of data in the selected area, the offline data size may vary.
d. Move the boundary box over the area of the map to be downloaded.
e. Select “Download Area”.
Comments:
1. Explorer does not support changing basemaps from within the same map, so two maps are provided for
each District, with each map having one of the two common basemap types. Users may elect to use
either or both maps to their preference but must manage the use of both separately.
2. Offline Areas must be created and/or downloaded while connected to mobile data or Wi-Fi. Once the
area has been downloaded, then it may be used while offline.
3. Offline Areas are saved and stored locally on the device and do not sync to other devices based on the
signed-in user. Default areas included with the maps must be downloaded again and user created areas
must be recreated on each new device.
4. To maximize compatibility and minimize storage usage across different Android, iOS, and Windows 10
devices with varying levels of built-in storage, the District maps intended for offline collection of new
Incidents do not include any attachments. Users should be aware that these Explorer maps for offline
collection are intended to allow the user to access the points from a map and utilize the link to collect
new Incidents.Updating Explorer Offline Areas
Supported Devices: Android, iOS, Windows 10
Networking: Online
1. Open “ArcGIS Explorer”.
2. Select the relevant District Map with an offline area to update.
3. If using one of the pre-defined default areas:
a. Click the menu button with three dots next to the title of the offline area.
b. Select “Check for Updates”.
4. If using a custom user defined area:
a. User defined areas cannot be updated in Explorer (at this time). See the previous section about
creating Offline Areas to begin creating a new area with the latest data.
Comments:
1. The data within the pre-defined default Offline Areas included with the maps are updated once a day at
6:30 AM, but users will need to manually check for updates to these areas prior to using them.
2. The points and data on the Explorer maps do not automatically update throughout the day, while the
data in user defined areas do not update at all. To view up-to-date data from within Explorer, users
must either create a new custom area with the data to be downloaded, use Collector, or use the link to
the web app while online.Adding a Note
Supported Devices: Android, iOS, Windows 10
Networking: Online
1. Open “ArcGIS Collector”.
2. Open the relevant District Map where the point will be placed.
3. Select the “+” (plus) button (lower left on Android/iOS, upper right corner on Windows 10).
4. Select the applicable option from the menu.
5. Place the point on the map, fill in the fields, and submit any attachments.
6. Select the “Submit” button to save the data to the database.
Comments:
1. It currently is not possible to add Notes while offline.
2. The Collector application is intended for the collection and editing of data, and is not recommended for
viewing and querying points.
Adding an Approach Terminal or Crash Cushion
Supported Devices: Android, iOS, Windows 10
Networking: Online, Offline
1. Open “ArcGIS Survey123”.
2. Check for updated Survey123 forms and download the updates before continuing.
3. Select the applicable Inventory form.
a. If not available on the device, download the form before continuing.
4. Select the “Collect” button at the bottom of the form’s information summary screen.
5. Complete the Survey123 form as required and include any attachments.
6. Click the check mark button in the bottom right to validate and attempt to submit the form.
a. If any errors are identified, correct them in the form then retry this button.
b. If the device has a network connection, select the option to submit the data.
c. If the device does not have a network connection, select the option to save data in the Outbox.Adding an Incident
Supported Devices: Android, iOS, Windows 10
Networking: Online, Offline
1. Ensure that the latest Survey123 forms have been downloaded prior to continuing.
2. If working offline, ensure that the latest Survey123 Offline Maps have been downloaded prior to
continuing.
3. Open the necessary field app based on network connectivity:
a. If working on a stable mobile data or Wi-Fi connection, open “ArcGIS Collector”.
b. If working in an area with no data connectivity, open “ArcGIS Explorer”. Offline areas must be
downloaded over a mobile data or Wi-Fi connection prior to visiting an area with no network
connectivity. See the section about how to download Offline Areas to Explorer prior to
continuing.
4. Select the relevant District Map where the point will be placed.
a. If using Explorer, select the previously downloaded Offline Area.
5. Locate the parent Approach Terminal or Crash Cushion point on the map and click it.
6. From the pop-up for the selected asset, select the “Add New Incident Record” link to open the
Survey123 form to add a new Incident.
7. Complete the Survey123 form as required and include any attachments.
8. Click the check mark button in the bottom right to validate and attempt to submit the form.
a. If any errors are identified, correct them in the form then retry this button.
b. If the device has a network connection, select the option to submit the data.
c. If the device does not have a network connection, select the option to save data in the Outbox.
9. After submitting the point, the user will automatically be returned to either Collector or Explorer (from
wherever the user originally clicked the link).
Comments:
1. The parent Approach Terminal and/or Crash Cushion record must already be saved in the database
before new Incidents can be added to them. If using Explorer, this means that the offline area will also
need to be updated and/or replaced to get the latest data.Submitting Survey123 Outbox Records
Supported Devices: Android, iOS, Windows 10
Networking: Online
1. Open “ArcGIS Survey123”.
2. Do not update any forms prior to submitting the data.
3. Select the previously downloaded Inventory form.
4. Select the “Outbox” button at the bottom of the form’s information summary screen.
5. Select the “Send” button at the bottom of the screen to immediately submit all form data not yet
uploaded to the database.
6. Select the back button in the upper left corner to return to the previous screen.
7. Repeat these steps for each form with data in the outbox.
8. If Survey123 had previously indicated that form updates were available, continue to update the forms at
this time prior to collecting new data using the forms.
Comments:
1. Users must submit data into the database as soon as possible. Form data saved to the Outbox is subject
to being lost or corrupt from app or form updates. This data is not officially on record in the database
and is only saved locally on that device until it is submitted. The Outbox should be utilized to save data
until a network connection is available again and should not be utilized to store data for weeks or
months at a time before adding to the database.
2. Users should not update their forms prior to submitting data stored in the Outbox. Updating the forms
prior to submitting outbox data may result in missing data, resetting of X/Y coordinates to “0, 0” (off the
coast of Africa), or other technical issues, which may require the user to redo each survey form for each
point/record from scratch. Users may not experience these issues if they update their forms prior to
clearing the Outbox, but results may vary based on device and on what has been updated in the form.Editing an Approach Terminal, Crash Cushion, Incident, and/or Note
Supported Devices: Android, iOS, Windows 10
Networking: Online
1. Open “ArcGIS Collector”.
2. Select the relevant District Collector Map or Data Correction Collector Map where the intended asset to
edit is located.
3. Locate the point on the map and click on it.
4. Click the “Edit” button.
5. Adjust the placement of the point, values in the fields, or change any attachments.
6. Click the “Update” button to save the changes to the database.
Comments:
1. Only the maps specified as ISPE District maps support adding Notes and provide links to Incidents.
Other maps specified as for the editing of blank incidents, for the correction of errors, attachment
issues, “other” types, possible duplicates, or for other specific segments of data are provided for editing
data only.
2. The Collector maps are not configured to update data in the background. Due to previous issues with
this functionality causing Windows 10 Collector to glitch and corrupt our data, this is not available on
the Collector maps. Scrolling or moving the maps may cause new feature points to appear, but it may
not update the data on currently visible points. We have previously experienced an issue where a user
had not closed Collector and left it running, and if points were edited by someone else, the app would
still have the older data cached, and that user would unintentionally replace the updated data with the
cached data. Users are strongly recommended to close the Collector map (or even Collector entirely)
when not editing, or to regularly close and reload the map if working in an area where others are also
actively working.
3. The Collector application is intended for the collection and editing of data, and is not recommended for
viewing and querying points.You can also read