Pumping station systems - PS.W.04-20 Installation and operating instructions GRUNDFOS INSTRUCTIONS
←
→
Page content transcription
If your browser does not render page correctly, please read the page content below
GRUNDFOS INSTRUCTIONS

Pumping station systems
PS.W.04-20

Installation and operating instructions
Pumping station systems
Table of contents

                    English (GB)
                    Installation and operating instructions . . . . . . . . . . . . . . . . . . . . . . . . . . . . . . . . . . . . . . . . . . . . . . . . . . . . . . . . . . . 3
                    Čeština (CZ)
                    Montážní a provozní návod . . . . . . . . . . . . . . . . . . . . . . . . . . . . . . . . . . . . . . . . . . . . . . . . . . . . . . . . . . . . . . . . . . 19
                    Deutsch (DE)
                    Montage- und Betriebsanleitung . . . . . . . . . . . . . . . . . . . . . . . . . . . . . . . . . . . . . . . . . . . . . . . . . . . . . . . . . . . . . . 35
                    Dansk (DK)
                    Monterings- og driftsinstruktion . . . . . . . . . . . . . . . . . . . . . . . . . . . . . . . . . . . . . . . . . . . . . . . . . . . . . . . . . . . . . . . 51
                    Español (ES)
                    Instrucciones de instalación y funcionamiento. . . . . . . . . . . . . . . . . . . . . . . . . . . . . . . . . . . . . . . . . . . . . . . . . . . . 67
                    Suomi (FI)
                    Asennus- ja käyttöohjeet . . . . . . . . . . . . . . . . . . . . . . . . . . . . . . . . . . . . . . . . . . . . . . . . . . . . . . . . . . . . . . . . . . . . 83
                    Français (FR)
                    Notice d'installation et de fonctionnement . . . . . . . . . . . . . . . . . . . . . . . . . . . . . . . . . . . . . . . . . . . . . . . . . . . . . . . 99
                    Italiano (IT)
                    Istruzioni di installazione e funzionamento. . . . . . . . . . . . . . . . . . . . . . . . . . . . . . . . . . . . . . . . . . . . . . . . . . . . . . 115
                    Nederlands (NL)
                    Installatie- en bedieningsinstructies . . . . . . . . . . . . . . . . . . . . . . . . . . . . . . . . . . . . . . . . . . . . . . . . . . . . . . . . . . . 131
                    Polski (PL)
                    Instrukcja montażu i eksploatacji . . . . . . . . . . . . . . . . . . . . . . . . . . . . . . . . . . . . . . . . . . . . . . . . . . . . . . . . . . . . . 147
                    Português (PT)
                    Instruções de instalação e funcionamento. . . . . . . . . . . . . . . . . . . . . . . . . . . . . . . . . . . . . . . . . . . . . . . . . . . . . . 163
                    Svenska (SE)
                    Monterings- och driftsinstruktion . . . . . . . . . . . . . . . . . . . . . . . . . . . . . . . . . . . . . . . . . . . . . . . . . . . . . . . . . . . . . 179
                    Slovensko (SI)
                    Navodila za montažo in obratovanje . . . . . . . . . . . . . . . . . . . . . . . . . . . . . . . . . . . . . . . . . . . . . . . . . . . . . . . . . . 195
                    Slovenčina (SK)
                    Návod na montáž a prevádzku . . . . . . . . . . . . . . . . . . . . . . . . . . . . . . . . . . . . . . . . . . . . . . . . . . . . . . . . . . . . . . 211
                    Türkçe (TR)
                    Montaj ve kullanım kılavuzu . . . . . . . . . . . . . . . . . . . . . . . . . . . . . . . . . . . . . . . . . . . . . . . . . . . . . . . . . . . . . . . . . 227
                    Norsk (NO)
                    Installasjons- og driftsinstruksjoner . . . . . . . . . . . . . . . . . . . . . . . . . . . . . . . . . . . . . . . . . . . . . . . . . . . . . . . . . . . 244
                    Declaration of conformity . . . . . . . . . . . . . . . . . . . . . . . . . . . . . . . . . . . . . . . . . . . . . . . . . . . . . . . . . . . . . . . . . . . 260
                    Declaration of conformity . . . . . . . . . . . . . . . . . . . . . . . . . . . . . . . . . . . . . . . . . . . . . . . . . . . . . . . . . . . . . . . . . . . 263
                    Declaration of performance . . . . . . . . . . . . . . . . . . . . . . . . . . . . . . . . . . . . . . . . . . . . . . . . . . . . . . . . . . . . . . . . . 264

                    2
English (GB) Installation and operating instructions
English (GB)
Original installation and operating instructions 1. General information
These installation and operating instructions describe Grundfos
pumping station system PS.W.04-20. 1.1 Hazard statements
Sections 1-6 give the information necessary to be able to unpack, The symbols and hazard statements below may appear in
install and start up the product in a safe way. Grundfos installation and operating instructions, safety
Sections 7-9 give important information about the product, as well instructions and service instructions.
as information on service, fault finding and disposal of the
product. DANGER
Indicates a hazardous situation which, if not avoided,
CONTENTS will result in death or serious personal injury.
Page
1. General information 3 WARNING
1.1 Hazard statements 3 Indicates a hazardous situation which, if not avoided,
1.2 Notes 3 could result in death or serious personal injury.
1.3 Target group 3
2. Safety instructions 4
CAUTION
3. Receiving the product 5
3.1 Transporting the product 5 Indicates a hazardous situation which, if not avoided,
3.2 Inspecting the product 5 could result in minor or moderate personal injury.
3.3 Storage 5
The hazard statements are structured in the following way:
4. Installing the product 6
4.1 Preparing the foundation 6 SIGNAL WORD
4.2 Lifting the pit 6 Description of hazard
4.3 Installing the pit 7 Consequence of ignoring the warning.
4.4 Backfill 7 - Action to avoid the hazard.
4.5 Uplift prevention 8
4.6 Connecting the pipes 8 1.2 Notes
4.7 Location of inlet 9 The symbols and notes below may appear in Grundfos
4.8 Fitting the sleeve 9 installation and operating instructions, safety instructions and
4.9 Pipes with flange connections 10 service instructions.
4.10 Installing the pump(s) 10
4.11 Fitting the chain 10
4.12 Installing the cover 10 Observe these instructions for explosion-proof
4.13 Installing the venting pipe 11 products.
4.14 Installing the cable entry 11
5. Installing the level controllers 11
5.1 Start and stop levels 11
5.2 Installing the pump controller 11 A blue or grey circle with a white graphical symbol
5.3 Float switches 12 indicates that an action must be taken.
5.4 Air bells 12
5.5 Pressure transducer 12
5.6 Other types of level control equipment 12 A red or grey circle with a diagonal bar, possibly with
6. Electrical connection 13 a black graphical symbol, indicates that an action
7. Product introduction 13 must not be taken or must be stopped.
7.1 Product description 13
7.2 Applications 13
7.3 Pumped liquids 14 If these instructions are not observed, it may result in
7.4 Pumping station system (PS.S) 14 malfunction or damage to the equipment.
7.5 Pumping station modular (PS.M) 14
7.6 CE approval of PS.W and PS.S 14
7.7 Identification 14
8. Maintaining and servicing the product 17 Tips and advice that make the work easier.
8.1 Repairing a non-return valve 18
8.2 Contaminated pumps 18
8.3 Service contract 18
1.3 Target group
9. Disposing of the product 18
These installation and operating instructions are intended for
professional installers.
Read this document before installing the product.
Installation and operation must comply with local
regulations and accepted codes of good practice.
32. Safety instructions Maintaining and servicing the product
English (GB)
Receiving the product DANGER
Crushing and suffocation hazard
DANGER
Death or serious personal injury
Crushing hazard
- Before entering PS.W.20, make sure that the cover
Death or serious personal injury and safety grid are locked in open position and
- Place the pit on even ground to prevent the pit
that the pit is ventilated according to local
from overturning.
regulations. If not, do not enter the pit.
Installing the product
DANGER
WARNING Fall hazard
Crushing hazard Death or serious personal injury
Death or serious personal injury - When entering the pit, wear a safety harness and
- The lifting equipment used for lifting the pit and the use approved equipment for lifting persons up from
pump must be rated for the weight of the pump, the pit according to local regulations.
approved and maintained according to local
regulations. CAUTION
Pressurised system
DANGER
Minor or moderate personal injury
Crushing hazard - Relieve the pressure by draining the system before
Death or serious personal injury dismantling the non-return valve.
- Do not stand under or close to a suspended load.
CAUTION
DANGER Biological hazard
Crushing hazard Minor or moderate personal injury
Death or serious personal injury - Remove the fuses or switch of the main switch
- Before lifting the pit, make sure that the lifting before dismantling the non-return valve.
equipment is capable of lifting the load. Make sure the power supply cannot be
- Make sure that the lifting bracket is tightened accidentally switched on.
before attempting to lift the pit. Tighten if - Use gloves and other suitable personal protection
necessary. Carelessness during lifting or equipment in accordance with local regulations.
transportation of the pit may cause injury to Observe local regulations on exposure to
persons or damage to the pit. wastewater.
Electrical connections - Rinse the non-return valve thoroughly with clean
water before carrying out maintenance and
CAUTION service.
Collapsing hazard - Flush the pump thoroughly with clean water, and
Minor or moderate personal injury rinse the pump parts in water after dismantling.
- Place the support for the crane at a suitable
distance from the pit to avoid collapse of the pit
hole.
Work according to local regulations.
WARNING
Electric shock
Death or serious personal injury
- Connect the pump or pump controller to an
external emergency stop.
If you use the main switch as emergency stop,
make sure that it fulfils EN 60204-1, 10.8.4.
DANGER
Electric shock
Death or serious personal injury
- Before starting work on the pump or valves,
remove the fuses or switch off the main switch.
Make sure that the power supply cannot be
accidentally switched on.
DANGER
Electric shock
Death or serious personal injury
- The control cabinet and internal pipes must be
earthed.
43. Receiving the product
English (GB)
3.1 Transporting the product
For correct lifting methods, see section 4.2 Lifting the pit.
When transporting and handling the pit at low
temperatures, take into consideration that the pit
impact resistance is reduced.
Precautions during transport and handling
• Do not dump the pit from the lorry.
• Use approved straps of textile or similar materials when lifting
the pit on to or down from a lorry or moving it on the
construction site.
• Handle and lift the pit according to local regulations.
TM06 1233 1914
• When lifting the pumping station with a strap, use the ribs on
the pumping station.
• Do not drag the pit over the ground.
• Point loads must not occur.
• The pit must not be exposed to sharp edges. Fig. 2 Placing the pit in upright position by means of straps
• Fix the pit securely during transport.
• When the pit is placed on the ground, make sure that the
3.2 Inspecting the product
ground is even. After transportation and before installation, the pumping station
must be inspected by the customer.
DANGER The inspection must include the following:
Crushing hazard • Check the pumping station for transport damage, etc.
Death or serious personal injury Contact the transporter immediately if you detect any damage.
- Place the pit on even ground to prevent the pit • Check that the products delivered correspond to the order.
from overturning.
• Check the positions and sizes of fittings.
• Check and retighten all bolted connections as they may have
The weight of a PS.W pit can vary from 50 to become loose during the transport.
maximum 2500 kg. • Check that the valves are open.
• Check other equipment such as venting pipes.
3.3 Storage
If the pit is equipped with a lifting point, use it during
In case the pit is not installed immediately or the ambient
handling.
temperature exceeds 30 °C, store the pit in upright position to
avoid deformation.
TM06 1232 1914
Fig. 1 Lifting the pit from a lorry
54. Installing the product 4.1.1 Foundation layer
English (GB)
• Place the pit on a foundation layer if soil analyses and
4.1 Preparing the foundation information about pit load show that the soil is not capable of
bearing the weight. The bedding layer on which the pit is
CAUTION
placed is not regarded as a foundation layer.
Collapsing hazard
• The foundation layer can be made after the excavation by
Minor or moderate personal injury laying a stable layer of suitable gravel or similar material and
- Place the support for the crane at a suitable compacting it in layers of maximum 30 cm (corresponding to
distance from the pit to avoid collapse of the pit approx. 20 cm after compaction). Such a foundation layer is
hole. also required if the excavation has become too deep by
Work according the local regulations. mistake.
Installation of pits must be carried out by an 4.1.2 Bedding layer
authorised person in accordance with local • The material for the bedding layer must be compactable and
regulations. composed so that neither its properties nor the compaction will
Work in or near wastewater pits must be carried out cause damage to the pit.
according to local regulations. • Grains larger than 16 mm must not be present.
With reference to DS/EN 1997-1: Eurocode 7: Geotechnical • The content of grains between 8 and 16 mm must not exceed
Category 2: 10 %.
We recommend that you complete a geotechnical investigation of • The material must not be frozen.
the site conditions before you install the pit. • Sharp flint etc. must not be present.
With reference to DS/EN 1997-1: Eurocode 7: Geotechnical • The bedding layer must have a thickness of 10 cm.
Category 1:
The geotechnical investigation can be judged to be unnecessary, 4.2 Lifting the pit
if below conditions are fulfilled:
• There is a negligible risk of overall instability, ground
movements or adverse ground conditions.
• Comparable local experience shows that the ground
conditions are sufficiently uncomplicated.
• There is no excavation below the water table.
• Comparable local experience indicates that the proposed
excavation below the water table will be uncomplicated.
In case of doubt, consult a geotechnical specialist.
4 4
TM06 9855 3517
3 Fig. 4 Lifting the pit
Place the support for the crane at a suitable distance
from the pit to avoid collapse of the pit hole.
Observe local regulations.
TM06 3629 0715
DANGER
2 Crushing hazard
1 Death or serious personal injury
- Do not stand under or close to a suspended load.
Fig. 3 Schematic installation drawing
DANGER
Pos. Description Crushing hazard
Death or serious personal injury
1 Foundation layer - Before lifting the pit, make sure that the lifting
2 Bedding layer equipment is capable of lifting the load.
3 Backfill compacted in layers of maximum 30 cm - Make sure that the lifting bracket is tightened
before attempting to lift the pit. Tighten if
Distance of 50 cm from cover where heavy loads must
4 necessary. Carelessness during lifting or
not occur
transportation of the pit may cause injury to
persons or damage to the pit.
Select the location of the pit so that its installation
does not damage other equipment. The other
equipment must not damage the buried pit.
64.3 Installing the pit
English (GB)
Before lowering the pit into position, retighten various
connections, as they may have become loose during the
transport.
Check the pit for external damage before lowering it
TM02 9361 2404
into position. When the pit has been installed,
Grundfos cannot be held responsible for possible
damage.
CAUTION
Collapsing hazard Fig. 6 Oval pit after compaction
Minor or moderate personal injury
- Place the support for the crane at a suitable
distance from the pit to avoid collapse of the pit 2
hole.
Work according to the local regulations.
Before lowering the pit into position, retighten various
connections, as they may have become loose during
the transport.
TM06 3603 0615
Place the pit on the bedding layer.
Check that the pit is vertical.
Groundwater must not rise above the bedding layer until
backfilling has been completed.
4.4 Backfill Fig. 7 Even pressure on all sides of the pit
• The backfill must provide sufficient support of the pit on all
sides and ensure that the load can be transferred without
detrimental point impacts or similar impacts. See fig. 5. Do not use plate compactors at a distance of less
• The backfill must meet the same requirements as those for the than 30 cm from the pit wall.
bedding layer.
• The backfilling must be carried out so that the pit is not
damaged or deformed.
If the hole for the pit is drilled, pay special attention to
• The backfill must be compacted in layers of maximum 30 cm,
the compaction of the backfill to prevent uplift.
corresponding to approx. 20 cm after compaction.
Compact the backfill under the inlet and outlet pipes
properly so that they are not exposed to downward 1 1a
loads when the backfill settles. See fig. 5.
Max.
25 kN
TM06 3602 0615
Max.
150 kg
Fig. 8 Compactors
The backfill must provide sufficient support of the pit on all sides
and ensure that the load can be transferred without detrimental
point impacts or similar impacts. See fig. 7.
TM06 3628 0715
Use mechanical compacting equipment and compact
the backfill to 98-100 % proctor density.
Fig. 5 Insufficient compaction under pipes
During backfilling, fit the cover on the pit to prevent
the pit from becoming deformed or oval-shaped.
74.5 Uplift prevention 4.6.1 Drilling the inlets
English (GB)
The pit design ensures that the pit is protected against uplift if Figures 10 and 11 show which hole saw to use for the various
installed correctly. Requirements for uplift prevention depend on pumping station diameters, depending on the difference in the
the geotechnical conditions. They should be determined by the wall thickness.
engineer or contractor and are outside Grundfos' area of
responsibility. PS.W.04 - PS.W.10
Diameter Wall thickness - A
The requirements below are minimum requirements. [mm] [mm]
Observe local regulations. 400 30
600 44
The safety against uplift is determined according to Eurocode EN
800 57
1997-1 including national annex, DS/EN 1997-1 DK NA:2015.
1000 72
The most unfavourable ground water conditions for the pit is
when the ground water table is located at terrain level. This
situation creates the highest hydrostatic water pressure at the
bottom of the pit, and causes the highest reduction in soil weight
for the stabilising soil volume.
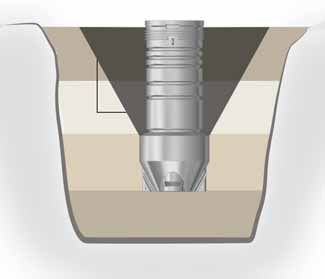
The sand volume resting on the shoulder of the pit is a stabilising
force. The sand volume is determined as a cone with hollow core
as illustrated in fig. 9.
The inclination of the cone is illustrated 1:n. The inclination n can
be determined based on the friction angle for the design. The
characteristic friction angle for sand with a unit weight of 19 kN/
m3, compacted to 97 % standard proctor, is estimated to 37
degrees. The design friction angle is 32 degrees which
corresponds to an inclination of n = 1.6.
TM06 3605 1317
Fig. 10 Wall profile PS.W.04-10
PS.W.20
Wall thickness varies for SN2 and SN4
Diameter [mm] SN2 [mm] SN4 [mm]
2000 Minimum 84 Minimum 114.5
TM06 7269 2316
X
Fig. 9 Stabilising sand volume
4.6 Connecting the pipes
Holes for inlet pipe, electrical connection and venting are to be
TM06 3610 0615
drilled on site.
We recommend that you provide the pit with a vent
pipe, supplied as an accessory.
Fig. 11 Wall profile PS.W.20
Place inlet and outlet pipe connections in accordance
with local regulations.
1. Mark the pit where the inlet is to be.
2. Drill the marked spot with a hole saw.
3. Remove all burrs from the hole.
84.7 Location of inlet
English (GB)
The pit inlet must not be located within the area shown in fig. 12,
as it will disturb the function of the float switches.
200 200
TM06 9859 3517
TM06 9858 3517
Fig. 12 Location of inlet relative to level control
Fig. 15 Location of inlet relative to inclined bottom plates
The pit inlet must not be located within the areas
shown in figs 13 and 14 as it will interfere with piping 4.8 Fitting the sleeve
and valves. 1. Fold the sleeve and insert it into the hole from the outside of
the pit.
2. Unfold the sleeve so that it lies evenly in the hole.
3. LM50/100/150 sleeves: Pull the sleeve outwards until its
collar touches the inside of the pit all around the hole.
L965 sleeves: Pull the sleeve outwards until its collar touches
the inside of the pit at the positions 3 and 9 o'clock. See fig.
18.
4. Lubricate the inside of the sleeve with a water-based
lubricant.
5. Chamfer the pipe and press it home.
LM50/100/150 sleeves
Push the inlet pipe through the sleeve. See fig. 16.
TM06 9856 3517
As it must be possible to pull the pump up through
220°
the pit, the inlet pipe must not project more than 5 cm
beyond the sleeve.
Fig. 13 Location of inlet relative to pipes with one pump
Pit side
Max. 50 mm
TM03 3709 0806
TM06 9857 3517
Fig. 16 Pipe with LM50/100/150 sleeve, seen from the side
190°
Fig. 14 Location of inlet relative to pipes with two pumps
The pit inlet must not be located within the area
shown in fig. 15 as it will destroy the function of the
inclined bottom plates.
9L965 sleeves
English (GB)
Push the inlet pipe into the sleeve and against the stop. See figs
17 and 18.
Pit side
TM02 9341 2404
TM03 3708 0806
Fig. 19 Chain fitted to the pump
Fig. 17 Pipe with L965 sleeve, seen from the side
WARNING
Crushing hazard
Death or serious personal injury
Pit side - The lifting equipment used for lifting the pit and the
pump must be rated for the weight of the pump,
approved and maintained according to local
regulations.
Chains supplied by Grundfos are marked with
maximum load and production date.
TM03 3768 1006
Do not exceed the maximum load.
Maintain the chain according to local regulations. We
recommend that you check chains and shackles
supplied by Grundfos at least once a year for cracks,
Fig. 18 Pipe with L965 sleeve, seen from the top corrosion or other irregularities. If you find any
defects, replace the chain or shackles.
4.9 Pipes with flange connections
4.12 Installing the cover
Loosen all bolts of the flange and retighten them PS.W is delivered with factory-fitted cover. The cover is not
when the pit has been installed. approved for traffic unless stated otherwise.
This will prevent stress in the pipes. For traffic-approved cover, contact Grundfos.
4.10 Installing the pump(s)
Make sure that covers are closed and locked to
Some versions come without the pump(s) installed. For
prevent unwanted access.
installation and startup of the pump, see the installation and
operating instructions for the pump.
Lower the pump carefully into the pit to avoid Never leave an open pit unattended.
damage to pump and pit.
WARNING
Crushing hazard
Death or serious personal injury
- The lifting equipment used for lifting the pit and the
pump must be rated for the weight of the pump,
approved and maintained according to local
regulations.
TM06 0113 4913 - TM06 0114 4913
4.11 Fitting the chain
For pumps on auto coupling, we recommend that you fit the chain
in the foremost lifting eye of the lifting bracket. The number of
lifting eyes depends on the pump.
Fig. 20 Not approved for pedestrians and vehicles
104.13 Installing the venting pipe 5. Installing the level controllers
English (GB)
If the cover is not pre-installed with a venting pipe, we
recommend that you provide the pit with a venting pipe, supplied
as an accessory. If the pit is equipped with an AutoADAPT-controlled
pump, an external level controller is not needed.
For installation, see section 4.6 Connecting the pipes.
When installing the level controllers, observe the following points:
• To prevent air intake and vibrations in the pump, install the
stop level switch in such a way that the pump stops before air
is sucked into the pump.
• In the case of 1-pump operation, install the start level switch in
such a way that the pump starts at the required level; however,
start the pump before the liquid level reaches the lower edge
of the bottom inlet pipe.
• In the case of 2-pump operation, install the start level switches
in such a way that pump 2 starts before the liquid level
reaches the lower edge of the bottom inlet pipe, and so that
pump 1 starts correspondingly earlier.
• Install the high-level alarm switch about 10 cm above the start
level switch; however, the alarm must always be given before
the liquid level reaches the inlet pipe.
TM06 3913 1215
For further settings, see the installation and operating instructions
for the pump controller selected.
5.1 Start and stop levels
The effective volume of the pit must be so large that the number
Fig. 21 Pit with venting pipe of starts does not exceed the maximum permissible number. See
the installation and operating instructions for the pump.
4.14 Installing the cable entry
The cables to the level switches and the pump can be led into the
5.2 Installing the pump controller
pit through a cable entry in the side of the upper region of the pit. See the installation and operating instructions for the pump
See fig. 22. controller.
Check that the pump controller is designed for the
pumps to be installed.
TM06 3478 0615
Fig. 22 Pipe for cable entry
Adjust the length of the power cable by coiling it up
on a relief fitting to ensure that the cable is not
damaged during operation.
Fasten the relief fitting to a suitable hook at the top of
the pit.
Make sure that the cable is not sharply bent or
pinched.
115.3 Float switches
English (GB)
If float switches have been selected, they can be fitted on a tube
which can be lifted out of the pit. This ensures easy adjustment of
the float switches.
Alarm: 32
Note that the bottom float switch (stop switch) must
stop the pump before the liquid level in the pit falls Start: 22
below the minimum level of the pump. See the
installation and operating instructions for the pump.
The stop level
TM02 8962 1204
depends on the
pump type.
Common: 11
Fig. 25 Electrodes in a pit with one pump
A
Alarm: 42
C Start2: 32
TM02 8960 1204
B
Start1: 22
TM02 8963 1204
The stop level
depends on the
Fig. 23 Adjusting the float switches
pump type.
A Minimum 300 mm Common: 11
B 50 to 100 mm Fig. 26 Electrodes in a pit with two pumps
C Operating range 110 mm
5.4 Air bells
Air bells are pulse generators for the pressure switches of the
Distance B must not be too large. Otherwise, the pump controller and function by means of pneumatic pressure
float switch may get stuck in other parts of the changes. The pressure changes when the liquid level changes in
installation. the air bell. The air bells are connected to the pressure switches
of the controller by means of pressure hoses.
The pit inlet must not be located within the area shown in fig. 24.
Otherwise, it will disturb the function of the float switches. CU 211
200 200
CU 211
TM06 9859 3517
TM01 9345 2404
Fig. 24 Location of the inlet electrodes
If electrodes are used for level control, note that the electrodes
come in a standard length of 1 m. When you install the cables, Fig. 27 Air bells in a pit with one pump
adjust the length of the cables to ensure that they are activated at
the correct levels. 5.5 Pressure transducer
If possible, bend the electrodes away from each other so that If a pressure transducer is used, install it in a protective pipe to
paper and similar items cannot get stuck between the electrodes prevent contamination and deposits.
and disturb the signal.
When you have shortened the cables to the desired length, strip 5.6 Other types of level control equipment
10 to 15 mm of the lower end of the electrodes. See the installation and operating instructions for the equipment.
The electrodes come with a 10 m cable.
126. Electrical connection 7. Product introduction
English (GB)
See the installation and operating instructions for the pump and
7.1 Product description
the pump controller.
Grundfos pumping stations are prefabricated pumping stations for
collection and pumping of wastewater.
The electrical installation must be carried out by an
authorised person in accordance with local The pump pit is made of PE-HD (polyethylene) or PP
regulations. (polypropylene) and comes with pipes and valves fitted.
The pipes are made of PE or stainless steel depending on the
location of the pit and the pumped liquid, and thus the pump
WARNING
selected.
Electric shock
Wastewater is led into the pit. When the liquid in the pit reaches
Death or serious personal injury the maximum liquid level, the pump will start and pump the liquid
- Connect the pump or pump controller to an further on into the sewer system.
external emergency stop.
If you use the main switch as emergency stop,
make sure that it fulfils EN 60204-1, 10.8.4. 2 9
DANGER
Electric shock 6
Death or serious personal injury
- Before starting work on the pump or valves,
remove the fuses or switch off the main switch. 5
Make sure that the power supply cannot be
accidentally switched on. 4 10
DANGER
Electric shock 3
Death or serious personal injury
8 3
- The control cabinet and internal pipes must be
earthed.
TM06 9860 3517
1 7
Do not install Grundfos control boxes and the free
end of the supply cable inside the pumping station.
Fig. 28 Example of pumping station
Observe the following:
• Seal all cable inlets properly. Pos. Description
• Connect pump cables as described in the
1 Pit
installation and operating instructions of the
pump. 2 Cover
• Handle cables with care to avoid damage on the 3 Pipes
cable insulation. Suspend excessive cables in 4 Non-return valve
cable hooks.
5 Isolating valve
• Always protect cables to prevent water from
entering the control box capillary. 6 Pipe coupling
7 Auto coupling
8 Guide rails
9 Guide rails holders
10 Level control system
7.2 Applications
Grundfos pumping stations are used for collection and pumping
of drainage water, rainwater (surface water) and wastewater.
Wastewater is led into the pumping station. When the liquid in the
pumping station reaches the starting level, the pump starts and
pumps the liquid further in the system to a sewage treatment
plant or sewer.
The pits are prepared for various pumps depending on the
pumped liquid.
137.3 Pumped liquids 7.7 Identification
English (GB)
7.3.1 Liquid temperature 7.7.1 Nameplate, PS.S and PS.M
Maximum 40 °C. For higher temperatures, contact Grundfos.
1 2
Select the pump on the basis of knowledge of the
3
liquid temperature. See the installation and operating
instructions for the individual pumps. 5
4
6 7
7.3.2 Acids and alkalis 9
11
The pumping station is resistant to strong acids and alkalis as
TM06 1743 2714
well as solvents.
The pumps are supplied with the pump pit and normally capable
of withstanding pH values between 4 and 10. In case of doubt,
contact Grundfos. 8 10 12 13 13
7.3.3 Viscosity Fig. 29 Nameplate, PS.S
Very thick wastewater must not be led into the pit. See also the
installation and operating instructions for the pump. 1 2
7.3.4 Density 4
Model Pumping Station Modular
3
Maximum 1100 kg/m3. Type PS.M.R.17.25.SEG.LCD.10.FS2
6 5
7.4 Pumping station system (PS.S) Made in Weight
8 7
This section applies only to pumping station systems consisting P.c.
TM06 7590 3616
of Grundfos-approved components mentioned on the nameplate 10 Well cpl. Pump cpl. 9
of PS.S. Control System Level System
11
Accessories
The pumping station system contains all the elements making the
99153401
12
pumping station function as one unit, and can contain the DK-8850 Bjerringbro, Denmark
13
following five elements:
Fig. 30 Nameplate, PS.M
• pit
• pump
• pump controller Pos. Description
• level controller 1 Product number
• accessories. 2 Production site
The pumping station system may not always have all five 3 Type designation
elements. However, it will always have a pit and a pump, but the
4 Country of origin
pump controller or the level controller may be incorporated in the
pump, and/or accessories may be omitted. 5 Weight
7.4.1 CE approval of PS.S 6 Production code
PS.S is CE-approved in accordance with these directives and Installation and operating instructions, publication
7
standards: number
• EN 2006/42/EC, EU Machinery Directive 8 Product number, pit
• EN/ISO 12100, Safety of machinery - General principles for 9 Product number, pump
design - Risk assessment and risk reduction. 10 Product number, pump controller
To ensure safe transport and to fulfil customers' requests, the 11 Product number, level controller
PS.S elements can be assembled on site. But the CE approval of
12 Product number(s), accessories
PS.S is only valid if the following conditions have been fulfilled:
• PS.S has been assembled correctly in accordance with the 13 Not filled in
installation and operating instructions for PS.S and the pit,
pump and control systems.
• PS.S contains the Grundfos-specified elements stated on the
PS.S nameplate. The PS.S nameplate is fitted inside the pit.
7.5 Pumping station modular (PS.M)
PS.M is used instead of PS.S when the CE approval for the
complete system is not needed, or some of the components in the
pumping station, such as the controllers, are not supplied by
Grundfos.
A risk assessment for the complete system must be performed by
the customer, if necessary.
7.6 CE approval of PS.W and PS.S
PS.W and PS.S are CE-approved in accordance with these
standards:
• EN 12050-1
• EN 12050-2.
147.7.2 Type key, PS.S and PS.M
Code Explanation Designation
English (GB)
Example: PS.S.R.17.25.SEG.LCD110.FS2
BIP Built into the pump
Code Explanation Designation AB2 Two air bells
PS Grundfos pumping station AB3 Three air bells
S CE-marked system FS2 Two float switches
M Modular system* FS3 Three float switches
System type FS4 Four float switches
R Rotation-moulded PE
W Welded PE or PP EL3 Three electrodes
Level controller
04 400 mm EL4 Four electrodes
05 500 mm EL5 Five electrodes
06 600 mm PT Pressure transducer
08 800 mm Pressure transducer and one
Pit sump diameter PF1
float switch
10 1000 mm [mm] x 100
Pressure transducer and two
12 1200 mm PF2
float switches
17 1700 mm
20 2000 mm * Without CE approval.
25 2500 mm Pit depth [mm] x 100 7.7.3 Nameplate, PS.W
CC Unilift CC
1 3 2
KP Unilift KP
AP12 Unilift AP12.50
Model P10
AP35 Unilift AP35, Unilift AP12.40
Type
AP50 Unilift AP50
Standards used: EN 12050-1 or EN 12050-2
APB Unilift AP35B, Unilift AP50B Made in Denmark Weight
Pump type
SEG SEG P.c. 1325 EU declaration of performance 98646710
DP/EF DP (0.6 - 1.5 kW), EF
TM06 1249 3414
DP (2.6 kW), SL1.50.65 and
98495490
DP/SL
SLV.65.65 Notified body:0197 DK-8850 Bjerringbro, Denmark
DPK DPK, DPK.V
SE/SL SE/SL 6 4 8 7 5
X No Grundfos controller Fig. 31 Nameplate, PS.W
BIP Built into the pump
CU Control unit
Pos. Description
LC231S Level controller
1 Product number
LC241S Level controller
LC231D Level controller - two pumps 2 Production site
LC241D Level controller - two pumps 3 Type designation
LC107 Level controller 4 Country of origin
LC108 Level controller 5 Weight
LC110 Level controller 6 Production code, date of production
LC115 Level controller Pump controller Installation and operating instructions, publication
7
LCD107 Level controller - two pumps number
LCD108 Level controller - two pumps 8 Not filled in
LCD110 Level controller - two pumps
LCD115 Level controller - two pumps
DC318 Dedicated controls
DC319 Dedicated controls
Dedicated controls - two
DCD318
pumps
Dedicated controls - two
DCD319
pumps
157.7.4 Type key, PS.W
Code Explanation Designation
English (GB)
Example: PS.W.20.25.D.GC.304.100.A100.SEG
CC Unilift CC
Code Explanation Designation KP Unilift KP
PS Grundfos pumping station AP12 Unilift AP12.50
W Welded PE or PP Pit type and material AP35 Unilift AP35, Unilift AP12.40
04 400 mm AP50 Unilift AP50
06 600 mm APB Unilift AP35B, Unilift AP50B Pump type
Pit sump diameter
08 800 mm SEG SEG
[mm] x 100
10 1000 mm DP/EF DP (0.6 - 1.5 kW), EF
20 2000 mm DP (2.6 kW), SL1.50.65 and
DP/SL
xx x 100 SLV.65.65
Pit depth [mm] x 100 SE/SL SE/SL
25 2500 mm
N No pump
S One pump Number of pumps
D Two pumps
DC Direct outlet, common
DS Direct outlet, separated
GC Goose neck, common Pipe design
NV No valves, separated
CL Launcher for cleaning pig
304.32 DN 32 (1")
304.40 DN 40 (1 1/2")
304.50 DN 50 (2")
Pipe material and
304.65 DN 65 (2 1/2") diameter
304.80 DN 80 (3") Stainless steel EN
1.4301 / AISI 304
304.100 DN 100 (4")
304.125 DN 125 (5")
304.150 DN 150 (6")
316.32 DN 32 (1")
316.40 DN 40 (1 1/2")
316.50 DN 50 (2")
Pipe material and
316.65 DN 65 (2 1/2") diameter
316.80 DN 80 (3") Stainless steel EN
1.4401 / AISI 316
316.100 DN 100 (4")
316.125 DN 125 (5")
316.150 DN 150 (6")
PE.63 D63 mm (2")
PE.75 D75 mm (2 1/2") Pipe material and
PE.90 D90 mm (3") diameter
PE.110 D110 mm (4") Polyethylene
PE.160 D160 mm (6")
A40 DN 40 pump connection
A50 DN 50 pump connection
A65 DN 65 pump connection Installation type
A80 DN 80 pump connection Auto-coupling
A100 DN 100 pump connection
A150 DN 150 pump connection
Installation type
S Free-standing pump
Free-standing
168. Maintaining and servicing the product
Pumps can be lifted with a crane, using the lifting
English (GB)
See the installation and operating instructions for the pump and
points.
the pump controller.
Use proper slings or chains approved for lifting.
We recommend that you make all maintenance and
service work when the pump is placed outside the CAUTION
pit. Biological hazard
Minor or moderate personal injury
- Use gloves and other suitable personal protection
equipment in accordance with local regulations.
Do not enter and work inside PS.W.04 - PS.W.10. Observe local regulations on exposure to
wastewater.
DANGER
If natural light is insufficient, the maintenance staff
Crushing and suffocation hazard must use lamps.
Death or serious personal injury
- Before entering PS.W.20, make sure that the cover
and safety grid are locked in open position and
that the pit is ventilated according to local
regulations. Otherwise, do not enter the pit.
1 2
90° 90°
3 4
TM06 9862 3517
TM06 9861 3517
Fig. 33 Lifting a free-standing pump for service
Fig. 32 Opening PS.W.20
DANGER
Fall hazard
Death or serious personal injury
- When entering the pit, wear a safety harness and
use approved equipment for lifting persons up from
the pit according to local regulation.
All work in pits must be carried out according to local
regulations and supervised by at least one person
outside the pumping station.
When work is going on in or in the proximity of an
open pumping station or valve chamber, place proper
TM06 9863 3517
warning signs and correct safety barriers around the
pit to avoid that persons fall into the pit. The warning
signs must be visible from all directions.
If the top opening is up to ∅1000, normal precaution
will be sufficient. Openings larger than ∅1000 must Fig. 34 Lifting pumps on auto coupling for service
be equipped with safety barriers or other safety
measures.
178.1 Repairing a non-return valve
Non-return valve Non-return valve,
English (GB)
CAUTION exploded view
Pressurised system
Minor or moderate personal injury
- Relieve the pressure by draining the system before
dismantling the non-return valve.
CAUTION
Biological hazard
TM06 1756 2714
Minor or moderate personal injury
- Remove the fuses or switch off the main switch
before dismantling the non-return valve.
Make sure that the power supply cannot be
accidentally switched on.
Fig. 36 Non-return valve
CAUTION
Biological hazard 8.2 Contaminated pumps
Minor or moderate personal injury
CAUTION
- Rinse the non-return valve thoroughly with clean
water before carrying out maintenance and Biological hazard
service. Minor or moderate personal injury
- Flush the pump thoroughly with clean water, and
rinse the pump parts in water after dismantling.
Make sure that the isolating valves cannot be For further information, see the installation and operating
accidentally opened. instructions for the pump.
8.3 Service contract
It is possible to make a service contract with Grundfos.
When entering the valve chamber, do not step on
pipes or valves.
9. Disposing of the product
Non-return valve placed inside the pumping station This product or parts of it must be disposed of in an
environmentally sound way:
1. Close the isolating valves. See fig. 36.
1. Use the public or private waste collection service.
2. Remove the two screws on the non-return valve cover. See
fig. 35. 2. If this is not possible, contact the nearest Grundfos company
or service workshop.
3. Replace worn-out valve balls, and clean the valves inside.
3. If it is not possible to dispose of the product as a complete
4. Close the valve cover and tighten the screws.
unit, the pump and installation equipment can be removed
5. Open the isolating valves. See fig. 35. from the pit, and the pit can be filled and covered.
The crossed-out wheelie bin symbol on a product
means that it must be disposed of separately from
household waste. When a product marked with this
symbol reaches its end of life, take it to a collection
point designated by the local waste disposal
Isolating valve
authorities. The separate collection and recycling of such
products will help protect the environment and human health.
See also end-of-life information at www.grundfos.com/product-
recycling.
TM06 3484 0615
Non-return valve
Fig. 35 Gooseneck with valves
18Declaration of conformity 1
Declaration of conformity
GB: EC declaration of conformity for Grundfos CZ: Prohlášení o shodě ES pro systém čerpací
pumping station system, stanice Grundfos, typ PS.S (PS.R, PS.W)
type PS.S (PS.R, PS.W) Toto prohlášení o shodě ES se vztahuje pouze na systém čerpací stanice
This EC declaration of conformity applies only to Grundfos pumping Grundfos, typ PS.S, který je na typovém štítku označen značkou CE.
station system, type PS.S, marked with the CE mark on the nameplate. Podmínkou platnosti prohlášení je, že systém čerpací stanice musí vždy
It is a condition for the validity of the declaration that the pumping station zahrnovat správné komponenty a produkty schválené společností
system at any time consists of the correct and Grundfos-approved Grundfos uvedené na typovém štítku systému čerpací stanice.
components and products mentioned in the nameplate of the pumping
station system. My, firma Grundfos, prohlašujeme na svou plnou odpovědnost, že
systém čerpací stanice, typ PS.S, na který se toto prohlášení vztahuje, je
We, Grundfos, declare under our sole responsibility that the pumping v souladu s ustanoveními směrnice Rady o sblížení právních předpisů
station system, type PS.S, to which this declaration relates, is in členských států Evropského společenství uvedených níže:
conformity with the Council directive on the approximation of the laws of
the EC member states listed below: Systém čerpací stanice, typ PS.S, vždy zahrnuje čerpací jímku,
minimálně jedno čerpadlo a, v závislosti na typu čerpadla, také regulátor
The pumping station system, type PS.S, always consists of a pit, čerpadla a regulátor hladiny, případně další příslušenství podle seznamu
minimum one pump and, depending on the pump type, also a pump níže:
controller and a level controller, and possibly accessories, all selected
from the list below: Prohlášení o shodě ES nebo prohlášení ES o výkonu komponent
a produktů naleznete v montážním a provozním návodu dodaném
Please find the EC declaration of conformity and/or EU declaration of s těmito komponentami a produkty.
performance of components and products in the installation and
operating instructions delivered with these components and products.
DE: EG-Konformitätserklärung für die DK: EF-overensstemmelseserklæring for
Grundfos-Pumpstationenanlage pumpestationssystem, type PS.S (PS.R, PS.W),
Typ PS.S (PS.R, PS.W) fra Grundfos
Die EG-Konformitätserklärung gilt nur für die Grundfos Pumpstationen- Denne EF-overensstemmelseserklæring gælder kun for pumpestations-
anlage vom Typ PS.S. Diese ist mit der CE-Kennzeichnung auf dem system, type PS.S, fra Grundfos som er mærket med CE-mærke på type-
Typenschild gekennzeichnet. Voraussetzung für die Gültigkeit der Erklä- skiltet. Det er en betingelse for erklæringens gyldighed, at
rung ist, dass die Pumpstationenanlage zu jeder Zeit aus den richtigen pumpestationssystemet til enhver tid består af de korrekte komponenter
und von Grundfos genehmigten Bauteilen und Produkten besteht, die auf og produkter, som er godkendt af Grundfos, og som er anført på pumpe-
dem Typenschild der Anlage vermerkt sind. stationssystemets typeskilt.
Wir, Grundfos, erklären in alleiniger Verantwortung, dass die Pumpstatio- Vi, Grundfos, erklærer under ansvar at pumpestationssystemet, type
nenanlage vom Typ PS.S, auf die sich diese Erklärung bezieht, mit den PS.S, som denne erklæring omhandler, er i overensstemmelse med
folgenden Richtlinien des Rates zur Angleichung der Rechtsvorschriften disse af Rådets direktiver om indbyrdes tilnærmelse til EF-medlemssta-
der EU-Mitgliedsstaaten übereinstimmt: ternes lovgivning:
Die Pumpstationenanlage vom Typ PS.S besteht immer aus einem Pumpestationssystemet, type PS.S, består altid af en brønd, mindst én
Schacht, mindestens einer Pumpe und, abhängig vom Pumpentyp, auch pumpe og, afhængig af pumpetypen, også en pumpestyring og en
aus einer Pumpensteuerung und einem Niveauschalter und enthält mög- niveaustyring, og evt. tilbehør fra listen nedenfor:
licherweise Zubehör aus der nachfolgenden Liste:
EF-overensstemmelseserklæring og/eller EF-ydeevnedeklaration for
Sie finden die EG-Konformitätserklärung und/oder die EG-Leistungser- komponenter og produkter fremgår af monterings- og driftsinstruktion
klärung für Bauteile und Produkte in der mitgelieferten Montage- und som leveres sammen med disse komponenter og produkter.
Betriebsanleitung.
ES: Declaración de conformidad de la CE para el FI: Grundfosin tyypin PS.S (PS.R, PS.W)
sistema de estación de bombeo Grundfos de pumppaamon
tipo PS.S (PS.R, PS.W) EY-vaatimustenmukaisuusvakuutus
Esta declaración de conformidad de la CE sólo es válida para sistemas Tämä EY-vaatimustenmukaisuusvakuutus koskee vain Grundfosin tyypin
de estación de bombeo Grundfos de tipo PS.S que ostenten la marca CE PS.S pumppaamoa, jonka tyyppikilvessä on CE-merkintä.
en la placa de características. La validez de la declaración queda supedi- Vaatimustenmukaisuusvakuutus on voimassa vain, kun
tada a que el sistema de estación de bombeo incorpore en todo pumppaamojärjestelmässä käytetään alkuperäisiä Grundfosin
momento los componentes y accesorios correctos y homologados por hyväksymiä komponentteja ja tuotteita, jotka on merkitty
Grundfos, indicados en la placa de características del sistema de esta- pumppaamojärjestelmän tyyppikilpeen.
ción de bombeo.
Grundfos vakuuttaa omalla vastuullaan, että tyypin PS.S pumppaamojär-
Grundfos declara, bajo su exclusiva responsabilidad, que el sistema de jestelmä, jota tämä vakuutus koskee, on EY:n jäsenvaltioiden lainsää-
estación de bombeo de tipo PS.S al que hace referencia esta declara- dännön yhdenmukaistamiseen tähtäävien Euroopan neuvoston
ción cumple lo establecido por la Directiva del Consejo sobre la aproxi- direktiivien vaatimusten mukainen seuraavasti:
mación de las legislaciones de los Estados miembros de la CE indicados
a continuación: Tyypin PS.S pumppaamojärjestelmä sisältää aina kaivon, vähintään
yhden pumpun ja pumpputyypistä riippuen myös pumppusäätimen ja pin-
El sistema de estación de bombeo de tipo PS.S debe incorporar siempre nankorkeuden säätimen sekä mahdollisesti lisäosia alla olevasta luette-
un pozo, un mínimo de una bomba y, según el tipo de bomba, también un losta:
controlador de bomba y un controlador de nivel, así como, posiblemente,
accesorios, todos los cuales deben formar parte de la siguiente lista: EY-vaatimustenmukaisuusvakuutus ja/tai komponenttien ja tuotteiden
EY-suoritustasoilmoitus toimitetaan kyseisten komponenttien ja tuottei-
Encontrará las declaraciones de conformidad de la CE y/o las declara- den asennus- ja käyttöohjeiden mukana.
ciones de rendimiento de la CE relativas a los componentes y accesorios
en las instrucciones de instalación y funcionamiento suministradas con
tales componentes y accesorios.
19Declaration of conformity
FR: Déclaration CE de conformité pour la station de IT: Dichiarazione CE di conformità per l'impianto
pompage Grundfos, type PS.S (PS.R, PS.W) della stazione di pompaggio Grundfos,
Cette déclaration CE de conformité s'applique uniquement à la station de tipo PS.S (PS.R, PS.W)
pompage Grundfos de type PS.S qui est marqué du logo CE. Pour la La presente dichiarazione di conformità CE è applicabile esclusivamente
validité de la déclaration il faut que les composants et produits conformes all'impianto della stazione di pompaggio Grundfos, tipo PS.S, contrasse-
et approuvés par Grundfos mentionnés sur la station de pompage corres- gnato con il marchio CE sulla targhetta di identificazione. È una condi-
pondent à ceux utilisés par la station de pompage. zione per la validità della dichiarazione in base alla quale l'impianto della
stazione di pompaggio è sempre costituito dai componenti e prodotti cor-
Nous, Grundfos, déclarons sous notre entière responsabilité que la sta- retti e approvati da Grundfos, menzionati nella targhetta di identificazione
tion de pompage de type PS.S, à laquelle la présente déclaration fait dell'impianto della stazione di pompaggio.
référence, est conforme aux directives du Conseil concernant le rappro-
chement des législations des États membres de la Communauté euro- Grundfos dichiara sotto la sua esclusiva responsabilità che l'impianto
péenne répertoriés ci-dessous : della stazione di pompaggio, tipo PS.S, ai quali si riferisce questa dichia-
razione, è conforme alle seguenti direttive del Consiglio riguardanti il
La station de pompage de type PS.S se compose toujours d'une fosse, et riavvicinamento delle legislazioni degli Stati membri CE:
selon le type de pompe, d'un coffret de commande et d'un régulateur de
niveau, et éventuellement d'accessoires, tous sélectionnés dans la liste L'impianto della stazione di pompaggio, tipo PS.S, è sempre costituito da
ci-dessous : un pozzetto, almeno una pompa e, a seconda del tipo di pompa, anche
un regolatore della pompa e un regolatore di livello, oltre ad eventuali
Veuillez trouver la déclaration CE de conformité et/ou la déclaration CE accessori selezionati dal seguente elenco:
de performance des composants et produits dans la notice d'installation
et de fonctionnement livrée avec lesdits produits et composants. La dichiarazione di conformità CE e/o la dichiarazione CE relativa alle
prestazioni dei componenti e ai prodotti si trovano nelle istruzioni di
installazione e funzionamento fornite con i componenti e i prodotti stessi.
NL: EG-conformiteitsverklaring voor Grundfos PL: Deklaracja zgodności WE dla przepompowni
pompput systeem, type PS.S (PS.R, PS.W) Grundfos typu PS.S (PS.R, PS.W)
Deze EG-conformiteitsverklaring geldt uitsluitend voor het Grundfos Niniejsza deklaracja zgodności WE dotyczy wyłącznie przepompowni
pompput systeem, type PS.S, dat is voorzien van een CE-merkteken op Grundfos typu PS.S oznaczonej znakiem CE na tabliczce znamionowej.
het typeplaatje. Het is een voorwaarde voor de geldigheid van de verkla- Deklaracja zgodności jest ważna pod warunkiem, że przepompownia
ring dat het pompput systeem te allen tijde is uitgerust met de correcte składa się z odpowiednich i zatwierdzonych przez Grundfos elementów
en door Grundfos goedgekeurde componenten en producten die op het i produktów wymienionych na tabliczce znamionowej.
typeplaatje van het pompput systeem staan vermeld.
My, Grundfos, oświadczamy z pełną odpowiedzialnością, że nasza
Wij Grundfos verklaren geheel onder eigen verantwoordelijkheid dat het przepompownia typu PS.S, której deklaracja niniejsza dotyczy, jest
pompput systeem, type PS.S, waarop deze verklaring betrekking heeft, zgodna z następującymi dyrektywami Rady w sprawie zbliżenia
in overeenstemming is met de Richtlijnen van de Raad in zake de onder- przepisów prawnych państw członkowskich:
linge aanpassing van de hieronder genoemde wetgeving van de EG-lid-
staten: Przepompownia typu PS.S zawsze składa się ze zbiornika, co najmniej
jednej pompy oraz, w zależności od typu pompy, z regulatora pompy
Het pompput systeem, type PS.S, bestaat altijd uit een put, minimaal één i sterownika poziomu, a także z ewentualnych akcesoriów
pomp en, afhankelijk van het pomptype, een pompregelaar en een wyszczególnionych na liście poniżej:
niveauregelaar, en mogelijk accessoires, die allemaal uit de onder-
staande lijst zijn geselecteerd: Deklaracje zgodności WE i/lub deklaracje właściwości użytkowych
elementów i produktów znajdują się w dołączonych do nich instrukcjach
Raadpleeg de EG-conformiteitsverklaring en/of EG-prestatieverklaring montażu i eksploatacji.
van componenten en producten in de installatie- en bedieningsinstructies
die zijn meegeleverd met deze componenten en producten.
PT: Declaração de conformidade CE para o sistema SE: EG-försäkran om överensstämmelse för
de estação elevatória Grundfos, Grundfos pumpstationssystem av
tipo PS.S (PS.R, PS.W) typ PS.S (PS.R, PS.W)
Esta declaração de conformidade CE aplica-se apenas ao sistema de Denna EG-försäkran om överensstämmelse gäller endast för Grundfos
estação elevatória da Grundfos, tipo PS.S, com a marca CE na chapa de pumpstationssystem av typ PS.S med CE-märkning på typskylten. För att
características. É condição para a validade da declaração que o sistema försäkran ska vara giltig måste pumpstationssystemet alltid bestå av kor-
de estação elevatória seja sempre composto pelos componentes e pro- rekta och av Grundfos godkända komponenter och produkter som anges
dutos correctos e aprovados pela Grundfos, mencionados na chapa de på pumpstationssystemets typskylt.
características do sistema de estação elevatória.
Vi, Grundfos, försäkrar under eget ansvar att pumpstationssystemet av
A Grundfos declara sob sua única responsabilidade que o sistema de typ PS.S, som denna försäkran avser, överensstämmer med Rådets
estação elevatória, tipo PS.S, ao qual diz respeito esta declaração, está direktiv om tillnärmning av lagstiftningen i de EU-medlemsstater som lis-
em conformidade com a Directiva do Conselho sobre a aproximação das tas nedan:
legislações dos Estados Membros da CE listados abaixo:
Pumpstationssystemet av typ PS.S består alltid av en brunn, minst en
O sistema de estação elevatória, tipo PS.S, é sempre composto por um pump och, beroende på typen av pump, även en pumpstyrenhet och en
poço, pelo menos uma bomba e, dependendo do tipo de bomba, também nivåstyrenhet och eventuella tillbehör, som alla är valda i nedanstående
por um controlador da bomba e um sensor de nível, bem como possíveis lista:
acessórios, todos seleccionados a partir da lista abaixo:
EG-försäkran om överensstämmelse och/eller EG-försäkran om kompo-
A Declaração de Conformidade CE e/ou a declaração CE de desempe- nenters och produkters prestanda finns i monterings- och driftsinstruktio-
nho dos componentes e produtos podem ser encontradas nas instruções nen som medföljer dessa komponenter och produkter.
de instalação e funcionamento entregues com esses componentes e pro-
dutos.
20Declaration of conformity
SI: Izjava o skladnosti ES za sisteme črpalnih SK: ES vyhlásenie o zhode k sústavám čerpacích
postaj Grundfos tipa PS.S (PS.R, PS.W) staníc Grundfos, typ PS.S (PS.R, PS.W)
Ta izjava o skladnosti ES se nanaša samo na sisteme črpalnih postaj Toto ES vyhlásenie o zhode sa vzťahuje len na sústavy čerpacích staníc
Grundfos, tipa PS.S, ki imajo na tipski ploščici oznako CE. Izjava je Grundfos typu PS.S, označené značkou CE na štítku.
veljavna samo pod pogojem, da je sistem črpalne postaje kadar koli Podmienkou platnosti vyhlásenia je, že sústava čerpacej stanice
sestavljeniz ustreznih delov in delov, ki jih odobri Grundfos, ter izdelkov, pozostáva zo správnych komponentov a produktov schválených
navedenih na tipski ploščici sistema črpalne postaje. spoločnosťou Grundfos tak, ako sú uvedené na štítku čerpacej stanice.
Mi, družba Grundfos, z izključno odgovornostjo izjavljamo, da je sistem My, spoločnosť Grundfos, vyhlasujeme na svoju plnú zodpovednosť, že
črpalne postaje tipa PS.S, na katerega se nanaša ta izjava, v skladu z sústava čerpacej stanice typu PS.S, na ktorú sa toto vyhlásenie
direktivo Sveta glede približevanja zakonodaje za izenačevanje pravnih vzťahuje, je v súlade s ustanoveniami smernice Rady pre zblíženie
predpisov držav članic ES, navedenih v nadaljevanju: právnych predpisov členských štátov Európskeho spoločenstva
v oblastiach:
Sistem črpalne postaje tipa PS.S je vedno sestavljen iz jaška, najmanj
ene črpalke in, v odvisnosti od tipa črpalke, tudi krmilnika črpalke ter Sústava čerpacej stanice typu PS.S vždy pozostáva z nádrže, minimálne
nivojskega krmilnika in morebitne dodatne opreme. jedného čerpadla a v závislosti od typu čerpadla, tiež z riadiacej jednotky
čerpadla a hladinovej riadiacej jednotky a ďalších prípadných doplnkov,
Izjava o skladnosti ES in/ali izjavo odelovanju sestavnih delov in izdelkov z ktorých sú všetky vybrané z nižšie uvedeného zoznamu:
EU sta na voljo v navodilih za namestitev in delovanje, ki so
priložena tem sestavnim delom in izdelkom. ES vyhlásenie o zhode a/alebo ES vyhlásenie o parametroch
komponentov a produktov nájdete v montážnom a prevádzkovom návode
dodávanom s týmito komponentmi a produktmi.
TR: PS.S (PS.R, PS.W) tipi Grundfos pompa NO: EF-samsvarserklæring for Grundfos
istasyonu sistemi için AB uygunluk beyanı pumpestasjonssystem, type PS.S (PS.R, PS.W)
Bu AB uygunluk beyanı sadece etiketinde CE işaretine sahip PS.S tipi Denne EF-samsvarserklæringen gjelder bare for Grundfos pumpesta-
Grundfos pompa istasyonu sistemi için geçerlidir. Beyanın geçerliliğinin sjonssystem, type PS.S, merket med CE-merke på typeskiltet. Det er en
bir koşulu, pompa istasyonu sisteminin her zaman etikette belirtilen betingelse for erklæringens gyldighet at pumpestasjonssystemet til
doğru ve Grundfos onaylı bileşen ve ürünlerden oluşmasıdır. enhver tid består av de korrekte og Grundfos-godkjente komponentene
og produktene som er oppført på pumpestasjonssystemets typeskilt.
Grundfos olarak bu bildirimin konusu olan PS.S tipi pompa istasyonu
sisteminin, aşağıda belirtilen AB üye ülkelerinin yasalarının uyumlu hale Vi, Grundfos, erklærer under vårt eneansvar at pumpestasjonssystemet
getirilmesiyle ilgili Konsey direktifine uygun olduğunu ve bununla ilgili type PS.S, som denne erklæringen gjelder, er i samsvar med rådets
olarak tüm sorumluluğun bize ait olduğunu beyan ederiz: direktiver om tilnærming av forordninger i EU-landene:
PS.S tipi pompa istasyonu sistemi daima bir pitten, minimum bir Pumpestasjonssystemet, type PS.S, består alltid av en pumpekum, minst
pompadan ve pompa türüne bağlı olarak tamamı aşağıdaki listeden én pumpe og, avhengig av pumpetype, også en pumpestyring og en
seçilen bir pompa kontrolörü ve seviye kontrolöründen ve muhtemelen nivåstyring og eventuelt tilbehør, som alle er valgt fra listen nedenfor:
aksesuarlardan oluşur:
EF-samsvarserklæringen og/eller EU-erklæringen om ytelsen til kompo-
Bileşen ve ürünlerin AB uygunluk beyanını ve/veya AB performans nenter og produkter er å finne i installasjons- og bruksanvisningen som
beyanını, bu bileşen ve ürünlerle birlikte teslim edilen montaj ve leveres med disse komponentene og produktene.
çalıştırma talimatlarında bulabilirsiniz.
Directive:
— Machinery Directive (2006/42/EC)
Standard used: EN ISO 12100:2010
— RoHS Directive: 2011/65/EU and 2015/863/EU
Standard used: EN IEC 63000:2018.
Components and products:
Pit: PS.R.05, PS.R.08, PS.R.10, PS.R.12, PS.R.17,
PS.W.04, PS.W.06, PS.W.08, PS.W.10, PS.W.20
Pump: CC, KP, AP12, AP35, AP50, APB, SEG, DP/EF,
DP/SL, DPK, DPK.V, SE/SL, CC-A, KP-A, AP12-A,
AP35-A, AP50-A, APB-A, SEG AUTOADAPT, DP/EF
AUTOADAPT, DP/SL AUTOADAPT, SE/SL AUTO ADAPT
Pump controller: CU, DC/DCD, LC/LCD
Level controller: Air bells, float switches, electrodes, pressure
transducer.
Accessories: Ventilation package, vaccum breaker, pressure
gauge, sleeves, chains, screen basket, baffle.
This EC declaration of conformity is only valid when published as part of
the Grundfos "Installation and operating instructions"
(PS.W: publication number 99249065).
Székesfehérvár, 27 October 2020
Róbert Kis
Senior Manager
Grundfos Holding A/S
Poul Due Jensens Vej 7
8850 Bjerringbro, Denmark
Person authorised to compile the technical file and
empowered to sign the EU declaration of conformity.
21You can also read


