Quick Start Guide - B80-BMB4 MOTHERSHIP BMB4 Rev A0 Rom A1 - Waves ...
←
→
Page content transcription
If your browser does not render page correctly, please read the page content below
B80-BMB4
    MOTHERSHIP
   BMB4 Rev A0 Rom A1

Quick Start Guide
  Section 1: Getting Started
  Section 2: SoundGrid Quick Start
  Section 3: BMB4 Clocking

         Revision 2.2 May 13, 2018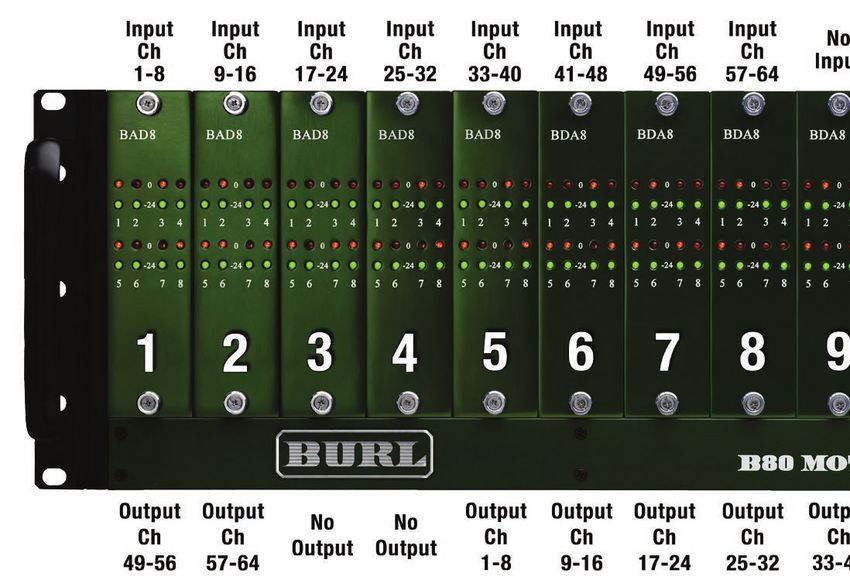
SECTION 1

1. GETTING STARTED

1.1 Register
Please register all serial numbers for your B80 MOTHERSHIP chassis, all Daughter Cards,
and BP-300 power supply.

You must register to activate your warranty! Please visit: www.burlaudio.com/register.

1.2 Check Jumper Settings On BMB4
The B80 MOTHERSHIP is fully modular, accommodating a wide variety of I/O needs. Jumper
settings on the BMB4 Motherboard allow for different I/O routing possibilities.

   1. Find H9 on the BMB4 Motherboard, as shown in Image 1 below.
   2. Use Examples A through D (on pages 2 and 3) to determine which setting to use based
        on your configuration.
   3.   See Channel Mapping for Jumper Settings charts on page 4.
   4.   Jumper positions 1 and 2 determine the INPUT channel mapping, this allows you to set
        the configuration for each card slot in the MOTHERSHIP.
        (Configurations possible: 4 Ch. per slot / 8 Ch. per slot / 8 and 4 Ch. per slot)
   5.   Jumper positions 3 and 4 determine the OUTPUT channel mapping, this allows you to
        change where the OUTPUTS start in the MOTHERSHIP chassis.
        (Output can start in slots 3, 5 & 7)
   6.   Jumpers on both 1 and 2 are for B16 MOTHERSHIP. Do not use with B80 chassis.

          Image 1: Locate the H9 Header on BMB4 Motherboard. From the rear of
          the chassis, BMB4 is on the far left. The H9 Header is highlighted. In this
          example, jumpers are on 1 and 3.

                                                1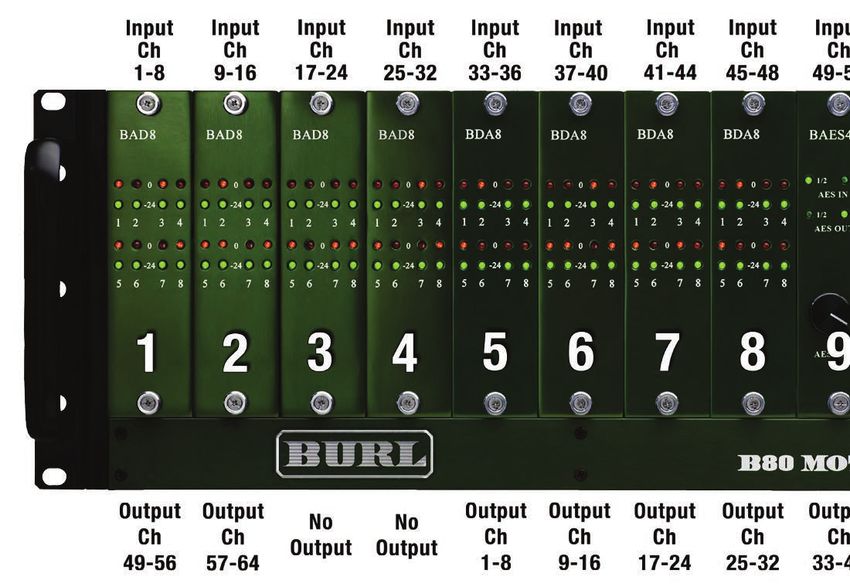
SECTION 1
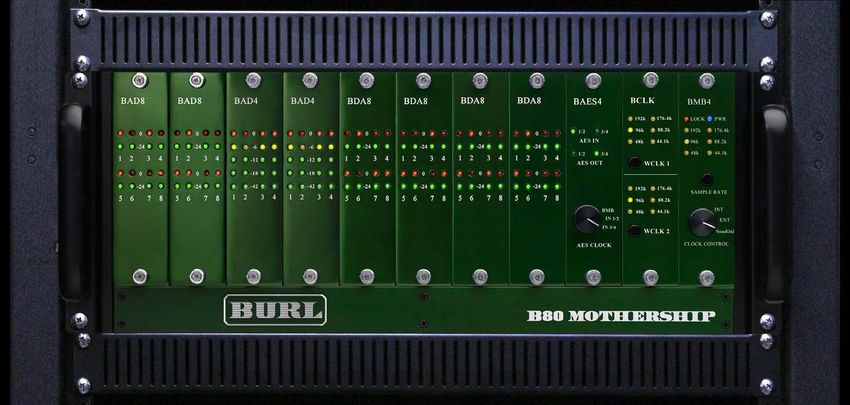
EXAMPLE A: JUMPERS ON 1 AND 3 (FACTORY SETTING)
BMB4 jumper settings for a 40 in x 40 out system using BAD8
and BDA8 Daughter Cards
Image 3: Jumpers on 1 and
3 for use with BAD8 and
BDA8. Jumper 1 enables 8
Image 2: This is an example of a 40 in x 40 out channels per slot for inputs.
MOTHERSHIP with BAD8 and BDA8 Daughter Cards. Jumper 3 assigns output
Ch. 1 to slot 5.
EXAMPLE B: NO JUMPERS ON 1 - 4
BMB4 jumper settings for a 24 in X 32 out system using BAD4
and BDA8 Daughter Cards
Image 5: In this example,
there are 4 inputs per slot and
output Ch.1 starts in slot 7.
Image 4: This is an example of a 24 in x 32 out
MOTHERSHIP with BAD4’s and BDA8’s.
2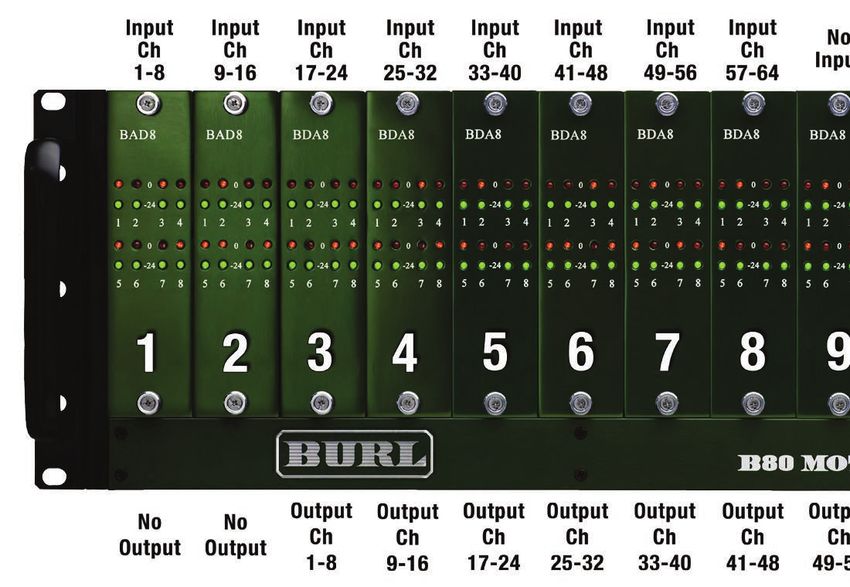
SECTION 1

                EXAMPLE C: JUMPERS ON 2 AND 3
BMB4 jumper settings for a 32 in x 32 out system using BAD8, BDA8, BAES4
                       and BCLK Daughter Cards

                                                   Image 7: Jumpers on 2 and
                                                   3 for use with for BAD8’s,
 Image 6: This is an example of a 32 in x 32 out   BAES4, and BDA8’s. Jumper
 MOTHERSHIP with BAD8’s, BDA8’s, BAES4, and        2 enables 8 Ch. per slot for
 BCLK Daughter Cards.                              inputs for slots 1-4. and 4
                                                   Ch. per slot for slots 5-10.
                                                   Jumper 3 assigns output Ch.
                                                   1 to slot 5.

                EXAMPLE D: JUMPERS ON 1 AND 4
       BMB4 jumper settings for a 16 in X 64 out system using BAD8
                      and BDA8 Daughter Cards

                                                   Image 9: Jumpers on 1 and 4
                                                   for use with BAD8 and BDA8.
Image 8: This is an example of a 16 in x 64 out    Jumper 1 enables 8 Ch. per
MOTHERSHIP with BAD8 and BDA8 Daughter Cards.      slot for inputs. Jumper 4
                                                   assigns output Ch. 1 to slot 3.

                                         3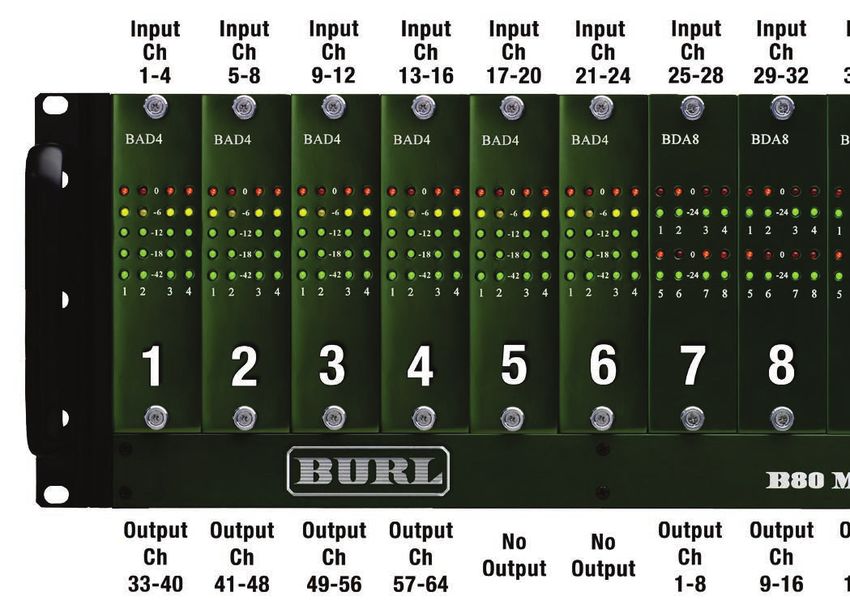
Section 1

              CHANNEL MAPPING FOR JUMPER SETTINGS
                              JUMPERS 1 AND 2: INPUTS

 i.
 ii.
 iii.

              CHANNEL MAPPING FOR JUMPER SETTINGS
                            JUMPERS 3 AND 4: OUTPUTS

 iv.
 v.
 vi.

        i.         ii.        iii.                      iv.               v.         vi.

1.3 Install Daughter Cards

 Image 10: Insert the Daughter Card into the card             Image 11: Attach the ribbon cable
 guides. Make sure the metal Daughter Card                    to the front panel.
 backplate, not PCB, is inserted into the card
 guides.

        Note: To purchase blanks for empty MOTHERSHIP slots, contact your BURL dealer!

                For more information on installing Daughter Cards, please go to
                         www.burlaudio.com/b80-quick-start-video

                                              4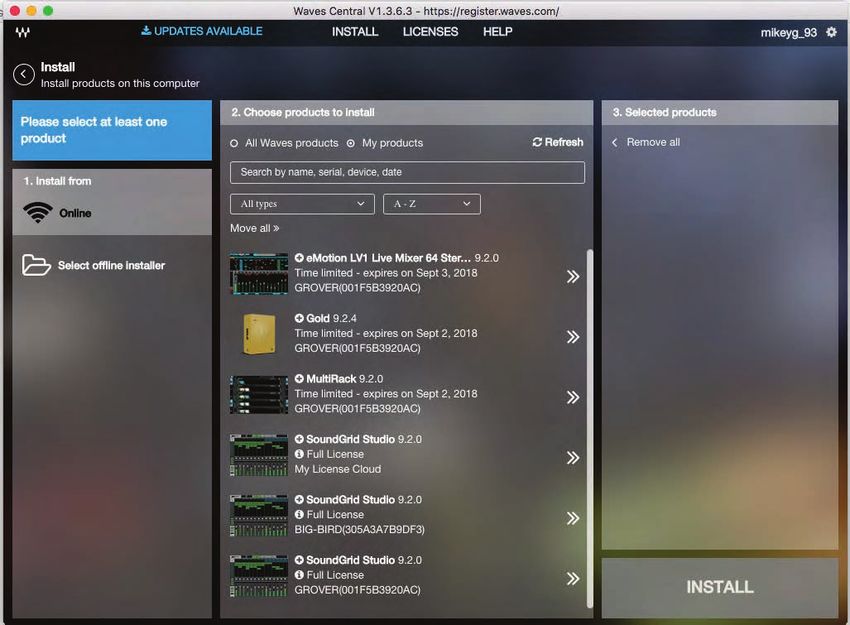
SECTION 1 / SECTION 2

1.4 Install Vents

      Image 12: B80 MOTHERSHIP with 1U vents above and below for proper airflow.

  Important Installation Notes:
  1. Install the 1U vents above and below the B80 chassis. The MOTHERSHIP MUST run
     with proper ventilation.
  2. The BP300 power supply should be installed underneath the MOTHERSHIP rather than
     above it.
  3. Failure to properly vent the MOTHERSHIP chassis above and below may cause failure,
     and will void the warranty.

2. SOUNDGRID QUICK START

YOU WILL NEED:
  •   B80 Mothership with BMB4 Motherboard
  •   Waves Central and Waves SoundGrid Studio
  •   Gigabit Ethernet Switch (optional, you can connect BMB4 directly to host CPU)
  •   Cat5e, Cat6 or Cat7 Ethernet Cables
  •   Waves SoundGrid Server (optional)

                     Image 13: Basic B80-BMB4 MOTHERSHIP setup.

For a complete list of Waves supported Ethernet switches:
https://www.waves.com/support/network-switches-for-soundgrid-systems

                                             5
SECTION 2

2.1 Download And Install Waves Central
Use the Waves Central application to download and install Waves software.
To download: https://www.waves.com/downloads/central
   1. Launch Waves Central and log in. Create an account if needed.

2.2 Install The BMB4 SoundGrid Motherboard Driver
   1. Via Waves Central, select “Install Products” and choose “Online”.
   2. Select “All Waves Products” at the top of the page (See Image 14 below) and then scroll
      or search for the “BMB4 SoundGrid Motherboard Driver” and select.
   3. Click the “Install” button.
   4. Restart your computer.

   Note: Installing BMB4 SoundGrid Motherboard Driver will also install Waves SoundGrid
   Studio.

   SoundGrid Studio can also be downloaded directly here:
   https://www.waves.com/soundgrid-studio-application

                                                            2

                                          1

                                                                                        3

                Image 14: Install the BMB4 SoundGrid Motherboard Driver.

   B80-BMB4 devices must be assigned to a host application. This is done within the
   application. Assignment is similar, but not identical, in all SoundGrid host applications.

   In this example, a B80-BMB4 MOTHERSHIP will be assigned to SoundGrid Studio.

   Refer to the SoundGrid Studio’s user guide for detailed instructions:
   https://www.waves.com/1lib/pdf/soundgrid/soundgrid-studio-manual.pdf

                                                6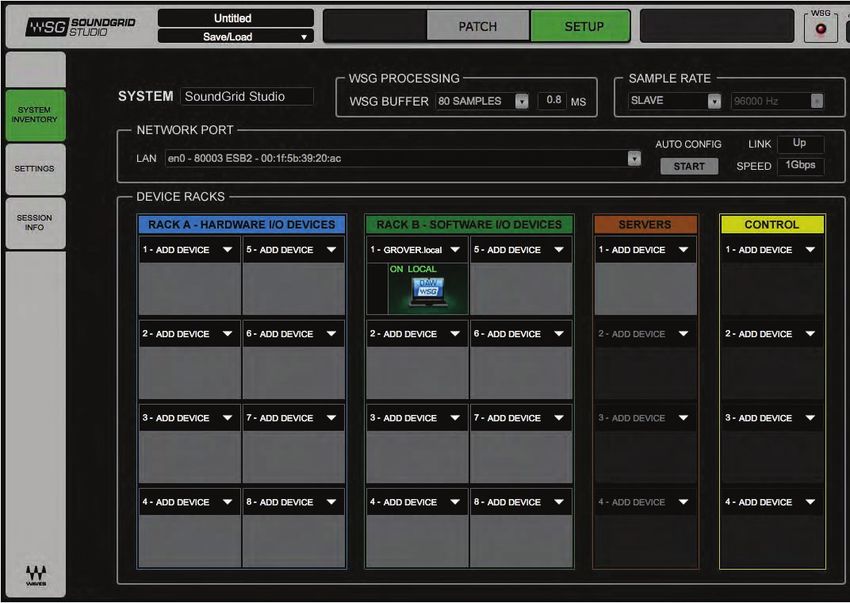
SECTION 2

2.3 Disconnect All Other Devices From Gigabit Switch
Note: If you are connecting the BMB4 directly to your computer, skip to step 2.6.

For best results, start by removing all other connections to the switch. SoundGrid should be
on its own network. Use different network ports on your computer for other networks (such as
internet).

2.4 Connect BMB4 Motherboard To Gigabit Ethernet Switch
Cat5e, Cat6, or Cat7 Ethernet cables are supported.

The SoundGrid Ethernet port can handle 64 ch. at:
   • 44.1 kHz
   • 48 kHz
   • 88.2 kHz
   • 96 kHz

                                 Image 15: BMB4 rear panel.

2.5 Connect The Computer’s Native Ethernet Port To Gigabit
Ethernet Switch Using CAT6 Ethernet Cables

2.6 Set BMB4 Front Panel To INT, EXT, Or SoundGrid

          Image 16: BMB4 Front panel. Set Clock Control to INT, EXT, or SoundGrid.
   •   When using the B80 on internal clock, set to INT.
   •   If using external word clock, set to EXT.
   •   When clocking off SoundGrid network, set to SoundGrid.
       For a complete guide to BMB4 Clocking, see page 11.

2.7 Select Network Port For SoundGrid

  Image 17: In this example, we are using “Port 1” on the CPU, which is identified as “en0”.

                                               7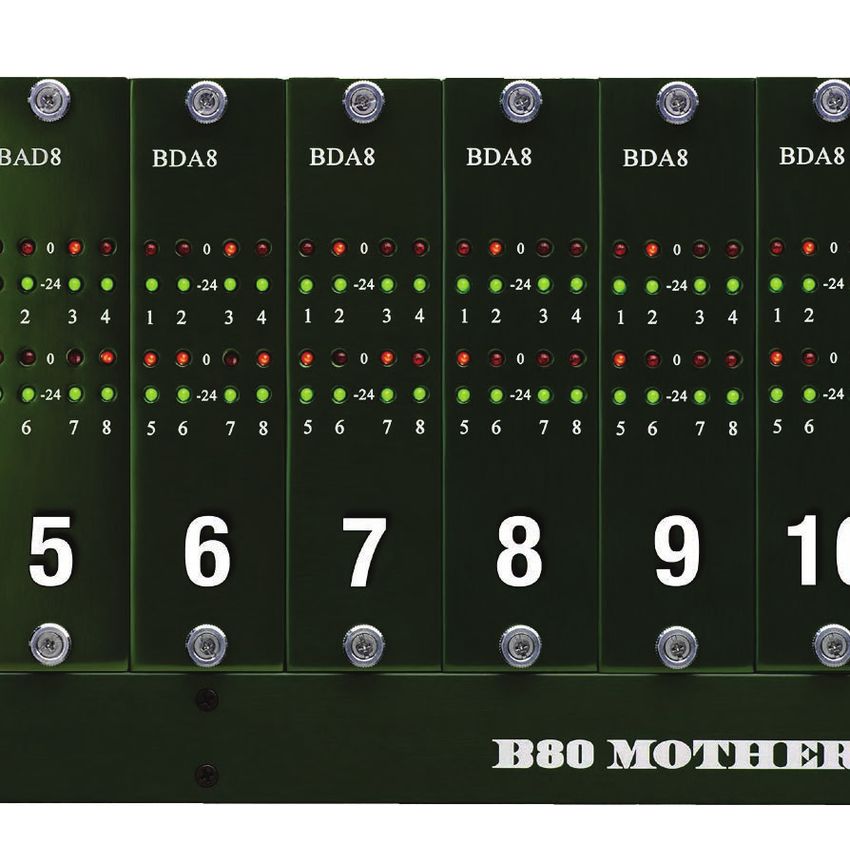
SECTION 2

2.8 Assign BMB4 To Host Application
I/O devices are assigned in the Device Racks of the System Inventory tab. You can assign the
B80-BMB4 to any Device Slot.

   1. Open SoundGrid Studio application.
   2. Select the “Setup” window.
   3. Choose the “System Inventory” tab. This is where devices are assigned.

                                                      2

                       3

                 Image 18: Shows device racks in the system inventory tab.

   4. If the B80-BMB4 is not already assigned to the SoundGrid host, click on the arrow in an
      empty device slot (See Image 19a below).

                                  4                       5

                   Image 19a: Click on the arrow in an empty device slot.

   5. Choose Burl Audio I/O from dropdown menu.
   6. Repeat this step to assign your DAW to Rack B (See Image 19b below).

                                                                     6

                 Image 19b: The Burl Audio I/O device will appear in the
                 device Rack A. Your DAW will appear in the device Rack B.

                                              8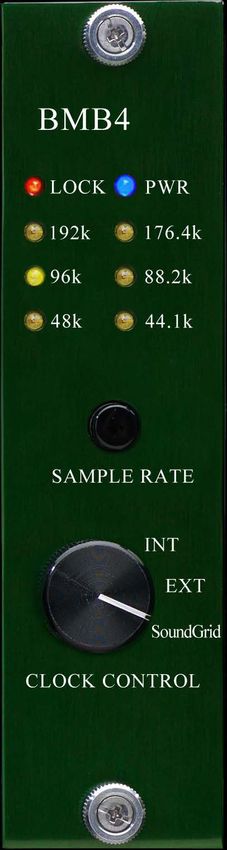
SECTION 2

2.9 Assign BMB4 To Driver And Driver To BMB4
When streaming audio to and from the MOTHERSHIP and a DAW, you must assign the
MOTHERSHIP inputs and outputs to the SoundGrid ASIO/Core audio driver.

All device and driver channels are shown along both the horizontal and vertical axes.

2.10 Input Assignment
Patch channel 1 from BMB4 to SoundGrid Driver channel 1. This assigns B80 input ch.1 to
SoundGrid ch. 1 (See Images 20 and 21).

                                                           Image 20:
                                       1                   1. Select Patch Window.
                                                           2. Select Device To Device.
                                   3                       3. Maximize DAW. In this example,
                                                           our CPU is named “Grover”.
                                                           4. Maximize “Burl Audio I/O-1”. In
                                                           this example, the MOTHERSHIP is
          4                             5                  in “Bank A-Slot 1”.
                                                           5. Patch channel 1 from the
 2                                                         MOTHERSHIP to channel 1 of the
                                                           Driver.

                                                           Image 21:
                                                           6. Click and drag from channel 1
                                                           downwards diagonally to enable all
                                                           inputs from the MOTHERSHIP.

                                                           In this example, we have 16 inputs
                                                           connected from the MOTHERSHIP
                                                           to SoundGrid.

                                             6

                                                 9
SECTION 2
2.11 Output Assignment
Patch channel 1 from BMB4 to SoundGrid channel 1. This assigns B80 output ch. 1 to
SoundGrid ch. 1 (See Images 22 and 23).
Image 22:
1 1. Select Patch Window.
3 2. Select Device To Device.
3. Maximize “Burl Audio I/O-1”.
4. Maximize “Bank B-Slot 1”.
5. Patch channel 1 from DAW to
channel 1 of the MOTHERSHIP.
4 5
2
Image 23:
6. Click and drag from channel 1
downwards diagonally to enable all
outputs from SoundGrid.
In this example, we have 16 outputs
connected from the MOTHERSHIP
to SoundGrid.
6
10SECTION 3
3. BMB4 CLOCKING
There are 3 ways to clock the B80 MOTHERSHIP:
BMB4 set to Internal Clock, External Clock, or Sound Grid
3.1 Clocking BMB4 To Internal Word Clock
1. Set BMB4 front panel to INT.
2. Push “Sample Rate” button on BMB4 faceplate to toggle to the SoundGrid
desired sample rate.
3. Open SoundGrid Studio, select SETUP.
4. Set SoundGrid sample rate to “SLAVE” (Image 24).
3
4
Image 24: SoundGrid Studio set to “SLAVE”.
5. In SoundGrid Studio, open MOTHERSHIP GUI by clicking on the gear box in the lower
left corner (Image 25).
6. Set Source to “B80 Control”. Soundgrid Studio and GUI sample rates should both
change to follow the B80 (Image 26).
6
5
Image 25: Open GUI Settings. Image 26: Set B80 GUI Source to
“B80 Control”.
NOTE: The MOTHERSHIP will always default to 96k when powered on.
You must manually change the sample rate on the BMB4 front panel.
11SECTION 3
3.2 Clocking BMB4 To External Word Clock
1. Set BMB4 front panel to EXT.
2. Connect External clock to word clock IN on BMB4. SoundGrid
3. Open SoundGrid Studio, select SETUP.
4. Set SoundGrid sample rate to “SLAVE” (Image 27).
3
4
Image 27: SoundGrid Studio set to “SLAVE”.
5. In SoundGrid Studio, open MOTHERSHIP GUI by clicking on the gear box in the lower
left corner (Image 28).
6. Set Source to “B80 Control”. Soundgrid Studio and GUI sample rates should both
change to follow the External Clock source (Image 29).
6
5
Image 28: Open GUI Settings. Image 29: Set B80 Gui Source to
“B80 Control”.
NOTE: When using EXT clock, the MOTHERSHIP will not need
to be manually set via the front panel.
12SECTION 3
3.3 Clocking BMB4 To SoundGrid
1. Set BMB4 front panel to SoundGrid.
2. Open SoundGrid Studio, select SETUP. SoundGrid
3. Set SoundGrid sample rate to “MASTER” (Image 30).
2
3
Image 30: SoundGrid Studio set to “MASTER”.
4. In SoundGrid Studio, open MOTHERSHIP GUI by clicking on the gear box in the lower
left corner (Image 31).
5. Set Source to “SoundGrid Internal”. Soundgrid Studio and GUI sample rates should
both change to follow the External Clock source (Image 32).
5
4
Image 31: Open GUI Settings. Image 32: Set B80 GUI Source to
“SoundGrid Internal”.
NOTE: When using the SoundGrid clock, the MOTHERSHIP will not need
to be manually set via the front panel.
13You can also read