Shopify QUICKGUIDE for - Release date: 18-05-2020 - Shiptimize
←
→
Page content transcription
If your browser does not render page correctly, please read the page content below
QUICKGUIDE for
Shopify
Release date: 18-05-2020
Installation

1. In Shopify go to "Apps".

2. Click on the link below the list of apps "Working with a developer on your shop? Manage private apps".

                                                                                                            2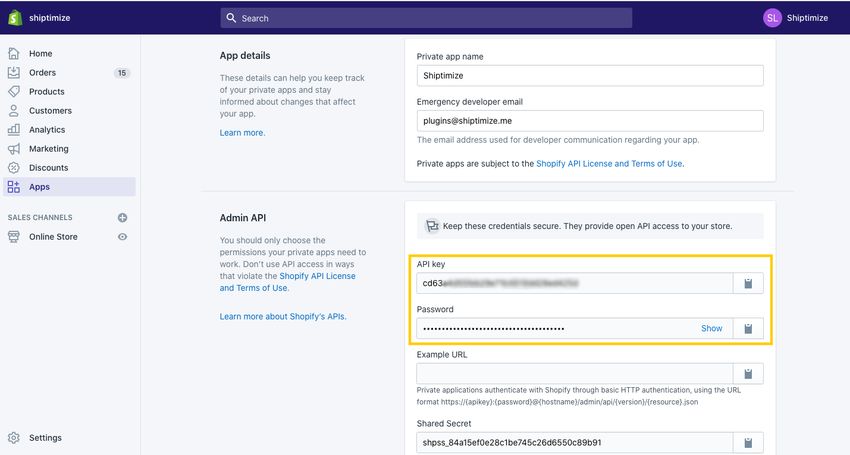
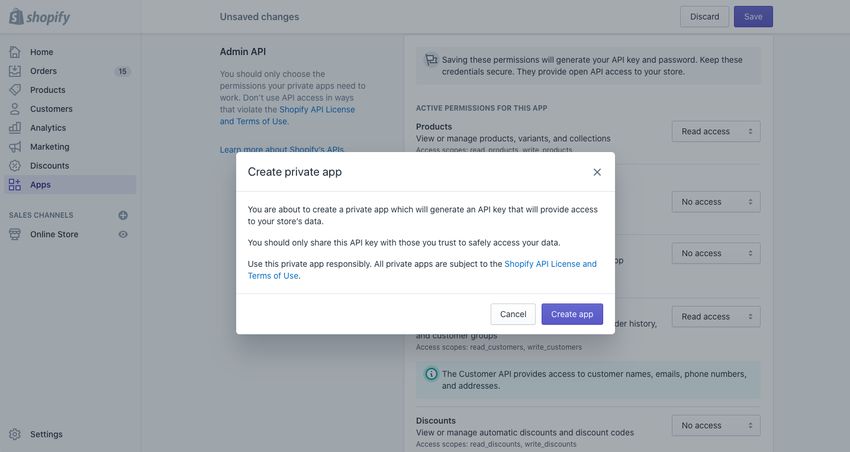
3. Click on “Create new private app”

                                       3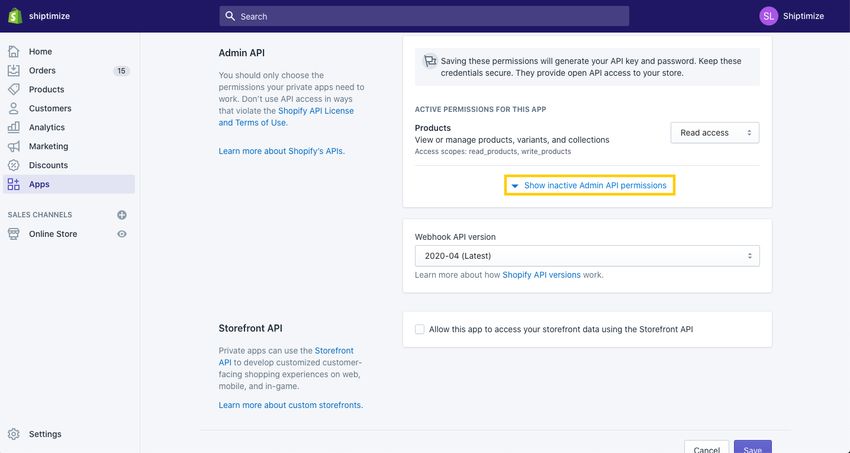
4. Create a name for the app and add it to the “Private app name” field. We suggest using the name Shiptimize
for easy identification.

5. Insert plugins@shiptimize.me at the Emergency developer email field.

                                                                                                                4
6. Click "Show inactive Admin API permissions" and make sure you select all listed below:

                                                                                            5
6.1. Customer - Read access
This option allows our platform to have access to the customer's email.
6.2. Inventory – Read access
That way, if an HS Code, has been defined, we can have access to it.
6.3. Locations - Read access
This option is mandatory so that Shiptimize can have access to the id of warehouse and can update
tracking codes.
6.4. Orders - Read and Write
This option allows Shiptimize to have access to other information necessary to complete shipping labels,
such as the address of the shipping address.
6.5. Products - Read access
Thus, it will be possible for Shiptimize to read order items necessary for, for example, filling out customs
forms.
6.6. Script tags - Read and Write
This option allows Shiptimize to add scripts to the checkout, making it possible to display options such as
the pick-up points.
6.7. Shipping - Read access
So, you can choose which carrier to match with a shipping method.
6As an example:
77. Click “Save”. A text box will appear asking you to confirm the creation of the app. Click on “Create app”.
88. On the next screen, in the API Admin section, you will have access to an API Key and a password that must
be added to the Shiptimize platform. To do this, open the Shiptimize platform in a separate tab.
99. In the PakketMail App go to "Settings"> "Shops". If you are using Shiptimize, go to “Settings”>
“Connect” > “Shop Details”.
1010. In PakketMail, add a Shop of type "Shopify Private App". In Shiptimize choose Shopify in the dropdown.
11. Make sure the Name (of the shop) matches your {shopname}.myshopify.com, including the
myshopify.com.
12. Copy the API Key and Password from your Shopify account and paste it on the API Key and Password
fields.
13. Hit Save
11Configuration
After integrating the Shipimize app for Shopify, it's time to configure your account options.
1. Update order status in your Shopify store.
If you want to send updates regarding the status of orders to your store using the tracking ID’s generated on the
Shiptimize platform, check the box “Update track code to shop”.
2. Carriers
Choose which Shiptimize partner carriers you would like to assign to each shipping method in your Shopify
store.
3. Status
Choose, in each order status category, which status types you want to import into Shiptimize.
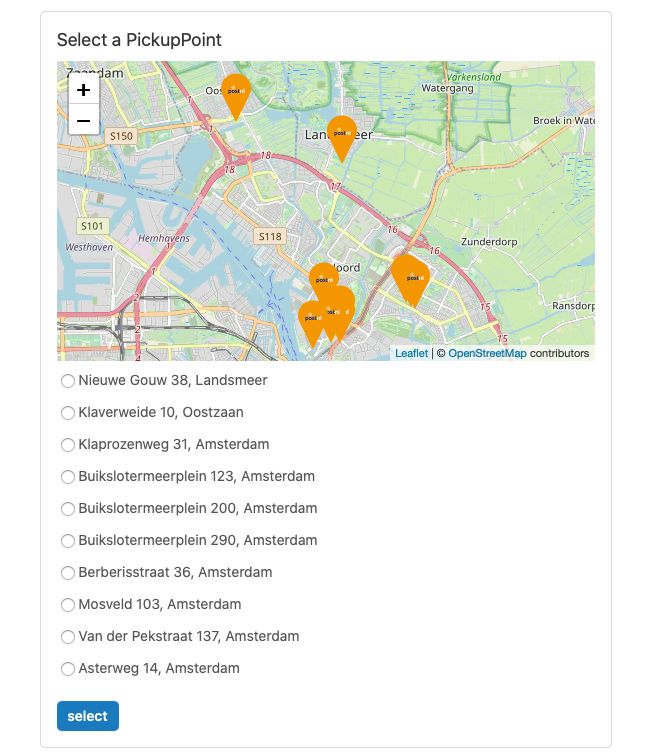
4. Google Maps
By default, we display an OpenStreetMap when your customer chooses to pick up the product at a pickup point,
if the carrier offers this option. If you prefer to use a Google map, enter your Google key in the “Google Maps
Integration Key” field.
12Importing Orders
1. On the Shiptimize Application go to “Shipping” > “Create Shipment” > “Shop Import”.
2. Select the Shopify Shop
3. Click “Start import”
Your orders will be imported and will be available under “Shipping” > “Shipments Overview”
13Automated updates between Shiptimize / PakketMail and Shopify
If you selected "update track code to shop" in the setting, as soon as you create a shipping label, we send the
associated tracking number to Shopify.
Additionally, from your Shiptimize account (Settings > Connect > Shop details) or from your PakketMail
account (Settings > Shops) you can set in which moment(s) order statuses in your Shopify backend should be
updated.
You can select to update when (1) an order is imported into your shipping dashboard, (2) a shipping label has
been printed, (3) the shipment has been delivered.
14The Checkout for your Customer incl. Pickup Locations
After installation and configuration, if a carrier provides a service to deliver to a Pickup Location directly, a
map will be added, allowing the user to select their preferred location.
15You can also read