Millet Extension Manual - APRIL 2021 - THE KENYA CEREALS ENHANCEMENT PROGRAMME - CLIMATE - Kenya Agricultural and Livestock ...
←
→
Page content transcription
If your browser does not render page correctly, please read the page content below
THE KENYA CEREALS ENHANCEMENT PROGRAMME - CLIMATE
RESILIENT AGRICULTURAL LIVELIHOODS (KCEP - CRAL) WINDOW

        Millet Extension Manual

                SUPPORTED BY FUNDS FROM EU
                      APRIL 2021
THE KENYA CEREALS ENHANCEMENT PROGRAMME - CLIMATE
RESILIENT AGRICULTURAL LIVELIHOODS (KCEP - CRAL) WINDOW

       Millet Extension Manual

                 SUPPORTED BY FUNDS FROM EU
                       APRIL 2021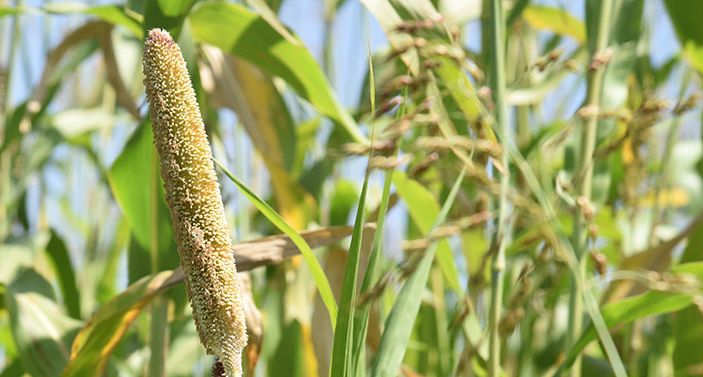
Disclaimer
The information presented in this manual is for advisory use only. Readers using the manual
should verify details that relate to their agro-climatic zones from their area agricultural
extension officers.

© Kenya Agricultural and Livestock Research Organization 2021
All rights reserved. No part of this book may be reproduced, stored in database systems,
transcribed in any form or by any means, electronic, mechanical photocopying, recording or
otherwise without prior written permission of the publisher.

Published by
Kenya Agricultural and Livestock Research Organization
KALRO Secretariat
P O Box 57811-00200
Nairobi, KENYA
Email: directorgeneral@kalro.org		            Tel. No(s): +254-722206986/733333223

Edited by: Esilaba, A.O., D. Nyongesa, M. Okoti, M. Otipa, L. Wasilwa

Compiling Authors: Oduori, C., Kisilu R., J. K. Karanja, J. W. Mwathi, P. A. Ooro, A. O.
Esilaba, D. Nyongesa, M. Okoti, C. Githunguri, J, Miriti, M. Otipa, E. Nassiuma, A, Amata,
R., A. Too, M. Kamidi, E. Wanjekeche, E. Odoyo, F. Wayua, P. Likhayo, G. M. Kamau, V.
Ochieng and L. Wasilwa

Production Editors: Mukundi K. T, P. Maina and K. Nyabundi

Design and layout: Nyaola E. O and J. Njeru

Citation
Esilaba, A.O.et al. (2021). KCEP-CRAL Millet Extension Manual. Kenya Agricultural and
Livestock Research Organization, Nairobi, Kenya

ISBN: 978 - 9966 - 30 - 039 - 3
ACKNOWLEDGEMENTS

The authors of this manual acknowledge the support of the European Union (EU) through
the International Fund for Agricultural Development (IFAD) and the Kenya Cereals
Enhancement Programme - Climate Resilient Agricultural Livelihoods Window (KCEP-
CRAL) of the Ministry of Agriculture, Livestock, Fisheries and Cooperatives (MOALF&C)
in collaboration with the Kenya Agricultural and Livestock Research Organization
(KALRO). We highly acknowledge the support of the Project Coordinating Unit (PCU) and
the KALRO Management for the overall guidance of the Project.
We also thank the researchers, farmers and stakeholders who participated in the project for
their support in setting up trials, collecting and processing the data and thus generating large
amounts of knowledge and information that KCEP-CRAL has packaged and shared through
scientific papers, in seminars and in reports among others. The support of technical officers,
laboratory personnel, administrative and support staff is also appreciated as it contributed to
the success that the project achieved.

                                               v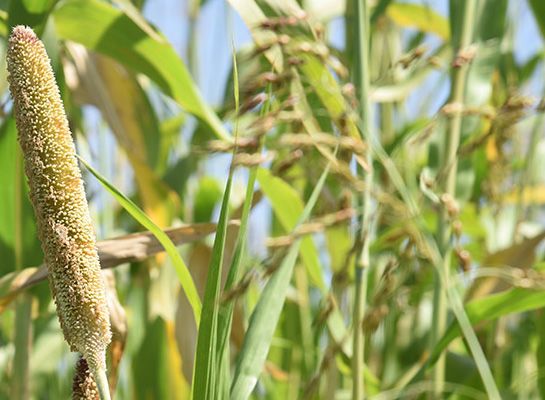
FOREWORD
Kenya Agricultural and Livestock Research Organization (KALRO) is one of the key partners
in the Kenya Cereals Enhancement Programme - Climate Resilient Agricultural Livelihoods
Window (KCEP-CRAL) Programme funded by the European Union (EU) and implemented
by the International Fund for Agricultural Development (IFAD). KALRO participation in
this programme is based on proven experience and expertise in agricultural research. Within
the programme, KALRO handles the research component, conducting on station and on
farm trials, develops farmer recommendations together with training materials for extension
staff and service providers and conducts the training. The implementation of KCEP-CRAL
is in thirteen (13) counties namely Nakuru, Nandi, Trans Nzoia, Kakamega, Bungoma, Kitui,
Tharaka-Nithi, Embu, Machakos, Makueni, Taita Taveta, Kwale and Kilifi.
KCEP-CRAL focuses on the three leading rain-fed cereals (maize, sorghum and millet) and
associated pulses (beans, green grams, cowpeas and pigeon peas). The programme’s overall
objective is to contribute to the reduction of rural poverty and food insecurity of smallholder
farmers.
Through this manual, the programme will provide a comprehensive guide to extension
officers, service providers and lead farmers on how to successfully produce cereals and pulses
in Kenya. The manual is a useful training and reference material for extension officers and
other stakeholders seeking to enhance the capacity of farmers, increase commercialization
for food security and promote gender inclusion and participation along the commodity value
chains.
Initial lessons learnt in this project indicate that enhancing the capacity of the extension staff
and service providers has improved uptake of new technologies for dry land farming. It has
opened up more land for farming through use of conservation agriculture in areas that hitherto
were not under agriculture. Besides easing the pressure on previously arable land, farmers in
the project areas have been trained to use alternative disease and pest management regimes
using Integrated Disease and Pest Management and Push pull technologies for persistent
pests of economic importance.
On behalf of KALRO, I am grateful to the European Union for supporting this project
through the IFAD and KCEP-CRAL of the Ministry of Agriculture, Livestock, Fisheries
and Cooperatives (MoALF&C). I also appreciate the excellent coordination of the whole
process by the KCEP-CRAL Secretariat led by Dr Anthony O. Esilaba, MoALF&C and
other partners, scientists in participating centres, Knowledge, Information and Outreach Unit
team and secretarial staff. It is my hope and desire that in using this manual, the expectations
of all stakeholders will be met.

Eliud K. Kireger, (PhD, OGW)
DIRECTOR GENERAL, KALRO

                                              vi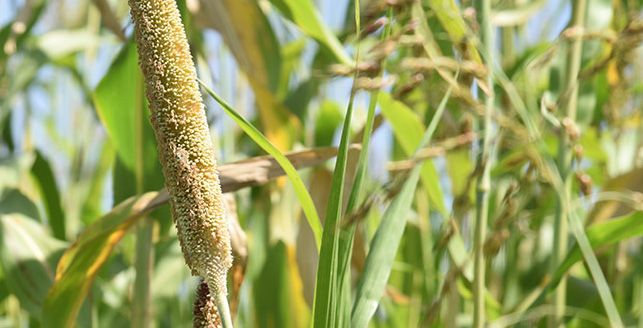
TABLE OF CONTENTS

ACKNOWLEDGEMENTS..............................................................................................v
FOREWORD.....................................................................................................................vi
ABBREVIATIONS AND ACRONYMS..........................................................................ix
1     INTRODUCTION......................................................................................................1
2     ECOLOGICAL REQUIREMENTS.........................................................................1
       2.1 Altitude.................................................................................................................1
       2.2 Rainfall.................................................................................................................1
       2.3 Soil types..............................................................................................................1
       2.4 Temperature..........................................................................................................1
       2.5 Varietal selection...................................................................................................2
       2.6 Site selection and land preparation ......................................................................4
       2.7 Soil fertility management.....................................................................................5
       2.8 Planting ................................................................................................................6
       2.9 Weeding ...............................................................................................................7
       2.10 Thinning .............................................................................................................7
       2.11 Roughing.............................................................................................................7

3     CROP PROTECTION...............................................................................................8
       3.1 Diseases of economic importance in millet production........................................8
       3.2 Arthropod Pests.....................................................................................................11
       3.3 Bird control ..........................................................................................................14
       3.4 Major Weeds Affecting Millet..............................................................................15

4     HARVESTING AND POST HARVEST MANAGEMENT...................................17
       4.1 Harvesting.............................................................................................................17
       4.2 Storage..................................................................................................................20
       4.3 Processing and Utilization....................................................................................20
       4.4 Storage Diseases, Symptoms and Control Strategies...........................................22

5     TAKE HOME MESSAGES......................................................................................23

6     REFERENCES...........................................................................................................24

                                                                   vii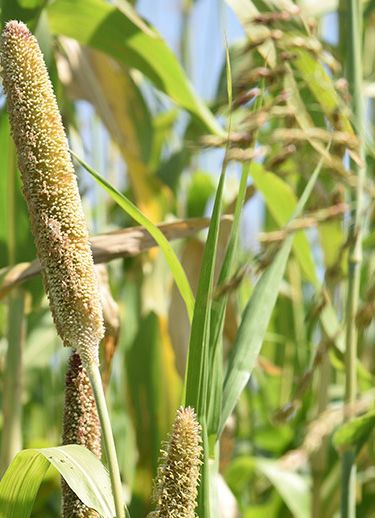
List of Tables
Table 1: Millet varieties for Kenya......................................................................................2
Table 2: The ‘salt method’ of checking grain moisture........................................................18
Table 3: Nutritional value of Pearl millet ...........................................................................21
List of Figures
Figure 1: Varieties of Millets (a) Pearl millet, (b) Finger millet, ........................................3
          (c) Proso millet and (d) Fox millet.......................................................................3
Figure 2: Normal seedlings with vigour .............................................................................4
Figure 3: Poor seedbed .......................................................................................................5
Figure 4: Ideal seedbed ......................................................................................................5
Figure 5: Manure banded in rows........................................................................................6
Figure 7: Furrows made by ox-plough ................................................................................6
Figure 6: Mixing manure with soil at planting....................................................................6
Figure 8: Manual planting....................................................................................................6
Figure 9: Pearl millet-groundnuts intercrop.........................................................................7
Figure 10: Weeding and thinning stages .............................................................................7
Figure 11: Bunchy and bushy appearance on affected crops...............................................8
Figure 12: Brown and water-soaked lesions .......................................................................8
Figure 13: Rotting grains ....................................................................................................9
Figure 14: Reddish brown pastules on both surfaces of the leaves.....................................9
Figure 15: Spindle shaped lesions and yellowish spot are the initial symptoms.................10
Figure 16: Infected floret ovaries are converted into sori that are oval and conical
           appearance..........................................................................................................10
Figure 17: Wire-stem and wilting of the seedlings from damping off.................................11
Figure 18: Dead heart of the whorl leaves caused by shoot fly damage..............................12
Figure 19: Adults head bugs ...............................................................................................12
Figure 20: Heavy infestation cause leaf yellowing..............................................................13
Figure 20: Heavy infestation cause leaf yellowing..............................................................13
Figure 20: Heavy infestation cause leaf yellowing..............................................................14
Figure 23: Common bird species that attack millets............................................................14
Figure 25: Couch grass infestation in soybean ...................................................................15
Figure 24: Drying and winnowing processes.......................................................................15
Figure 25: Couch grass infestation in soybean ...................................................................16
Figure 26: Checking when the grains are dry for threshing, using teeth or pinching with
          fingers..................................................................................................................17
Figure 27: Dickey-John multi-grain tester to detect moisture content in grains..................19
Figure 28: Millet winnowing...............................................................................................20

                                                               viii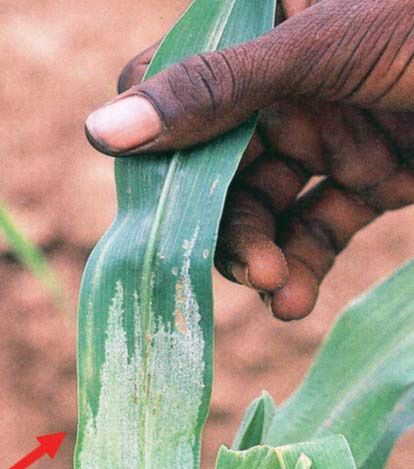
ABBREVIATIONS AND ACRONYMS

AEZ 		    Agro-ecological-zones
ASALs     Arid and Semi-Arid Lands
°C 		     Degrees Celcius
CAN       Calcium ammonium nitrate
FYM 		    Farmyard manure
ICRISAT   International Crops Researchh Institution for the Semi Arid Tropics
KALRO     Kenya Agricultural and Livestock Research Organization
KCEP 		   Kenya Cereal Enhancement Programme
KES		     Kenya Shillings
KSC 		    Kenya Seed Company
NPK 		    Nitrogen, Phosphorus, Potassium
GDP 		    Kenya’s Gross Domestic Product
MoA 		    Ministry of Agriculture
ppm		     parts per million

                                       ix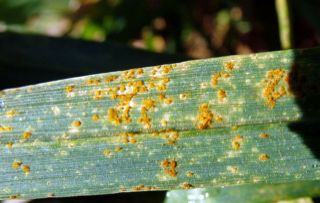
1    INTRODUCTION
Millets are a group of small seeded cereals grown in semi-arid dry areas. They include pearl
millet, finger millet, foxtail millet and prosso millet. They have a short growing season, can
withstand dry and high-temperature conditions and yet yield well, hence they are important
food security crops in semi-arid lands of Kenya. Millets are widely cultivated as human
food or as fodder for animals. The grains are similar in nutrient composition to maize but
richer in protein and fibre. They fit well in popular local recipes such as Ugali and Uji. In
addition to grain and forage/fodder uses, millet crop residues are used as building material
and fire wood for cooking, particularly in dry land areas. In recognition of millets nutrition
value and frequent maize crop failures, the Government of Kenya is putting more emphasis
on production of millet to mitigate food and nutritional security.

2    ECOLOGICAL REQUIREMENTS

2.1 Altitude
Generally, millets adapt to a wide range of agro-economic zones. In Kenya millet is grown
from 0 – 2400 M above sea level (Masl). However, in the arid and semi-arid areas (ASALs)
it is grown within 250 – 1500m above sea level.

2.2 Rainfall
Millets are water user efficient crops and grow well in areas of low moisture. They are
early maturing and therefore drought escaping. An average annual rainfall of 200-600 mm is
sufficient for the production of pearl, prosso and foxtail millets, while finger millet requires
an annual rainfall of 250-900 mm.

2.3 Soil types
Millets grow in a wide range of soil types provided it is well-drained loamy, even on hilly areas
as long as soil erosion control measures are in place. However, it can also grow in shallow
soils and in soils with clay, clay-loam and sandy-loam texture. Millets do not tolerate water-
logged soils or extreme drought conditions. Root development can be severely restricted
in soils having excessively high or low soil moisture levels, and hard pan and compacted
layers. It is also grown on medium black soils, deep alluvial loams and on sandy and gravelly
soils of poor fertility with low organic matter content, but the yield is low.

2.4 Temperature
Millets are adapted to a wide range of temperatures. They require warm temperatures for
germination and development and are sensitive to cold. Optimum soil temperatures for seed
germination are between 15OC and 30OC. They can tolerate temperature as low as 100 c,
however, very cold temperature hampers growth. Pearl millet is a warm-weather crop and
grows best at temperature of 30 - 340C. Millets are more tolerant to higher temperatures than
probably any other major cultivated cereal.

                                                1
2.5 Varietal selection
In varietal selection, agro-climatic adaptation of the crop and farmer preference, household
utilisation and market are key factors of consideration (Table 1 and Figure 1). Millet has a
wide range of maturity periods. Some varieties mature in as little as 60 to 80 days (short
duration) while others take about 100 days (medium) to mature. Long season varieties can
take up to 180 days to mature from planting. Cultivation of short-duration varieties reduces
the risk of crop failure.
Table 1: Millet varieties for Kenya
Crop Variety Maturity Grain colour
Grain colour Yield
Yield(90
(90kg
kgbag)/
bag)
(months) acre
Pearl
Pearl millet
millet KAT/PM-1
KAT/PM-1 2.5 - 3
2.5-3 Grey
Grey 88-–1010bags/acre
KAT/PM-2 2 Grey 7
KAT/PM-2 2 Grey 7 bags/acre
KAT/PM-3 2.5 - 3 Grey 10 - 12
KAT/PM3 2.5-3 Grey 10-12bags/acre
Finger millet P224 4 Brown 10 - 12
Finger millet P224
Gulu E 44 Brown
Brown 810 – 12 bags/acre
Gulu E
KAT/FM-1 43 Brown
Brown 68-bags/acre
8
KAT/FM-1
LANET FM-1 34 Brown
Brown 76--8
10bags/acre
Proso millet KAT/PRO-1
LANET FM-1 42.5 Cream
Brown 67-–810bags/acre
Fox millet
Proso millet KAT/FOX-1
KAT/PRO-1 4
2.5 Cream yellow
Cream 86-- 10
8 bags/acre
Fox millet KAT/FOX-1 4 Cream yellow 8 -10bags/acre
a b
2c d
Figure 1: Varieties of Millets (a) Pearl millet, (b) Finger millet,
(c) Proso millet and (d) Fox millet
2.5.1 Seed selection and treatment
Seed is a vital input in millet production. Therefore, access and availability of certified, quality
seed, either through the authorised formal or informal seed merchants are recommended for
optimal production. Farmers can also select and save seeds from the harvest and re-plant
them for 3 seasons before buying certified seed once more.
These steps are essential when farmers are selecting their own seed:
• Identify disease and pest free plants in the field
• Select plants with large panicles and preferably in the middle of crop field
• Tag the identified plants
• Harvest them separately before harvesting the rest of the crop
• Sun dry to the recommended moisture content (12%)
• Discard the tip of the panicle to avoid small malformed grains
• Thresh and clean the seed before treatment
• Store seeds in a cool dry environment
• Dress the seed with recommended seed dressing chemical.
32.5.2 Seed germination test
To determine the viability germination of the saved seed:
i. Select a site near the homestead where there is access to water
ii. Prepare 1 × 1 m seedbed and make 100 planting holes spaced at10 cm × 10 cm
iii. Plant a 100 seed and cover with soil and water adequately for seven days
iv. Take first germination count after 3 days and the final after seven days
v. The best temperature for the germination of millet seed is 23 to 32°C. Poor
emergence and seedling growth may result, if planted before soil temperatures
reach 23OC
vi. 85% germination count is considered adequate for millet
vii. Select seeds with good vigour (Figure 2).
Figure 2: Normal seedlings with vigour
2.6 Site selection and land preparation
Dry ploughing is advantageous to kill the weed seeds and hibernating insects and pathogens
by exposing them to the heat. Initial ploughing should be carried out at optimum moisture
range to get fine seedbed and should be avoided when moisture is in excess.
For pearl millet, prosso and foxtail millets, birds are a major threat in all major millet
production areas in Kenya and especially where isolated production takes place. In such
areas, isolated fields far from homesteads and near birds breeding sites should be avoided.
Timely land preparation facilitates timely planting which ensures higher yield. Millet is
a small seeded crop and therefore requires a fine seedbed, for good seed germination and
seedling establishment. If a tractor or oxen plough is used to open the field, it is advisable to
harrow it once in order to break the large soil boulders as seen (Figure 3). When hand-hoes
are used for land preparation, the large soil boulders should be reduced by breaking them to
provide a moderately smooth seed bed (Figure 4). Land preparation should ensure that all
crop residues, crop volunteers and weeds are completely buried in the soil.
4Figure 3: Poor seedbed
Figure 4: Ideal seedbed
2.7 Soil fertility management
Most soils in millet production areas are deficient in essential macronutrients such as nitrogen
(N) and phosphorus (P), which are essential for adequate crop growth. To correct these
deficiencies, a wide range of organic and inorganic fertilizers are recommended. During
planting, it is recommended to apply NPK (20:20:0 or 23:23:0) at a rate of one bag (50 kgs)
or DAP (18:46:0) 25 kg/ha per acre. Planting fertilizer is drilled along the planting furrow
and thoroughly mixed with soil before seeds are planted. In soils with low fertility and in
instances where rainfall continues beyond 30 days after planting, top dress with CAN at a
rate of one bag (25 Kgs) per acre when the crop three weeks after germination.
2.7.1 Manure/compost
Manure improves nutrients level in the soil. It also improves the soil structure and increases
moisture retention capacity of the soil. Well-decomposed manure (2 tons/Acre) is broadcasted
in the field close to the onset of the rains and mixed with the soil during ploughing. In case
of low volumes of manure, it can be spread in bands along the planting furrows and mixed
with the soil before seeds are placed (Figures 5 and 6).
5Figure 5: Manure banded in rows Figure 6: Mixing manure with soil at planting
2.8 Planting
The full production potential of millets can be achieved through planting before or at the
onset of the rains by either drilling in furrows made by oxen plough, tractor or hand hoe/
jembe, or planting in holes dug by a jembe or panga. The recommended planting depth is 5
cm on dry soils, and 2 and/or 4 cm on wet soils. The spacing of planting furrows depends
on; the type of millet being used and whether it is a sole or intercrop. For pearl millet
sole cropping, 15 cm between seeds and 60 cm between rows is recommended when hand
planting is done, however a spacing of 90 cm between row and 20 cm when using ox-plough
can be used (Figures 7 and 8). For finger millet, foxtail and Proso millet a spacing 10 cm
between seeds and 30 cm between rows is recommended. The seed rate for Pearl millet is
2-3 kg/acre, finger millet is 1.2 kg/acre, prosso millet is 1.6 kg/acre and fox tail millet is 1.6
kg/acre.
Figure 7: Furrows made by ox-plough Figure 8: Manual planting
Millet can be intercropped with pulses such as pigeon peas, beans, cowpeas and green
grams. The row arrangement for the millet and pulses could be a single alternate where a
legume falls between two rows of millet spaced at 90 cm. Two rows of pulses could also be
alternated with two rows of millet all spaced at 60 cm apart (Figure 9).
6Figure 9: Pearl millet-groundnuts intercrop
2.9 Weeding
The first weeding should be done within 2 weeks after emergence (Figure 10), as the yield
components that determine the grain filling capacity are determined within 45 days after
emergence. Two weeding sessions in a season are recommended. Chemical weeding can
also be done using recommended pre-emergence herbicides.
Figure 10: Weeding and thinning stages
2.10 Thinning
Due to the millets seed size the population is always high at emergence. To reduce competition
for nutrients, water and sunlight within the seedlings, thinning must be done to single plant
per stand 3 weeks after emergence (at 3-4th leaf stage). Wider spacing on sandy soils allows
individual plant to develop more lateral roots and make the plants more resilient to droughts.
The general recommendation is that thinning should be done when the soil is moist to ensure
minimal disturbance of the roots of the remaining plants for a healthy growth. While thinning
the less vigorous, diseased or weak seedlings is recommended. If necessary, thinned healthy
seedlings can be used to fill in gaps in places where emergence was poor. Seedlings used for
gapping should be used on the same day that they are thinned out, and adequate moisture
should be available or provided to facilitate their re-establishment.
2.11 Roguing
Rouging is done at plant maturity to ensure quality seed or grain. This is the removal of plants
that are less vigorous (weak), diseased or attached by pests. It also involves the removal of
plants that display off type characteristics like being taller, having different flower and grain
colour from the majority of other plants.
73 CROP PROTECTION
3.1 Diseases of economic importance in millet production
3.1.1 Downy Mildew/ Green ear disease (Sclerospora graminala)
Chlorosis occur at the base of infected leaves, followed by development of spores on the
underside of the leaf usually referred to as “half -leaf” symptom (Figure 11). The plant
assumes a bunchy and bushy appearance. Severely infected plants are generally stunted and
do not produce panicles, floral parts are transformed into leafy structures.
Figure 11: Bunchy and bushy appearance on affected crops
Photo source: American Phytopathological society
Management: Provide good drainage in your soils and avoid planting in water logged areas.
Practise crop rotation and proper field hygiene, including rouging out and burning of infected
plants and weeding. Apply chemical sprays of mancozeb and cymoxanil based products.
3.1.2 Cercospora Leaf Spot (Cercospora penniseti)
Leaves and stems develop grey water-soaked lesions that turn brown upon drying. Lesions
are often surrounded by a chlorotic halo that will die and give concentric rings (Figure 12).
Figure 12: Brown and water-soaked lesions
Photo source: American Phytopathological society
Management: Plant resistant varieties and practice crop rotation in the farm.
3.1.3 Ergot of millet (Clariceps fusiformis)
It is a disease of millet grain bearing heads. It causes direct grain yield loss by replacing
grains with toxic sclerotia making it unfit for consumption.
It produces cream to pink mucilaginous droplets of “honeydew” ooze out of infected florets.
Within 10 to 15 days, the droplets dry and harden, and dark brown to black mass develop in
8place of seeds on the panicle. The Sclerotia are irregularly shaped, and generally get mixed
with the grain during threshing (Figure 13). If grains are processed with sclerotia, they result
to mycotoxin contamination leading to ergot disease upon consumption.
Figure 13: Rotting grains
Management: Practise good field sanitation, plant resistant varieties, remove affected
panicles, use clean seeds and practice crop rotation with pulses.
3.1.4 Leaf Rust (Puccinia substriata)
Distal half of the leaf is infected first. Appears as yellow to white sports on leaves. The
fungal bodies spread over both surfaces of the leaves as reddish brown pustules but occur
at the upper side of the leaf. Necrotic spots may develop around the pustules and causes
premature drying of the leaves (Figure 14).
Figure 14: Reddish brown pastules on both surfaces of the leaves
Management: Practise proper farm hygiene including weeding to remove alternate host that
may keep the inoculum. Grow resistant varieties. Spray with Azoxystrobin, tebuconazole or
propiconazole based products at recommended rates.
3.1.5 Leaf/ Head blast (Pyriacularia setariae)
Young seedlings may get blast in the nursery and the field (Figure 15). The lesions are
spindle shaped, early formed spots have yellowish margins and greyish green centre which
latter become whitish grey and disintegrate.
The olive grey overgrowth of fungus develops at the centre of the spot. The lesions develop
on the blades of adult plants and the spots appear on the blade.
9Figure 15: Spindle shaped lesions and yellowish spot are the initial symptoms
Photo source: CABI
Management: Practice crop rotation with non-host family crops such as legumes, collect
and destroy by burning infected crop residues from the previous season. Spray with
Carbendazim, Trifloxystrobin and tebuconazole based products at recommended rates.
3.1.6 Millet Smut (Moesziomyces peniccilliraea)
The disease affects the inflorescence of the millet plant immediately after the boot stage. The
infected floret ovaries are converted into structures called sori which are oval and conical in
appearance. The bright green sori project beyond the grain glumes and latter turn brown to
black (Figure 16).
Management: Use of resistant varieties to manage the disease, Rotate with beans, cowpea,
greengram family for a minimum of 3 seasons. Plough deep at least 2 months before
planting. Avoid planting in areas with history of disease. Remove and destroy by burning
affected plants. Spray using copper oxychloride (70g/20 Ltr of water) or Propiconazole and
cyproconazole based products.
Figure 16: Infected floret ovaries are converted into sori that are oval and conical appearance
Photo source: ICRISAT
103.1.7 Damping off (Pythium, Rhizoctonia, Fusarium, Aspergillus)
Germinated seedlings die back and leaves have water soaked appearance (Figure 17). At
the soil line, seedlings have girdled stems with lessions and cankers, stems are twisted,
discoloured also known as “wire stem”.
Figure 17: Wire-stem and wilting of the seedlings from damping off
Source: R. Gregory - Plant diseases library
Management: Plant certified quality seeds, drain the soils well to avoid water logging in the
farm. Seed dress with metalaxyl and difenoconazole based products such as “Apron star”.
Drench the affected soils using systemic fungicide such as carbendazim and metalaxylmethyl
based products. Drench using Mancozeb (Ridomil Gold), hydrochloride (Previcur at 30-
50ml/20 Ltr of water) or Carbendazim (Rodazim, Pearl, Sahara, Botran). Observe 4-6 weeks
intervals.
3.2 Arthropod Pests
Most arthropod pests can be controlled through a combination of techniques such as use of
pesticides, cultural practices, intercropping, use of resistant varieties and biological control.
Pesticides are used only after monitoring indicates there is need according to established
guidelines. Key insect pests commonly found in millet in Kenya and their management
strategies are discussed in the sub-topics that follow.
3.2.1 Shoot fly (Atherigon asoccata)
The maggots damage seedlings between 5 to 30 days of emergence by cutting the growing
point resulting in central leaf drying and formation of a dead heart (Figure 18). The central
leaf when pulled out produces a foul smell. The damaged plants produce axillary tillers as a
means of recovery and survival.
11Figure 18: Dead heart of the whorl leaves caused by shoot fly damage
Photo source: ICRISAT
Management: Practise good crop husbandry in the farm including weeding and clearing of
alternate hosts around the farm especially grass family, use high seeding rates during planting
to achieve the desired optimum plant population, practice crop rotation and intercropping
with sunflower, cotton or legumes. Plant early about 7 to 10 days before the onset of rains
to enable the crop escape shoot fly high population densities. Plant with phosphorus and
nitrogen fertilizer and avoid animal manure since shoot flies are attracted by manure.
3.2.2 Millet Ear head bugs (Calocoris angustatus)
Nymphs and adults suck sap from tender leaves, petioles and grains at milk stage. Heavy
infestation results in leaf yellowing and eventually drying (figure 19). This can lead to
shedding of leaves, inflorescences, and young grain. Grains shrink and turn black and chaffy.
Eggs are blue cigar shaped, nymphs and adults are slender and green.
Figure 19: Adults head bugs
Source: University of Georgia extension-Bulletin 1283
Management: Destroy affected parts at the beginning of the infestation. Spray with
chlorpyriphos or carbaryl 50 WP base insecticide.
123.2.3 Aphids (Rhopalosiphum mayidis)
They are small, long, soft-bodied dark green to bluish-green in colour with two long antennas
and live in colonies. Colonies are found on the central whorl or the entire leaf surface (Figure
20). Causes yellowing of the leaves due to excessive sucking, in dry conditions they suck sap
from plants until it dies. Aphids release sweet honey dew which allows black sooty mould
fungus to grow over it and honey dew is also fed by ants.
Figure 20: Heavy infestation cause leaf yellowing
Photo source: ICRISAT
3.2.4 Root Aphid (Tetraneura nigriabdominalis)
They stay above the soil line and are not easily seen. They are slightly smaller than the
stem and leaf aphids, they have shorter legs and antennae (Figure 21). They are identified
by white waxy material secreted. Damage caused by the root aphids results in wilting and
drying of the plants in patches. Black ants can be used as an indicator of the presence of the
root aphids.
Figure 20: Heavy infestation cause leaf yellowing
Photo source: ICRISAT
Management: Keep the field clean from alternate hosts such as milkweed. Observe correct
planting space to avoid high plant density. Maintain flowering hedge of Lantana camara
around the farm to enhance conservation of natural enemies. Spray with biopesticides such
as Neem based product “Achook”. Seed dress with Thiamethoxam (Cruiser), Imidacloprid
(Gaucho) based products. Spray with Acetamiprid, Lambda cyhalothrin Pentagon and
deltamethrin Apm, all at a rate of 10-15 20ml /L of water to control aphids.
133.2.5 Millet stem borer (Coniesta ignefusalis)
Stem borers are a major pest of millet though not reported as a pest in East African region.
The caterpillars of this moth tunnel into the stems causing them to fall over (lodging), ‘dead
hearts’ and poor grain development (Figure 22).
Figure 20: Heavy infestation cause leaf yellowing
Management: Use resistant varieties if locally available. Plant early, with the first rains.
Intercrop millet with crops such as, cowpeas, beans and pigeon peas.
Destroy crop residues after harvest. Use ‘push-pull’ method against stem borers by
intercropping cowpea or dolichos with millet to act as a repellent that ‘pushes’ the pest away
from the millet. Around the border of the field, plant a trap crop such as Brachiaria or Sudan
grass to attract or ‘pull’ the stem borer moths away from the millet.
3.3 Bird control
Various methods are used to control millet grain damage by birds. Chase away birds from
damaging millet. Use scare crows or sound bells.
Serinus reichenowi Plocepasser mahali Amadina fasciata Quelea quelea Streptopelia capicola
Figure 23: Common bird species that attack millets
In some cases, millets may be harvested early, followed by sun drying for 2-3 weeks to save
crop from damage by birds, and the possibility of Aflatoxin contamination (Figure 24).
14Figure 24: Drying and winnowing processes
Source: Mutisya, KALRO
3.4 Major Weeds Affecting Millet
3.4.1 Couch grass or Bermuda grass (Cynodon dactylon)
It is a spreading perennial grass with vigorous mat-forming stolons. It reproduces and spreads
by rhizomes but it is also propagated by seed. Couch grass and other species of Cynodon are
common in East Africa and are troublesome as a weed of arable land and perennial crops
(Figure 25).
Figure 25: Couch grass infestation in soybean
Source: Charles T. Bryson, USDA
153.4.2 Purple witchweed (Striga spp)
The weeds grow on roots of millet and obtain nutrients from the host plant (Figure 26). A
single weed plant produces many thousands of tiny seeds that survive in the soil for a long
period. The problem is more serious in areas with low soil fertility and rainfall.
Figure 25: Couch grass infestation in soybean
Source: Charles T. Bryson, USDA
Management: Plough or harrow deeply during dry season to ensure the weeds are buried
deep. Germination is halted or delayed and rhizomes are exposed to direct sunlight. Practise
hand weeding to remove weeds before flowering. Rotate millet with trap crops such as such
as sunflower, pulses and cotton that stimulate the germination of striga seeds, but inhibits
post-germination growth of the weed. Intercrop millet with legumes such as green grams.
Rotate millet with broad-leafed crop to smother the weeds. Apply selective herbicide 7-10
days after planting such as Satunil 60 EC, Garil EC, Sanaphen DSL (2, 4-D Dimethyl 1-2
days after application. Perennial weeds can be controlled using systemic glyphosate-based
products such as Round-up, glycel, weedal 480SL Touchdown forte 500 SL, Erase 480 SL
before planting millet.
164 HARVESTING AND POST HARVEST MANAGEMENT
4.1 Harvesting
Millet grains should be harvested as soon as they are physilogically mature. Late harvesting
may lead to lodging leading to losses and grain deterioration due to rapid changes in
temperatrue and humidity. In hand harvesting the panicle is cut from the standing stalk at
about 16-20% moisture content and the stalks are used as animals feed. The panicles should
be kept off the soil on raised platforms, mats, or trays while drying for threshing.
Millet can be threshed by beating the panicles with sticks or using manual or mechanised
threshers. After the grain has been threshed, it must be dried again to a moisture content of
13% or less. The threshed grain should be dried on plastic tarpaulins, mats, plastic sheets or
wire mesh trays raised on a platform. Spread the grain thinly on the drying surface to allow
air to pass through it and turn the grain regularly to avoid overheating. Protect the grain from
rain, insects, animals and dirt.
The dryness of the grain can be tested before threshing using:
• Teeth (the grains are brittle when bitten) or pinching with the fingers (Figure 26).
• Salt testing: Dry salt is put into a dry glass bottle and the grain added then shaken. After
some minutes if the salt sticks to the sides of the bottle, then the grain moisture content
is above 15% but if salt does not stick then the grain has the correct moisture content
(Table 4)
• Moisture metre (Figure 27)
The dryness of the grain can be tested before threshing using teeth (the grains are brittle
when bitten) or pinching with the fingers (Figure 26).
Figure 26: Checking when the grains are dry for threshing, using teeth or pinching with
fingers
17A more objective approach is to use the ‘salt method’ (Table 2). Dry salt will absorb moisture
from grain. This principle can be used to help determine whether a grain sample has moisture
content of above or below 15%.
The salt must first be dried by spreading it out on some plastic sheeting in the hot sun and
leaving it for at least 3 - 4 hours until it is hard. It should be turned at intervals during this
time. It can also be dried in an oven. The dry salt should be placed in a sealed container until
it is ready for use.
Table 2: The ‘salt method’ of checking grain moisture
Materials required:
- A clean dry glass bottle of about 750 ml
capacity, with a cap that makes it airtight
- Some common salt
- 250-350 g of the grain to be tested
- Take one sample (a handful is
enough) from the middle of each bag
of sorghum grain. It is best to remove
a sample using a special instrument
called a sampling spear
- Make sure that the jar you are using is
clean and completely dry
- Fill one third of the dry bottle with the
grain sample (250-300g)
- Add the salt in the jar (enough salt to fill
up a quarter of the jar)
- Close the bottle tightly with its cap
18- Shake the bottle vigorously for 1 minute
to mix the salt and grain
- Allow the grain to settle for about 15
minutes
- If after 15 minutes the salt sticks to
the side of the bottle then the moisture
content of the grain is above about 15%
and so is not safe for storage
- If the salt does not stick to the bottle then
the moisture content is below 15% and so
is safe for storage
Moisture meters are electronic and operate on dry cells or electricity to check for
moisture (Figure 27). The meters are quick, portable, simple to use and fairly accurate.
The meters are expensive for smallholder farmers, and would normally be used at
warehouses and by farmers’ groups that handle a lot of grain. However, extension
staff have been provided with the meters to help farmers determine if safe moisture
content (≤ 13%) is achieved before storage. A sample size of about 150 grams of the
grains is scooped with a hand and poured into the moisture meter then closed. The
device is given a few seconds to do the detection of moisture and temperature. The
digital electronic machines will display the readings on the screen once the detection
is over. The recommended grain moisture should be 13% or below.
Figure 27: Dickey-John multi-grain tester to detect moisture content in grains
(Source: www.ruralking.com)
19Dry grains are winnowed and sorted to remove chaff, dust, foreign matter such as stones,
broken, shrivelled, mouldy, insect damaged, rotten, discoloured or faded grains and any
remaining plant parts, leaves and stalks to improve the quality (Figure 28).
Figure 28: Millet winnowing
4.2 Storage
Millet grain should be sun-dried to the recommended moisture content of 12-13 % and
dusted with actellic gold. The grain is then kept in either metal or plastic containers. If 90
kg sisal bags are used, they should be kept in a cool, dry and well-ventilated place. If grain
is kept for more than 90 days especially in hot areas, a second dusting is recommended after
3 months.
4.3 Processing and Utilization
Millet is a high-energy, nutritious cereal (Table 3). It is particularly recommended for
children, lactating mothers, convalescents and the elderly. Some of the healthy benefits of
millet includes; prevention of certain types of cancer, help control diabetes, offer a dietary
option for people with Celiac disease, improve digestive health, build strong bones, promote
red blood cell development, and boost energy and fuel production. Pearl millet is traditionally
used for making a variety of foods including thin porridge, “Ugali” and local brew.
20Table 3: Nutritional value of Pearl millet
Basic components Amount
Proteins 22g
Ash 6.5g
Calories
Total calories 756
Calories from carbohydrates 600
Calories from fats 71
Calories from Proteins 85.3
Carbohydrates
Total carbohydrates 146
Dietary fibre 17g
Fats and Fatty Acids
Total fats 8.4g
Saturated Fat 1.4g
Monounsaturated Fat 1.5g
Polyunsaturated Fat 4.3g
Omega-3 Fatty Acids 236mg
Omega-6 Fatty Acids 4g
Vitamins
Vitamin E 100mcg
Vitamin K 1.8 mcg
Thiamin 842 mcg
Riboflavin 580 mcg
Niacin 9.4 mg
Vitamin B6 768 mcg
Folate 170 mcg
Pantothenic Acid 1.7 mg
Minerals
Calcium 16 mg
Iron 6 mg
Magnesium 228 mg
Phosphorus 570 mg
Potassium 390 mg
Sodium 10 mg
Zinc 3.4 mg
Copper 1.5 mg
Manganese 3.3 mg
Selenium 5.4 mcg
214.4 Storage Diseases, Symptoms and Control Strategies
Fusarium and aspergillus remain a key challenge to storage of millet. To curb these infections,
optimal moisture content should be observed during drying. Moisture content of 13% is
usually recommended before storage.
225 TAKE HOME MESSAGES
The main points to remember in millet production and crop protection are:
1. Plant clean certified seeds to prevent seed-borne diseases
2. Ensure timely land preparation and timely planting to take advantage of rain and
control diseases
3. Accurate and timely disease identification is critical to undertake correct
management decisions in urgent cases
4. Use disease free planting materials from reliable dealers
5. Uproot and destroy severely infected plants by burning
6. Maintain a weed free field to reduce competition and alternative hosts for diseases
7. Scout your fields regularly to identify problems before they get out of control
8. Prevent and control of pest and diseases in all stages to minimize loss (quantity and
quality)
9. Only use pesticides if the physical and cultural control methods are not working
236 REFERENCES
Acland, J. D.(1971). East African Crops. FAO and Longman. Nairobi
Jaetzold, R. Schmidt, H. Hornetz, B. and Shisanya, C. (2006). Farm Management
Handbook of Kenya, Vol. II/C1. Ministry of Agriculture, Kenya and German Agency
Technical Cooperation team (CTZ)
KARI-MIAC. (1997). Sorghum and Millet Production and utilization Guidelines, Nairobi,
KARI Headquarters
Leslie, J.F. (2002). Sorghum and millet diseases-Revised edition
Ministry of Agriculture. (2010). The Annual Report, Crop Development Division, Kenya
Mitaru, B.N., Karuga, J.T. and Munene, C. (1993). Finger millet production and utilization
in Kenya. In: eds. K.W. Riley, .C. Gupta, A. Seetharam, J.N. Mushonga. Advances in
small millets. Oxford & IBH Publishing
MoA. (2011). Field Crops Technical Handbook. Volume1
Muui, C.W., Muasya, R.M. and Kirubi, D.T., (2013). Baseline survey on factors affecting
sorghum production and use in Eastern Kenya. African Journal of Food Agriculture
Nutrition and Development. Vol. 13, ISSN 16845374
Omiti, J. M., Freeman, H. A., Kaguongo, W., and Bett, C., (1999), Soil fertility
maintenance in Eastern Kenya: Current practices, Constraints and opportunities.
CARMASAK Working Paper No.1
Swigonova, Z., Lai, J., Ma, J., Wusurika, R. (2004). Close split of sorghum and maize
genome progenitors. Genome Research. 14: 1916-1923
Sasaki, T. and Antonio, B.A. (2009). Sorghum in Sequence. Nature. 457: 547-548
Vanlauwe, B., Bationo, A., Chianu, J., Giller, K.E., Merckx, R.E., Mokwunye, U.,
Ohiokpehai, O., Pypers, P., Tabo, R., Shepherd, K., Smaling, E., Woomer, P.L.,
Sanginga, N., (2010). Integrated soil fertility management: Operational definition and
consequences for implementation and dissemination. Outlook on Agriculture
24KCEP-CRAL Extension Manuals are well-written and up-to-date publications
with basic information that Extension Officers and service providers need
in each value chain. The comprehensive manuals cover all areas of the
value chain.
Available extension manuals cover basic cereals (maize, millet and
sorghum), pulses (beans, cow peas, pigeon peas and green grams), soil
Climate Smart Agriculture and Farming as a Business as listed:
1. Common Dry Bean Extension Manual
2. Cow Pea Extension Manual
3. Green Gram Extension Manual
4. Pigeon Pea Extension Manual
5. Maize Extension Manual
6. Millet Extension Manual
7. Sorghum Extension Manual
8. Climate Smart Agriculture Extension Manual
9. Farming as a Business Extension Manual
10. Soil Fertility Management Extension Manual
11. Farm - Level Agricultural Resilience and Adaptation to Climate
Change Extension ManualYou can also read