Installation Manual for Gurobi 9.1 with Python 3.7 and Anaconda/Spyder
←
→
Page content transcription
If your browser does not render page correctly, please read the page content below
Installation Manual for Gurobi 9.1 with Python 3.7 and
                   Anaconda/Spyder
                       Matthias Walter (m.walter@utwente.nl)
                                      February 4, 2021

This manual explains the installation of the optimization software Gurobi 9.1, using Python
version 3 as an interface. Python is used to make the integer programming model known to
Gurobi, ask it to solve the model, and finally to access the resulting solution. The manual also
explains how to install Python version 3 including the distribution Anaconda. We recommend
to use the development environment Spyder that is shipped with Anaconda.
A detailed manual and additional examples can be found in the quickstart guides for the
corresponding operating systems Windows, Linux, or Mac.
At the end of this manual you can find information on typical errors.

1     Installing Gurobi
1.1    Obtaining a license
In order to use Gurobi, a license is required. As a student, the license can be obtained for free
here. When creating an account, select “academic” and specify your UTwente mail address.
Make sure that the mail address is spelled correctly.

                                               1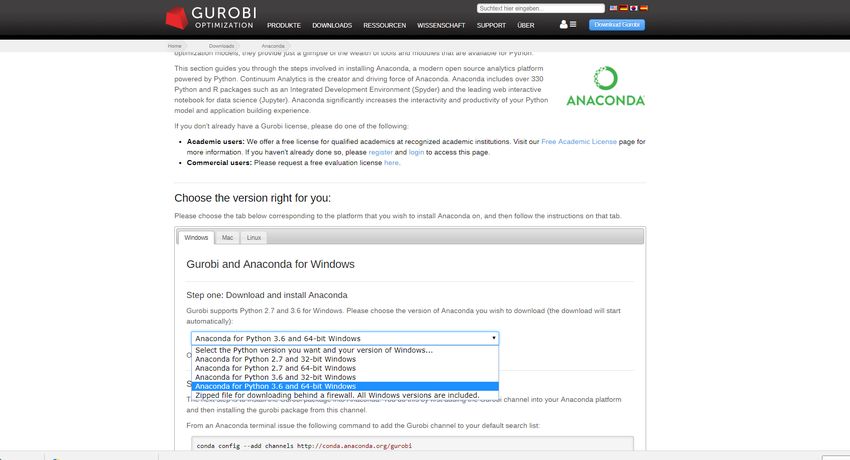
1.2   Downloading the software
When logged in, the current Gurobi version for the corresponding operating system can be
obtained here. The distinction between 32 und 64 bits is important. If you are unsure which
bit number to use, you can find help in this Manual for Windows or Manual for Mac. Finally,
the most recent version of Gurobi should be installed.

1.3   Adding the license to Gurobi
Select the license, copy (as shown below) the grbgetkey-command, and execute it in the
console. Under Windows, open the start menu and search for cmd.exe in the search field.
Under Mac or Linux, open a terminal.

                                            2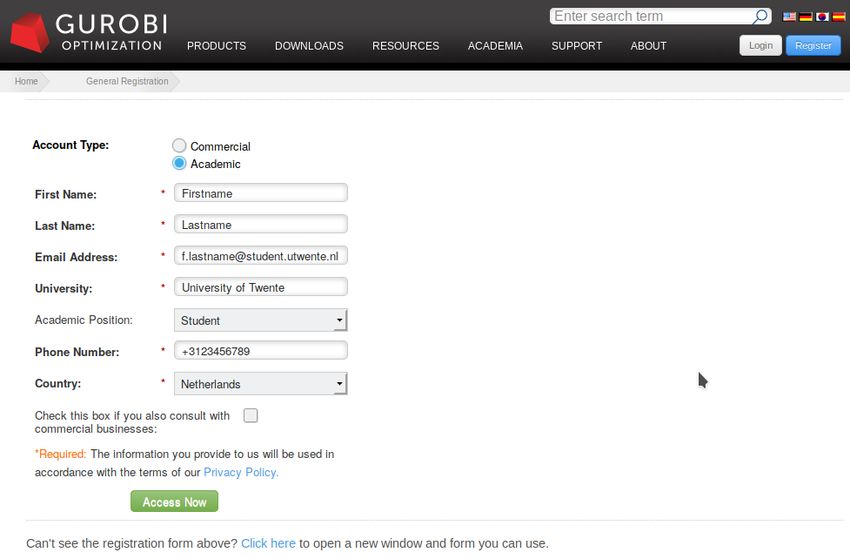
To avoid problems, use the suggested directory for storing the license file!

2     Installing the Anaconda Python distribution
2.1   Downloading and installing the distribution
Now, the Anaconda package can be downloaded and installed; select the version 3.7 for the
appropriate bit number for your platform.

                                           3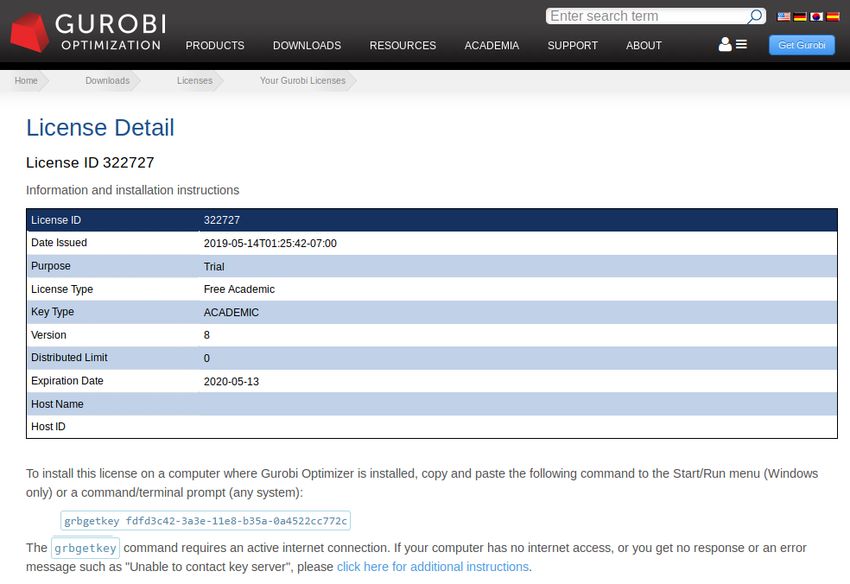
2.2 Downloading and installing the Gurobi module
Finally, the console or terminal has to be opened again to enter the following commands. Under
Windows the Anaconda prompt, which can be found in the start menu, is recommended.
In the console, type the following:
conda config --add channels http://conda.anaconda.org/gurobi [ENTER]
conda install gurobi [ENTER]
If, during the second step, you are asked whether a package should be updated, confirm this
with y [ENTER]
For Windows users:
If the enviroment variables of Anaconda are not set (a message stating that "conda" was not
found), enter the two commands in the console of Anaconda (program: Anaconda Prompt).
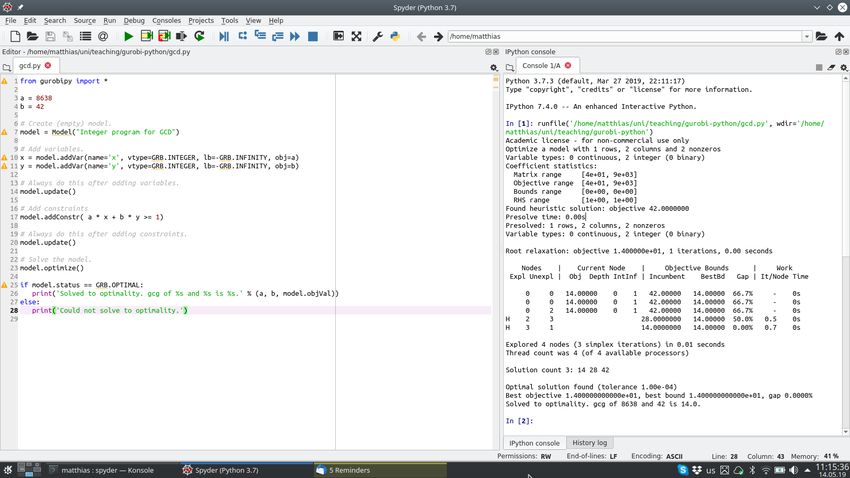
2.3 Testing the installation
In order to test the installation, obtain the file “gcd.py” from Canvas and open Spyder (by
searching for Spyder in the Windows search bar). Finally, open the file, e.g., by dragging it into
Spyder (alternatively, open it with a double-click and select Spyder from the list of installed
programs, or by choosing File→Open in Spyder).
After running the file (green “play” symbol in the top bar), you should see the following output:
43 Frequent errors
• If the test was not successful, please try to do the following:
1. Open the command prompt, if necessary with administrator priviledges.
2. Navigate, using the cd command, into the Gurobi directory; to this end, type cd
followed by [space] and the file path of the Gurobi directory in quotes (”). The file
path can be obtained by opening the Gurobi directory and clicking to an empty
position in the navigation/explorer bar (the file path can then be entered manually
or pasted into the console via right-click).
3. In the Gurobi directory, execute the command python setup.py install. If you
don’t have the priviledges to execute this command, open the command prompt as
an administrator.
4. Finally, test again.
If the error message no module named gurobipy appears you may try to install the
package in a different way. To this end, open the Anaconda-Navigator and choose the
tab Environments. In the box stating Installed select All instead. Now search for the
package gurobi, mark it and start the installation with Apply.
• For MacOS users:
If Spyder states the error message Kernel died and the terminal shows segmentation
fault 11, the combination of Spyder and Python 3.7 will not work for your system.
You can install PythonIDLE in the version 3.7.3. Now, only the module gurobipy has
to be installed for PythonIDLE. To this end, open the terminal, and go to the directory
containing the setup.py file of gurobi. If you did not change the installation path of
gurobi, this directory will be /Library/gurobi752/mac64. Hence, enter the following
commands:
5cd /Library/gurobi911/mac64 [ENTER]
python3.7 setup.py install [ENTER]
• Sometimes, the output of Spyder states the error that the Gurobi license has the wrong
version number. This can happen if the Gurobi version is not up to date. Anaconda
always installs the most recent version of the Gurobi interface. If the error appears,
install the most recent version and request a new license (see above).
• For Windows users:
If the conda config --add channels command contained the wrong address (e.g., due
to a typo), it must be removed again, since otherwise the installation will fail. The address
is stored in C:\User\[Username]\.condarc. If not sure, simply remove this file as it will
be recreated automatically.
If the user name contains special characters it may happen that the installation of Ana-
conda fails. An alternative to Anaconda is WinPython. We recommend the version 3.6.3.0
since the newer versions (3.6.4.x and 3.6.5.x) produced errors. Similar to Anaconda, Win-
Python contains Python and Spyder. After the installation of WinPython, you have to
make Gurobi known to Python. To this end, execute the first steps of this section.
• If also the installation of WinPython fails, Python(x,y) may be used as an alternative or
Python and Spyder are installed separately by hand. Both are described under https://
pythonhosted.org/spyder/installation.html. The manual installation is titled “The
hard way”. Similar to WinPython, you have to make Gurobi known to Python.
Please pose potential questions to m.walter@utwente.nl. Only contact the Gurobi
support if we could not help you!
Good luck with the installation!
6You can also read