Opsi Getting Started opsi-Version 4.1 - uib gmbh Bonifaziusplatz 1b 55118 Mainz Tel.:+49 6131 275610 www.uib.de
←
→
Page content transcription
If your browser does not render page correctly, please read the page content below
opsi Getting Started opsi-Version 4.1

                                        uib gmbh
                                        Bonifaziusplatz 1b
                                        55118 Mainz
                                        Tel.:+49 6131 275610
                                        www.uib.de
Stand: June 26, 2019                    info@uib.de
opsi Getting Started opsi-Version 4.1                                                                                          i

Contents

1 Copyright                                                                                                                   1

2 Introduction                                                                                                                2
   2.1   Steps for Installation and Getting Starting . . . . . . . . . . . . . . . . . . . . . . . . . . . . . . . . . .       2
   2.2   Hardware Requirements . . . . . . . . . . . . . . . . . . . . . . . . . . . . . . . . . . . . . . . . . . . .         2
   2.3   Configuration Requirement . . . . . . . . . . . . . . . . . . . . . . . . . . . . . . . . . . . . . . . . . .         3

3 opsi Support Matrix (opsi runs on which server)                                                                             5
   3.1   Supported distributions for server . . . . . . . . . . . . . . . . . . . . . . . . . . . . . . . . . . . . . . .      5

4 Installation                                                                                                                7
   4.1   opsi-server Base Installation . . . . . . . . . . . . . . . . . . . . . . . . . . . . . . . . . . . . . . . . . .     7
         4.1.1   Starting up the uib preconfigured Virtual Machine . . . . . . . . . . . . . . . . . . . . . . . . .           7
                 4.1.1.1   First Start . . . . . . . . . . . . . . . . . . . . . . . . . . . . . . . . . . . . . . . . . .     7
                 4.1.1.2   Language selection . . . . . . . . . . . . . . . . . . . . . . . . . . . . . . . . . . . . . .      8
                 4.1.1.3   First boot . . . . . . . . . . . . . . . . . . . . . . . . . . . . . . . . . . . . . . . . . . .    8
                 4.1.1.4   Second Start . . . . . . . . . . . . . . . . . . . . . . . . . . . . . . . . . . . . . . . . .     10
                 4.1.1.5   Terminal Window . . . . . . . . . . . . . . . . . . . . . . . . . . . . . . . . . . . . . .        11
                 4.1.1.6   Check the Network Connection . . . . . . . . . . . . . . . . . . . . . . . . . . . . . . .         12
                 4.1.1.7   Update the opsi-Server . . . . . . . . . . . . . . . . . . . . . . . . . . . . . . . . . . .       12
                 4.1.1.8   Install the standard opsi-products . . . . . . . . . . . . . . . . . . . . . . . . . . . . .       12
                 4.1.1.9   Starting opsi-Server Interface . . . . . . . . . . . . . . . . . . . . . . . . . . . . . . . .     13
         4.1.2   Installation on a Debian / Ubuntu . . . . . . . . . . . . . . . . . . . . . . . . . . . . . . . . . .        13
         4.1.3   Installation on a Univention Corporate Server (UCS) . . . . . . . . . . . . . . . . . . . . . . . .          15
                 4.1.3.1   Installation through Univention App-Center . . . . . . . . . . . . . . . . . . . . . . .           15
                 4.1.3.2   Upgrading an existing opsi-Installation from UCS 3 to UCS 4 (over the App-Center) .                16
                 4.1.3.3   Manual opsi-installation on UCS (without App-Center) . . . . . . . . . . . . . . . . .             16
                 4.1.3.4   Hints about installing opsi on an UCS server with the role member            . . . . . . . . . .   18
                 4.1.3.5   PXE-Boot configuration for operating system installation . . . . . . . . . . . . . . . .           18
                 4.1.3.6   Synchronising data from LDAP to opsi . . . . . . . . . . . . . . . . . . . . . . . . . .           19
         4.1.4   Installation on openSUSE . . . . . . . . . . . . . . . . . . . . . . . . . . . . . . . . . . . . . . .       19
opsi Getting Started opsi-Version 4.1                                                                                         ii

         4.1.5   Installation on Suse Linux Enterprise Server (SLES) . . . . . . . . . . . . . . . . . . . . . . . .         20
         4.1.6   Installation on RedHat Enterprise Linux (RHEL) . . . . . . . . . . . . . . . . . . . . . . . . . .          22
         4.1.7   Installation on CentOS Server . . . . . . . . . . . . . . . . . . . . . . . . . . . . . . . . . . . . .     23
   4.2   Update and Configuration of the opsi-server . . . . . . . . . . . . . . . . . . . . . . . . . . . . . . . . .       24
         4.2.1   Proxy Entry in apt-configuration File . . . . . . . . . . . . . . . . . . . . . . . . . . . . . . . .       24
         4.2.2   Update of the opsi-server . . . . . . . . . . . . . . . . . . . . . . . . . . . . . . . . . . . . . . .     24
         4.2.3   Backend Configuration . . . . . . . . . . . . . . . . . . . . . . . . . . . . . . . . . . . . . . . . .     25
         4.2.4   Set Samba Configuration and Change Passwords . . . . . . . . . . . . . . . . . . . . . . . . . .            27
         4.2.5   Checking the Java Configuration . . . . . . . . . . . . . . . . . . . . . . . . . . . . . . . . . . .       27
         4.2.6   Create Users and administrate the groups opsiadmin / pcpatch . . . . . . . . . . . . . . . . . .            28
   4.3   DHCP Configuration . . . . . . . . . . . . . . . . . . . . . . . . . . . . . . . . . . . . . . . . . . . . . .      29
         4.3.1   Using a DHCP Server at the opsi-server . . . . . . . . . . . . . . . . . . . . . . . . . . . . . . .        29
         4.3.2   Using an External DHCP Server . . . . . . . . . . . . . . . . . . . . . . . . . . . . . . . . . . .         30
         4.3.3   Checking the Backend Configuration for DHCP Entries . . . . . . . . . . . . . . . . . . . . . .             30
   4.4   Configure how the opsi-server gets the Client’s IP-Address . . . . . . . . . . . . . . . . . . . . . . . . .        30
   4.5   Install the minimal opsi-products . . . . . . . . . . . . . . . . . . . . . . . . . . . . . . . . . . . . . . .     31
   4.6   Manual Installation of opsi-products . . . . . . . . . . . . . . . . . . . . . . . . . . . . . . . . . . . . .      32
   4.7   Installing and Checking the Activation File . . . . . . . . . . . . . . . . . . . . . . . . . . . . . . . . .       32
   4.8   Starting the management interface (opsi-configed) . . . . . . . . . . . . . . . . . . . . . . . . . . . . .         33
   4.9   Network Ports used by a opsi installation . . . . . . . . . . . . . . . . . . . . . . . . . . . . . . . . . .       33

5 Integration of Existing Clients                                                                                            35
   5.1   Installation of the opsi-client-agent . . . . . . . . . . . . . . . . . . . . . . . . . . . . . . . . . . . . . .   35
         5.1.1   Usage of service_setup.cmd . . . . . . . . . . . . . . . . . . . . . . . . . . . . . . . . . . . . . .      35
                 5.1.1.1   service_setup.cmd on Windows NT6 . . . . . . . . . . . . . . . . . . . . . . . . . . .            35
                 5.1.1.2   service_setup_NT5.cmd on Windows NT5 . . . . . . . . . . . . . . . . . . . . . . . .              36
         5.1.2   Usage of the opsi-deploy-client-agent . . . . . . . . . . . . . . . . . . . . . . . . . . . . . . . . .     36
   5.2   Rollout existing products . . . . . . . . . . . . . . . . . . . . . . . . . . . . . . . . . . . . . . . . . . .     38
         5.2.1   Usage of opsi standard products: opsi-configed . . . . . . . . . . . . . . . . . . . . . . . . . . .        38
         5.2.2   Hard- and Software Inventory with the Products hwaudit and swaudit . . . . . . . . . . . . . .              38
         5.2.3   Hardware Inventory with the Netboot Product hwinvent . . . . . . . . . . . . . . . . . . . . . .            38

6 Installation of a new Windows OS using opsi                                                                                39
   6.1   Creating a New Client using the opsi Management Interface . . . . . . . . . . . . . . . . . . . . . . . .           39
         6.1.1   Hardware Inventory with the Netboot Product hwinvent . . . . . . . . . . . . . . . . . . . . . .            40
   6.2   Create a New Client using the opsi-client-bootcd . . . . . . . . . . . . . . . . . . . . . . . . . . . . . .        40
   6.3   OS-Installation: Complete the Base Package for Windows . . . . . . . . . . . . . . . . . . . . . . . . .            43
         6.3.1   NT6 family: as of Win7 / 2008R2 . . . . . . . . . . . . . . . . . . . . . . . . . . . . . . . . . .         43
         6.3.2   Creating a PE . . . . . . . . . . . . . . . . . . . . . . . . . . . . . . . . . . . . . . . . . . . . .     43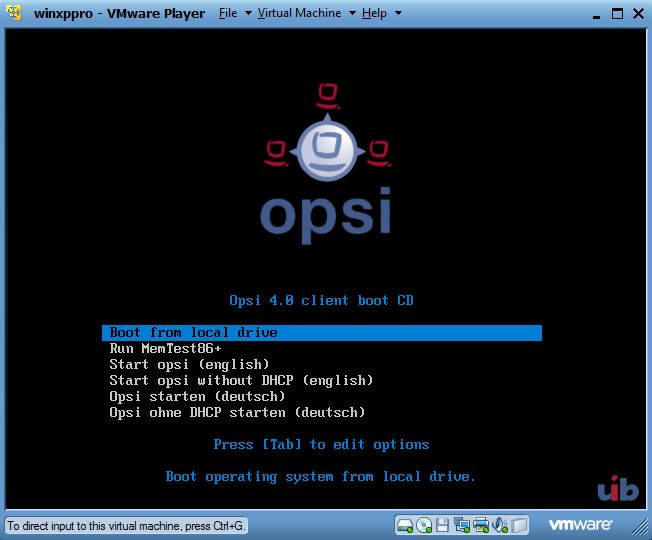
opsi Getting Started opsi-Version 4.1                                                                                          iii

                 6.3.2.1   Automated PE creation using opsi . . . . . . . . . . . . . . . . . . . . . . . . . . . . .          43
                 6.3.2.2   Manual PE creation for Windows 10 & Windows 8 (ADK) . . . . . . . . . . . . . . .                   44
                 6.3.2.3   Manual PE creation for Windows 7 (WAIK) . . . . . . . . . . . . . . . . . . . . . . .               44
         6.3.3   Extending a PE      . . . . . . . . . . . . . . . . . . . . . . . . . . . . . . . . . . . . . . . . . . . .   45
         6.3.4   unattend.xml . . . . . . . . . . . . . . . . . . . . . . . . . . . . . . . . . . . . . . . . . . . . . .      46
         6.3.5   Driver Integration . . . . . . . . . . . . . . . . . . . . . . . . . . . . . . . . . . . . . . . . . . .      46
         6.3.6   Providing the Installation Files . . . . . . . . . . . . . . . . . . . . . . . . . . . . . . . . . . . .      46
         6.3.7   Installation Log files . . . . . . . . . . . . . . . . . . . . . . . . . . . . . . . . . . . . . . . . . .    47
         6.3.8   Windows Product Key . . . . . . . . . . . . . . . . . . . . . . . . . . . . . . . . . . . . . . . . .         47
         6.3.9   Start the Windows Installation . . . . . . . . . . . . . . . . . . . . . . . . . . . . . . . . . . . .        48
   6.4   Structure of the Unattended Installation Products . . . . . . . . . . . . . . . . . . . . . . . . . . . . .           48
         6.4.1   Directory Tree Overview . . . . . . . . . . . . . . . . . . . . . . . . . . . . . . . . . . . . . . . .       48
         6.4.2   File Descriptions . . . . . . . . . . . . . . . . . . . . . . . . . . . . . . . . . . . . . . . . . . . .     49
         6.4.3   Directory installfiles / winpe . . . . . . . . . . . . . . . . . . . . . . . . . . . . . . . . . . . . .      49
         6.4.4   Directories opsi and custom . . . . . . . . . . . . . . . . . . . . . . . . . . . . . . . . . . . . . .       49
         6.4.5   Directory drivers . . . . . . . . . . . . . . . . . . . . . . . . . . . . . . . . . . . . . . . . . . . .     49
   6.5   Simplified Driver Integration during the unattended Windows Installation . . . . . . . . . . . . . . . .              49
         6.5.1   General Driver Packages . . . . . . . . . . . . . . . . . . . . . . . . . . . . . . . . . . . . . . . .       50
         6.5.2   Preferred Drivers . . . . . . . . . . . . . . . . . . . . . . . . . . . . . . . . . . . . . . . . . . . .     50
         6.5.3   Drivers that will be manually assigned to clients . . . . . . . . . . . . . . . . . . . . . . . . . .         50
         6.5.4   Drivers which will be Automatically Assigned to the Clients using the Fields / 51
                 6.5.4.1   Structure of the Driver Directory and Driver Files: . . . . . . . . . . . . . . . . . . . .         51
                 6.5.4.2   Processing of the Different Levels of Driver Integration . . . . . . . . . . . . . . . . .          52
                 6.5.4.3   Driver Addition and Checking . . . . . . . . . . . . . . . . . . . . . . . . . . . . . . .          52

7 Integration of New Software Packages into the opsi Server                                                                    56
   7.1   A Brief Tutorial: How to write a opsi-winst Script . . . . . . . . . . . . . . . . . . . . . . . . . . . . .          56
         7.1.1   Introduction . . . . . . . . . . . . . . . . . . . . . . . . . . . . . . . . . . . . . . . . . . . . . .      56
         7.1.2   Methods of Non-Interactive Installation . . . . . . . . . . . . . . . . . . . . . . . . . . . . . . .         56
         7.1.3   Structure of a opsi-script / opsi-winst Script      . . . . . . . . . . . . . . . . . . . . . . . . . . . .   57
         7.1.4   Primary Sections . . . . . . . . . . . . . . . . . . . . . . . . . . . . . . . . . . . . . . . . . . . .      57
         7.1.5   Important Kinds of Secondary Sections . . . . . . . . . . . . . . . . . . . . . . . . . . . . . . .           58
         7.1.6   Global Constants . . . . . . . . . . . . . . . . . . . . . . . . . . . . . . . . . . . . . . . . . . . .      59
         7.1.7   Second Example: tightvnc . . . . . . . . . . . . . . . . . . . . . . . . . . . . . . . . . . . . . . .        59
         7.1.8   Elementary Commands for Primary Sections . . . . . . . . . . . . . . . . . . . . . . . . . . . .              60
                 7.1.8.1   String Variable . . . . . . . . . . . . . . . . . . . . . . . . . . . . . . . . . . . . . . . .     60
                 7.1.8.2   Message / showbitmap . . . . . . . . . . . . . . . . . . . . . . . . . . . . . . . . . . .          60
                 7.1.8.3   if [else] endif . . . . . . . . . . . . . . . . . . . . . . . . . . . . . . . . . . . . . . . . .   60
                 7.1.8.4   Functions . . . . . . . . . . . . . . . . . . . . . . . . . . . . . . . . . . . . . . . . . . .     61
opsi Getting Started opsi-Version 4.1 iv
7.1.8.5 Error, Logging and Comments . . . . . . . . . . . . . . . . . . . . . . . . . . . . . . . 61
7.1.8.6 Requirements . . . . . . . . . . . . . . . . . . . . . . . . . . . . . . . . . . . . . . . . . 61
7.1.9 Third example: The Generic Template opsi-template . . . . . . . . . . . . . . . . . . . . . . . . 61
7.1.10 Interactive Creation and Testing of a opsi-winst Script . . . . . . . . . . . . . . . . . . . . . . . 68
7.1.11 Suggestions on How to Solve Problems with opsi-winst Scripts . . . . . . . . . . . . . . . . . . 72
7.1.11.1 Search for Unattend or Silent Switches . . . . . . . . . . . . . . . . . . . . . . . . . . 72
7.1.11.2 Some Important opsi-winst Commands . . . . . . . . . . . . . . . . . . . . . . . . . . 73
7.1.11.3 Installation When the User is Logged on . . . . . . . . . . . . . . . . . . . . . . . . . 74
7.1.11.4 Working with MSI-packages . . . . . . . . . . . . . . . . . . . . . . . . . . . . . . . . 74
7.1.11.5 Customization after a silent/unattended Installation . . . . . . . . . . . . . . . . . . . 75
7.1.11.6 Integration with Automated Answers for the setup Program . . . . . . . . . . . . . . 75
7.1.11.7 Analyze and Repackage . . . . . . . . . . . . . . . . . . . . . . . . . . . . . . . . . . . 78
7.1.11.8 How to uninstall Products . . . . . . . . . . . . . . . . . . . . . . . . . . . . . . . . . 78
7.1.11.9 Known Issues with the 64 Bit Support . . . . . . . . . . . . . . . . . . . . . . . . . . . 79
7.2 Creating an opsi Package . . . . . . . . . . . . . . . . . . . . . . . . . . . . . . . . . . . . . . . . . . . 80
7.2.1 Create, Pack, and Unpack a New Product . . . . . . . . . . . . . . . . . . . . . . . . . . . . . . 80
7.2.1.1 Create with opsi-newprod . . . . . . . . . . . . . . . . . . . . . . . . . . . . . . . . . . 81
7.2.1.2 Build the Package with opsi-makepackage . . . . . . . . . . . . . . . . . . . . . . . . . 88
8 More Information 90opsi Getting Started opsi-Version 4.1 1 / 90 Chapter 1 Copyright The Copyright of this manual is held by uib gmbh in Mainz, Germany. This manual is published under the creative commons license Attribution - ShareAlike (by-sa). A German description can be found here: https://creativecommons.org/licenses/by-sa/3.0/de/ The legally binding German license can be found here: https://creativecommons.org/licenses/by-sa/3.0/de/legalcode The English description can be found here: https://creativecommons.org/licenses/by-sa/3.0/ The English license can be found here: https://creativecommons.org/licenses/by-sa/3.0/legalcode Most parts of the opsi software are open source. The parts of opsi that are not open source are still under a co-funded development. Information about these parts can be found here: opsi cofunding projects All the open source code is published under the AGPLv3. The legally binding AGPLv3 license can be found here: http://www.gnu.org/licenses/agpl-3.0-standalone.html Some information around the AGPL: http://www.gnu.org/licenses/agpl-3.0.en.html For licenses to use opsi in the context of closed software please contact the uib gmbh. The names opsi, opsi.org, open pc server integration and the opsi logo are registered trade marks of uib gmbh.
opsi Getting Started opsi-Version 4.1                                                                             2 / 90

Chapter 2

Introduction

These instructions explain in detail the installation and starting of an opsi-server. It starts from the provided instal-
lation package and leads to the test installation of a client.
The network configuration described here is exemplary and relates to a network without a concurrent DHCP server
(i.e. the first trials are done in an isolated test network with an opsi-server and a few clients).
We strongly recommend that the first trials of opsi be done in a test network, separated from other DHCP servers. A
temporary connection to the main network can be used for downloads of actual product packages.
uib provides consulting services for the integration of opsi into your existing production environment.

2.1     Steps for Installation and Getting Starting

The four steps to install and start an opsi-server are:

  1. base installation of the server
  2. configuration of the server:
     configuration of the network, setting passwords (opsi administrator, pcpatch, samba), server updates
  3. download and installation of the required opsi client products to the opsi server

  4. completion of the system software base packages for Windows using the original Windows DVD or other sources.

At that point, a client can be automatically integrated into the opsi server.
Depending on your requirements, opsi offers different types of base installations. The procedure to perform different
types of base installations are described in the chapter Chapter 4 of this manual. The types of installations included
offer the possibility to either use an existing virtual machine or to perform a direct installation of opsi to the host
machine.

2.2     Hardware Requirements

For a opsi-server the following hardware is recommended:

• Intel-x86-compatible PC
• 2GB RAM or higher
• a hard disk with 60 GB capacity or more
opsi Getting Started opsi-Version 4.1 3 / 90
The requirements of the server are moderate in testing environments. In the case of production environments it is
recommended to increase the capabilities of the host system.
We recommend in the case of testing with a Virtual machine, that the host computer should have at least a dual core
processor and at least 4GB of RAM. For testing purposes, a test client can be run as another Virtual machine on the
same host computer.
2.3 Configuration Requirement
Your server and your network have to comply the following requirements to install and work with opsi:
• valid DNS domain name
Your DNS domain name should contain at least a domain name and a top level domain. So the full qualified domain
name (FQDN) should contain one or more dots. The top level domain must contain at least two chars.
Valid domain names are e.g.: domain.local , uib.de, subdomain.domain.de. An invalid example: mydomain.d
because this is only one character at the top-level domain An invalid example: mydomain because this is only a
top-level domain
see also:
http://en.wikipedia.org/wiki/Domain_name
• valid DNS hostname
The hostnames (also the client hostnames) have to follow standard naming rules. They may contain the ASCII
letters a-z, digits 0-9 and the hyphen -. No underscores are allowed.
see also:
http://en.wikipedia.org/wiki/Hostname
• correct name resolution for the server
Execute the following command and check the result:
getent hosts $(hostname -f)
The result should look like the following example:
192.168.1.1 server.domain.tld server
The result has the scheme:
If the result looks different from the above example (contains eg. 127.0.0.1 or localhost), or the full qualified
hostname does not contain one or more dots, then you must correct your name resolution (DNS or /etc/hosts
file).
Note
The names must be in accordance of the rules of a DNS system but a DNS server is not required for the usage of opsi.
Note
opsi does not required an Active Directory or similar. Integrating opsi is possible but not required.
Check needed network ports at: Section 4.9
• localisation settings opsi requires configured language settings (locale) on the server. It is recommended to use
an UTF-8 compatible locale.
The following command performs a simplified check:
test -e /etc/default/locale && echo "ok" || (echo "Check locales:" && locale)opsi Getting Started opsi-Version 4.1 4 / 90 If the output is ok locales are set. If the output is check locales: you should check if the following list has settings for LANG or LC_ALL that are according to your used language. For English we recommend en_GB.UTF-8 or en_US.UTF-8. The following commands show how these settings can be changed if no or an undesired value is set: sudo locale-gen en_GB.UTF-8 update-locale LANG=en_GB.UTF-8 To apply these settings systemwide the server should be restarted. For more information please consult the manuals of your Linux distribution.
opsi Getting Started opsi-Version 4.1                                                            5 / 90

Chapter 3

opsi Support Matrix (opsi runs on which
server)

Here an overview on which distributions and releases the opsi-server will run:

3.1     Supported distributions for server

As of 19.06.2019

  Distribution                                                           Opsi 4.1   Opsi 4.0.7

  Debian 9 Stretch

  Debian 8 Jessie

  Debian 7 Wheezy

  Ubuntu 18.04 LTS Bionic Beaver

  Ubuntu 16.04 LTS Xenial Xerus

  Ubuntu 14.04 LTS Trusty Tahir

  Ubuntu 12.04 LTS Precise Pangolin

  RHEL 7

  RHEL 6

  CentOS 7

  CentOS 6

  SLES 15

  SLES 12SP4

  SLES 12SP3

  SLES 12SP2

  SLES 12SP1
opsi Getting Started opsi-Version 4.1                                          6 / 90

  SLES 12

  SLES 11SP4

  SLES 11SP3

  openSuse Leap 15

  openSuse Leap 42.3

  openSuse Leap 42.2

  openSuse Leap 42.1

  openSuse 13.2

  UCS 4.4

  UCS 4.3

  UCS 4.2

  UCS 4.1

  UCS 4.0

  UCS 3.3

  UCS 3.2

   : Supported     : Unsupported        : Under development   : Discontinued
opsi Getting Started opsi-Version 4.1                                                                           7 / 90

Chapter 4

Installation

4.1       opsi-server Base Installation

This chapter describes different types of opsi-server installations. You can choose your installation type and skip the
other instructions.
If all required steps are successful, then the server system is properly configured and ready to start. Before you run
the opsi-server, you should update your system according to the chapter Update of the opsi-server.
For evaluation purposes, we recommend using the Virtual-Machine provided by uib.
Please follow the instructions by entering the commands in the
marked fields

(via cut-and-paste from this document)
Please set the apropriate environment variables http_proxy and https_proxy on your opsi-server .
If you encounter any problems, please ask for help at https://forum.opsi.org

4.1.1     Starting up the uib preconfigured Virtual Machine

An opsi-server can be installed as a virtual machine, because the load on the system is low. A ready-to-use and
pre-configured virtual machine is provided by uib. You can download the VMware or Virtualbox files from the uib
website or opsi.org. The free of charge VMware player or Virtualbox is sufficient to run this machine.
You may also use VMware ESXi.

4.1.1.1   First Start

VMware
If you have a server running VMware or a VMware player, it only takes a few mouse clicks to install a base opsi-server:

• Download the opsi-ServerVM from opsi.org

• Unzip the file and a directory opsivm will be generated.
• Start the VMware player. Open "Open a Virtual Machine" and search for the file opsivm.ovf in the opsivm
  directory. You can import the server with an new name. The virtual machine will still boot.

ESXi-Server
opsi Getting Started opsi-Version 4.1                                                                        8 / 90

• Download the opsi-ServerVM from opsi.org
• Unzip the file and a directory opsivm will be generated.
• Start the vSphere Client.
  Install a new client with File / Deploy OVF Template. . . . and answer the following questions.

Virtualbox

• Download the opsi-ServerVM from opsi.org

• Unzip the file and a directory opsivm will be generated.
• Start the Virtualbox.
  At the menu File / Import Appliance select your opsivm.ovf file and import it.

General
The VMware player is free of charge and available for all common operating systems at vmware.com. Usually it can
be installed without any problems, as long as the resources of the host computer (especially memory) meet the needs
of running software systems in parallel.

4.1.1.2   Language selection

The first step is to choose the preferred language:

                                            Figure 4.1: Language selection

4.1.1.3   First boot

The opsi-server needs to be connected to the Internet to work properly. The script 1stboot.py will automatically
start at the first boot in order to configure the opsi-server network settings.
If something goes wrong while running 1stboot.py, then you may run 1stboot.py again from the command line.

          Warning
          You cannot use 1stboot.py to rename your opsi-server afterwards!

The log file of 1stboot.py is located at /var/lib/1stboot/1stboot.log.
opsi Getting Started opsi-Version 4.1 9 / 90
Figure 4.2: Startup mask
Fill in the configuration information for your network and answer the questions.
Figure 4.3: Input mask
In the following, you will be asked for:
server name
Name of this server (without domain) e.g. opsidemo
domain
DNS-Domain (not Windows-Domain) the name has to include a dot e.g. opsi.local
ip address
Address of this server e.g. 192.168.1.50
netmask
Net mask of this server e.g. 255.255.255.0
windows domain
Name of the Windows Domain (not the DNS domain)
country
For the creation of the SSL-certificate: Identification of the nation (2 capital letter) e.g. DE
state
For the creation of the SSL-certificate: Identification of the federal state e.g. RPL
city
For the creation of the SSL-certificate: Identification of the city e.g. Mainzopsi Getting Started opsi-Version 4.1 10 / 90
organization
For the creation of the SSL-certificate: Identification of the company e.g. uib gmbh
organizational unit
For the creation of the SSL-certificate: Identification of the bureau (optional)
email address
For the creation of the SSL-certificate: mail address (optional)
gateway
IP-address of the Internet gateway e.g. 192.168.1.1
proxy
If required for the Internet access the proxy information: e.g. http://myuser:mypass@192.168.1.5:8080
DNS server
ip address of the name server e.g. 192.168.1.1
mail relay
ip address of the mail server e.g. 192.168.1.1
tftp server
ip of the tftp server (usually the server)
Password of root
Password of root
Password of adminuser
Password of local opsi-admin.
After the program 1stboot.py finishes, the virtual machine will be rebooted.
4.1.1.4 Second Start
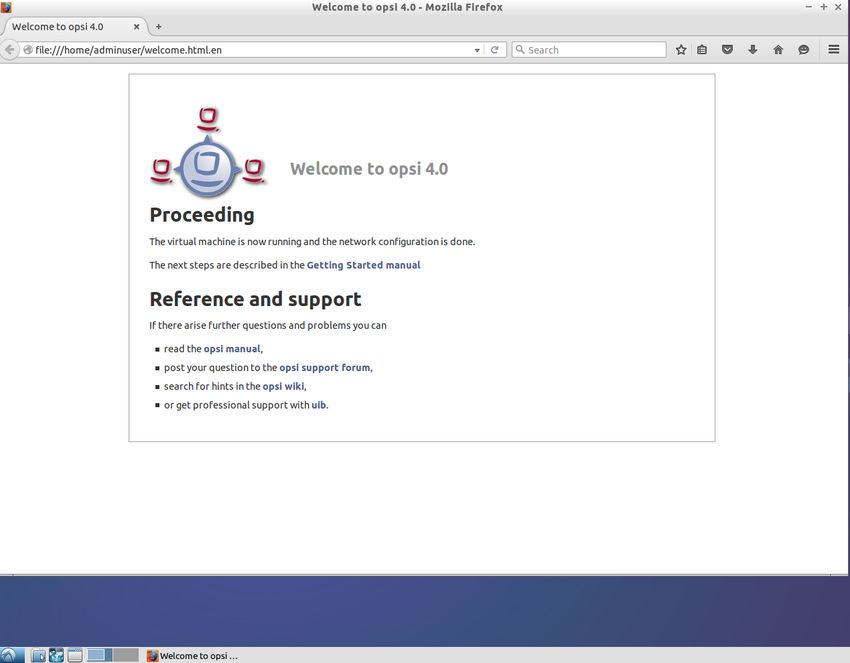
After the reboot, login as adminuser with your password.
The graphical user interface of the opsi-server should have already started (implemented as a sustainable window
manager). A "Firefox" browser window might appear at startup, and display further instructions and information.
This information can serve as a reference to the getting started document (the document you are currently reading).
If you get a message that there is no network connection, try rebooting the server. This might solve the problem.opsi Getting Started opsi-Version 4.1 11 / 90
Figure 4.4: View of fresh started opsi-server
If the network was correctly configured in the previous steps, then you should be able to remotely access the opsi-server,
for example:
• use ssh at the command line to access to the server (ssh should already be installed on linux systems, for Windows
use putty: http://www.chiark.greenend.org.uk/~sgtatham/putty/)
Use root as the user name, and authenticate with the root password.
4.1.1.5 Terminal Window
In the following sections, some commands have to be entered into a command line interface. It may be the easiest
way to work through these instructions.
The commands are input into a window called a "terminal window". Here are examples that explain how to access a
terminal window:
• Remote access per ssh on the opsi-server (see Section 3.1.1.4 of the last chapter)opsi Getting Started opsi-Version 4.1 12 / 90 • Open a terminal window in the opsi-server graphical interface with a click on the terminal icon in the icon bar. • Open a terminal window in the opsi-server graphical interface with a right mouse click inside the interface, and choose "Terminal". Note: the graphical interface has many working applications that are reachable using the variety of buttons in the upper-left-hand corner of the display. We recommend cutting and pasting commands from this handbook directly into the opsi-server terminal window (most applications support cut and paste). Example snippets from configuration files are formatted like this: depoturl = smb://smbhost/sharename/path Example snippets for commands that you have to execute are formatted like this: cd /tmp ls -l Angle brackets < > mark abstract names. When entering commands, please replace the with a real name. For example: The file share, where opsi places the software packages, may abstractly be noted as . If the real file share is /var/lib/opsi/depot, then you have to replace the abstract name by this exact string. The location of the package /ooffice becomes /var/lib/opsi/depot/ooffice. . 4.1.1.6 Check the Network Connection If the network configuration is correct, and the computer is connected to the Internet, then you can access any Internet address using the browser in the start window. If the Internet connection is not working, then you have to open a terminal window (maybe remote access isn’t possible, except using the server terminal window) and then perform the necessary network connection checks and fixes. You can re-enter the network configuration by entering this command in the terminal window: 1stboot.py A reboot is forced with the command: reboot If the network connection works, then you can install opsi packages or update them, and configure the environment for the first installation test. If you want to use the virtual machine (and not install the opsi-server directly to your host system), then skip to Section 4.2. 4.1.1.7 Update the opsi-Server To update your opsi-Server you need to double click the Icon Update OS on the desktop. To do this please introduce the current password for the adminuser. 4.1.1.8 Install the standard opsi-products By performing a double click the Icon First package installation the minimal opsi Products will be installed. To do this please introduce the current password for the adminuser. Through this installation the actual stock of opsi-products, incl. templates for OS deployments, will be downloaded from the opsi repositories and installed on the server. For more information see Section 4.5.
opsi Getting Started opsi-Version 4.1                                                                             13 / 90

4.1.1.9   Starting opsi-Server Interface

For a description of the Server Interface check Section 4.8.
You have a running opsi server now, i.e. the opsi application itself is fully configured.
You can now proceed with:

• Chapter 5
• Chapter 6

4.1.2     Installation on a Debian / Ubuntu

In this chapter, we assume you are familiar with the debian-package system (you will find information about the
debian-package in the appropriate Debian books, in the manual pages, or under https://www.debian.org/doc/).
Please note that an opsi-server needs storage in /var/lib/opsi. A minimum of 16 GB of free space is recommended.

           Important
           Check here if your Server Operating System Version is supported by opsi: Chapter 3
           Please note the Configuration Requirements: Section 2.3.

We recommend the following software installations:
apt install wget host pigz

opsi needs samba, which can be installed as:
apt install samba samba-common smbclient cifs-utils

The MySQL-Server which is used for inventory- and license management can be installed as follows:
apt install mysql-server

Check the opsi-server entry in /etc/hosts, or the output of
getent hosts $(hostname -f)

The result should look like the following example:
192.168.1.1 server.domain.tld server
The result has the scheme:

If the result looks different than the above example (contains eg. 127.0.0.1 or localhost), or the full qualified hostname
does not contain one or more dots, then you must correct your name resolution (DNS or /etc/hosts file).
To start with the installation of opsi add the repository to apt:
Ubuntu 18.04 LTS Bionic Beaver:
echo "deb http://download.opensuse.org/repositories/home:/uibmz:/opsi:/4.1:/stable/xUbuntu_18.04/ /" > /etc/apt/sources\
     .list.d/opsi.list

Ubuntu 16.04 LTS Xenial Xerus:
echo "deb http://download.opensuse.org/repositories/home:/uibmz:/opsi:/4.1:/stable/xUbuntu_16.04/ /" > /etc/apt/sources\
     .list.d/opsi.list

Debian 9 Stretch:
opsi Getting Started opsi-Version 4.1 14 / 90
echo "deb http://download.opensuse.org/repositories/home:/uibmz:/opsi:/4.1:/stable/Debian_9.0/ /" > /etc/apt/sources.\
list.d/opsi.list
Debian 8 Jessie:
echo "deb http://download.opensuse.org/repositories/home:/uibmz:/opsi:/4.1:/stable/Debian_8.0/ /" > /etc/apt/sources.\
list.d/opsi.list
Execute the following command in order to import the signature key of the repository:
Ubuntu 18.04 LTS Bionic Beaver:
wget -nv https://download.opensuse.org/repositories/home:uibmz:opsi:4.1:stable/xUbuntu_18.04/Release.key -O Release.key
apt-key add - < Release.key
Ubuntu 16.04 LTS Xenial Xerus:
wget -nv https://download.opensuse.org/repositories/home:uibmz:opsi:4.1:stable/xUbuntu_16.04/Release.key -O Release.key
sudo apt-key add - < Release.key
Debian 9 Stretch:
wget -nv https://download.opensuse.org/repositories/home:uibmz:opsi:4.1:stable/Debian_9.0/Release.key -O Release.key
apt-key add - < Release.key
Debian 8 Jessie:
wget -nv https://download.opensuse.org/repositories/home:uibmz:opsi:4.1:stable/Debian_8.0/Release.key -O Release.key
apt-key add - < Release.key
All:
Check for key import success:
apt-key list
should contain the output:
pub 2048R/D8361F81 2017-09-30 [verfällt: 2019-12-09] uid home:uibmz:opsi OBS Project
Execute the following commands in order to install opsi at your server:
apt update
apt remove tftpd
# Only needed when a tftp line is present in the inetd configuration
update-inetd --remove tftp
apt install opsi-tftpd-hpa
apt install opsi-server
apt install opsi-windows-support
If you are asked for the tftp directory during the tftpd-installation answer with /tftpboot. ` During the installation
of the opsiconfd, you will be asked for information for the creation of a local SSL certificate.
During the opsi-server installation, you have to allow the patching of the file smb.conf. Answer the question with yes.
Also, you will be asked for a password for the user pcpatch. Set a new password, and please remember this password
when continuing with the following sections. ``
Debian 8 (Jessie) specialities: The bootimage has issues to mount the opsi_depot-Share over mount.cifs. To avoid
these problems you can either configure ID mapping in Samba or disable winbind. If you do not rely on winbind we
recommend to disable the daemon.
Disable starting of winbindd:
systemctl disable winbindopsi Getting Started opsi-Version 4.1 15 / 90
or
insserv -r winbind
For a sane ID mapping configuration specify a configuration with limited mapping range in smb.conf and then restart
Samba.
To configure ID mapping you can insert the following into the [global] section of smb.conf.
idmap config * : range = 1000-1999999
Assuming all of the above steps completed successfully, we can assume that the network is properly configured. Next
continue on with Section 4.2.3
4.1.3 Installation on a Univention Corporate Server (UCS)
Important
Check here if your Server Operating System Version is supported by opsi: Chapter 3
Please note the Configuration Requirements: Section 2.3.
The installation on a Univention Corporate Server is possible through the Univention App Center as well as on the
classic way by using the repositories maintained by uib.
Both are equally supported methods of installations. We recommend using only one method per server. The difference
is that an installation of opsi on a member server is not possible if the App Center is used. If new packages for an
operating system are released they are available right away if the repositories maintained by uib are used. If the
installation is made through the App Center the change to a newer UCS version (i.e. from UCS 4.2 to UCS 4.3) will
be blocked until all installed apps are supported on the new version of the operating system.
Note
Installations on a system with 32bit and 64bit are currently both supported.
In the future the support for 32bit will be dropped. Therefore we recommend to only use opsi on a system with a 64bit
architecture.
With all installation methods the package opsi4ucs will be installed. This will prepare the use of opsi by using a join
script. This preparation includes adding required users, groups and shares.
The first opsi server in a domain will have it’s backend configured to make use of the installed MySQL server. All
following servers will be registered as depots in opsi.
When updating from opsi 4.0 the join script will execute the migrations of the backends.
4.1.3.1 Installation through Univention App-Center
In the Univention App-Center an automatic installation of the opsi-Server is available. The installation-app for opsi
can be found in the UCS-Management-Webinterface in the category System. Over the App-Center opsi can be installed
on server roles master, backup and slave.
If you want to update a existing opsi4ucs-Installation please check the next chapter for further information.
Additional packages will be installed: opsi-tftpd-hpa, opsi-windows-support, univention-mariadb respectively
univention-mysql.
If an existing opsi-server is detected opsi-package-updater will be configured to retrieve packages from this server. On
installation opsi-package-updater will be called to download and install opsi packages. This will not be done after an
update. On an major or minor update package updates will installed automatically.
Please note that no automatic transfer of clients to opsi takes place. More information at Section 4.1.3.6.
After the described steps the opsi-Installation on a UCS-Server with the help of the Univention App-Center is finished.
Please continue with following chapter: Section 4.7opsi Getting Started opsi-Version 4.1 16 / 90
4.1.3.2 Upgrading an existing opsi-Installation from UCS 3 to UCS 4 (over the App-Center)
Since opsi 4.0.5 the group opsifileadmins replaces the group pcpatch in UCS. This group has already been introduced
with the support of UCS 3.0, but only on installations that had Samba 4 and the Univention Directory Services
(Samba4-AD). In all other variants and roles the group continues to be, as it was before pcpatch.
Since this situation represents a problem not only on the installation, but could also lead to potential problems
with migrations (especially of Samba3 on Samba4) since the release of 4.0.5 the group pcpatch will be created as
opsifileadmins.
Warning
To implement the integration package in a clean way, an already existing group pcpatch will be renamed
automatically to opsifileadmins. This is done via the join script. If your config server is run on role master or
backup the join script will be executed automatic.
The main reason for this drastic measure is that the manual rename of this group is not trivial, because
it is a primary group. Therefore it is recommended before installing this update to make sure that your group is
still named pcpatch. If so, the update should be started with the config server and soon afterwards on the depot
servers as well. Otherwise the operation on multi depot-environments could lead to issues. This should not be
the case, if your group is already named opsifileadmins. Nevertheless, it is recommended after importing the
update to check every opsi server to verify complete functionality.
4.1.3.3 Manual opsi-installation on UCS (without App-Center)
Important
Check here if your Server Operating System Version is supported by opsi: Chapter 3
Please note the Configuration Requirements: Section 2.3.
Necessary preparations:
• The command
hostname -f
must return a full qualified domain name containing two dots, e.g. opsiserver.domain.local
• The command
getent hosts $(hostname -f)
has to show the IP-adress of the network interface which the client has to connect with. If the command shows the
address 127.0.0.1 or 127.0.0.2, you have to correct your name resolution in /etc/hosts file.
• Samba has to be configured. For the use of a server with the member role univention-samba has to be used instead
of univention-samba4.
• univention-mariadb or univention-mysql has to be installed.
• If the machine should also work as DHCP-server, then the daemon dhcpd has to be configured and should be
running.
The installation of opsi is possible on the roles master, backup, slave and member. For the installation on a member
you need to read Section 4.1.3.4!
The following documentation describes an installation on a master with Samba4.opsi Getting Started opsi-Version 4.1 17 / 90
Caution
When installing on role slave the server must be already joined and Samba 4 has to be installed first.
UCS configuration is usually done on the master while the installation and configuration of opsi happen on the
slave.
The classic installation with the user: pcpatch in the primary group: pcpatch does not work with UCS. Samba4
has placed fundamental restrictions on the Active-Directory, so groups with the same name as a user are no longer
allowed. For this reason the configuration file /etc/opsi/opsi.conf has been introduced. This file controls how
the group used for Samba access will be named. More specifically for UCS the group name pcpatch will be renamed
to opsifileadmins. This means that users that need clearance for opsi (opsi package builder for example) can’t be
members of the group pcpatch but must be member of opsifileadmins. This peculiarity applies only to UCS and is
different to other distributions and chapters in the opsi-documentation. Furthermore, since UCS 3 the user pcpatch is
created as an domain user. For more information about this new configuration file please refer the opsi-manual.
• Next add the opsi4ucs repository:*
UCS 4.4:
echo "deb http://download.opensuse.org/repositories/home:/uibmz:/opsi:/4.1:/stable/Univention_4.4/ /" > /etc/apt/\
sources.list.d/opsi.list
UCS 4.3:
echo "deb http://download.opensuse.org/repositories/home:/uibmz:/opsi:/4.1:/stable/Univention_4.3/ /" > /etc/apt/\
sources.list.d/opsi.list
Now import the key to the repository system with the following command:
UCS 4.4:
wget -nv https://download.opensuse.org/repositories/home:uibmz:opsi:4.1:stable/Univention_4.4/Release.key -O Release.\
key
apt-key add - < Release.key
UCS 4.3:
wget -nv https://download.opensuse.org/repositories/home:uibmz:opsi:4.1:stable/Univention_4.3/Release.key -O Release.\
key
apt-key add - < Release.key
For the installation the following commands must be entered:
UCS 4.4:
univention-install univention-mariadb
univention-install opsi-tftpd-hpa opsi4ucs
univention-install opsi-windows-support
UCS 4.3:
univention-install opsi-tftpd-hpa
univention-install univention-mariadb
univention-install opsi4ucs
univention-install opsi-windows-support
If the role of the target systems different than master or backup then the following commands run the opsi4ucs
Join-Script:
univention-run-join-scriptsopsi Getting Started opsi-Version 4.1 18 / 90
A link to the management interface can be found at the URL https://:4447.
To use the opsi configurations editor the user has to be a member of the group opsiadmin. The group membership
can be edited by using Univention-Admin. The user administrator will automatically be added to this group during
the opsi installation.
Finally the opsi_depot release point must be released in UDM. To realize this settings set the link to yes under
Advanced Settings → Advanced Samba Settings: follow symlinks. The same should be done for the opsi_depot_rw,
so the driver integration will run without problems. If the directory /var/lib/opsi/depot was found on an extra
partition or hard disk then the option for wide links should be set to yes.
To make sure that opsi is running with the proper settings restart opsi by entering the following commands:
opsi-setup --init-current-config
opsi-set-rights
systemctl restart opsiconfd.service
systemctl restart opsipxeconfd.service
Please be advised that samba4 will not be automatically restarted, since it is a important service with potential
dependencies. You have to restart it manually.
Since UCS 3 there is no direct link between the Univention LDAP backend and opsi all Clients have to be created
twice. First in the Univention-LDAP using udm and then in opsi including all system information (in particular the
MAC address). Deleting the LDAP clients in Univention does not mean that the client was also deleted under opsi
and vice versa. This problem is further discussed in Section 4.1.3.6.
Since opsi was installed on an already running server we assume that the network configuration is correct.
Continue with the installation be skipping forward to Section 4.2.3.
Warning
The Unix commands used in the following chapters are for Debian systems. You may have to change them to
match your Linux system.
4.1.3.4 Hints about installing opsi on an UCS server with the role member
Warning
Running opsi on a member server is affected by certain limitations. Therefore we recommend beginners to run
their opsi systems on a different role.
Installing opsi on a server with the role member is possible. However an automated installation through the Univention
App Center is currently not possible.
After an installation you need to make sure that the user that will be used to access the depot is set with the current
domain. Control the host parameter clientconfig.depot.user for this. Let’s assume that the domain is backstage,
then the value has to be backstage\pcpatch. If it is memberserver\pcpatch then it has to be changed.
Setting the password for the user pcpatch through opsi-admin fails because of the missing AD write access of a
member server. To change the password you have to do so additionally on a server with write access - a master,
backup or slave.
4.1.3.5 PXE-Boot configuration for operating system installation
If the PXE-Boot should be used for OS installations the DHCP-service on the relevant UCS-System has to be recon-
figured. There are two characteristics which differentiate UCS from other supported distributions.opsi Getting Started opsi-Version 4.1 19 / 90
• The configuration is not made automatically during the opsi installation on an active UCS-Infrastructure because
the configuration already exists.
• The opsi-tftpd-hpa is not configured as usual using the directory /tftpboot as base directory, instead the
/var/lib/univention-client-boot is used. All important files of opsi-linux-bootimage will be moved from
/tftpboot to the base directory. The side effect is that the DHCP-Option filename pxelinux.0 will be replaced
with linux/pxelinux.0 instead.
You have to set guide lines to realize the mentioned configurations in the UCS-System. These guide lines are dependend
on existent guide lines and have to be realized appropriately. If opsi was installed on an UCS-test system without
existing guide lines you need to install DHCP-service at first. If the DHCP-service is already installed the easiest way to
create guide lines in the UMC-web interface (Univention Management Console) is from UCS-server. Therefore choose
the category "Domain" and subjacent the module DHCP-server. Next you have to choose the service (in a testing
system you find only one entry usally). In the following detailed view choose guide lines in the menu. The needed
guide line is a DHCP-Boot guide line. During the guide line configuration choose cn=default-settings as default
entry (should be the only entry) and choose edit. Under the basic settings DHCP-boot for the option Bootserver enter
the IP from opsi-server and insert as boot-filename pxelinux.0.
Warning
If the guide line is configured like mentioned above, this configuration Section 4.2.3 affects every device whose
IP is served by the DHCP from this server. So once again this instruction should only be used for evaluation
purposes which will be also testing not only opsi but also UCS. In a productive UCS environment you should not
configure the guide lines as described previously.
Optional you can run the udm-commands at the console. You can find more informations in the UCS-documentation.
4.1.3.6 Synchronising data from LDAP to opsi
In an opsi4ucs installation Windows-Clients have to be created in the UDM first and in a second step they have to be
created in opsi. Changes to the client in UDM will not be passed on to opsi. For example if a client’s MAC address
changes in LDAP and in opsi a netboot-product is set to setup, the boot configuration would be provided with a
wrong MAC address.
A solution for this is the extension opsi-directory-connector. Please consult the manual for more information.
4.1.4 Installation on openSUSE
Important
Check here if your Server Operating System Version is supported by opsi: Chapter 3
Please note the Configuration Requirements: Section 2.3.
Necessary preparations:
• The command
hostname -f
has to return a full qualified domain name containing two dots, e.g. opsidemo.domain.local
• The command
getent hosts $(hostname -f)opsi Getting Started opsi-Version 4.1 20 / 90
has to return the IP-adress of the networkinterface the clients should connect with. If the command returns the
result 127.0.0.1 or 127.0.0.2 then file /etc/hosts has to be corrected.
• Samba has to be installed and configured.
• MariaDB-server has to be installed.
• If the machine should also act as DHCP-server then the daemon dhcpd has to be configured and be active.
You can use zypper to add the opsi-SUSE-Repository:
openSUSE Leap 42.3:
zypper addrepo http://download.opensuse.org/repositories/home:uibmz:opsi:4.1:stable/openSUSE_Leap_42.3/home:uibmz:opsi\
:4.1:stable.repo
After adding the repository, you may start the opsi installation:
zypper refresh
Do you want to (r)eject the Key, (t)emporary or (a)lways trust? [r/t/a/?] (a): a
zypper -v install opsi-server
zypper -v install opsi-windows-support
Please make sure that your firewall configuration allows access to the tftp Port (69/UDP) and the opsi ports (4447/TCP
and 4441/TCP).
If you used a tool like yast or autoyast to help you with your network configuration, then the tool may have created
an entry in your /etc/hosts file that has the following pattern:
127.0.0.2
If you want opsi to manage the configuration of the DHCP server, then you need to correct this entry to point to the
server’s public IP adress.
Assuming all of the above steps completed successful we can assume that the network is properly configured. Next
continue on with Section 4.2.3
Warning
The unix commands used in the following chapters are working on Debian systems. You may have to change
them to match your linux system.
4.1.5 Installation on Suse Linux Enterprise Server (SLES)
Important
Check here if your Server Operating System Version is supported by opsi: Chapter 3
Please note the Configuration Requirements: Section 2.3.
Necessary preparations:
• The command
hostname -f
returns a full qualified domain name containing two dots, e.g. opsidemo.domain.local
• Check the opsi-server entry in /etc/hosts or the output ofopsi Getting Started opsi-Version 4.1 21 / 90
getent hosts $(hostname -f)
to make sure it returns the IP-adress of the networkinterface the clients should connect to. If the command send
the result 127.0.0.1 or 127.0.0.2 then file /etc/hosts has to be corrected.
• Samba has to be configured.
• mariadb-server must be installed.
• If the machine should also act as DHCP-server then the daemon dhcpd has to be configured and be running.
You can use zypper to add the opsi-SLES-Repository:
SLES 12SP4:
zypper addrepo http://download.opensuse.org/repositories/home:uibmz:opsi:4.1:stable/SLE_12_SP4/home:uibmz:opsi:4.1:\
stable.repo
SLES 12SP3:
zypper addrepo http://download.opensuse.org/repositories/home:uibmz:opsi:4.1:stable/SLE_12_SP3/home:uibmz:opsi:4.1:\
stable.repo
SLES 12SP2:
zypper addrepo http://download.opensuse.org/repositories/home:uibmz:opsi:4.1:stable/SLE_12_SP2/home:uibmz:opsi:4.1:\
stable.repo
SLES 12SP1:
zypper addrepo http://download.opensuse.org/repositories/home:uibmz:opsi:4.1:stable/SLE_12_SP1/home:uibmz:opsi:4.1:\
stable.repo
SLES 12:
zypper addrepo http://download.opensuse.org/repositories/home:uibmz:opsi:4.1:stable/SLE_12/home:uibmz:opsi:4.1:stable.\
repo
After adding the repository, you may start the opsi installation:
zypper refresh
Do you want to (r)eject the Key, (t)emporary or (a)lways trust? [r/t/a/?] (a): a
zypper -v install opsi-server
zypper -v install opsi-windows-support
In case you used a tool like yast or autoyast to help you with your network configuration it’s possible the tool may
have created an entry in your /etc/hosts file like:
127.0.0.2
If you want opsi to manage the configuration of the DHCP server, then you need to correct this entry to point to the
server’s public IP adress.
Assuming all of the above steps completed successful we can assume that the network is properly configured. Next
continue on with Section 4.2.3
Warning
The unix commands used in the following chapters are working on Debian systems. You may have to change
them to match your linux system.opsi Getting Started opsi-Version 4.1 22 / 90
4.1.6 Installation on RedHat Enterprise Linux (RHEL)
Important
Check here if your Server Operating System Version is supported by opsi: Chapter 3
Please note the Configuration Requirements: Section 2.3.
Necessary preparations:
• The command
hostname -f
returns a fully qualified domain name containing two dots, e.g. opsidemo.domain.local
• The command
getent hosts $(hostname -f)
has to return the IP-adress of the network interface the clients should connect to. If the command returns the
result 127.0.0.1 or 127.0.0.2 then file /etc/hosts has to be corrected.
• Install Samba and a database server:
yum install mariadb-server samba samba-client
• Configure samba and database server:
systemctl start smb.service
systemctl start nmb.service
systemctl start mariadb.service
systemctl enable smb.service
systemctl enable nmb.service
systemctl enable mariadb.service
mysql_secure_installation
• If the machine should also act as DHCP-server then the daemon dhcpd has to be configured and be running.
Register at the Red Hat Network:
rhn_register
Add the opsi RHEL Repository:
RHEL 7:
cd /etc/yum.repos.d/
wget https://download.opensuse.org/repositories/home:uibmz:opsi:4.1:stable/RHEL_7/home:uibmz:opsi:4.1:stable.repo
yum makecache
After the repository is added you may start the opsi installation:
yum remove tftp-server
yum install opsi-server
yum install opsi-windows-support
It could happened that the following dialog windows prompt you if you want to import the GPG key of the repository:
Importing GPG key 0xD8361F81 "home:uibmz OBS Project " from http://download.opensuse.\
org/repositories/home:/uibmz:/opsi:/opsi40/RedHat_RHEL-6/repodata/repomd.xml.key
Is this ok [y/N]: yopsi Getting Started opsi-Version 4.1 23 / 90
Please answer with y.
Please make sure that your iptables and SELinux configuration allows the access to the tftp Port (69/UDP) and the
opsi ports (4447/TCP and 4441/TCP).
If you want opsi to manage the configuration of the DHCP server, then you need to correct this entry, and point it to
the server’s public IP address.
Assuming all of the above steps were completed successfully we can assume that the network is properly configured.
Next, please continue on with Section 4.2.3
Warning
The unix commands used in the following chapters are working on Debian systems. You may have to change
them to match your linux system.
4.1.7 Installation on CentOS Server
Important
Check here if your Server Operating System Version is supported by opsi: Chapter 3
Please note the Configuration Requirements: Section 2.3.
Necessary preparations:
• The command
hostname -f
returns a fully qualified domain name containing two dots, e.g. opsidemo.domain.local
• The command
getent hosts $(hostname -f)
returns the IP-adress of the network interface that the clients should connect to. If the command returns the results
127.0.0.1 or 127.0.0.2 then the file /etc/hosts has to be corrected.
• Install samba and database server:
yum install mariadb-server samba samba-client
• Configure samba and database server:
systemctl start smb.service
systemctl start nmb.service
systemctl start mariadb.service
systemctl enable smb.service
systemctl enable nmb.service
systemctl enable mariadb.service
mysql_secure_installation
• If the machine should also act as DHCP-server then the daemon dhcpd has to be configured and up and running.
Add the opsi CentOS Repository:
CentOS 7:opsi Getting Started opsi-Version 4.1 24 / 90
cd /etc/yum.repos.d/
wget https://download.opensuse.org/repositories/home:uibmz:opsi:4.1:stable/CentOS_7/home:uibmz:opsi:4.1:stable.repo
yum makecache
After adding the repository you may start the opsi installation:
yum install opsi-server
yum install opsi-windows-support
It could happened that the following dialog window prompt you if you want to import the GPG key of the repository:
Importing GPG key 0xD8361F81 "home:uibmz OBS Project " from http://download.opensuse.\
org/repositories/home:/uibmz:/opsi:/opsi40/CentOS_CentOS-5/repodata/repomd.xml.key
Is this ok [y/N]: y
Please answer with y.
Please make sure that your iptables and SELinux configuration allow access to the tftp Port (69/UDP) and the opsi
ports (4447/TCP and 4441/TCP).
Assuming all of the above steps were completed successfully we can assume that the network is properly configured.
Next continue on with Section 4.2.3
Warning
The unix commands used in the following chapters are working on Debian systems. You may have to change
them to match your linux system.
4.2 Update and Configuration of the opsi-server
4.2.1 Proxy Entry in apt-configuration File
If necessary please adapt the file /etc/apt/apt.conf to your network configuration (enter the correct proxy or
comment/delete unnecessary lines). You can edit your file with a program like midnight commander:
mcedit /etc/apt/apt.conf
4.2.2 Update of the opsi-server
Update the opsi-server with the commands:
apt update
apt upgrade
Tip
During the installation, you may be asked to modify the smb.conf file. Please select Yes. If you have modified the
smb.conf file before you should save the default and make a diff on both files later. If you answered the question with
default before reading this tip with no you can reconfigure samba from an opsi-server console with following command:
opsi-setup --auto-configure-sambaopsi Getting Started opsi-Version 4.1 25 / 90
4.2.3 Backend Configuration
opsi supports different backends for data management.
The most important backends are:
• file - storage in files
• mysql - storage in a MySQL database
Besides these main backends there are some special backends:
• opsipxeconfd - the service used for network boots with opsi
• dhcpd - used for configuring and restarting the local dhcp service at opsi-server
• jsonrpc - redirects all calls to another server via JSON-RPC
The default is to use the mysql backend for inventory data. The usage of the file backend for inventory data is possible
but noticeably slower and therefore not recommended.
Note
The use of the mysql backend for inventory data is free and does not require activation.
More information about the activation of co-financed modules can be found here.
Note
Some distributions use MariaDB instead of MySQL.
The mysql backend will also work with MariaDB.
Caution
Since MySQL server version 5.7 the strict mode is enabled by default.
This mode prevents the command opsi-setup --configure-mysql from finishing properly.
To disable the strict mode please edit the file /etc/mysql/mysql.conf.d/mysqld.cnf.
In the [mysqld] section add the following line underneath the section name:
sql_mode=NO_ENGINE_SUBSTITUTION
Now the service mysql has to be restarted: systemctl restart mysql.service
We will now configure the mysql backend. It is assumed that a MySQL server is installed and configured. We
require the credentials for an database administrator. For specific information on installation and configuration of
your database please refer to the manuals of your distribution.
For the initial configuration of the mysql backend use the command:
opsi-setup --configure-mysql
The command will ask for information to database access and then use the provided credentials to create a database
and an user with appropriate rights to access that database for opsi.
The following screen shots show example parameters for a MySQL configuration setup:opsi Getting Started opsi-Version 4.1 26 / 90
Figure 4.5: Dialog opsi-setup --configure-mysql: Input mask
Figure 4.6: Output: opsi-setup --configure-mysql: Output
You may accept the defaults for all questions except the Database Admin Password. The Database Admin Password is
linux123 on the pre-installed opsi-VM, otherwise it is the password you entered during the mysql-server installation.
Different kinds of data may be stored in different types of backends. For some actions (such as method calls) more
than one backend has to be involved. Therefore, the different method calls can be used by more than one backend.
These method-to-backend(s) calls are configured in the file /etc/opsi/backendManager/dispatch.conf.
Here an example:
# = = = = = = = = = = = = = = = = = = = = = = = = = = = = = = = = = = = = = =
# = backend dispatch configuration =
# = = = = = = = = = = = = = = = = = = = = = = = = = = = = = = = = = = = = = =
#
# This file configures which methods are dispatched to which backends.
# Entries has to follow the form:
# :
#
# Backend names have to match a backend configuration
# file basename .conf beneath /etc/opsi/backends.
# For every method executed on backend dispatcher
# the first matching regular expression will be decisive.
# Recommended standard configuration (dhcpd not at the opsi server)
# file as main backend, mysql as hw/sw invent
# and license management backend and opsipxeconfd backend:You can also read