3 JDS6600-Lite Dual-Channel Signal Generator - joy-it
←
→
Page content transcription
If your browser does not render page correctly, please read the page content below
3
JDS6600-Lite
Dual-Channel Signal Generator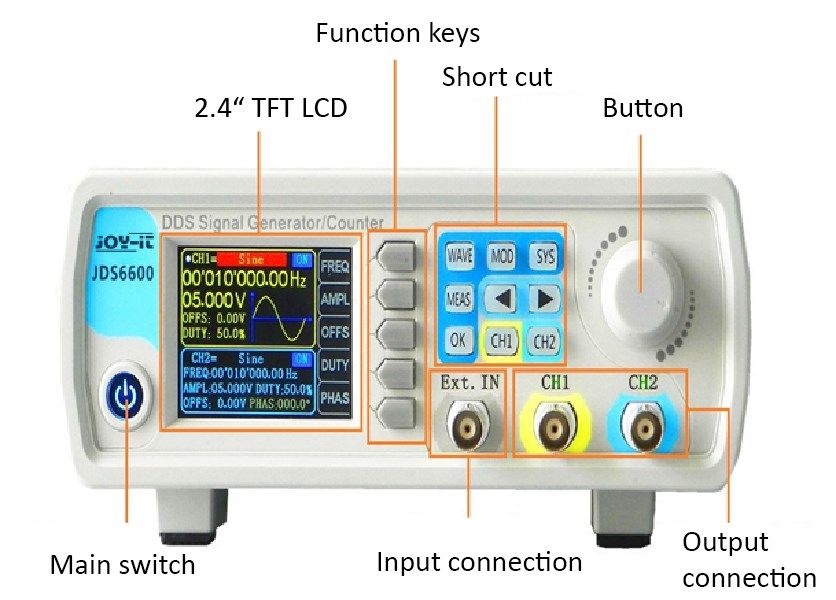
JDS6600-Lite

TABLE OF CONTENTS

1.    Introduction

2.    Device Overview

3.    Shortcut Overview

4.    Parameter settings in the main interface

5.    Measuring and counting functions

6.    Modulation mode

7.    System settings

8.    Other Informations

9.    Support

Published: 30.07.2019               Copyright by Joy-IT                  2
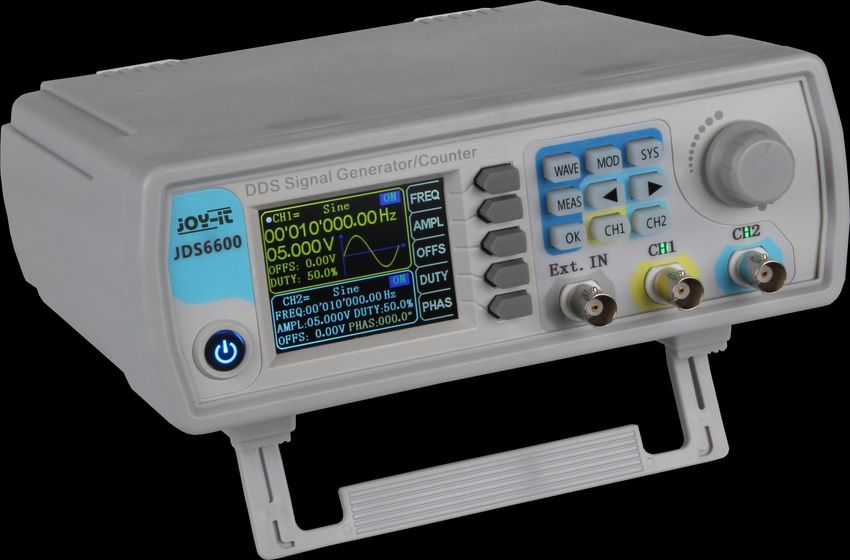
JDS6600-Lite

1.     INTRODUCTION

Dear customer,
Thank you very much for choosing our product. In the following we have listed what you have to consider
during commissioning.

2.     DEVICE OVERVIEW

Published: 30.07.2019                    Copyright by Joy-IT                                          3
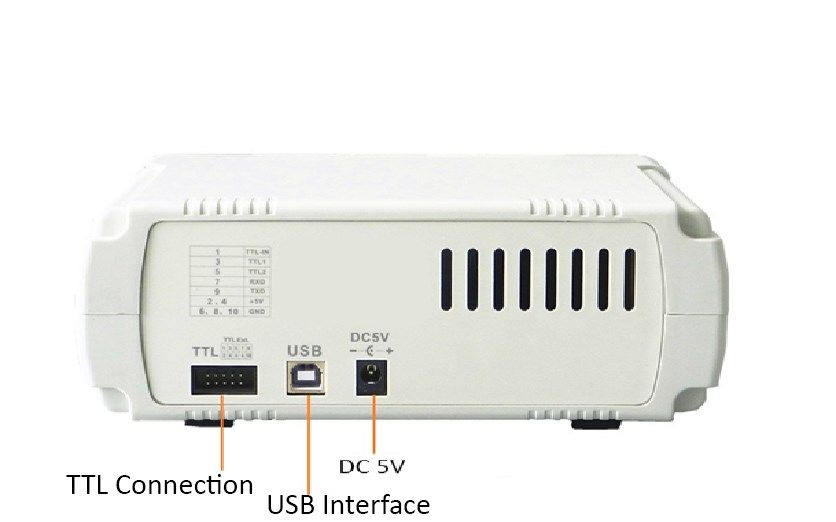
JDS6600-Lite

Published: 30.07.2019   Copyright by Joy-IT                  4
JDS6600-Lite
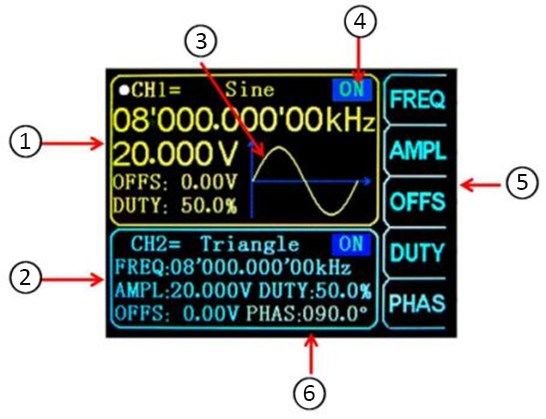
1 CH1 Parameter
2 CH2 Parameter
3 waveform display
4 Channel output status
5 menu bar
6 Phase difference between CH1 and CH2
3. SHORTCUT OVERVIEW
Configuration of the waveform
Configuration of the measuring mode
Activating the modulation mode
system settings
Control the output of CH1 and CH2.
Used in other menus for control and confirmation (On/Off).
Moving the cursor position
Press and hold to select channel 1 as the main display.
Press and hold to select channel 2 as the main display.
Published: 30.07.2019 Copyright by Joy-IT 5JDS6600-Lite 4. PARAMETER SETTINGS IN THE MAIN INTERFACE Press the button to enable or disable simultaneous output for both channels. Use the and keys to switch between the respective channels. Pressing again while in the channel activates or deactivates the output. Press and hold the corresponding channel key to place the channel in the main interface. Press the button to activate the waveform. While the waveform is active, the shape can be changed quickly using the main button. The arrow keys can be used to switch between the waveforms and the presets. Use the button to highlight the frequency parameter. Then use the direction keys to move the cursor to the value you want to edit. Then press the Main button to edit the respective value. Then press and hold the Frequency button to change the unit (MHz, KHz, Hz, MHz). Published: 30.07.2019 Copyright by Joy-IT 6
JDS6600-Lite

5.     MEASURING AND COUNTING FUNCTIONS

Press        and then the        button in the measuring mode to switch between the measuring
function and the counting function.

The input signal frequency, period, positive pulse width, duty cycle and other parameters can be
measured. The measuring frequency range is between 1 Hz and 100 MHz. The measuring signal amplitude
range is between 2 MVpp and 20 Vpp. The input interface is Ext.IN.

Coupling setting: Press the        button to switch between AC and DC mode.

Gate Time Setting: Press the button          to set the gate time (0.01 - 10S). Move the cursor with the
arrow keys to select the value to be edited. Use the Skin button to adjust the value.

Measuring mode: Press the           button to switch between the counting frequency and the counting
period.

Measurement parameters: Frequency, period, positive pulse width, negative pulse width, duty cycle.

After you have set all parameters, you can use the key to         start the counting function. Use the
key to stop the function.

Published: 30.07.2019                      Copyright by Joy-IT                                             7
JDS6600-Lite

6.     MODULATION MODE

Press the button      to start the modulation mode. Press the        button to switch between the
sweep function (channel CH1/CH2), the pulse function (channel CH1) and the burst function (channel
CH1).

Sweep function: Here you can set any start and end frequency of the signal generator. The possible time
is between 0.1 and 999.9s.

In sweep mode (channel CH1), press the                 buttons to set the start and end frequency, time,
direction and mode. Once the setting has been selected, you can use the direction buttons and the main
knob to adjust it.

Pulse function: With this option you can set the pulse wave width and the pulse time.

Within the pulse function (channel CH1), press the keys to select the pulse width, period,
offset and amplitude. Once a parameter is highlighted, you can adjust it with the direction
keys. The pulse width and period can be set using the key. You can switch between ns and
us.

Burst function: The pulse sequence can be set to output 1-108575 periods. Burst mode is divided into
internal CH2 channel bursts, external input bursts and manual bursts. The period time of the burst is less
than the period time of the burst signal.

Within the burst function (channel CH1), press the buttons to select the pulse number and burst mode.
Use the direction keys to set the respective parameters.

After you have made all the settings, you can use the button        to start the corresponding function.
Press        to exit.

Published: 30.07.2019                      Copyright by Joy-IT                                               8
JDS6600-Lite

7.     SYSTEM SETTINGS

Press the         button to open the setup menu. Use the buttons                   to navigate. The
following settings can be made:
In/Out position, sound settings, brightness configuration, language settings, synchronization, setting the
arbitrary wave display.

After you have opened a corresponding setting, you can configure it with the main button. Now press the
corresponding button to save the settings.

Sound settings: The tones can be activated or deactivated with the           and        buttons.

Brightness configuration: Here you can adjust the brightness in 12 different levels.

Language settings: The English and Chinese languages are available here.

Synchronization: Channel CH1 is used as target during synchronization. The parameters of the CH2
channel change according to the CH1 parameters. When the synchronization point is highlighted, press
the                  keys to select the point to be synchronized.

Then use the button         to select or the          button to cancel the operation.

Setting the arbitrary wave display: The number of waveforms in the main interface can be quickly
adjusted by turning the knob (1-60).

Published: 30.07.2019                          Copyright by Joy-IT                                           9
JDS6600-Lite

8.     OTHER INFORMATION

Our information and take-back obligations according to the Electrical and Electronic
Equipment Act (ElektroG)

Symbol on electrical and electronic equipment:

This crossed-out dustbin means that electrical and electronic equipment does not belong in the
household waste. You must return the waste to a collection point. Before handing over waste batteries
and accumulators that are not enclosed by waste equipment must be separated from it.

Return options:
As an end user, you can return your old device (which essentially performs the same function as the new
device purchased from us) for disposal free of charge when you purchase a new device.
Small appliances with no external dimensions greater than 25 cm can be disposed of in normal household
quantities independently of the purchase of a new appliance.

Possibility of return at our company location during opening hours:
Simac GmbH, Pascalstr. 8, D-47506 Neukirchen-Vluyn, Germany

Possibility of return in your area:
We will send you a parcel stamp with which you can return the device to us free of charge. Please contact
us by e-mail at Service@joy-it.net or by telephone.

Information on packaging:
If you do not have suitable packaging material or do not wish to use your own, please contact us and we
will send you suitable packaging.

Published: 30.07.2019                     Copyright by Joy-IT                                           10
JDS6600-Lite

9.     SUPPORT

We are also there for you after the purchase. If you still have questions or problems, we are also available
by e-mail, telephone and ticket support system.

E-Mail: service@joy-it.net

Ticket-System: http://support.joy-it.net

Phone: +49 (0)2845 98469 – 66 (9:30 - 17:00 o‘clock)

For further information please visit our website:

www.joy-it.net

Published: 30.07.2019                      Copyright by Joy-IT                                           11
You can also read