EIQ Toolkit User's Guide - NXP
←
→
Page content transcription
If your browser does not render page correctly, please read the page content below

NXP Semiconductors         Document identifier: EIQTUG
User Guide                     Rev. 3, 18 January 2022

eIQ Toolkit User's Guide

NXP Semiconductors

Contents
Chapter 1 Introduction........................................................................................... 3

Chapter 2 Workflows..............................................................................................4

Chapter 3 eIQ Portal.............................................................................................. 5

Chapter 4 eIQ Model Tool....................................................................................26

Chapter 5 Command-line Tools........................................................................... 31

Chapter 6 Model Zoo........................................................................................... 42

Chapter 7 Revision history...................................................................................50

                                     eIQ Toolkit User's Guide, Rev. 3, 18 January 2022
User Guide                                                                                                     2 / 51
NXP Semiconductors

Chapter 1
Introduction
The eIQ Toolkit is a machine-learning software development environment that enables the use of ML algorithms on NXP
microcontrollers, microprocessors, and SOCs.
The eIQ Toolkit is for those interested in building machine learning solutions on embedded devices. A background in machine
learning, especially in supervised classification, is helpful to understand the entire pipeline. However, if the user does not have
any background in the areas mentioned above, the eIQ Toolkit is designed to assist the user.
The eIQ Toolkit consists of the following three key components:
  • eIQ Portal
  • eIQ Model Tool
  • eIQ Command-line Tools
The eIQ Portal is designed to help you with image classification and object detection tasks without deep machine-learning
knowledge. Using the eIQ Portal easy-to-use Graphical User Interface (GUI), you can create a project and import a custom dataset
into it to solve a specific real-life problem. Then you select the model that fits your problem the best and train and evaluate it over
the dataset you imported. The evaluation process gives you information about how accurate the model that you trained is and how
fast it runs on the target architecture. In addition to this, the eIQ Portal provides very efficient techniques to improve your model
performance, customized for each target type.
The eIQ Model Tool is used for the subsequent analysis of your models, including model and per-layer time profiling.
For users who prefer it, NXP offers a set of command-line tools (the eIQ Command-line Tools), which also include a self-contained
Python environment.

                                                                  NOTE
              To use the eIQ Command-line Tools, it is important either to launch them using the COMMAND LINE button
              from the home screen or run the /bin/eiqenv.bat script, which sets up the command-
              line environment.

                                                                   NOTE
                                       The eIQ Toolkit is currently supported only on Windows OS.

                                            eIQ Toolkit User's Guide, Rev. 3, 18 January 2022
User Guide                                                                                                                       3 / 51
NXP Semiconductors

Chapter 2
Workflows
There are two approaches available with the eIQ Toolkit, based on what the user provides and what the expectations are. The
following approaches are referred to throughout this document:
  • Bring Your Own Data (BYOD) – the users bring image data, use the eIQ Toolkit to develop their own model, and deploy it
    on the target.
  • Bring Your Own Model (BYOM) – the users bring a pretrained model and use the eIQ Toolkit for optimization, deployment,
    or profiling.

                         User data                                                   User machine learning model

  eIQ™ Toolkit
    Bring Your Own Data
      eIQ Portal / Command-line Tools
                                                                           Bring Your Own Model
                      Import dataset
                                                                             eIQ Model Tool / Command-line Tools

              (Optional) Augment dataset                                              Load and/or visualize model

                     Select and optimize                                              Convert and optimize model
                       model for target

                                                                                         (Optional) Validate model
                        Train model                                                               on target

                 Validate model on target                                                Deploy model to target

                 Deploy model to target                                                  Profile model on target

                                                   eIQ inference engines

                                                            Prediction

 Figure 1. BYOM and BYOD workflows

                                           eIQ Toolkit User's Guide, Rev. 3, 18 January 2022
User Guide                                                                                                            4 / 51
NXP Semiconductors

Chapter 3
eIQ Portal
The eIQ Portal is a GUI that allows the user to leverage the eIQ Toolkit capabilities in a practical and intuitive manner.
With little or no knowledge of machine learning, the eIQ Portal enables the user to build models for image classification and
object-detection problems.
In the eIQ Portal title bar (see Figure 2), you can find several buttons in the home screen and in the opened project
screen, respectively:
  • REMOTE DEVICES - opens a modal window where you can set remote devices to validate and profile your model.
  • MARKETPLACE - provides information on additional services and solutions that are available from NXP and eco-system
    partners.
  • HELP - provides the eIQ Toolkit documentation.
  • WORKSPACES - (appears after opening a project) - this drop-down menu enables you to switch between the eIQ Portal
    sections of an opened project.
  • PLUG-INS - provides information about all available converter plugins. You can check if the relevant plugin is ready and
    where it is located.

3.1 Home
In the eIQ Portal home screen, you can create a new project, open an existing one, launch the eIQ Model Tool, and
open a command-line window by clicking on CREATE PROJECT, OPEN PROJECT, MODEL TOOL, and COMMAND LINE
buttons, respectively.

 Figure 2. eIQ Portal: home

                                         eIQ Toolkit User's Guide, Rev. 3, 18 January 2022
User Guide                                                                                                                 5 / 51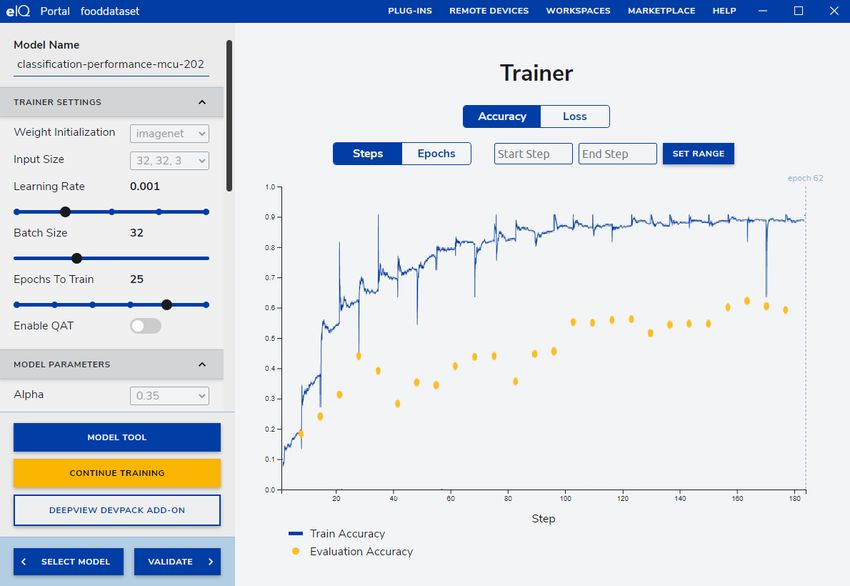
NXP Semiconductors
                                                                                                                             eIQ Portal

3.2 Projects
A project is a database that stores the data that you work with and the related information. When you import images, add labels,
or generally modify the data, these changes are automatically stored in the project. All the images that you work with are stored
in the project as well, so when working with a large dataset, the file size is not small.
Use the Importer command-line tool for importing bigger datasets into a project.
There are a few things to note for more advanced users:
  • There are two file extensions accepted - .eiqp and .deepview. There is no difference between the two.
  • Internally, a project is organized in an SQLite database.

                                                                      NOTE
                                     While it is possible to edit files manually, it is not recommended.

3.2.1 Importing a Keras dataset into a project
You can create a project and upload the target dataset directly from Keras. We made available a script that creates a project and
imports the data for this tutorial automatically. You can find the details about its contents in Keras dataset import script. You can
use this script as a starting point to create your own scripts. To import the data for the tutorial, you can run the script as follows:
   1. Open the eIQ Portal (see Figure 2) and click "COMMAND LINE".
   2. Go to the /workspace folder.
   3. Install the tqdm library and run the CIFAR_uploader script by typing the following:

        python -m pip install tqdm
        python -m CIFAR_uploader

   4. When the script finishes, CIFAR-10 is migrated and ready to use for the eIQ Portal tool. The CIFAR-10 dataset for the
      eIQ Portal is saved as cifar10.deepview and it is stored in the workspace directory.

3.2.2 Keras dataset import script
There are two Python scripts placed in the /workspace folder: CIFAR_uploader.py and importer.py. The
following steps are taken in the CIFAR_uploader.py script.
   1. The following three Python lines create an empty project within the directory specified in the parameter path:

        datastore = DataStoreWrapper(datastore='http://127.0.0.1:10812/')
        datastore.create_project(project_name='cifar10.deepview', path='E:\\DATASETS')

   2. With the project created, you can start to upload data into it. To do that, load the target dataset from Keras. Firstly, add
      the name of the classes to the dataset to have a comprehensive view of the dataset within your project (label names
      instead of label indexes). Secondly, load the dataset from the Keras module and limit the number of training and testing
      samples to 1000 and 500, respectively:

        class_names =
        ["airplane","automobile","bird","cat","deer","dog","frog","horse","ship","truck"]
        (x_train, y_train), (x_test, y_test) = tf.keras.datasets.cifar10.load_data()

   3. The following lines limit the script to import only the first 1000 samples of the training dataset and the first 500 samples
      of the test dataset (if you would like to import the complete data, you may skip these lines):

        x_train = x_train[:1000]
        y_train = y_train[:1000]
        x_test = x_test[:500]
        y_test = y_test[:500]

                                            eIQ Toolkit User's Guide, Rev. 3, 18 January 2022
User Guide                                                                                                                       6 / 51
NXP Semiconductors
                                                                                                                       eIQ Portal

   4. The dataset is in the memory and you are ready to insert it into your project. Firstly, set the new dimensions of
      the images. This is used to improve the quality of images for this particular dataset because they are (32, 32). The
      application can handle images with any dimensions. They are adjusted later during the training process. Secondly,
      upload the training and test data into your project:

        new_dimension = (128, 128)
        for i in tqdm.tqdm(range(x_train.shape[0])):
            datastore.upload_image(x_train[i], class_names[y_train[i][0]], new_dimension)
        for i in tqdm.tqdm(range(x_test.shape[0])):
            datastore.upload_image(x_test[i], class_names[y_test[i][0]], new_dimension)

   5. When the script finishes, CIFAR-10 is migrated and ready to use for the eIQ Portal tool.

3.3 Plugins
Plugins are an extension to the Converter tool. The currently installed plugins allow for conversion between TF Lite, RTM, and
ONNX formats, but a custom conversion can be implemented to extend the current functionality. Conversions are not only
format-to-format conversions. Input and output formats can actually be the same and the plugin may do just about anything to the
machine learning model internally, for example, a graph transformation or an optimization (such as quantization).

3.3.1 Adding a new converter plugin
Plugins are implemented as Python modules installed in the eIQ Toolkit's Python environment. To implement them, use the
following folder structure:

 Project directory
 ---setup.py
 ---converter_plugin
    ---assets
       ---image.svg or image.png
       ---info.html
    ---__main__.py
    ---Other files or folders

The image.svg or image.png files should have resolution of 128x128 and they show up in the eIQ Portal plugins
screen. The info.html file describes the plugin details, parameters, and others. The main plugin source code file
(converter_plugin.__main__.py) should implement the following functions:
  • query_convert(src_type, dst_type) -> dict()
  • convert(src_file, dst_file, params) -> dict()
For example, see the content of the /python/Lib/site-packages/deepview_tensorflow/__main__.py file (or
other modules, such as deepview_onnx and deepview_rtm) and how the two above functions are implemented.
On top of that, a standard setup.py file should also be implemented to build the wheel package. A sample setup.py script may look
as follows:

 from setuptools import setup,find_packages
 Package_name=''
 setup(
  name='',
  version='',
  description='',
  url='',
  author='',
  author_email='',
  license='',
     entry_points={'deepview_converter':
         ['converter = .__main__']},

                                           eIQ Toolkit User's Guide, Rev. 3, 18 January 2022
User Guide                                                                                                                   7 / 51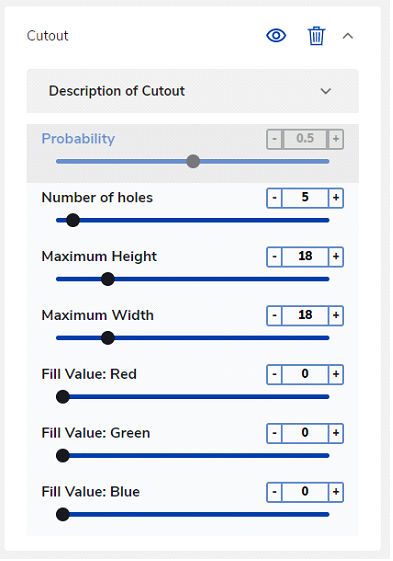
NXP Semiconductors
                                                                                                                        eIQ Portal

  packages=[],
     package_data={package: ['assets\\*']},
             install_requires=[ '',
         '', ],
  classifiers=[],
 )

When the files and folders are created and all the required code is implemented, the plugin can be compiled within the eIQ Toolkit
command line:

 python .\setup.py bdist_wheel --universal

This creates a *.whl file that can be installed using the following command:

 deepview-converter -i

When the plugin is installed, it should be automatically discovered. To check that the plugin was installed successfully, run the
following command:

 deepview-converter -l

A plugin can also be uninstalled if needed:

 deepview-converter -u

3.4 Data Set Curator
Data curation is the organization and integration of data collected from various sources. To open the "Data Set Curator" window,
click the CREATE PROJECT or OPEN PROJECT buttons in the main menu (see Figure 2). Depending on the images that you
have currently imported, the dataset curator window can look as follows:

 Figure 3. eIQ Portal: dataset

                                         eIQ Toolkit User's Guide, Rev. 3, 18 January 2022
User Guide                                                                                                                  8 / 51
NXP Semiconductors
                                                                                                                                 eIQ Portal

The "Data Set Curator" workspace allows you to preview the images imported so far. This workspace uses a lazy loading strategy
to show the images, so scroll down to see the rest.

                                                                       NOTE
              If there are no images in the current project, the "Data Set Curator" window shows the "No images found" message
              on the screen.

3.4.1 Dataset import
To import data into the project, the interface provides three different options that differ according to the source where the data
is captured:
  • IMPORT: You can browse your local machine to select multiple sample images and upload them at once.
  • CAPTURE: This option utilizes a connected camera to take instantaneous images.
  • REMOTE: This option allows you to capture images from a remote device.

3.4.2 Train-test split
The "Dataset Test Holdout" box in the "Data Set Curator" panel allows you to define what percentage of the collection of data in the
imported data set is used for testing vs training. The selection is random and the data in the "test" set are not used in the training
step. The input value corresponds to the size of the test data set. The default value is 20 %:

 Figure 4. eIQ Portal: "Dataset Test Holdout" box

3.4.3 Dataset annotation
To enable dataset annotation, click the image that you want to annotate. A good recommendation is to select the "Unlabeled
Images" option in the left panel (see Figure 3) to avoid confusion between the labeled and unlabeled images. By selecting this
option, you only see the images that remain unlabeled.
There are two different ways to annotate the data:
  • Bounding box: labels a specific region within the image.
  • Full image: assigns a label to the whole image (see Figure 5).

                                            eIQ Toolkit User's Guide, Rev. 3, 18 January 2022
User Guide                                                                                                                           9 / 51
NXP Semiconductors
                                                                                                                            eIQ Portal

 Figure 5. eIQ Portal: dataset annotation

Now that you have selected a specific image, you can perform the annotations. By default, the "Bounding Box" selector is enabled
so you can draw rectangles over the images to enclose the desired regions and label them.
The "Box" drawer also enables an input field that helps you to introduce the annotation inline. Notice that the labels are created
once and they can be reutilized later. Also, you can check the annotations by moving the mouse over the label in the right panel.
See how the bounding box is enclosed in a yellow rectangle. When you place the mouse over each annotation in the right panel,
you can also delete that label.
During the annotation process for every image, add a new label for the entire image or select an existing one. Notice that the labels
in the project are shared for both annotations ("Region-Specific Labels" and "Full Image Labels"). In this way, you can reutilize
all the labels as well. To add a full image label, click the plus icon in the right panel ("Full Image Labels") and add a new label or
select an existing one.
The "Train" and "Test" buttons in right panel assign the image to the training and testing datasets, respectively.

3.4.4 Augmentation tool
The data augmentation workspace allows you to quickly adjust the image parameters to improve model training by reducing
over-fitting and increasing the robustness for dynamic real-world environments. It is widely used in machine learning to diversify
the training dataset (without adding more data) by transforming a percentage of existing data into a variation, as supported by the
augmentation pipeline. Using these techniques, you can generate new training samples and apply simple transformations to the
original data. To apply the data augmentation, click the "AUGMENTATION TOOL" button in the "Data Set Curator" menu (see
Figure 3). The following screen shows the "Augmentation Pipeline" workspace with an explanation of augmentation controls:

                                           eIQ Toolkit User's Guide, Rev. 3, 18 January 2022
User Guide                                                                                                                     10 / 51
NXP Semiconductors
eIQ Portal
Adding new
pipeline
Pipeline name
Adding new
Delete this augmentation
augmentation
Augmentation name
Expand/collapse
Enable/disable augmentation
preview controls
Expand/collapse
augmentation
explanation
Probability of applying
this augmentation
(Enabled when
preview is off)
Augmentation specific
Lower limit Preview value Upper limit parameter controls
Figure 6. eIQ Portal: "Augmentation Pipeline" workspace
The "Augmentation Pipeline" allows the user to combine one or more augmentation processors into a group. The default pipelines
are already preset with the preset augmentations. Add a new pipeline by clicking the new button in the top left corner of the screen.
Once added, you can change the name to the desired name. You can add one or more augmentations to a custom pipeline
(the default pipelines cannot be edited). To do that, click the “ADD” button next the "Augmentations" area. A list with available
augmentation is displayed. Click the desired augmentation to add it. The "Probability" value on each augmentation defines the
percentage of images added to the training dataset with this augmentation effect. If the probability is 0.2 and if there are 100
images in the data set, then 20 images receive this augmentation in the training process per batch.
The "GENERATE NEW RANDOM AUGMENTATION" button allows you to generate a preview of how the augmented data might
look like in the right-hand part of the screen.
NOTE
If an augmentation parameter has lower and upper limits, then the parameter has a random value between
these limits.
The following operators are supported by the augmentation tool:
3.4.4.1 Random Blur
Image blurring is achieved by convolving the image with a low-pass filter kernel.
It is useful to simulate an out-of-focus camera or images with low resolution.
It is useful for removing noise. It removes high-frequency content (noise, edges) from the image, which results in blurred edges
when this filter is applied.
The probability slider adjusts the percentage of images that undergo this augmentation in each iteration.
The blur limit controls the kernel size in pixels.
eIQ Toolkit User's Guide, Rev. 3, 18 January 2022
User Guide 11 / 51NXP Semiconductors
eIQ Portal
Figure 7. eIQ Portal: Random Blur settings
3.4.4.2 Cutout
This technique creates random patches of image. It is useful in simulating a partially obstructed object in an image.
The patched images can be filled with RGB values, as provided in the fill value. The number of holes defines the number of patches
created per image at random locations of the Maximum Height and Maximum Width values.
Figure 8. eIQ Portal: Cutout settings
3.4.4.3 Gaussian Noise
It is statistical noise with a Probability Density Function (PDF) equal to that of the normal distribution, which is also known as the
Gaussian distribution.
The values that the noise can take on are Gaussian-distributed.
Cameras with low lighting conditions usually introduce Gaussian noise.
eIQ Toolkit User's Guide, Rev. 3, 18 January 2022
User Guide 12 / 51NXP Semiconductors
eIQ Portal
The intensity of the Gaussian noise in the augmented image is controlled by the Var Limit slider and the mean value is controlled
by the Mean slider.
The Probability slider adjusts the percentage of images that undergo this augmentation in each iteration.
Figure 9. eIQ Portal: Gaussian Noise settings
3.4.4.4 Horizontal Flip
A horizontal flip flips the image horizontally around the y-axis. This technique acts like a mirror and moves the objects on the
left-hand side of the image to the right-hand side and the other way round.
This operator is useful in scenarios such as a car going from left to right or from right to left.
The Probability slider adjusts the percentage of images that undergo this augmentation in each iteration.
Figure 10. eIQ Portal: Horizontal Flip settings
3.4.4.5 Vertical Flip
The vertical flip flips the input vertically around the x-axis.
The Probability slider adjusts the percentage of images that undergo this augmentation in each iteration.
eIQ Toolkit User's Guide, Rev. 3, 18 January 2022
User Guide 13 / 51NXP Semiconductors
eIQ Portal
Figure 11. eIQ Portal: Vertical Flip settings
3.4.4.6 Hue Saturation Value
This operator simulates the malfunction and drifting camera color control.
The Probability slider adjusts the percentage of images that undergo this augmentation in each iteration.
Figure 12. eIQ Portal: Hue Saturation Value settings
3.4.4.7 ISONoise
When an image has a lot of noise, it appears grainy and unclear. This happens when your camera’s ISO value is set high. The
higher the ISO is, the more noise appears.
The Probability slider adjusts the percentage of images that undergo this augmentation in each iteration.
While the rule of thumb is always to keep the ISO low for noise-free images, today’s high-tech cameras can handle it better and
allow for higher and clearer ISOs. The ISO determines how sensitive to light your camera is. The higher the ISO, the less light you
need to take a photo.
eIQ Toolkit User's Guide, Rev. 3, 18 January 2022
User Guide 14 / 51NXP Semiconductors
eIQ Portal
Figure 13. eIQ Portal: ISONoise settings
3.4.4.8 Random Brightness
Image brightness is governed by the light-gathering power of the lens, which is a function of numerical aperture. Just as the
brightness of illumination is determined by the square of the condenser working in numerical aperture, the brightness of the
specimen image is proportional to the square of the lens numerical aperture.
This operator can easily simulate day/evening timings, as well as sunny and cloudy conditions.
The probability slider adjusts the percentage of images that undergo this augmentation in each iteration.
Figure 14. eIQ Portal: Random Brightness settings
3.4.4.9 Random Brightness Contrast
This operator adds contrast effects in addition to brightness, as defined above.
The Probability slider adjusts the percentage of images that undergo this augmentation in each iteration.
eIQ Toolkit User's Guide, Rev. 3, 18 January 2022
User Guide 15 / 51NXP Semiconductors
eIQ Portal
Figure 15. eIQ Portal: Random Brightness Contrast settings
3.4.4.10 Random Contrast
This operator adds random contrast to the images.
The Probability slider adjusts the percentage of images that undergo this augmentation in each iteration.
Figure 16. eIQ Portal: Random Contrast settings
3.4.4.11 Random Gamma
The gamma correction or gamma is a nonlinear operation used to encode and decode luminance or tristimulus values in video or
still-image systems. The gamma correction is (in the simplest cases) defined by the following power-law expression: V1 = A * V0
^ gamma. The non-negative real input value V0 is raised to the power gamma and multiplied by the constant A to get the output
value V1.
In the common case of A = 1, inputs and outputs are typically in the range from 0 to 1. A gamma value of gamma < 1 is
sometimes called an encoding gamma and the process of encoding with this compressive power-law nonlinearity is called
gamma compression. A gamma value of gamma >1 is called a decoding gamma and the application of the expansive power-law
nonlinearity is called gamma expansion.
The probability slider adjusts the percentage of images that undergo this augmentation in each iteration.
eIQ Toolkit User's Guide, Rev. 3, 18 January 2022
User Guide 16 / 51NXP Semiconductors
eIQ Portal
Figure 17. eIQ Portal: Random Gamma settings
3.4.4.12 Random Scale
This operator simulates the distance of an object from the camera.
The Probability slider adjusts the percentage of images that undergo this augmentation in each iteration.
Figure 18. eIQ Portal: Random Scale settings
3.4.4.13 Random Rotate
This operator simulates a common example in the image AI. The camera can be rotated and the object may not be aligned to an
axis. For example, when a deck of cards is scattered on a table, the cards can be in any orientation.
When an image is rotated, it can create voids in the corners. This is addressed by the fill colors.
The probability slider adjusts the percentage of images that undergo this augmentation in each iteration.
eIQ Toolkit User's Guide, Rev. 3, 18 January 2022
User Guide 17 / 51NXP Semiconductors
eIQ Portal
Figure 19. eIQ Portal: Random Rotate settings
3.5 Model selection
The "Model Selection" workspace allows you to select the best suited model for the target. There are two ways how to proceed:
• "Wizard" – a step-by-step flow where you select the type of problem and define the target, such as a performance-oriented
MCU, or an accuracy-oriented MPU. The eIQ Portal determines which model is best suited.
• "Custom Model" – a Python implementation of the model selected either from the Base Models (default implementations
installed with the eIQ Portal) or the User Models (custom implementation).
3.5.1 Wizard
The software interface offers two different options for tackling the computer vision tasks:
• Classification: the image classification refers to the assignment of a label to the entire image.
• Detection: the image detection refers to the regional detection of objects within the images and the assignment of a
corresponding label.
eIQ Toolkit User's Guide, Rev. 3, 18 January 2022
User Guide 18 / 51NXP Semiconductors
eIQ Portal
Figure 20. eIQ Portal: Model Selection workspace
For both tasks (detection and classification), you have three different options where each one is specialized in the optimization of
different metrics:
• Performance: A very fast model that shows excellent performance over small problems.
• Balanced: A tradeoff between performance and accuracy.
• Accuracy: The most accurate model.
Furthermore, there are four target architectures for the eIQ Portal to be optimized for. Pick the most suitable target that fits
your needs:
• NPU (Neural Processing Units) are specialized circuits optimized for machine-learning algorithms, mainly neural networks.
• GPU (Graphical Processing Units) are common on many embedded platforms and they tend to run models quickly. GPUs
are less powerful than the NPUs. They are not faster than the dedicated NPUs, but faster than CPUs.
• CPU (Central Processing Units)
• MCU (Micro Controller Units) are not as powerful as other hardware units, but they make up for that in their tiny size and
huge versatility.
3.5.2 Restore model
The trained model checkpoints are automatically saved for every trained epoch on the hard drive, so you can restore the progress
at any point. To load a previous model, perform the following steps:
1. Click the "RESTORE MODEL" button in the "Model Selection" workspace.
2. Click the previously trained model that you want to restore.
3. Select the checkpoint that you want to restore.
eIQ Toolkit User's Guide, Rev. 3, 18 January 2022
User Guide 19 / 51NXP Semiconductors
eIQ Portal
3.5.3 Base models
The base models are pre-implemented popular models such as the MobileNets from which you can choose without using
the Wizard.
1. Click the "BASE MODELS" button in the "Model Selection" workspace.
2. Select the model that corresponds to your task.
The location of base models is set by the "DEEPVIEW_PLUGINS_BASE" environmental variable. By default, it
is C:\\plugins.
3.5.4 User models
You are not limited to the base models, but you can implement your own custom model as well.
The location of the user models is set by the "DEEPVIEW_PLUGINS_USER" environmental variable. By default, it is in the
Windows user directory (for example, C:\Users\\AppData\Roaming\eIQ Portal\Plugins).
Currently, models for image classification and object detection problems are supported. To implement your own model, see the
C:\\docs\CustomModels.md file, which contains a tutorial to do so, or work through one of the models
in the C:\\plugins folder (for example, ssd_mobilenet_v3.py for object detection or mobilenet_v1.py for
image classification).
3.6 Training
Models gain the capability to predict by viewing annotated samples and adjusting a cost function. This process is also known as
training. You can go to the training window by clicking the "TRAIN" button in the previous model selection menu (see also Figure
20). The eIQ Portal provides a user-friendly interface for training models. See the left part of the following figure:
eIQ Toolkit User's Guide, Rev. 3, 18 January 2022
User Guide 20 / 51NXP Semiconductors
eIQ Portal
Figure 21. eIQ Portal: training
3.6.1 CUDA acceleration
®
The eIQ Toolkit and TensorFlow accelerate the training using CUDA by default (if available). The installation of CUDA is currently
not distributed as a component of the eIQ Toolkit, so it is up to the user to install it. To do that, both CUDA and cuDNN must be
installed. Download them from the NVidia Developer website (https://developer.nvidia.com/cuda-zone).
The version of CUDA and cuDNN depends on what version of eIQ Toolkit you have installed. For eIQ Toolkit 1.1 (TensorFlow 2.5),
CUDA 11.2 and cuDNN 8.2.4 are required.
The cuDNN package is distributed as an archive. For Windows, the DLL files must be extracted either to the eIQ Toolkit "bin"
directory (together with "deepview-trainer.exe") or to a path visible to the OS by default.
NOTE
The cuDNN 8.2.4 is available for CUDA 11.4, which works as well.
3.6.2 Settings description
With the model selected, the interface shows you the possible parameters that you can modify to achieve the best fit of the model
over your training data:
• Weight Initialization: Sets the initial values of the weights before training. The primary function of the training is to adjust
model weights to achieve a higher accuracy. The closer the weights are initialized to the post-training weights, the faster
the model becomes optimal. By default, the initial model is trained on the ImageNet dataset for faster training (based on
popular MobileNet models). You can also select a random initialization or initialize the weights' values from a file.
eIQ Toolkit User's Guide, Rev. 3, 18 January 2022
User Guide 21 / 51NXP Semiconductors
eIQ Portal
• Input Size: The input resolution for your model. Images are automatically resized to the selected input size (if needed).
Increasing this value also increases the training/inference time. The first two numbers of each option refer to the horizontal
and vertical dimensions of the input image. The third number refers to the number of input channels.
• Learning Rate: Controls how much the weights of the model are changed after every batch. When it is too low, the model
learns very slowly and it can get stuck on the wrong answer. When it is too high, the model can change its weights too
much, which could prevent it from learning the correct answer. The lower the learning rate, the more epochs should be
set. Typically, the low learning rate should lead to setting more epochs.
• Batch Size: Sets the number of samples that the model tries to estimate/predict before updating its weights. For a dataset
with many very similar images, larger batch sizes are more likely to reach a higher accuracy faster. For smaller datasets
and datasets with dissimilar images, smaller batch sizes are likely to reach a higher accuracy faster.
• Epochs to Train: Sets the number of times that the model goes through in the whole training dataset. By increasing this
value, the model weights have more chances to learn the important features to extract. When too many epochs are used,
the training may cause your model to overfit the training dataset. An epoch consists of a series of batches. This parameter
is typically used as the stopping condition for the training. To set a different stopping condition, drag the "Epochs to Train"
slider to the right (shows infinity in this case) and choose the desired stopping condition.
• Enable QAT: This option enables additional model quantization with the number of quantization epochs. This option is
available for model classification only.
• Alpha: Alpha is a multiplier that affects the number of filters in each layer of the model.
• Optimizer: Optimizers are mathematical formulas that, when applied to a weight, find the best possible weight in as few
adjustments as possible. The following optimizers are available:
— Stochastic Gradient Descent (SGD) is a method to find best weight vectors in a model adjusting one direction and seeing
if the output improved. SGD is great at quickly training a model when the model is far from ideal.
— Adagrad is similar to SGD in how it calculates the direction to adjust weights. It is different in that it uses the magnitude
of the previous changes when adjusting a weight to determine how much to change that weight in the next train step.
— Adadelta is an extension of Adagrad that only collects a fixed number of past adjustments, rather than collect them all.
— Root Means Square propagation (RMSporp) is similar to SGD in how it calculates the direction to adjust weights. It is
different in that it treats each parameter of a weight separately. This helps to prevent the oscillation on a single axis. In
nearly all cases, RMSprop performs better than Adagrad or SGD.
— Adaptive Movement Estimation (Adam) combines the benefits of Adagrad and RMSprop. It accumulates an
exponentially decaying average of past adjustments to evaluate the next adjustment. Adam is better than SGD
and Adagrad in almost all cases and better than RMSprop in most cases. It combines the faster gradient descent of
Adagrad with the oscillation-dampening learning rate of RMSprop.
— Adamax is a generalized version of the Adam optimizer, which uses "infinity norms". The fewer trainable parameters are
(the simpler the model is), the more accurate this optimizer becomes. Adamax can outperform Adam with particularly
small models. With image classification (the models are typically large) and even with small models, Adam occasionally
outperforms Adamax. With larger models, Adamax performs similarly to Adam, so it is an optional alternative.
— Nesterov-accelerated Adaptive Movement Estimation (Nadam) combines the Adam optimizer with the Nesterov
accelerated gradient technique. This causes the next adjustment to be calculated as if the current trend of adjustment
were to continue with another step.
NOTE
The best optimizer for any situation varies with the datasets. However, good choices for most image classification
models are Adam, Nadam, and Adamax.
3.6.3 Recommended settings
To create a new model from a dataset in the eIQ Portal, the recommended settings to start from are as follows:
• Imagenet weight initialization
eIQ Toolkit User's Guide, Rev. 3, 18 January 2022
User Guide 22 / 51NXP Semiconductors
eIQ Portal
• Input size of 128, 128, 3
• Learning rate of 0.0001
• Batch size of 10
• Alpha of 0.50
• Adam Optimizer
If (after some training) the accuracy is too low with these settings, the input size and the Alpha can be incrementally
increased to desirable results. If (after some training) the inference time is too long, the input size and the Alpha can be
incrementally decreased.
3.6.4 Execution
You can start the training process by clicking the "START TRAINING" button. You can stop the training process whenever you
want by clicking the "STOP" button and restart the training by clicking the "CONTINUE TRAINING" button (see Figure 21).
3.6.5 View results
During the training process, two metrics are collected and shown in the "Trainer" panel in real time:
• Accuracy: How accurate the predictions of the current model are (see Figure 22, the left-hand part).
• Loss: How distant your predictions are from the ground truth (see Figure 22, the right-hand part).
You can switch between the two metrics by clicking the "Accuracy" and "Loss" buttons, respectively.
When hovering the mouse cursor over the metric graph, you can see the metric of the test and train datasets at a particular time
step. To zoom the metric graph, enter "Start Step" and "End Step" and click the "SET RANGE" button.
Figure 22. eIQ Portal: accuracy vs. loss function of a trained model
If you are satisfied with the results, click the "VALIDATE" button to go to the next window.
3.7 Validation
The validation of the model is a very important step when training supervised classifiers. This process gives you a measure of
how accurate the model is on images it never saw in the training phase. The eIQ Portal offers a simple interface that allows you
to deploy and evaluate the model on a target/remote device. This feature is enabled just after the first training epoch is completed
by the training process.
By clicking the VALIDATION TARGET button (see Figure 23), a modal window appears to insert new target devices or select an
existing device to perform the validation on. You can also choose to not select a target and validate the model on your local host
(your computer) by default.
Clicking the "VALIDATE" button (see Figure 23) starts the validation process.
The validation converts the model and runs it on the target architecture to see the real performance of the model. When the
validation ends, you can see the confusion matrix, which is fully interactive and represents the distribution of the test dataset
eIQ Toolkit User's Guide, Rev. 3, 18 January 2022
User Guide 23 / 51NXP Semiconductors
eIQ Portal
based on classification results. Notice that we added a background class to map the values that are classified correctly but have
a confidence below the "Softmax Threshold" slider. You can also click any cell and see what instances were recorded in it.
The interface also allows you to adjust the minimum confidence of the predictions and update the confusion matrix in real time by
moving the "Softmax Threshold" slider. The "Softmax threshold" slider enables you to determine what is the acceptable limit of
the prediction accuracy. Move the threshold up and down and notice how it affects the cell colors, which also relate to the number
of passing instances in a cell.
Figure 23. eIQ Portal: validation
NOTE
The confusion matrix is used to match the ground truth (the actual label) to the predicted label. For the best
validation results, you need all cells along the diagonal to have a dark green color. The darker the green color, the
more instances are associated with that cell. The darker the red color, the higher the number of mispredictions.
3.8 Deployment
If you are satisfied with the validation accuracy of your model, you can export it to a highly optimized format capable of running
in the selected inference engine. Click the "DEPLOY" button (see Figure 23) to move into the "Export Model" workspace.
The Export Model workspace summarizes the training/validation results, as well as the configurations of the project. To export the
model, click the "EXPORT MODEL" button, select the destination, and save the model.
NOTE
The model can be exported to different formats, such as a DeepView file (*.rtm), a TensorFlow Lite file (*.tflite), an
ONNX file (*.onnx), or a Keras file (*.h5).
When the model is exported, you see two more buttons in the left-hand pane. By clicking the "SHOW MODEL" button, a file
browser dialog with the exported model appears. You can also open the model in the eIQ Model Tool by clicking the "OPEN
MODEL" button.
eIQ Toolkit User's Guide, Rev. 3, 18 January 2022
User Guide 24 / 51NXP Semiconductors
eIQ Portal
Figure 24. eIQ Portal: deployment
3.9 Quantization
You can quantize a trained model to reduce its size and speed up the inference time on different hardware accelerators (for
example, GPU and NPU) with a minimal accuracy loss. You can choose between the per channel and per tensor quantizations.
The per tensor quantization means that all the values within a tensor are scaled in the same way. The per channel quantization
means that tensor values are separately scaled for each channel (for example, the convolution filter is scaled separately for each
filter). The per channel quantization usually introduces a smaller error, while the per tensor quantization usually runs faster on the
hardware accelerators.
To quantize a trained model, perform the following steps:
1. Go to the "Validation" window (see Figure 23) by clicking the "VALIDATE" button in the "Trainer" menu (see Figure 21).
2. Enable the post-training quantization by clicking the associated toggle button.
3. Choose the "Per Channel or Per Tensor" quantization and select the required "Input Data Type" and "Output Data
Type".
4. Apply the subsequent process by clicking the "VALIDATE" or "VALIDATION TARGET" buttons.
To export a quantized model, perform the following steps:
1. Go to the "Export Model" window (see Figure 24) by clicking the "DEPLOY" button in the "Validation" menu (see Figure
23).
2. Enable the post-training quantization by clicking the "Export Quantized Model" button.
3. Choose the "Per Channel" or "Per Tensor" quantization and select the required "Input Data Type" and "Output Data
Type".
4. Click the "EXPORT MODEL" button and select the required output name and folder.
eIQ Toolkit User's Guide, Rev. 3, 18 January 2022
User Guide 25 / 51NXP Semiconductors
Chapter 4
eIQ Model Tool
The "eIQ Model Tool" allows you to analyze and profile trained models. Models can be run on a local machine or a remote device.
You can either open the "eIQ Model Tool" and then load your model or open the model after training using the eIQ Portal as follows:
1. From the "Start" menu, click the "eIQ Model Tool" and open a model.
2. Open the eIQ Portal (Figure 2), and click the "MODEL TOOL" button.
3. Click the "Open Model…" button and select the required model.
In the "eIQ Model Tool", individual layers are visualized when zooming in and out. By clicking a layer, you see more information
in the right-hand panel. See also the following figure:
Figure 25. eIQ Model Tool: convolution layer details
In this case, the "eIQ Model Tool" is used as a viewer for neural networks and machine-learning models.
4.1 Model profiling
The "eIQ Model Tool" integrates a profiling tool, analyzing the performance of your neural network models. It provides both the
overall and per-layer average execution times over multiple iterations.
You can profile a model on both the local computer and remote target using a client-server approach. For RTM models on a target
use "modelrunner -e rt -c 0 -H 10818". To profile a model, perform the following steps:
1. Run the "ModelRunner" server application on your local computer (/bin folder) or on the remote
target (/bin folder). The application has plenty of parameters. To display all parameters, type "modelrunner -h".
2. Open the "List of Targets" dialog box ("Tool/Manage Targets").
3. If the desired target is not listed, enter the URI and the target name and click the "ADD" button (see Figure 26):
eIQ Toolkit User's Guide, Rev. 3, 18 January 2022
User Guide 26 / 51NXP Semiconductors
eIQ Model Tool
Figure 26. eIQ Model Tool: list of target devices
4. Select the target devices that you want to profile your model on by enabling the "Profiling" checkbox.
5. Close the dialog box.
6. Run the profiling tool ("Tool/Profile Model").
NOTE
Running the model profiling in the simulation mode or on the target is differentiated by selecting the proper URI in
the client tool. If using a simulator, select the local host. If using a real target, select its proper URI.
When the profiling tool finishes, you can see the per-layer execution time in each node and the overall execution time in the input
node properties. Notice that the engine selected by the "ModelRunner" must be compatible with the model format opened in the
"eIQ Model Tool". To profile a model on your computer, perform the following steps:
1. Open the eIQ Portal (see Figure 2) and click "COMMAND LINE".
2. Run the server application by typing "modelrunner -H 10820" into the console.
3. Open a model in the RTM format in the "eIQ Model Tool".
4. Go to "Tool/Manage Targets" and enter the "http://localhost:10820" URI and the "PC" target name.
5. Run the client application, which is the profiling tool ("Tool/Profile Model").
The profiling results of an RTM model are shown in Figure 27.
eIQ Toolkit User's Guide, Rev. 3, 18 January 2022
User Guide 27 / 51NXP Semiconductors
eIQ Model Tool
Figure 27. eIQ Model Tool: model profiling
NOTE
Run the server application on the target board using the following mandatory parameters: "modelrunner -e
-H -c ", for example, "modelrunner -e tflite -H 10819 -c 3". See
also Remote validation using ModelRunner.
4.2 Model conversion
The "eIQ Model Tool" can be used for the model conversion. The model can be converted to different formats. The following types
of model formats are currently supported:
• RTM – Real Tracker Module file format
• TFLite – TensorFlow Lite Flatbuffers file format
• ONNX – Open Neural Network Exchange file format
To start the conversion, click the "File/Convert" dialog box in the menu. The following screen appears:
eIQ Toolkit User's Guide, Rev. 3, 18 January 2022
User Guide 28 / 51NXP Semiconductors
eIQ Model Tool
Figure 28. eIQ Model Tool: model conversion selection
After selecting the desired model format, the following screen appears:
Figure 29. eIQ Model Tool: model conversion options
There are several options available for various conversions:
Table 1. Conversion options
Parameter Description
Model name The name of the output model.
Default input shape The input shape of the model. It is populated automatically when possible.
Rename input/output nodes This allows you to rename the input or output nodes of the converted model.
Input/output nodes This allows you to specify the input and output nodes of the file.
Table continues on the next page...
eIQ Toolkit User's Guide, Rev. 3, 18 January 2022
User Guide 29 / 51NXP Semiconductors
eIQ Model Tool
Table 1. Conversion options (continued)
Parameter Description
Labels file This is used in RTM conversions to create an internal vector.
Enable quantization The quantization options.
Per channel/per tensor Select the per channel quantization or the per tensor quantization. RTM
conversions can be of either type, TFLite conversions must be per channel,
and ONNX conversions must be per tensor.
Input/output data type The data type for the input/output nodes. ONNX conversions must be of the
float32 type.
Quant normalization The quantization normalization (signed, unsigned).
Samples folder Opens a dialog that allows you to select a folder full of sample images to be used
during quantization.
For the quantization, more options open up, depending on the model (see Figure 30).
Figure 30. eIQ Model Tool: quantization options
The conversion process is started by clicking the "Convert" button. If the conversion process is performed correctly, the
"Conversion Download" output box appears and the new model is saved into the working directory. Otherwise, the "Conversion
Error" message box with the problem description appears. In this case, you can change the conversion parameters and try the
conversion again.
eIQ Toolkit User's Guide, Rev. 3, 18 January 2022
User Guide 30 / 51NXP Semiconductors
Chapter 5
Command-line Tools
The "eIQ Command-line Tools" allow you to run some of the previously described tasks in a command prompt, instead of running
these tasks in the Graphical User Interface (GUI) of the "eIQ Toolkit". Moreover, it provides additional features that cannot be
accessed through the GUI. There are two ways to open the command-line shell that make sure that you are able to use the
"eIQ Toolkit":
1. From the "Start" menu, click the "eIQ Command-line Tools".
2. Open the eIQ Portal (see Figure 2) and click "COMMAND LINE".
The Windows command prompt opens. You can apply the relevant commands here (see the below subsections). The binary files
of these command-line tools are in the /bin folder. This path should be also assigned to the Windows
environment into the system path variables.
NOTE
Each of these tools has lots of parameters. For a full list of options, add "-h" or "--help" after the binary name, for
example "deepview-converter.exe -h".
5.1 Converter
The "Converter" command-line tool can convert machine-learning models into different output formats.
The supported input formats are the following:
• TensorFlow.pb/SavedModel files
• TensorFlowLite.tflite files
• Keras .h5/.h5df files
• TensorFlow hub saved_models/links
• Neural Network Exchange Format (NNEF) graphs
The supported output formats are the following:
• DeepView RTM files
• TensorFlowLite.tflite files
• ONNX files
Table 2 can be used to navigate through various model file conversions. The "q" notation means that the quantized file and the
destination quantized files use the "--quantize" arguments during the conversion.
Table 2. Converter support
Source\destination RTM TFLite (MLIR/TOCO) ONNX RTM q TFLite q (MLIR/ ONNX q
TOCO)
1.x Pb Y Y Y N Y Y
Saved model (folder/TAR) Y Y Y Y Y Y
Keras (h5) Y Y Y Y Y Y
RTM N/A N N N/A N N
Table continues on the next page...
eIQ Toolkit User's Guide, Rev. 3, 18 January 2022
User Guide 31 / 51NXP Semiconductors
Command-line Tools
Table 2. Converter support (continued)
Source\destination RTM TFLite (MLIR/TOCO) ONNX RTM q TFLite q (MLIR/ ONNX q
TOCO)
TFLite (MLIR/TOCO) Y N/A Y N N Y
ONNX Y Y N/A N Y Y
TFLite q (MLIR/TOCO) Y N/A Y N N/A N/A
ONNX q Y Y N/A N N/A N/A
The limitations for the conversion are related to third-party function calls and software library/runtime versions. It is mainly
converting from ONNX to TFLite or vice versa due to unsupported operators, op-set requirements, or node dimension mismatch.
Error messages appear when such conversions are attempted and not supported.
Converting the source quantized TFlite to the quantized ONNX model requires ONNX Runtime 1.6 (or higher), because it uses
dynamic quantization where the model weights are quantized 8-bit internally, but they are converted to float during runtime. If the
source model is already quantized, do not pass the "--quantize" arguments in the command tool and do not enable the quantization
in a conversion form in the model tool.
The conversion from the source float TFLite model to the quantized ONNX model uses static quantization, where the
"--quant-tensor" argument must be passed to run on ONNX runtime 1.5.3. The per-channel quantization is supported in the
command-line tool, but the model does not work on ONNX runtime 1.5.3. Therefore, the per-tensor static quantization must be
used in the conversion for now. This may change with updated ONNX runtimes in the future BSPs.
5.1.1 Example
The tool has two mandatory parameters: "input_file" and the model (output file). To convert the mobilenet model from Keras,
perform the following steps:
1. Open the eIQ Portal (see Figure 2) and click "COMMAND LINE".
2. Download and save the mobilenet model from "keras.applications":
python
>> import tensorflow as tf
>> tf.keras.applications.MobileNet().save('mobilenet.h5')
3. Exit the Python prompt and execute the following command to convert the mobilenet.h5 model to the mobilenet.rtm
model and embed the labels (provided by default in the workspace):
deepview-converter mobilenet.h5 mobilenet.rtm --
labels ..\workspace\models\mobilenet_v1_1.0_224\labels.txt
4. Execute the following command to also convert the Keras mobilenet.h5 model to the mobilenet.tflite model:
deepview-converter mobilenet.h5 mobilenet.tflite
NOTE
You can open the created mobilenet.rtm and mobilenet.tflite models in the "eIQ Model Tool" to see that the input
name is "input_1" and the output name is "Identity".
5.2 Importer
Importing images manually is a time-consuming task, where using a command line is typically much faster than doing so
one-by-one using a graphical user interface. The "Importer" command-line tool helps you with such work.
eIQ Toolkit User's Guide, Rev. 3, 18 January 2022
User Guide 32 / 51NXP Semiconductors
Command-line Tools
The "DeepView Importer" imports VOC-type datasets into the eIQ Portal. This format originates from the PASCAL Visual Object
Classes Challenge at the University of Oxford. The format is also used by the ImageNet datasets.
The "DeepView Importer" can be executed from the command line as follows:
deepview-importer [-list] [-difficult] [-truncated] [-group GROUP] [-project
DEEPVIEW_PROJECT] VOC_DATASET.TAR
The VOC_DATASET.TAR is the tar-file for the VOC train or test dataset. It should be used in combination with the "-group train"
or "-group test" arguments. Otherwise, the shuffle feature can be used.
The "-list" option lists a summary of discovered labels and associated annotations.
The "-difficult" option causes the importer to include annotations flagged as difficult.
The "-truncated" option causes the importer to include annotations flagged as truncated.
Finally, the "-project DEEPVIEW_PROJECT" option triggers the actual import operation to happen against this target dataset. It
can be an existing dataset or a new one, though you should back up existing datasets in cases of errors, because it has not been
heavily tested.
5.2.1 Importing PASCAL VOC dataset
The "Importer" can be used by itself with no special setup. The "PASCAL VOC" dataset can be imported into the eIQ Portal using
the "Importer". Download the original datasets for import first.
5.2.1.1 VOC 2008
The "VOC 2008" dataset includes about 3k training images which can be used along with the "VOC 2007" test set which contains
3k images with no overlap to the training images.
• http://host.robots.ox.ac.uk/pascal/VOC/voc2008/index.html#devkit
• http://host.robots.ox.ac.uk/pascal/VOC/voc2007/index.html#devkit
The example can look like this:
deepview-importer -group train -project VOC.eiqp VOCtrainval_14-Jul-2008.tar
deepview-importer -group test -project VOC.eiqp VOCtest_06-Nov-2007.tar
NOTE
Before running the "deepview-importer" command, copy both datasets to the /bin directory, or specify the full path
to these files.
5.2.1.2 VOC 2011
The "VOC 2011" dataset includes about 11k training images. The test datasets are not available for the "VOC 2011" dataset. The
options are to use the "VOC 2007/2008" dataset or to reshuffle the "VOC 2011" dataset from the eIQ Portal to generate a train/test
split. See http://host.robots.ox.ac.uk/pascal/VOC/voc2011/index.html#devkit.
5.2.2 Importing custom VOC-type datasets
The following is a simple guide on how to prepare a custom dataset and import it into the eIQ Portal:
1. Create a folder with two subfolders: Annotations and JPEGImages.
2. Copy the JPEG images that are used to train or validate a model to the JPEGImages folder. The image filename should
end with ".jpg".
3. Create the annotation files and save them to the Annotations folder. Each image has an annotation file that has the
same filename with the .xml extension, for example, the annotation file for shark.jpg is shark.xml.
eIQ Toolkit User's Guide, Rev. 3, 18 January 2022
User Guide 33 / 51You can also read